
Popular categories
Looking for a yarn?


Comments / Questions (26)
![]() Gaetane wrote:
Gaetane wrote:
Bonjour ! Pour les augmentations de la manche , vous dites après 6 cm, de l ouvrage , on commence les augmentations, alors à partir du début du poignet qu on mesure? On se trouve alors sur le diagramme A1.c est ça ? Et le fil marqueur se trouve au bout de l aiguille ? C est ça ? Merci 🙏
12.02.2024 - 16:56DROPS Design answered:
Bonjour Gaetane, mesurez les 6 cm à partir du rang de montage. Le marqueur du début du tour doit être au niveau de la jonction, autrement dit entre la fin du tour et le début du tour suivant. Tricotez les nouvelles mailles en suivant A.1/.A5. Bon tricot!
13.02.2024 - 08:18
![]() Gaetane Bouchard wrote:
Gaetane Bouchard wrote:
Bonjour ! je saisi pas concernant vos augmentations de chaque cote de la manche ? en étant sur endroit au bout du rang je fait un jeté avant les 2 dernieres mailles et la j ai on fil marqueur ok je me trouve maintenant a etre sur l envers alrs je tricote 2 mailles et la est ce que je fais un jeté ? ainsi de suite est ca? merci
11.02.2024 - 16:46DROPS Design answered:
Bonjour Mme Bouchard, les manches se tricotent en rond sur les aiguilles doubles pointes, vous allez augmenter 1 maille à la fin du tour + 1 maille au début du tour ainsi: tricotez jusqu'à ce qu'il reste 2 mailles avant le fil marqueur, faites 1 jeté, tricotez les 2 mailles suivantes (la dernière maille du tour + la 1ère maille du tour suivant), faites 1 jeté; au tour suivant, tricotez les jetés torse à l'endroit pour éviter des trous. Bon tricot!
12.02.2024 - 09:02
![]() Gaetane wrote:
Gaetane wrote:
Bonjour, lorsqu’on est rendu à un autre diagramme l on commence tu a l endroit où selon qu on a fini l autre diagramme? Exemple: après avoir fini en hauteur celui de A1 je me trouve être à l envers , alors est-ce que je commence A3 à l envers ? Ou je fait un autre rang à l envers pour commencer le A3 à l endroit ? Merci 🙏
09.02.2024 - 13:31DROPS Design answered:
Bonjour Gaetane, dans ce cas vous allez effectivement tricoter le 1er rang de A.3 sur l'envers. Bon tricot!
12.02.2024 - 07:05
![]() Gaetane wrote:
Gaetane wrote:
Bonjour! Suite à votre réponse concernant le diagramme , la 1ère ligne en noir et rendu sur l envers je prends la 2 iemes ligne de gauche en blanc et je recommence ainsi ? Alors pour le fil qui suit pas je coupe ? Je saisi pas ça ! Surtout les 1ère ligne sans motif ? Merci !
01.02.2024 - 12:15DROPS Design answered:
Bonjour Gaetane, vous pouvez soit couper le fil soit tricoter le rang du côté où se trouve le fil, autrement dit, vous pouvez par ex tricoter (A.1) 1 rang sur l'endroit en noir, 1 rang sur l'endroit en naturel, 1 rang sur l'envers en noir, 1 rang sur l'envers en naturel, puis continuer sur l'endroit avec la suite du diagramme. Bon tricot!
01.02.2024 - 15:48
![]() Gaetane wrote:
Gaetane wrote:
Bonjour ! Je suis rendu au diagramme ! Alors rendu sur l envers de mon tricot est-ce que je tricote les mailles comme elle se présente ou est-ce que je suis là 2 iemes ligne du diagramme sens inverse ? Merci 🙏
31.01.2024 - 17:39DROPS Design answered:
Bonjour Gaetane, sur l'envers tricotez les diagrammes de gauche à droite en commençant par A.2 (dernière maille sur l'endroit) puis répétez A.1 en lisant le diagramme de gauche à droite. Bon tricot!
01.02.2024 - 08:13
![]() Gaetane wrote:
Gaetane wrote:
Bonjour ! Pourquoi a t on besoin des aiguilles circulaires et aussi doubles pointes? Quand fait on le rechange au patron ? Merci !
30.01.2024 - 13:21DROPS Design answered:
Bonjour Gaetane, on utilise des aiguilles circulaires pour avoir suffisamment de place pour y loger toutes les mailles (et on tricote ici en allers et retours), on va utiliser les aiguilles doubles pointes pour les manches, mais vous pouvez utiliser une aiguille circulaire de 80 cm dans chaque taille et tricoter en magic loop si vous préférez. Bon tricot!
31.01.2024 - 08:11
![]() Gaetane wrote:
Gaetane wrote:
Bonjour ! Une RÉ-HAUSSE ENCOLURE DOS c est quoi ? Est ce un col au dos ? Merci 🙏
25.01.2024 - 12:55DROPS Design answered:
Bonjour Gaetane, ce sont des rangs raccourcis qui vont vous permettre de tricoter davantage de rangs sur la partie dos pour que l'encolure dos soit plus haute que l'encolure devant, sur un pull, on va la tricoter comme dans cette vidéo. Bon tricot!
26.01.2024 - 07:13
![]() Marie Svensk wrote:
Marie Svensk wrote:
Ärmens bredd vid armhålan ska enligt måttskissen vara på storlek L 23+3+4=30 cm , dvs 60 cm runt hela ärmhålet. Men antalet maskor är då 78 maskor. Masktätheten är 21 maskor = 10 cm enligt mönstret och även min stickning. 78 maskor blir ca 37 cm runt om och det är ju på tok för smalt för att få in armen i. Så något måste vara fel på mönstret. Det är stor skillnad på 37 cm och 60 cm. Behöver hjälp med att kunna slutföra stickningen, tack. Marie Svensk
12.01.2024 - 09:43DROPS Design answered:
Hej Marie, nej, den här koftan är med raglan, så du kan inte räkna ärmhålan så. Du sätter ihop ärmarna med fram & bakstycke, först då börjar ärmhålet. Se videoen om du är osäker :)
16.01.2024 - 11:45
![]() Gaetane wrote:
Gaetane wrote:
Bonjour ! Que veut dire groupe de fil B ? J en ai vu sur amazone de la laine garnstudio mais à 4 pli , est ce la même que votre patron ? Merci 🙏
09.01.2024 - 12:22DROPS Design answered:
Bonjour Gaetane, nos fils sont classés par groupe en fonction de leur épaisseur, un fil 4 pli correspond à un fil du groupe A, ceux du groupe B sont des fils 8 plis - retrouvez tous les groupes de fils ici. Bon tricot!
10.01.2024 - 08:42
![]() Anne Redman wrote:
Anne Redman wrote:
Any progress on checking the yoke for medium size? Number of stitches left at top of yoke is less than small size
27.06.2021 - 03:35DROPS Design answered:
Dear Mrs Redman, number of sts is correct here, you finish with just 6 sts less in M than S but then will have more stitches than in S for neck. Happy knitting!
28.06.2021 - 07:57
|
|||||||
Telegram Jacket#telegramjacket |
|||||||
 |
 |
||||||
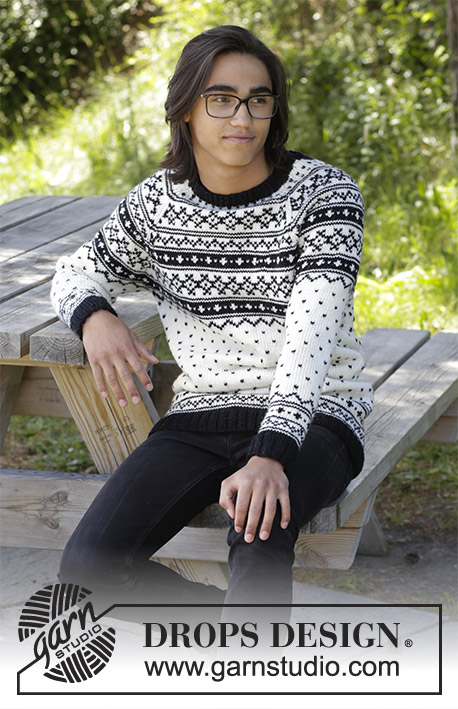
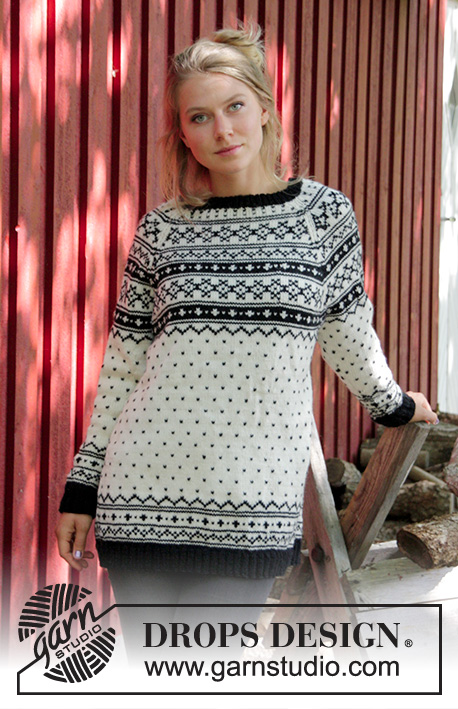
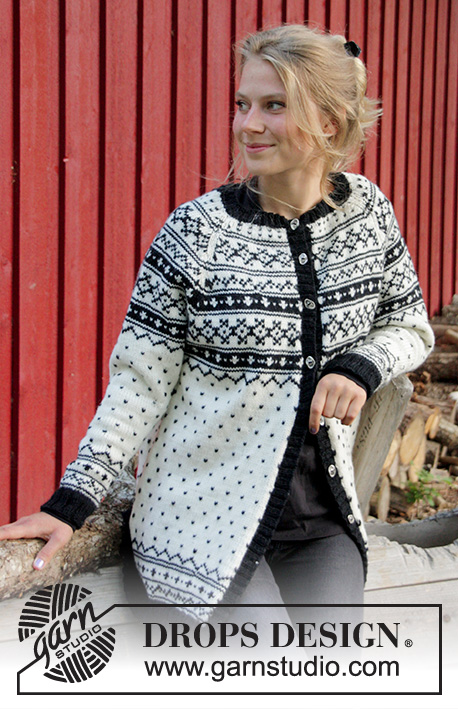
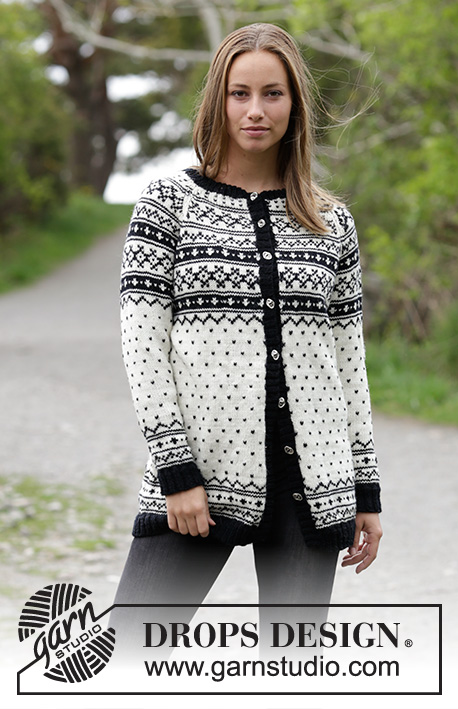
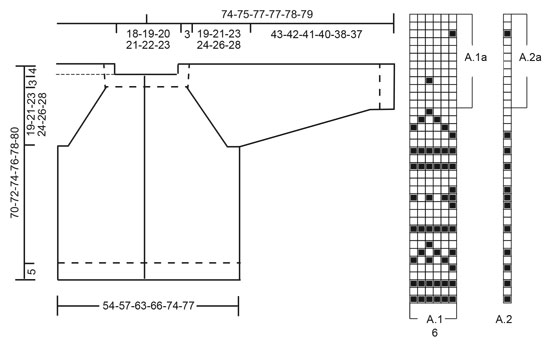
Knitted jacket with multi-coloured pattern and raglan. Size: S - XXXL Piece is knitted in DROPS Karisma.
DROPS 184-22 |
|||||||
|
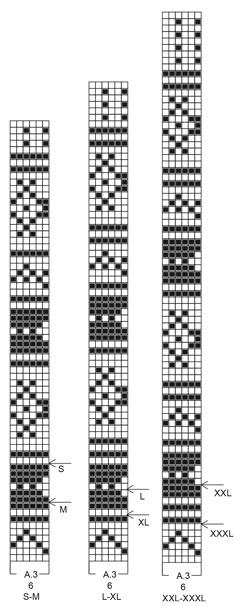
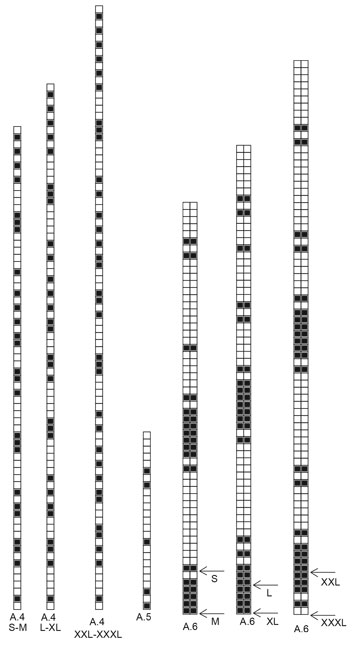
INFORMATION FOR PATTERN: GARTER STITCH (back and forth): 1 ridge = knit 2 rows. PATTERN: See diagrams A.1 to A.6. Work the entire pattern in stocking stitch. Choose diagram for your size. KNITTING TIP-1: To avoid the knitting tension to tighten when working pattern, it is important not to tighten the strands on back side of piece. Switch to a higher needle number when working pattern if the pattern is somewhat tight. KNITTING TIP-2 (applies to yoke on jacket): If knitting tension is incorrect in height and there are more rows vertically on 10 cm than stated in pattern the yoke will be too short and the armhole too small. This can be compensated by working 1 extra row in stocking stitch evenly on yoke. DECREASE TIP: To calculate how to decrease evenly, use the total number of stitches on row (e.g. 272 stitches) and divide stitches by number of decreases to be done (e.g. 44) = 6.1. In this example work approx. every 5th and 6th stitch together. INCREASE TIP: Work until 2 stitches remain before marker thread, make 1 yarn over (= 1 stitch increased), knit 4 (marker thread is in the middle of these stitches), make 1 yarn over (= 1 stitch increased). On next row work yarn over twisted It should not make a hole. RAGLAN: All decreases are done from the right side! Decrease for raglan on each side of every A.6 as follows: Decrease 1 stitch after A.6 as follows: Slip last stitch in A.6, knit 1, pass slipped stitch over (= 1 stitch decreased). Decrease 1 stitch before A.6 as follows: Work until 1 stitch remains before A.6, knit the next 2 stitches together (= 1 stitch decreased). I.e. decrease 2 stitches at every A.6 and 8 stitches in total on row. BUTTONHOLES (applies to right band): Decrease for buttonholes on right band. When band measures approx. 1.5 cm, decrease for 8-8-8-9-9-9 buttonholes evenly (decrease for buttonholes in purl sections seen from right side). 1 buttonhole = purl 2 together and make 1 yarn over – top buttonhole should be approx. 2 cm from the top, the other buttonholes should be approx. 7-8 cm apart. ---------------------------------------------------------- JACKET: Worked back and forth on circular needle from mid front. Sleeves are work in the round on double pointed needles, switch to a short circular needle when needed. Join the parts together and work yoke back and forth. Work band back and forth at the end. BODY: Cast on 276-288-320-332-372-388 stitches (including 1 edge stitch in each side of piece) on circular needle size 3 mm with black. Work as follows: Work 1 edge stitch in GARTER STITCH – see explanation above, work rib (= knit 2 / purl 2), until 3 stitches remain, finish with knit 2 and 1 edge stitch in garter stitch. When piece measures 5 cm, switch to circular needle size 4 mm and knit 1 row from right side while decreasing 39-45-53-47-57-55 stitches evenly - read DECREASE TIP = 237-243-267-285-315-333 stitches. Work 1 row as follows: Work 1 edge stitch in garter stitch, 60-60-66-72-78-84 stitches in stocking stitch (= front piece), insert 1 marker in next stitch, and work this stitch in stocking stitch, work 113-119-131-137-155-161 stitches in stocking stitch (= back piece), insert 1 marker in next stitch, and work this stitch in stocking stitch, work 60-60-66-72-78-84 stitches in stocking stitch until 1 stitch remains, finish with 1 edge stitch in garter stitch (= front piece). Markers shows sides of garment. Then work next row as follows: Work 1 edge stitch in garter stitch in base colour in pattern, A.1 (= 6 stitches) until 2 stitches remain (= 39-40-44-47-52-55 times in width), and finish with A.2 over next stitch and 1 edge stitch in garter stitch - read KNITTING TIP-1. REMEMBER THE KNITTING TENSION! When A.1 and A.2 have been worked 1 time vertically, repeat A.1a and A.2a vertically. When piece measures 39-41-40-42-41-43 cm, work A.3 over A.1 and A.4 over A.2. When you have worked up to arrow in A.3, work next row in A.3 as follows: Work the first 58-58-64-70-76-82 stitches as before, cast off 3 stitches before marker and 4 stitches after marker (= 7 stitches in total), work the next 107-113-125-131-149-155 stitches as before, cast off 3 stitches before marker and 4 stitches after marker (= 7 stitches), work the last 58-58-64-70-76-82 stitches as before. Piece measures approx. 44-44-44-45-45-45 cm. Put piece aside and work the sleeves. SLEEVES: Work in the round on double pointed needles, switch to a short circular needle when needed. Cast on 48-52-56-60-64-64 stitches on double pointed needles size 3 mm. Work rib (= knit 2/purl 2). When piece measures 5 cm, switch to double pointed needles size 4 mm and work 1 round in stocking stitch while decreasing 6-8-8-10-12-10 stitches evenly = 42-44-48-50-52-54 stitches. Insert 1 marker thread at beginning of round (= mid under sleeve). Work 1 round with black, then work next round as follows: Work 0-1-0-1-2-0 stitches A.5, work A.1 over the next 42-42-48-48-48-54 stitches (= 7-7-8-8-8-9 repetitions), finish with 0-1-0-1-2-0 stitches A.5. When A.1 has been worked 1 time vertically, repeat A.1a. When piece measures 6 cm, increase 1 stitch on each side of marker thread (= 2 stitches increased) - read INCREASE TIP! Increase like this every 3-2½-2-1½-1½-1½ cm 12-14-15-17-19-21 times in total = 66-72-78-84-90-96 stitches. Work stitches in A.5 and the increased stitches in the pattern. When piece measures 38-39-37-37-34-35 cm, work A.3 over A.1. When all stitches under sleeve have been increased, work A.3 11-12-13-14-15-16 times in total in width. When you have worked up to arrow in A.3, work next round as follows: Cast off 4 stitches, work the next 59-65-71-77-83-89 stitches as before, cast off the last 3 stitches. Sleeve measures approx. 43-42-41-40-38-37 cm. Knit another sleeve the same way. YOKE: Slip sleeves on to same circular needle as body where armholes were cast off = 341-359-395-425-467-497 stitches. Insert 1 marker thread between every transition between each sleeve and body before continuing. Work 1 edge stitch in garter stitch, work pattern as before until 2 stitches remain before marker thread between sleeve and body, A.6 over the next 2 stitches (= front piece), work pattern over the 59-65-71-77-83-89 stitches (= sleeve), A.6 over the next 2 stitches, work pattern over the next 103-109-121-127-145-151 stitches as before, A.6 over the next 2 stitches (= back piece), work pattern over the next 59-65-71-77-83-89 stitches (= sleeve), A.6 over the next 2 stitches, pattern as before until 1 stitch remains, finish with 1 edge stitch in garter stitch – read KNITTING TIP-2. Continue pattern like this and decrease for RAGLAN – see explanation above, every other row 26-29-31-33-36-39 times in total = 133-127-147-161-179-185 stitches. When A.3 has been worked 1 time vertically, switch to black. Work 1 row with black. Yoke measures approx. 19-21-23-24-26-28 cm. An elevation in the back of neck can be worked to get a better fit so that yoke is somewhat higher in the neck. This elevation can be skipped, to make the neck the same at the front and back. Work elevation in the back of neck or start to work the neck edge if you don’t want an elevation. ELEVATION IN BACK OF NECK: Skip this paragraph if you do not want an elevation. Insert 1 marker in the middle stitch on needle (= mid back). Knit 30-30-34-34-40-40 past marker, turn, tighten yarn and purl 60-60-68-68-80-80. Turn, tighten yarn and knit 54-54-61-61-72-72, turn, tighten yarn and purl 48-48-54-54-64-64. Turn, tighten yarn and knit 42-42-48-48-56-56, turn, tighten yarn and purl 36-36-42-42-48-48. Turn, tighten yarn and knit 30-30-35-35-40-40, turn, tighten yarn and purl 24-24-28-28-32-32, turn, tighten yarn and work the rest of row. NECK EDGE: On next row from right side decrease as follows: Knit 27-24-29-34-37-40 and decrease 3-0-4-6-9-10 stitches evenly, work the next 18 stitches together 2 by 2 (= 9 stitches decreased), knit 44-44-54-58-70-70 and decrease 5-0-8-10-18-18 stitches evenly, work the next 18 stitches together 2 by 2 (= 9 stitches decreased), knit the last 26-23-28-33-36-39 and decrease 3-1-5-7-10-11 stitches evenly = 104-108-112-120-124-128 stitches. Switch to circular needle size 3 mm. Work next row as follows: Knit 1, * Knit 2, purl 2, knit 1, make 1 yarn over (= 1 stitch increased), purl 2, knit 2, make 1 yarn over (= 1 stitch increased), purl 1 *, work from *-* until 3-7-11-19-3-7 stitches remain, work rib (= knit 2/purl 2) until 3 stitches remain, finish with knit 2 and 1 edge stitch in garter stitch = 124-128-132-140-148-152 stitches. Work yarn overs twisted in rib (i.e. knit 2/purl 2) on next row to avoid holes. When rib measures 3 cm, cast off knit over knit and purl over purl. LEFT BAND: Work band back and forth on circular needle size 3 mm with black. Pick up 174-210 stitches (number of stitches must be divisible by 4 + 2) on circular needle size 3 mm with black inside 1 edge stitch from right side. Knit 1 row from wrong side. Work rib (= purl 2/knit 2) until 2 stitches remain, finish with knit 2. Continue with knit over knit and purl over purl until rib measures 3 cm. Cast off stitches with knit over knit and purl over purl. RIGHT BAND: Work as left band but decrease for BUTTONHOLES - see explanation above. ASSEMBLY: Sew opening under each sleeve in front loop of outermost stiches. Sew on buttons on left band. |
|||||||
Diagram explanations |
|||||||
|
|||||||
 |
|||||||
 |
|||||||
 |
|||||||
Have you finished this pattern?Tag your pictures with #dropspattern #telegramjacket or submit them to the #dropsfan gallery. Do you need help with this pattern?You'll find 35 tutorial videos, a Comments/Questions area and more by visiting the pattern on garnstudio.com. © 1982-2026 DROPS Design A/S. We reserve all rights. This document, including all its sub-sections, has copyrights. Read more about what you can do with our patterns at the bottom of each pattern on our site. |
|||||||


With over 40 years in knitting and crochet design, DROPS Design offers one of the most extensive collections of free patterns on the internet - translated to 17 languages. As of today we count 324 catalogues and 12290 patterns translated into English (UK/cm). 12290
We work hard to bring you the best knitting and crochet have to offer, inspiration and advice as well as great quality yarns at incredible prices! Would you like to use our patterns for other than personal use? You can read what you are allowed to do in the Copyright text at the bottom of all our patterns. Happy crafting!
Post a comment to pattern DROPS 184-22
We would love to hear what you have to say about this pattern!
If you want to leave a question, please make sure you select the correct category in the form below, to speed up the answering process. Required fields are marked *.