
Popular categories
Looking for a yarn?


Comments / Questions (122)
![]() Tina wrote:
Tina wrote:
Hi, I've just completed this dress and tried it on. Karisma feels prickly and itchy when worn. Will it be better after washing? Washing instructions say not to use fabric softeners but it feels like it really need softening. Pls advice because I was looking to make another dress Highland Heather which also uses Karisma. But if it's not comfortable to wear, I won't make it.
16.01.2022 - 10:25DROPS Design answered:
Dear Tina, Karisma is 100% natural wool so it's normal that some people which are more sensitive to yarn may feel that it's a bit itchy. In these cases, we recommend using superwash yarns, such as Merino Extra Fine, which is of the same Yarn Group as Karisma but is more recommended for sensitive skin. We don't recommend using fabric softeners; you could use a yarn detergent.
16.01.2022 - 21:10
![]() Monika Behr wrote:
Monika Behr wrote:
Please excuse my confusion but do you read charts A.1 and A.2 from the bottom or the top? If from the bottom, then does the black square (has been decreased) refer to the stitch that was passed over the other 2? If from the top, then I do not understand what the black square is.
04.01.2022 - 00:20DROPS Design answered:
Dear Mrs Behr, read diagrams bottom up - Correct, the black square refers to the stitch decreased below (ex. on 3rd row in A.1a/1st row in A.1b). Happy knitting!
04.01.2022 - 07:31
![]() Tina wrote:
Tina wrote:
1) Increase for the Raglan - Size L increase for A.1a every other row as well as the 4th row. So do I increase on 1st, 3rd, 4th and 5th row etc ... OR...Increase on 1st, 3rd, 4th and 6th row etc? 2)"On last repeat of A.1b in height on yoke do not inc with YO " - ON last repeat refers to the 24 increases for L size? So I skip the YO for the hole on 3rd row of A.1b diagram on my last A.1b when close to complete the 24 increases, is that what it means please? Thank you :))
01.12.2021 - 07:34DROPS Design answered:
Dear Tina, in size L (= 3rd size) you will increase on every other round a total of 23 times on both body and sleeves (= 1 round with increase, 1 round without increase) then on every 4th round (3 rounds after last increase, then 1 round with inc) 1 time (a total of 24 times) - increase 8 sts on every increase round. The increase should be worked on either side of each A.1b - when all increases are done, work the last A.1b on yoke (just before dividing piece without the yarn over to keep the number of sts correct). Happy knitting!
01.12.2021 - 07:45
![]() Tina wrote:
Tina wrote:
Hi, I'm looking through the pattern while waiting for my yarn to arrive, and found something I do not understand - It's the explanation of a symbol in the A1 diagram - K 2 sts in 1 st I.e. work in front and back loop of st. What is the 'l.e ' please? Thanks :))
29.11.2021 - 19:19DROPS Design answered:
Hello Tina! The abbreviation “i.e.” stands for id est, which is Latin for “that is.” Here it says how to knit 2 stitches in 1 stitch by working in front and back loop of that stitch. Happy knitting!
29.11.2021 - 20:16
![]() Jette Melsen wrote:
Jette Melsen wrote:
Der er fejl i første linie i diagram a1a, der mangler en ret maske efter omslag
02.11.2021 - 12:52
![]() Melanie Coleman wrote:
Melanie Coleman wrote:
Bonjour je voudrais faire ce tuto mais je ne suis pas capable de voir les grilles pour pouvoir le faire. es ce qu'il a une facon que je pourrais avoir les grilles svp merci
25.09.2021 - 18:20DROPS Design answered:
Bonjour Mme Coleman, vous trouverez les diagrammes A.1a/A.1b et A.2a/A.2b juste à droite du schéma des mesures. Si besoin, cette leçon explique comment tricoter un diagramme. Bon tricot!
27.09.2021 - 08:10
![]() Eulalie wrote:
Eulalie wrote:
Bonjour, je tricote en taille S et je n'ai pas le même compte de mailles que vous après les augmentations en raglan. J'arrive à 284 mailles au lieu de 280. Il me semble que l'erreur vient du patron qui indique avant le raglan 132 mailles + 4 augmentées dans les motifs = 136. Si on ajoute les mailles du raglan (taille S) (20x4)+(17x4)=148 et 136+148=284 Qu'en pensez-vous ? Merci beaucoup pour tous vos patrons très agréables à tricoter. Eulalie
30.08.2021 - 16:10DROPS Design answered:
Bonjour Eulalie, après les augmentations du 1er tour après les côtes, vous avez bien 132 m (+ 1 m augmentée dans chacun des A.1a), lorsque toutes les augmentations des raglans sont terminées, vous avez 280 m (et, en fonction du rang de A.1b, 1 m en plus dans chaque A.1b si vous avez 7 m soit 284 m au total ou bien juste 280 m si vous êtes après le 2ème ou le 3ème rang de A.1b. Bon tricot!
31.08.2021 - 07:59
![]() Dagmar wrote:
Dagmar wrote:
Ganz herzlichen Dank. Jetzt hat sich der Knoten in meinem Kopf gelöst.
25.08.2021 - 11:14
![]() Dagmar wrote:
Dagmar wrote:
Wenn ich die Passe mit 124 Maschen auf der Nadel beginne, wie komme ich nach den Zunahmen auf 136 (+4) Maschen? Irgendwie rechne ich falsch. Ich habe die Zunahmemaschen addiert und komme auf 76 Maschen. Aber wenn ich von 124 Maschen auf 136 Maschen kommen soll, dann darf ich eigentlich nur 12 Maschen zunehmen. Bitte helfen Sie mir, meinen Denkfehler zu finden. Danke.
24.08.2021 - 18:14DROPS Design answered:
Liebe Dagmar, so stricken Sie in M: 16 M re str und 2 M gleichmäßig verteilt zunehmen (= halbes Rückenteil = 18 M.), A.1a (= 6 M in der 1. Rd), 18 M re str und 2 M zunehmen (= rechter Ärmel = 20 M), A.1a (6 M), 32 M re str und 4 M gleichmäßig verteilt zunehmen (= Vorderteil) (36 M), A.1a (6 M), 18 M re str und 2 M gleichmäßig verteilt zunehmen (= linker Ärmel = 20 M), A.1a (6 M), 16 M re str und 2 M zunehmen (= halbes Rückenteil = 18 M.) = 18+6+20+6+36+6+20+6+18= 136 M (+ 1 M die in jedem Rapport von A.1a in der Rd zugenommen wird = 4 M zugenommen). Viel Spaß beim stricken!
25.08.2021 - 07:15
![]() Vivia wrote:
Vivia wrote:
SKAL jeg strikke møster under ærmet? Jeg tror det er unødvæntigt.
22.08.2021 - 19:55
|
||||||||||||||||||||||
Josephine#josephinedress |
||||||||||||||||||||||
 |
 |
|||||||||||||||||||||
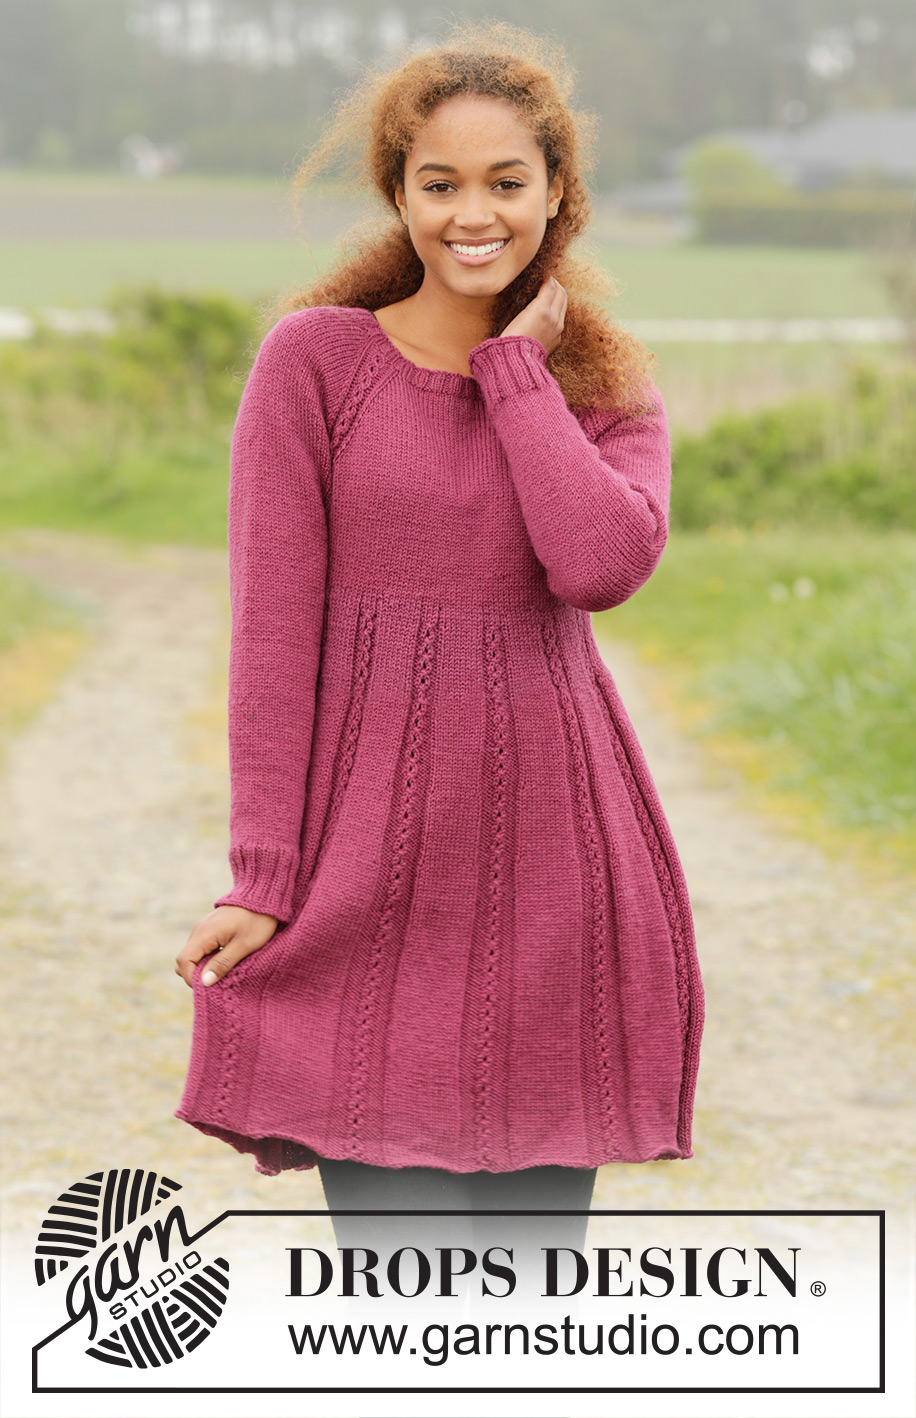
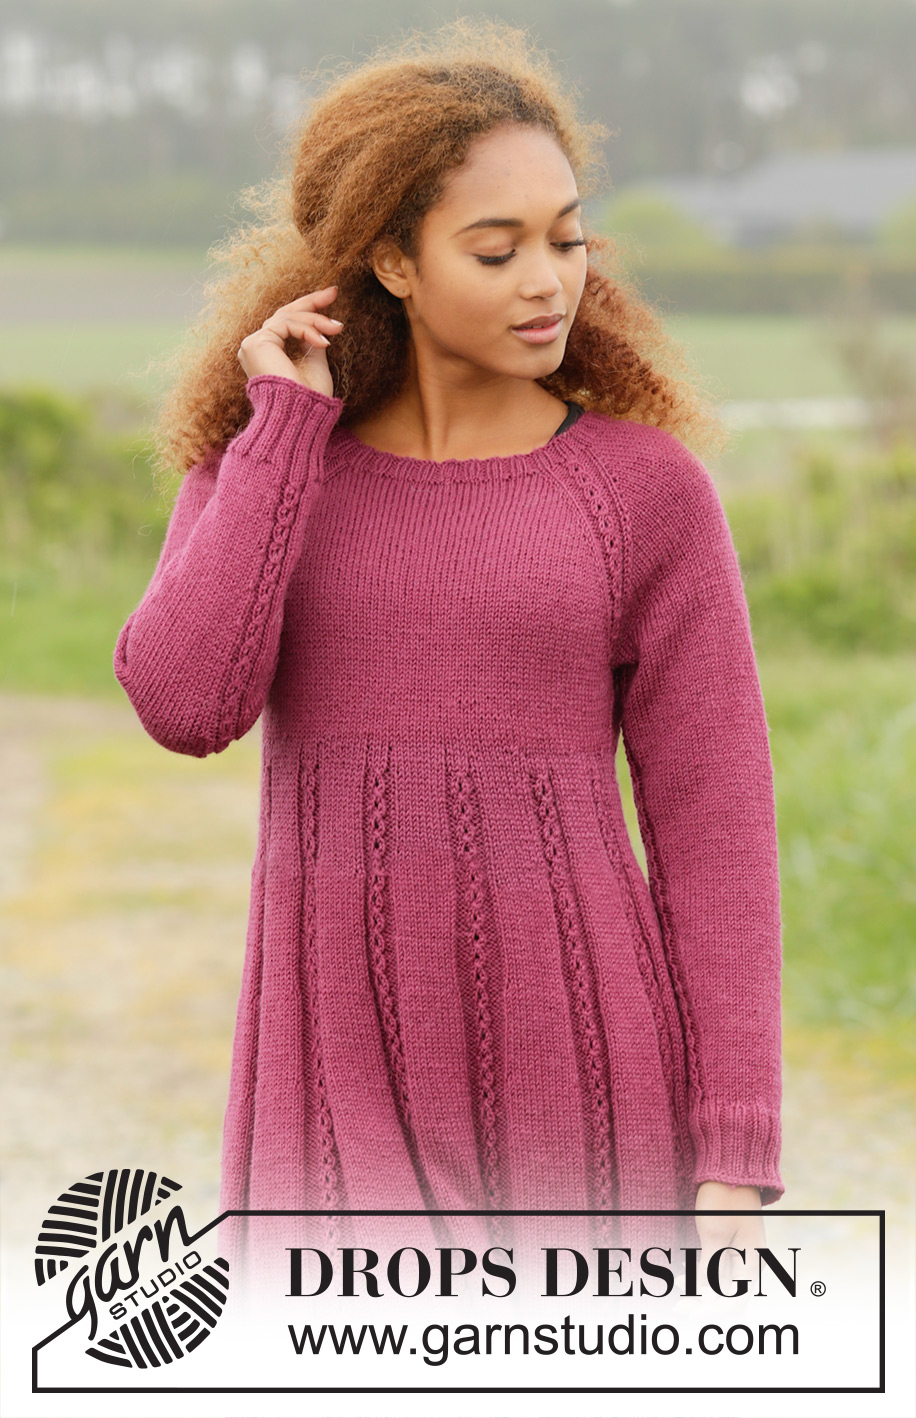
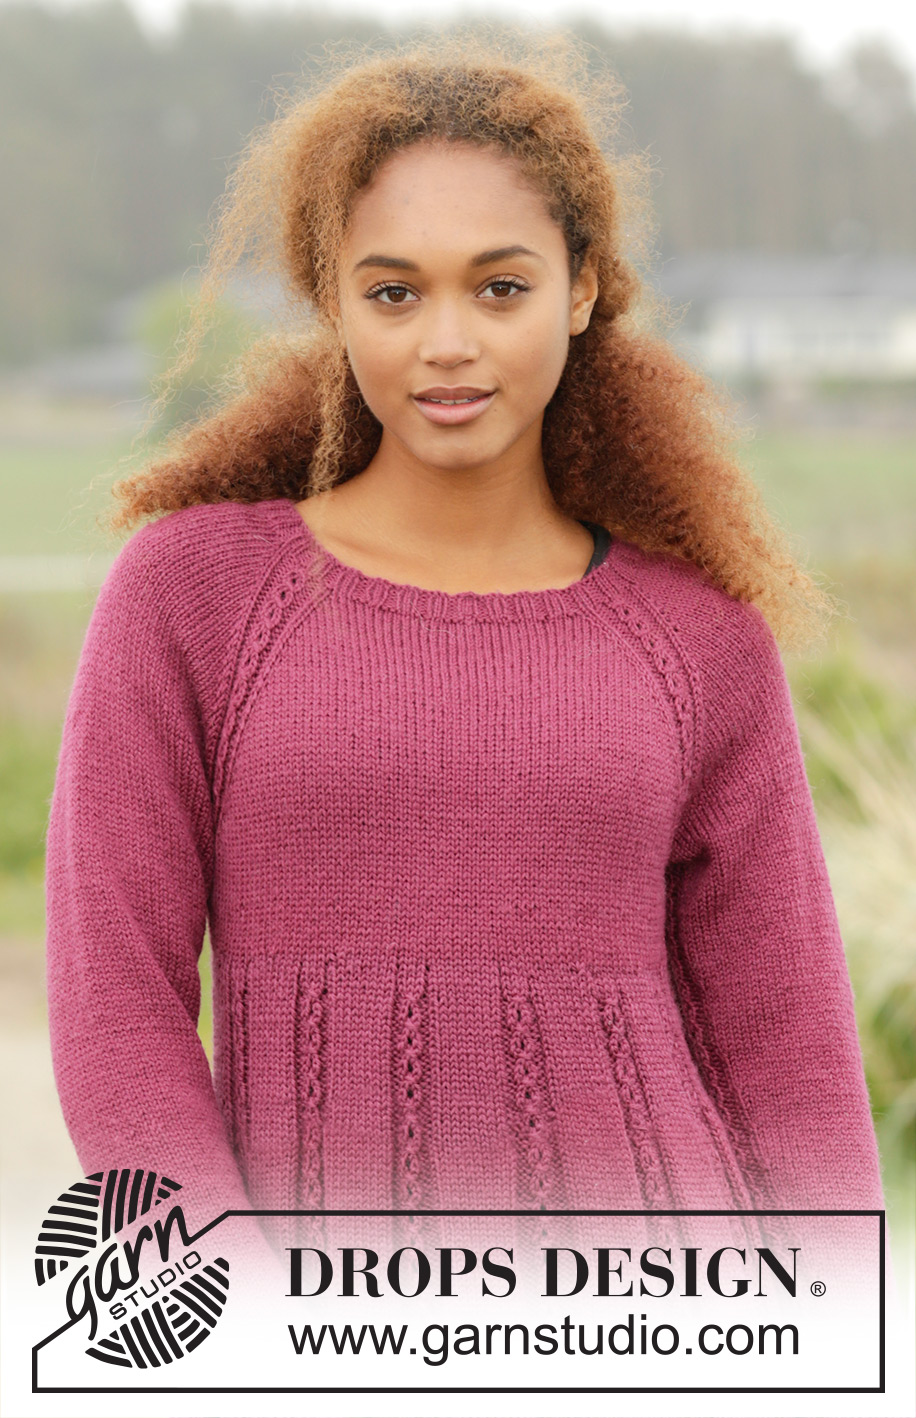
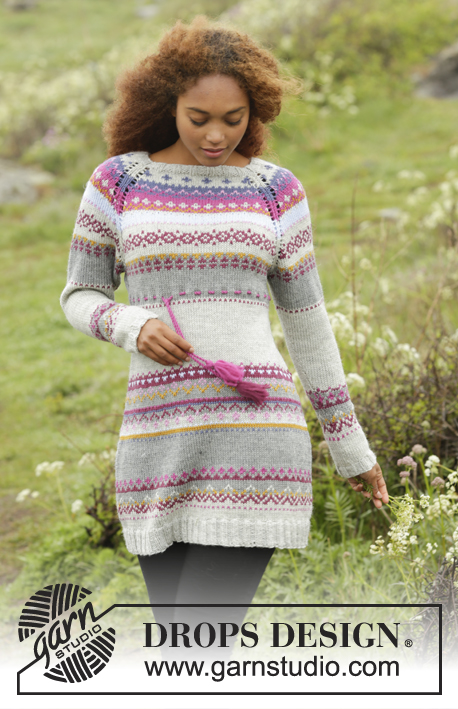
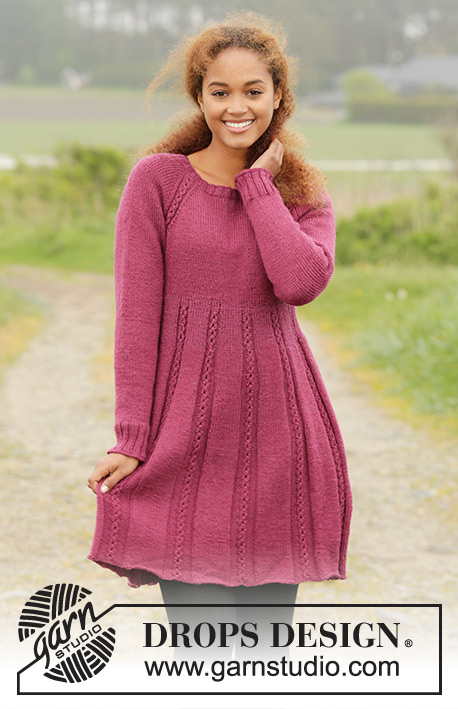
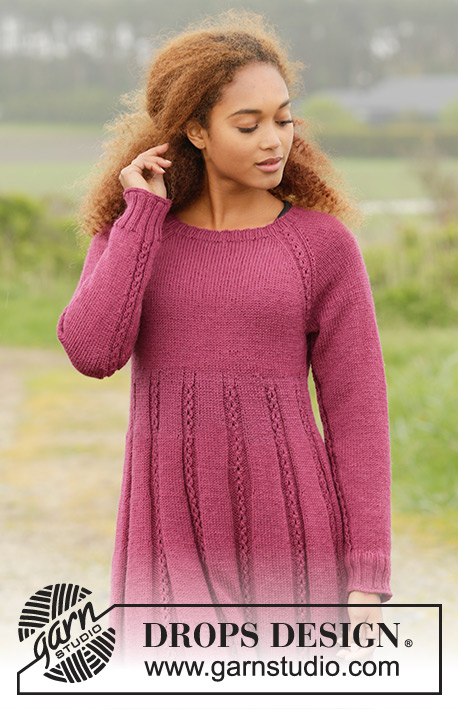
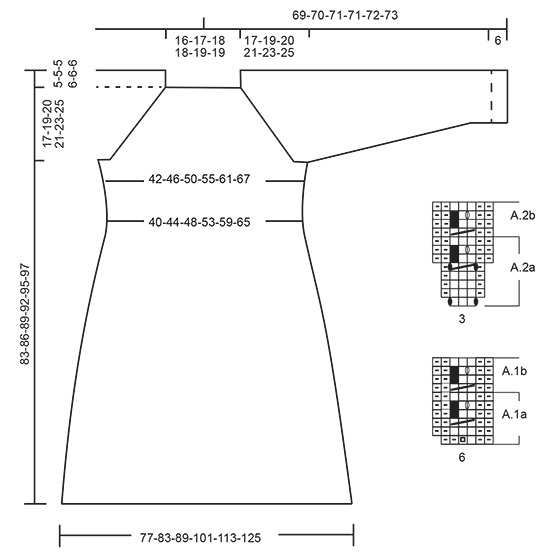
Knitted DROPS dress with raglan and cables, worked top down in ”Karisma”. Size S-XXXL.
DROPS 172-14 |
||||||||||||||||||||||
|
PATTERN: See diagrams A.1 and A.2. RAGLAN: Inc as follows before A.1a: Work until 1 sts remain before A.1a, 1 YO, K 1. Inc as follows after A.1a: K 1, 1 YO. On next round K YOs twisted to avoid holes. INCREASE TIP-1: Inc 1 st K by making 1 YO. On next round K YO twisted to avoid holes. INCREASE TIP-2: Inc 1 st P by making a YO. On next round P YO twisted to avoid holes. DECREASE TIP (sleeve): Dec as follows before A.1b: Work until 3 sts remain before A.1b, K 2 tog, K 1. Dec as follows after A.1b: K 1, slip 1 st as if to K, K 1, psso DECREASE TIP (body): Dec as follows before marker: Work until 6 sts remain before marker, K 2 tog, K 4. Dec as follows after marker: K 4, slip 1 st as if to K, K 1, psso CAST-OFF TIP: To avoid a tight cast-off edge, you may use a needle ½ size larger. ---------------------------------------------------------- DRESS: Worked in the round, top down. Rounds start mid back. YOKE: Cast on 124-124-132-140-148-148 sts on circular needle size 3.5 mm with Karisma. K 1 round. Then work 6 rounds rib = K 2/P 2. Switch to circular needle size 4 mm. On first round work as follows: K the first 16-16-18-18-20-20 and inc 1-2-2-2-2-2 sts evenly (= half back piece), work A.1a (= 6 sts on first round), K the next 18-18-18-22-22-22 and inc 2-2-2-2-4-4 sts evenly (= right sleeve), work A.1a over the next 6 sts, K the next 32-32-36-36-40-40 and inc 2-4-4-4-4-4 sts evenly (= front piece), work A.1a over the next 6 sts, K the next 18-18-18-22-22-22 and inc 2-2-2-2-4-4 sts evenly (= left sleeve), work A.1a over the next 6 sts, K the remaining 16-16-18-18-20-20 and inc 1-2-2-2-2-2 sts evenly (= half back piece) = 132-136-144-152-164-164 sts (+ 1 st that will be inc in each report of A.1a on round = 4 sts on round). REMEMBER THE KNITTING TENSION On next round work pattern and inc for raglan as follows: READ WHOLE SECTION BEFORE CONTINUING. Continue in stocking st and A.1a in every transition between body and sleeves. When A.1a has been worked vertically, repeat A.1b over A.1a - NOTE: On last repeat of A.1b in height on yoke do not inc with YO (i.e. there are 6 sts in every repetition of A.1b when inc for raglan is done). AT THE SAME TIME on 2nd round in A.1a start inc for RAGLAN - see explanation above, on each side of A.1a/A.1b. NOTE: Inc differently on body and sleeves. RAGLAN BODY: Inc like this on every round 0-0-0-7-9-12 times, every other round 19-22-23-23-24-26 times and on every 4th round 1-1-1-0-0-0 times (= 20-23-24-30-33-38 times in total). RAGLAN SLEEVES: Inc like this every other round 13-18-23-22-20-18 times and every 4th round 4-3-1-2-4-7 times (= 17-21-24-24-24-25 times in total). When all inc are done there are 280-312-336-368-392-416 sts on round. Work next round as follows: Work 40-44-47-53-58-63 sts (= half back piece), slip the next 60-68-74-78-80-82 sts on a stitch holder (= sleeve), cast on 8-8-10-10-12-14 sts under sleeve, work the next 80-88-94-106-116-126 sts (= front piece), slip the next 60-68-74-78-80-82 sts on a stitch holder (= sleeve), cast on 8-8-10-10-12-14 sts under sleeve, work the last 40-44-47-53-58-63 sts (= half back piece). BODY: There are now 176-192-208-232-256-280 sts for body. Continue in stocking st. Insert a marker in each side, in the middle of the 8-8-10-10-12-14 sts that were cast on under sleeves. NOW MEASURE PIECE FROM HERE! When piece measures 4 cm, dec 1 st on each side of markers (= 4 sts dec) - READ DECREASE TIP (body)! Dec like this every 6th round 2 times in total = 168-184-200-224-248-272 sts. When piece measures 7 cm, dec 25-30-35-37-39-41 sts evenly = 143-154-165-187-209-231 sts. NOTE: This is done to compensate for the 26-28-30-34-38-42 sts inc on 1st round in pattern A.2a. Work 1 round more that finishes when 2 sts remain on round. This is now beg of round. This is done to get a symmetrical pattern. Now work pattern as follows: * A.2a (= 3 sts on 1st round), K 8 * repeat from *-* 12-13-14-16-18-20 more times on round (= 13-14-15-17-19-21 repetitions) = 169-182-195-221-247-273 sts. Continue with pattern in the round like this. When entire A.2a has been worked vertically, there is 195-210-225-255-285-315 sts on round. Then work A.2b over A.2a until finished measurements AT THE SAME TIME inc in the sections with P and the sections in stocking st as follows: INC IN SECTIONS IN STOCKING ST: When piece measures 14 cm, inc 2 sts in every repetition in stocking st by making a YO inside 1 st K in each side of repetition – READ INCREASE TIP-1 (= 26-28-30-34-38-42 sts inc on round). Inc like this every 8 cm 3 times in total. INC IN SECTIONS WITH P: When piece measures 20 cm, inc 1 P st in every section with P - READ INCREASE TIP-2 (= 26-28-30-34-38-42 sts inc on round). Inc like this every 8 cm 3 times in total. When all inc are done there are 351-378-405-459-513-567 sts on round. Continue until piece measures 83-86-89-92-95-97 cm measured from shoulder – adjust so that last round is 2nd round in A.2b. Cast off with K over K and P over P - READ CAST-OFF TIP. SLEEVE: Worked in the round on double pointed needles. Slip sts from stitch holder back on double pointed needles size 4 mm and pick up 1 st in each of the 8-8-10-10-12-14 new sts cast on under sleeve = 68-76-84-88-92-96 sts. Insert a marker in the middle of the new sts under the sleeve. NOW MEASURE THE PIECE FROM HERE. Now continue in stocking st and A.1a mid under sleeve (i.e. 3 sts in A.1a on each side of marker). When A.1a has been worked vertically, continue with A.1b over A.1a. When piece measures 4 cm, dec 1 st on each side of A.1b under sleeve - READ DECREASE TIP (sleeve). Dec like this every 8th-6th-5th-4th-4th-4th round 12-15-18-19-20-21 times in total = 44-46-48-50-52-54 sts. When sleeve measures 38-37-36-35-34-33 cm (shorter measurements in the larger sizes because wider shoulders) - adjust so that next round is 2nd round in A.2b, inc 8-6-8-6-8-6 sts evenly over sts in stocking st = 52-52-56-56-60-60 sts. Switch to double pointed needles size 3.5 mm. Now work rib (K 2/P 2) – adjust to work K over K and P over P over the 6 sts over A.2b. When rib measures 6 cm, cast off with K over K and P over P. Work the other sleeve the same way. |
||||||||||||||||||||||
Diagram explanations |
||||||||||||||||||||||
|
||||||||||||||||||||||
 |
||||||||||||||||||||||
Have you finished this pattern?Tag your pictures with #dropspattern #josephinedress or submit them to the #dropsfan gallery. Do you need help with this pattern?You'll find 30 tutorial videos, a Comments/Questions area and more by visiting the pattern on garnstudio.com. © 1982-2026 DROPS Design A/S. We reserve all rights. This document, including all its sub-sections, has copyrights. Read more about what you can do with our patterns at the bottom of each pattern on our site. |
||||||||||||||||||||||


With over 40 years in knitting and crochet design, DROPS Design offers one of the most extensive collections of free patterns on the internet - translated to 17 languages. As of today we count 324 catalogues and 12290 patterns translated into English (UK/cm). 12290
We work hard to bring you the best knitting and crochet have to offer, inspiration and advice as well as great quality yarns at incredible prices! Would you like to use our patterns for other than personal use? You can read what you are allowed to do in the Copyright text at the bottom of all our patterns. Happy crafting!
Post a comment to pattern DROPS 172-14
We would love to hear what you have to say about this pattern!
If you want to leave a question, please make sure you select the correct category in the form below, to speed up the answering process. Required fields are marked *.