
Popular categories
Looking for a yarn?


Comments / Questions (28)
Annette Große wrote:
Gibt es die Anleitung auch auf Deutsch?
30.03.2018 - 19:35DROPS Design answered:
Ja, Sie können die Sprache unter dem Bild auswählen oder Sie gehen auf die deutsche Hauptseite, dann erscheinen auch alle Anleitungen auf Deutsch. Viel Spaß beim Stricken!
31.03.2018 - 09:36
![]() DERAS Marie-Danièle wrote:
DERAS Marie-Danièle wrote:
Bonjour je ne comprend pas le départ car nous avons 2 m et au raang suisvant 4 m hors dans les explications les jeté se fony toujours entre 2 m si je calcule bien 1m 1 jete 1m = 3 m dites moi comment je dois faire pour avoir mes 4 mailles merci a vous
10.04.2017 - 10:59DROPS Design answered:
Chere Marie-Daniele! Vous avec 2 mailles sur chaque aiguille. Ensuite verrez bien le diagramme: il y a: un jete, une maille, un jete, une maille = 4 mailles sur chaque aiguille. Bon tricot!
10.04.2017 - 23:18
![]() DERAS Marie-Danièle wrote:
DERAS Marie-Danièle wrote:
Bonjour dites moi si je comprends bien sur le diagramme on ne voit que les rangs endroit , et pour les rangs envers on tricote ls mailles comme elle se présentent est ce bien cela ?
10.04.2017 - 08:56DROPS Design answered:
Bonjour! Les diagrammes montrent tous les rangs du point fantaisie, vus sur l'endroit. Pour les rangs envers vous tricotez les rangs pairs du diagramme. Consultez aussi la lecon ICI et verrez la legende au-dessus du schemat. Bon tricot!
10.04.2017 - 09:35
![]() DERAS Marie-Danièle wrote:
DERAS Marie-Danièle wrote:
Bonjour je ne comprends pas au tout début nous avons 2 mailles au rang suivant 4 m hors dans l 'explication les jetes se font entre les mailles alors comment fait on pour avoir ces 4 m bonne journee
10.04.2017 - 08:50DROPS Design answered:
Bonjour Marie-Daniele! Au debut vous avec 2 mailles sur chaque aiguille. Ensuite verrez bien le diagramme. Il y a: un jete, une maille, un jete, une maille = 4 mailles sur chaque aiguille. Bon tricot!
10.04.2017 - 23:22
![]() Nicoletta wrote:
Nicoletta wrote:
Bellissimo, io proverò a lavorarlo con lana alpaca viola
23.11.2016 - 09:33
![]() Monika Schiffer wrote:
Monika Schiffer wrote:
Jag har svårt att komma igång, förstår inte varför det i diagrammet står t ex efter rutsymbolen "= rm från rätsidan, am från avigsidan". Man stickar ju runt så det är väl rätsida hela tiden? Eller ska varannat varv räknas som avigsidan? På 1:a varvet är det 1 omslag mellan 2 m, men eftersom det på 2:a varvet är 4 m på varje sticka är det väl 2 omslag per sticka? Ska man börja med ett omslag, sticka en rm, ett omslag och en rm? Hoppas på snabbt svar. Hälsningar Monika
03.10.2016 - 22:30DROPS Design answered:
Hej Monika. Du starter med at strikke rundt, men senere strikker du frem og tilbage. Derfor er der ogsaa beskrivelse af hvordan du skal strikke fra vrangen. Der er to omslag paa förste pind af A.1 = 4 m i anden pind. Du starter med et omslag, 1 rm, 1 omsl, 1 rm.
04.10.2016 - 14:48
![]() Doris wrote:
Doris wrote:
Ein wunderschönes Modell! Das kommt unbedingt auf mein Liste der Modell, die ich noch machen will!
15.07.2016 - 12:21
![]() Danielle Bertrand wrote:
Danielle Bertrand wrote:
J'ai vraiment hâte d'entreprendre ce beau projet!
28.06.2016 - 14:52
![]() MONIQUE FORT wrote:
MONIQUE FORT wrote:
Quel joli pull, j'ai hâte de prendre à nouveau mes aiguilles ☺
27.06.2016 - 18:05
![]() Audrey Schoepple wrote:
Audrey Schoepple wrote:
This one is my favorite!!!
24.06.2016 - 23:44
|
||||||||||||||||||||||
Lucky Charm#luckycharmsweater |
||||||||||||||||||||||
|
|
||||||||||||||||||||||
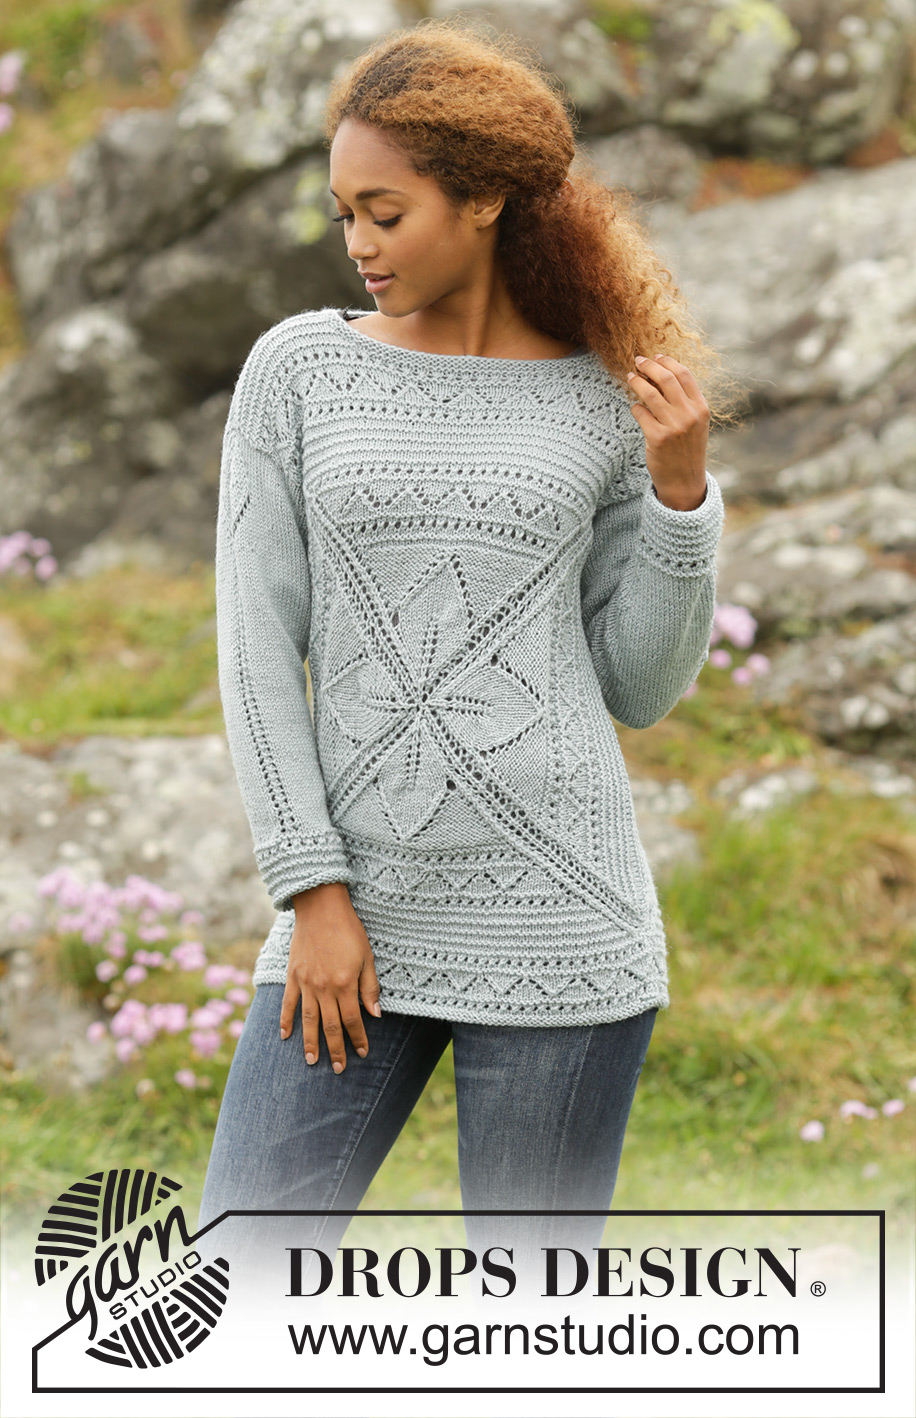
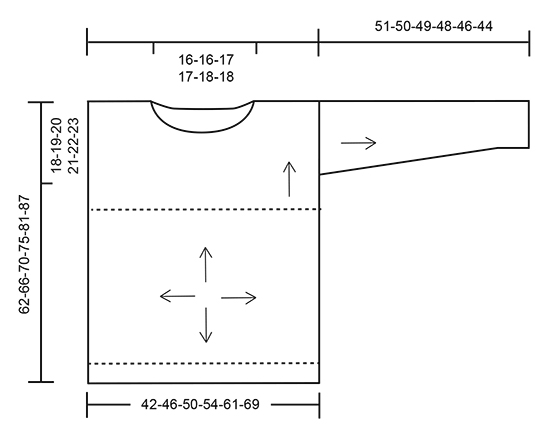
Knitted DROPS jumper with leaf pattern, lace pattern and ridges, worked from the middle and outwards in a square in ”Cotton Merino”. Size: S - XXXL.
DROPS 172-3 |
||||||||||||||||||||||
|
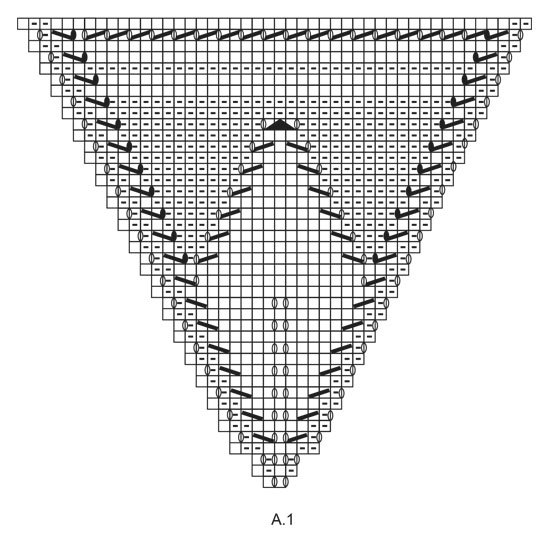
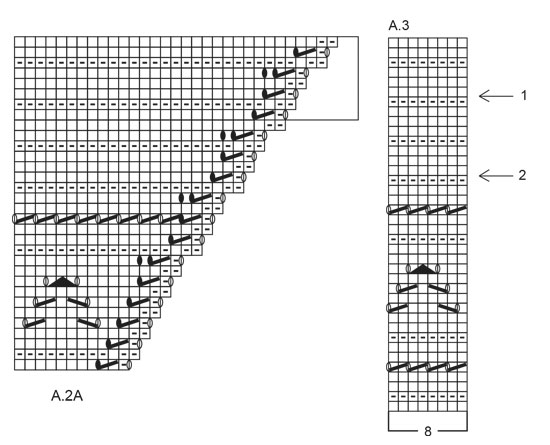
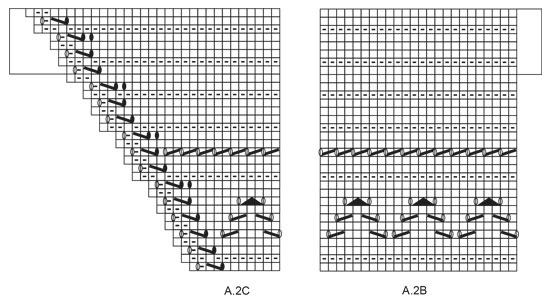
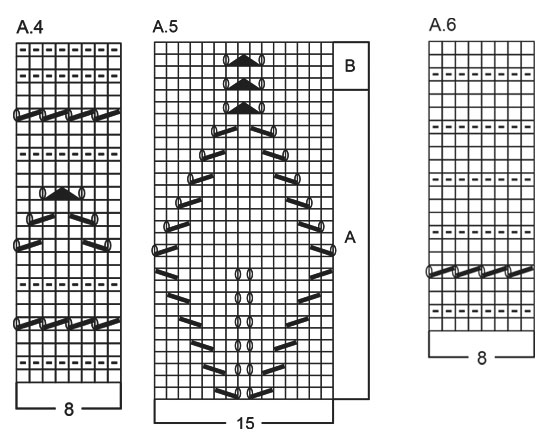
PATTERN: See diagrams A.1 to A.6. The diagrams show all rows in pattern seen from RS. GARTER ST (worked in the round): 1 ridge = 2 rounds. * K 1 round and P 1 round *, repeat from *-*. ---------------------------------------------------------- BACK PIECE: Cast on 8 sts with Cotton Merino and divide them on 4 double pointed needles size 4 mm (= 2 sts on every needle). Work according to A.1 (= 4 repetitions on round). Work A.1 1 time vertically = 184 sts on round, then work as follows: *A.2 A (= 11 sts), A.2 B (= 24 sts), A.2 C (= 11 sts) *, repeat from *-* 3 more times. When A.2 has been worked 1 time vertically (= 344 sts on round), work the last 8 rounds in A.2 A-C 0-1-2-3-4-6 more times (40 sts inc for every time the last 8 rounds are worked) = 344-384-424-464-504-584 sts. Then work as follows: Keep the first 86-96-106-116-126-146 sts, on needle, cast off the next 86-96-106-116-126-146 sts, slip the next 86-96-106-116-126-146 sts on a stitch holder and cast off the last 86-96-106-116-126-146 sts on round. NOTE! The yarn must be cut several times in piece. TOP PART: Continue back and forth over the first 86-96-106-116-126-146 sts. Work first row in A.3 AT THE SAME TIME adjust no of sts to 89-97-105-113-129-145. Then work as follows: A.3 over 88-96-104-112-128-144 sts (= 11-12-13-14-16-18 repetitions), finish with 1 st which is worked as first st in A.3 (K when working K and P when working P). On row with arrow -1 cast off the middle 31-31-33-33-35-35 sts for neck and finish each shoulder separately. On next row dec 1 st towards the neck = 28-32-35-39-46-54 sts remain on each shoulder. Finish A.3, then cast off. BOTTOM PART: Slip 86-96-106-116-126-146 sts from stitch holder back on circular needle, work first row in A.4, AT THE SAME TIME adjust no of sts to 89-97-105-113-129-145. Then work back and forth as follows: A.4 over 88-96-104-112-128-144 sts (= 11-12-13-14-16-18 repetitions), finish with 1 st which is worked as first st in A.4 (K when working K and P when working P). Cast off when A.4 has been worked vertically. FRONT PIECE: Cast on and work as on back piece until A.2 has been worked = 344-384-424-464-504-584 sts. TOP PART: Continue back and forth over the first 86-96-106-116-126-146 sts. Work first row in A.3, AT THE SAME TIME adjust no of sts to 89-97-105-113-129-145. Then work back and forth as follows: A.3 over the next 88-96-104-112-128-144 sts (= 11-12-13-14-16-18 repetitions), finish with 1 st which is worked as first st in A.3 (K when working K and P when working P). On row with arrow- 2, slip the middle 25-25-27-27-29-29 sts on a stitch holder for neck and finish each shoulder separately. Cast off for neck on every row towards mid front: 2 sts 1 time and 1 st 2 times = 28-32-35-39-46-54 sts remain on each shoulder. Continue until A.3 has been worked vertically, cast off. BOTTOM PART: Work as bottom part on back piece. SLEEVES: Worked top down in the round on double pointed needles. Cast on 77-79-85-89-93-97 sts on double pointed needles size 4 mm. Work as follows: 31-32-35-37-39-41 sts in stocking st, A.5 A (= 15 sts), 31-32-35-37-39-41 sts in stocking st. Insert 1 marker at beg of round = mid under sleeve. When piece measures 4 cm dec 1 st on each side of marker, dec every 2-2-2-1½-1½-1½ cm 17-17-19-20-21-22 times = 43-45-47-49-51-53 sts. AT THE SAME TIME when A.5 A has been worked one time vertically continue with A.5 B over A.5 A. When piece measures 43-42-41-40-38-36 cm, adjust no of sts to 40-40-48-48-48-56. Then work according to A.6 (= 5-5-6-6-6-7 repetitions in width). When A.6 has been worked 1 time vertically, work 2 ridges in GARTER ST – see explanation above, then cast off, sleeve measures approx. 51-50-49-48-46-44 cm. ASSEMBLY: Sew the shoulder seams. Sew side seams, leave a gap of at the top of 18-19-20-21-22-23 cm = armholes. Sew in sleeves. NECK EDGE: Pick up approx. 80-96 sts (including sts on stitch holder) around the neck on a short circular needle size 4 mm. Work 2 ridges, then cast off. |
||||||||||||||||||||||
Diagram explanations |
||||||||||||||||||||||
|
||||||||||||||||||||||
 |
||||||||||||||||||||||
 |
||||||||||||||||||||||
 |
||||||||||||||||||||||
 |
||||||||||||||||||||||
 |
||||||||||||||||||||||
Have you finished this pattern?Tag your pictures with #dropspattern #luckycharmsweater or submit them to the #dropsfan gallery. Do you need help with this pattern?You'll find 30 tutorial videos, a Comments/Questions area and more by visiting the pattern on garnstudio.com. © 1982-2026 DROPS Design A/S. We reserve all rights. This document, including all its sub-sections, has copyrights. Read more about what you can do with our patterns at the bottom of each pattern on our site. |
||||||||||||||||||||||


With over 40 years in knitting and crochet design, DROPS Design offers one of the most extensive collections of free patterns on the internet - translated to 17 languages. As of today we count 324 catalogues and 12290 patterns translated into English (UK/cm). 12290
We work hard to bring you the best knitting and crochet have to offer, inspiration and advice as well as great quality yarns at incredible prices! Would you like to use our patterns for other than personal use? You can read what you are allowed to do in the Copyright text at the bottom of all our patterns. Happy crafting!
Post a comment to pattern DROPS 172-3
We would love to hear what you have to say about this pattern!
If you want to leave a question, please make sure you select the correct category in the form below, to speed up the answering process. Required fields are marked *.