
Popular categories
Looking for a yarn?


Comments / Questions (49)
![]() Sylvie wrote:
Sylvie wrote:
Bonjour, Au niveau du diagramme, je ne comprends pas à quelle hauteur on doit passer du diagramme M1 au diagramme M2. Pouvez-vous m'expliquer SVP ? Merci d'avance Sylvie
06.02.2017 - 12:06DROPS Design answered:
Bonjour Sylvie, quand M.1 a été tricoté 1 fois en hauteur, augmentez 1 maille comme indiqué et continuez en tricotant M.2. Bon tricot!
06.02.2017 - 13:18Fulvia wrote:
Buonasera Vorrei sapere se è possibile avere la traduzione in italiano di questo modello Grazie Cordiali saluti Fulvia
23.09.2016 - 17:45DROPS Design answered:
Buongiorno Fulvia. Tradurremo e caricheremo sul sito il modello nei prossimi giorni. Grazie e buon lavoro!
23.09.2016 - 18:09
![]() Marie wrote:
Marie wrote:
Bonjour, madame! Pensez-vous qu'il est possible de tricoter les manches de cette veste en rond (sans faire de couture) en supprimant les mailles lisière? Est-ce que cela va déranger pour le reste du tricot? Merci!
15.01.2016 - 15:39DROPS Design answered:
Bonjour Marie, vous pouvez tout à fait tricoter les manches en rond jusqu'à l'arrondi où il vous faudra terminer en allers et retours pour rabattre les mailles de chaque côté. Bon tricot!
16.01.2016 - 10:48BELLA wrote:
Hello I am just working on tension sample of pattern 88-4 Please tell me 1 -the gauge knitting tension is measured for working in stocking stitch or pattern stitch ? 2-Worked In stocking- for 10 cm. I knitted 21 st. with 3.5 cm. needles and it looks fine.(4 cm needles are too big) what can I do? ) Thanks
31.12.2015 - 16:08DROPS Design answered:
Dear Bella, tension stated is worked in stocking st. You can also wash and block your swatch to check out the tension on the finished item. Remember your DROPS store will help you for any individual assistance, even per mail or telephone. Happy knitting!
02.01.2016 - 16:02
![]() Ina wrote:
Ina wrote:
Diese wunderschöne Jacke habe ich vor vielen Jahren gestrickt. Nun habe ich sie aus Versehen zu heiß gewaschen und sie paßt nicht mehr.Ich möchte sie gern noch einmal stricken, aber den Glitter in grün gibt es nicht mehr und ohne den Metallfaden sieht sie nicht so schön aus. Ich habe schon viele Händler kontaktiert, alles negativ. Meine Hoffnung ist, dass Sie mir helfen können. Vielleicht gibt bei Ihnen doch noch einige Reste.?? Viele Grüße Ina Mikhail
17.10.2015 - 21:17DROPS Design answered:
Leider ist Glitter in Grün nicht mehr erhältlich. Sie könnten höchstens vielleicht in Online-Gebrauchtplattformen schauen, ob dort noch jemand etwas verkauft. Oder Sie verwenden Glitter in Gold, das würde zu dem Grün der Jacke auch ganz gut passen und der Jacke einen warmen Glanz verleihen, das ist aber natürlich Geschmackssache.
29.10.2015 - 14:30Stickolina wrote:
Hur många maskor bör jag ha kvar vid avmaskning av ärmen? Det framgår inte i mönstret och jag blir osäker....
02.08.2015 - 18:48DROPS Design answered:
Hej Stickolina, Det beror på hur många ggr du hinner avm 2 m i varje sida innan ditt arb når 55-55-56-57-57 cm. Man avm enligt beskrivningen i varje sida så man får en rund och jämn ärmkulle. Lycka till!
10.08.2015 - 11:15
![]() Marion wrote:
Marion wrote:
Bei der Halskante werden doch alle Maschen der Hilfsfäden, also die 5 Bordmaschen und die Maschen für den Ausschnitt wieder mit auf die Nadel genommen? Welche Maschen werden dann wieder auf einen Hilfsfaden genommen und wann genau, zu welchem Zweck?
14.05.2015 - 13:55DROPS Design answered:
Sie stricken zunächst nur die 5 Blenden-M weiter, die Blende muss ja noch bis zum Beginn des Halsausschnitts hochgestrickt werden, sie wird dann anschließend an das Vorderteil genäht (das muss so gemacht werden, damit die Blende weiterhin mit Nadel Nr. 3,5 gestr. wird, die Passe wird ja mit 4,5 gestr.). Dann nehmen Sie für die Halsblende alle M auf die Nadel, also die 5 Blenden-M, daran anschließend die stillgel. M des einen Vorderteils, dann fassen Sie aus dem Halsausschnitt des Vorderteils M auf, fassen aus dem Halsausschnitt des Rückens M auf, dann aus dem Halsausschnitt des anderen Vorderteils, dann folgen die stillgel. M & dann die anderen hochgestrickten 5 Blenden-M.
15.05.2015 - 12:47
![]() Corinne wrote:
Corinne wrote:
Guten Tag Ich verstehe die Abnahmen bei den Ärmeln nicht. Es heisst: nach 46cm bei jeder 2. Reihe gegen die Schulter abk. 4M. 1Mal ect. Welche Seite des Ärmels ist gegen die Schulter? Oder muss ich auf beiden Seiten des Ärmels je 4M. abketten? Vielen Dank für die Hilfe!
14.08.2014 - 08:46DROPS Design answered:
Liebe Corinne, die Übersetzung ist an dieser Stelle vielleicht etwas missverständlich, sie wird gleich korrigiert. Sie müssen an beiden Seiten des Ärmels für die Armkugel abnehmen. Schauen Sie einfach noch mal in die korrigierte Anleitung, wenn dann noch etwas unklar ist, fragen Sie einfach noch mal.
15.08.2014 - 11:55
![]() Carina wrote:
Carina wrote:
Hej! Jag skulle vilja sticka tröjan i ett garn som tål maskintvätt.Funderade på fabel men det är väl lite tunnare.Jag vill inte heller använda någon glittertråd i.Kan jag få tips hur jag ska kunna hitta rätt garn och stickfasthet.Om jag bara ökar storleken på stickan blir kanske tröjan för löst stickad
10.05.2014 - 15:14DROPS Design answered:
Jo du kan strikke denne model i Fabel og alle andre garner som tilhörer garngruppe A. Fabel og Baby Merino er superwashbehandlet og kan vaskes i maskine. God fornöjelse!
12.05.2014 - 10:29
![]() Karin Van Lemmeren wrote:
Karin Van Lemmeren wrote:
Goedemiddag, ik ben misschien een beetje dom,maar in het patroon staat duidelijk dat de hele voorkant in ribbelsteek gebreid wordt en dat je dat zelfs een beetje strak moet doen,dus ik snap er nu niet veel meer van,hoe moet het nu?
04.04.2014 - 13:47DROPS Design answered:
De vraag is ons niet helemaal duidelijk, maar misschien helpt wat extra uitleg. De voorkant is niet het hele voorpand maar het zijn de 5 steken middenvoor waar de knopen en de knoopsgaten op komen. Deze 5 voorkantsteken breit u in ribbelsteek en niet los, maar een beetje stevig zodat de rand netjes wordt.
07.04.2014 - 19:10
|
||||||||||
DROPS 88-4 |
||||||||||
|
|
||||||||||
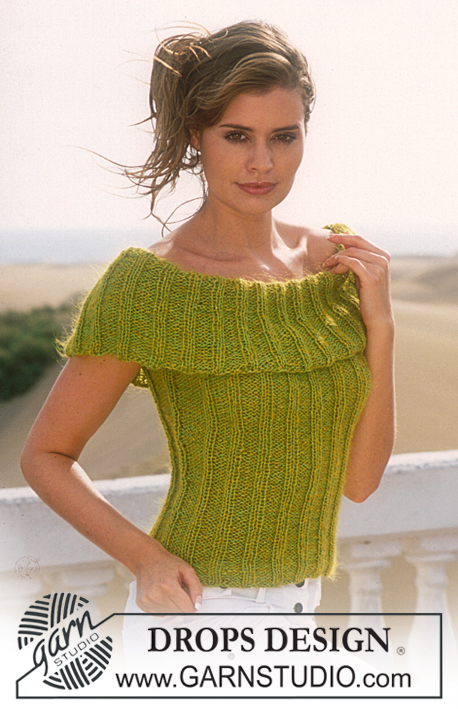
DROPS Cardigan in Alpaca with glitter
DROPS 88-4 |
||||||||||
|
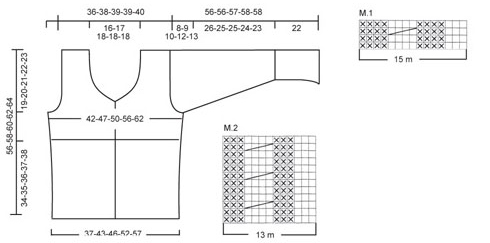
Knitting Tension: 3.5mm needle: 23 sts x 30 rows = 10 x 10 cm. 4.5mm needle: 20 sts x 26 rows = 10 x 10 cm Front band: knitted in garter stitch. Buttonholes: Make buttonholes on right front band from the right side as follows: K 1, K2 tog, yon. On next row knit yon. Make buttonholes as follows: XS/S: 10, 20, 30 and 40 cm S/M: 11, 21, 31 and 41 cm M/L: 10, 18, 26, 34 and 42 cm XL: 10, 19, 27, 35 and 43 cm XXL: 10, 18, 27, 36 and 45 cm Neckline: *knit until there’s 1 st left on needle, turn, put this st on thread*, repeat from *-* until finished measurements. Pattern: See chart M.1 and M.2. The pattern is seen from the right side and the entire pattern is knitted in stocking stitch. English translations for the wording in the diagram are given at the bottom of this pattern, and they are given in the vertical order in which they appear in the diagram. Body: The jumper is knitted back and forth on circular needles. Cast on 223-253-268-313-343 sts (incl 5 front band sts either side)on 3.5 needle and 1 thread Alpaca and 1 thread glitter. Purl one row and continue as follows: 5 front band sts in garter, M.1 over the next 210-240-255-300-330 sts, 3 sts in stocking stitch, 5 front band sts in garter. After 1 report of M.1 (4 rows), decrease the 4 purled sts to 3 = 195-221-234-273-299 sts. Continue as follows: 5 front band sts in garter, M.2 over the next 182-208-221-260-286 sts, 3 sts in stocking stitch, 5 front band sts in garter. Remember buttonholes! Read all of the next section before knitting it: Yoke: When piece measures approx 34-35-36-37-38 cm (adjust so that you’ve knitted one row after a cable) put the 5 front band sts either side on thread = 185-211-224-263-289 sts. Knit 1 row from the right side and 1 from wrong side (garter), change to needle 4.5mm and stocking sts and at the same time, decrease 17-23-24-39-41 sts evenly on row = 168-188-200-224-248 sts. Insert a marking thread 42-47-50-56-62 sts from each side = 84-94-100-112-124 sts between marking threads = back piece. Armhole: At the same time, when piece measures 37-38-39-40-41 cm, decrease 6-6-6-8-10 sts each side for armhole (i.e. 3-3-3-4-5 sts either side of the marking threads) = 78-88-94-104-114 sts on back piece and 39-44-47-52-57 sts on each front piece. Finish each piece separately. Back piece: = 78-88-94-104-114 sts. Decrease for armhole each side on every other row as follows: 2 sts 0-1-2-3-4 times and 1 st 3-4-4-7-9 times = 72-76-78-78-80 sts. When piece measures 54-56-58-60-62 cm, cast off middle 28-30-32-32-32 sts for neckline and finish each shoulder separately. Decrease 1 st on every other row twice = 20-21-21-21-22 sts left on shoulder. Cast off when piece measures 56-58-60-62-64 cm. Right Front: = 39-44-47-52-57 cm. Decrease for armhole as on back piece. At the same time, when piece measures 41-42-43-44-46 cm, put the 5-6-7-7-7 sts towards mid front on thread for neckline. Decrease to shape the neckline on every other row as follows: 2 st 2 times, 1 st 4 times; thereafter on every 4th row: 1 st 3 times. After all decreases for armhole and neck, there are 20-21-21-21-22 sts left on shoulder. Cast off when piece measures 56-58-60-62-64 cm. Left Front: as right, but mirrored. Sleeves: Back and forth on circular needle. Cast on 77-77-77-92-92 sts loosely on needle 3.5mm and 1 thread Alpaca and 1 thread Glitter. Purl one row and continue in M.1 with 1 edge st each side. After 1 report of M.1 (4 rows), decrease the 4 purled sts to 3 = 67-67-67-80-80 sts. Continue in M.2 with one edge st each side. When sleeve measures approx 20 cm (adjust so that you’ve knitted one row after a cable), knit one row from the right side and one from the wrong side (garter), change to needle 4.5mm and stocking sts whilst decreasing 13-9-7-18-16 sts evenly on row = 54-58-60-62-64 sts. At the same time, when sleeve measures 22 cm, increase 1 st each side every 4-3-2.5-2-1.5 cm a total of 7-8-9-11-13 times = 68-74-78-84-90 sts. When sleeve measures 48-47-47-46-45 cm, decrease for armhole each side on every other row as follows: 4 sts 1 time, 3 sts 1 time, 2 sts 2 times and 1 st 2-4-4-7-8 times. Thereafter decrease 2 sts each side until sleeve measures 55-55-56-57-57 cm. On next row decrease 3 sts each side and cast off remaining sts when sleeve measures approx 56-56-57-58-58 cm. To make up: Join shoulders. Front band: Put the 5 front band sts from one piece on needle 3.5mm. Knit approx 7-7-7-7-8 cm (to fit front piece up to neck line), put sts on thread and repeat on other front piece- remember button holes on right front piece. Sew on front bands to front pieces. Neck line: From the right side, pick up approx 116-128 sts (incl sts on thread at front)round neck line using 1 thread Alpaca and 1 thread Glitter and needle 3.5mm. Knit reverse stocking stitch, putting last st on thread on every row (see Neckline). At the same time, when neckline measures 2 cm, increase 1 st in every 4th st = approx 137-152 sts. When neckline measures 4 cm, put sts on thread back on needle and knit 1 row before casting off all sts. To ensure that the neckline doesn't become too tight, make a "yarn over needle" after every 8 sts whilst casting off – the yarn over needle is cast off like a st. Set in sleeves and join sleeve seams. Sew on buttons. Rosette: Use a remnant of Alpaca and Glitter (pictured: Alpaca colour no 3720, Glitter no 07) and crochet with 1 thread of each quality and crochet hook size 3.5. Crochet 4 ch and form a ring with a sl st. 1st round: 6 dc in ring and finish with a sl st in first dc 2nd round: 1 dc in first dc, *3 ch, 1 dc in next dc*, repeat from *-* a total of 5 times and finish with a sl st in first dc from beg of round = 6 ch-loops 3rd round: 1 ch, *1 dc, 1 ch, 1 tr, 1 ch, 1 dc* in each ch-loop and finish with a sl st in first ch from beg of round 4th round: *1 dc round dc from 2nd round (i.e. crochet round dc from behind the leaf), 5 ch*, repeat from *-* a total of 6 times and finish with a sl st in first dc from beg of round 5th round: 1 ch, *1 dc, 1 ch, 5 tr, 1 ch, 1 dc* in each ch-loop and finish with a sl st in first ch from beg of round 6th round: *1 dc round dc from 2nd round (as in round 4), 7 ch*, repeat from *-* a total of 6 times and finish with a sl st in first ch from beg of round 7th round: *1 dc, 1 ch, 1 tr, 5 dtr, 1 tr, 1 ch, 1 dc* in each ch-loop and finish with a sl st in first ch from beg of round 8th round: *1 dc round dc from 2nd round (as in round 4), 8 ch*, repeat from *-* a total of 6 times and finish with a sl st in first dc from beg of round 9th round: 1 ch, *1 dc, 1 ch, 1 tr, 3 dtr, 1 ttr, 3 dtr, 1 tr, 1 ch, 1 dc* in each ch-loop and finish with a sl st in first ch from beg of round. Cut the thread and attach rosette to cardigan. |
||||||||||
Diagram explanations |
||||||||||
|
||||||||||
 |
||||||||||
Have you finished this pattern?Tag your pictures with #dropspattern or submit them to the #dropsfan gallery. Do you need help with this pattern?You'll find 32 tutorial videos, a Comments/Questions area and more by visiting the pattern on garnstudio.com. © 1982-2026 DROPS Design A/S. We reserve all rights. This document, including all its sub-sections, has copyrights. Read more about what you can do with our patterns at the bottom of each pattern on our site. |
||||||||||


With over 40 years in knitting and crochet design, DROPS Design offers one of the most extensive collections of free patterns on the internet - translated to 17 languages. As of today we count 324 catalogues and 12290 patterns translated into English (UK/cm). 12290
We work hard to bring you the best knitting and crochet have to offer, inspiration and advice as well as great quality yarns at incredible prices! Would you like to use our patterns for other than personal use? You can read what you are allowed to do in the Copyright text at the bottom of all our patterns. Happy crafting!
Post a comment to pattern DROPS 88-4
We would love to hear what you have to say about this pattern!
If you want to leave a question, please make sure you select the correct category in the form below, to speed up the answering process. Required fields are marked *.