
Popular categories
Looking for a yarn?


Comments / Questions (9)
![]() Silke wrote:
Silke wrote:
Moin, in der Anleitung vor dem Bund steht: „In der nächsten Hin-Reihe beginnt das Rippenmuster und GLEICHZEITIG werden 46-54-58-62-66-74 Maschen gleichmäßig verteilt zugenommen“. Soviel Zunahme beim Bund? Ist das richtig?
01.04.2026 - 09:32DROPS Design answered:
Liebe Silke, ja soviele braucht man damit das Bündchen die Arbeit nicht zusammenzieht, man braucht mehr Maschen für das Rippenmuster mit den kleineren Nadeln als für das Glattrechts mit den grösseren Nadeln. Viel Spaß beim Stricken!
07.04.2026 - 16:05
![]() Brigitte Poignonnec wrote:
Brigitte Poignonnec wrote:
Bonjour, je ne comprends pas votre réponse car vous m indiquez que pour A1 on met 1m devant et pour A2 les 2 m derrière, or la correction mentionne 2 m derrière pour A1 et 1m devant pour A2.
19.03.2025 - 16:43DROPS Design answered:
Bonjour Mme Poignonnec, vous avez raison, autrement dit, suivez simplement la légende des diagrammes qui est juste :) Désolée pour la confusion. Bon tricot!
20.03.2025 - 10:24
![]() Brigitte Poignonnec wrote:
Brigitte Poignonnec wrote:
Bonjour, il y a une erreur sur les explications pour l échantillon. Si l échantillon est trop petit, donc avec pas assez de mailles, ce sont des aiguilles plus grosses qu il faut utiliser et non le contraire comme c est écrit.Pouvez vous confirmer également que pour A1 c est une maille sur l aiguille torsade et non 2 comme indiqué sur le modèle. Je viens de voir cela sur les commentaires après avoir eu un doute et devoir détricoter ce que je viens de faire.
19.03.2025 - 10:32DROPS Design answered:
Bonjour Mme Poignonnec, si vous avez trop de mailles pour 10 cm, c'est que vos mailles sont trop petites et que vous devez essayer avec des aiguilles plus grosses pour les "agrandir", mais si vous n'avez pas assez de mailles pour 10 cm, vous devez alors utiliser des aiguilles plus petites pour les "rétrécir" et ainsi - dans les 2 cas obtenir l'échantillon - retrouvez plus d'infos ici. La légende des diagrammes a été corrigée, A.1 et A.2 sont donc justes ainsi: dans A.1 on met 1 m devant et dans A.2 les 2 m derrière pour tricoter 1 maille (qui sera devant).. Bon tricot!
19.03.2025 - 16:06
![]() Jacobs wrote:
Jacobs wrote:
Alors moi je dis des points à la place de dire des mailles, donc je pense que vous m’avez compris. Excusez-moi pour l’erreur. Bonne journée.
18.03.2025 - 11:33
![]() Jacobs Patricia wrote:
Jacobs Patricia wrote:
Bonjour, je vois qu’il y a encore des erreurs dans le modèle à partir de l’augmentation à 182pour la taille M. Ce n’est pas augmenter 22 points avec le point fantaisie c’est 23 et dans la taille SMl en dessous c’est aussi 23 fois et non pas 22 fois sinon il nous reste trop de points. Et avec une augmentation de plus ça tombe pile, c’est le deuxième modèle que je fais avec vous et je trouve souvent des erreurs dans les explications. Bonne journée.
18.03.2025 - 11:28DROPS Design answered:
Bonjour Mme Jacobs, vous ne devez pas tricoter 21-22-23 fois (en taille S-M-L) le diagramme A.3 mais 21-22-23 fois (3 m jersey puis le diagramme A.3), ainsi vous augmenterez 21-22-23 fois 2 mailles dans chaque A.3 et vous aurez bien de 126-136-146 +(2x21-22-23)=168-180-192 mailles. Bon tricot!
18.03.2025 - 16:55
![]() Jacobs Patricia wrote:
Jacobs Patricia wrote:
Donc il y a une erreur dans le A1, c’est une maille derrière et pas 2 mailles derrière.!! comme le précise le commentaire avant moi !!!
10.03.2025 - 15:53DROPS Design answered:
Bonjour Mme Jacobs, effectivement, merci pour l info.
11.03.2025 - 17:01
![]() Jacobs Patricia wrote:
Jacobs Patricia wrote:
Bonjour, ce que je ne comprends pas sur le modèle c’est le début I-CORD quand le premier. Point et le dernier, on passe le fil comme si qu’on tricoter à l’envers et après on tricote le suivant à l’endroit mais quand je fais la ligne suivante, je me retrouve avec une jetée donc je crois que je dois me tromper quelque part, je ne comprends pas merci de m’expliquer correctement, j’ai essayé plusieurs choses mais je ne comprends pas. Cordialement. Patricia jacobs
10.03.2025 - 09:10DROPS Design answered:
Bonjour Mme Jacobs, retrouvez dans cette vidéo comment tricoter ces mailles: les 2 premières mailles du rang sont les mailles I-cord suivies de 4 mailles point mousse, et on termine par 4 mailles point mousse + les 2 dernières mailles I-cord, à la fois sur l'endroit et sur l'envers. Vous ne devez pas avoir de jeté, on doit simplement glisser 1 maille comme pour la tricoter à l'envers en mettant le fil devant, puis remettez le fil derrière pour tricoter la maille suivante. Bon tricot!
10.03.2025 - 13:20
![]() Tove Hansen wrote:
Tove Hansen wrote:
Den er bare så smuk.
06.03.2025 - 18:53
![]() Dina wrote:
Dina wrote:
Buongiorno, il diagramma A1 è lavorato su 4 maglie mentre A2 è lavorato su 3 maglie?
26.02.2025 - 08:44DROPS Design answered:
Buongiorno, entrambi i diagrammi sono su 3 maglie. Buon lavoro!
28.02.2025 - 15:26
|
||||||||||||||||
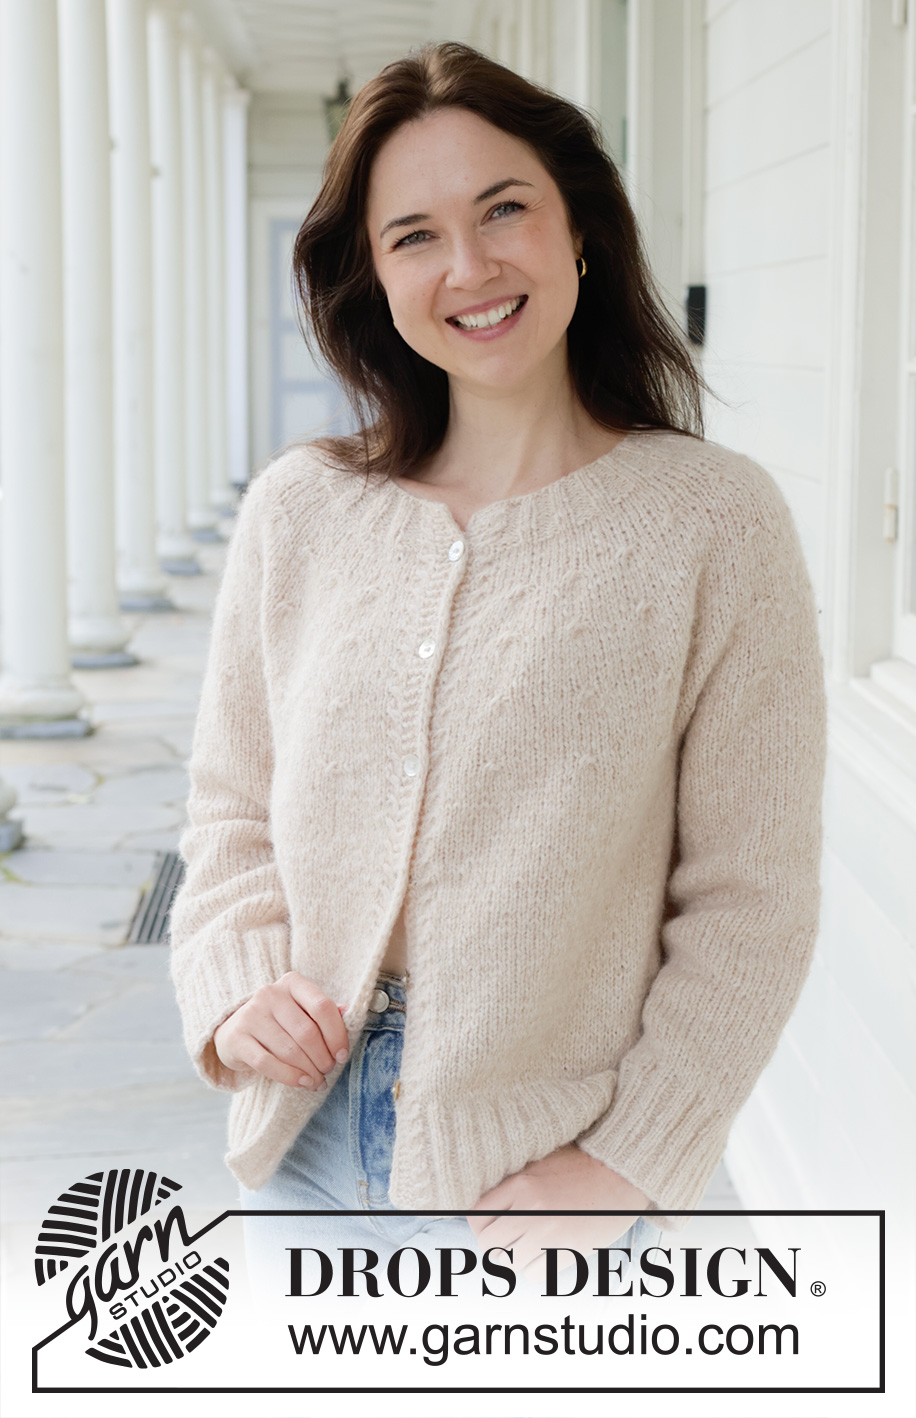
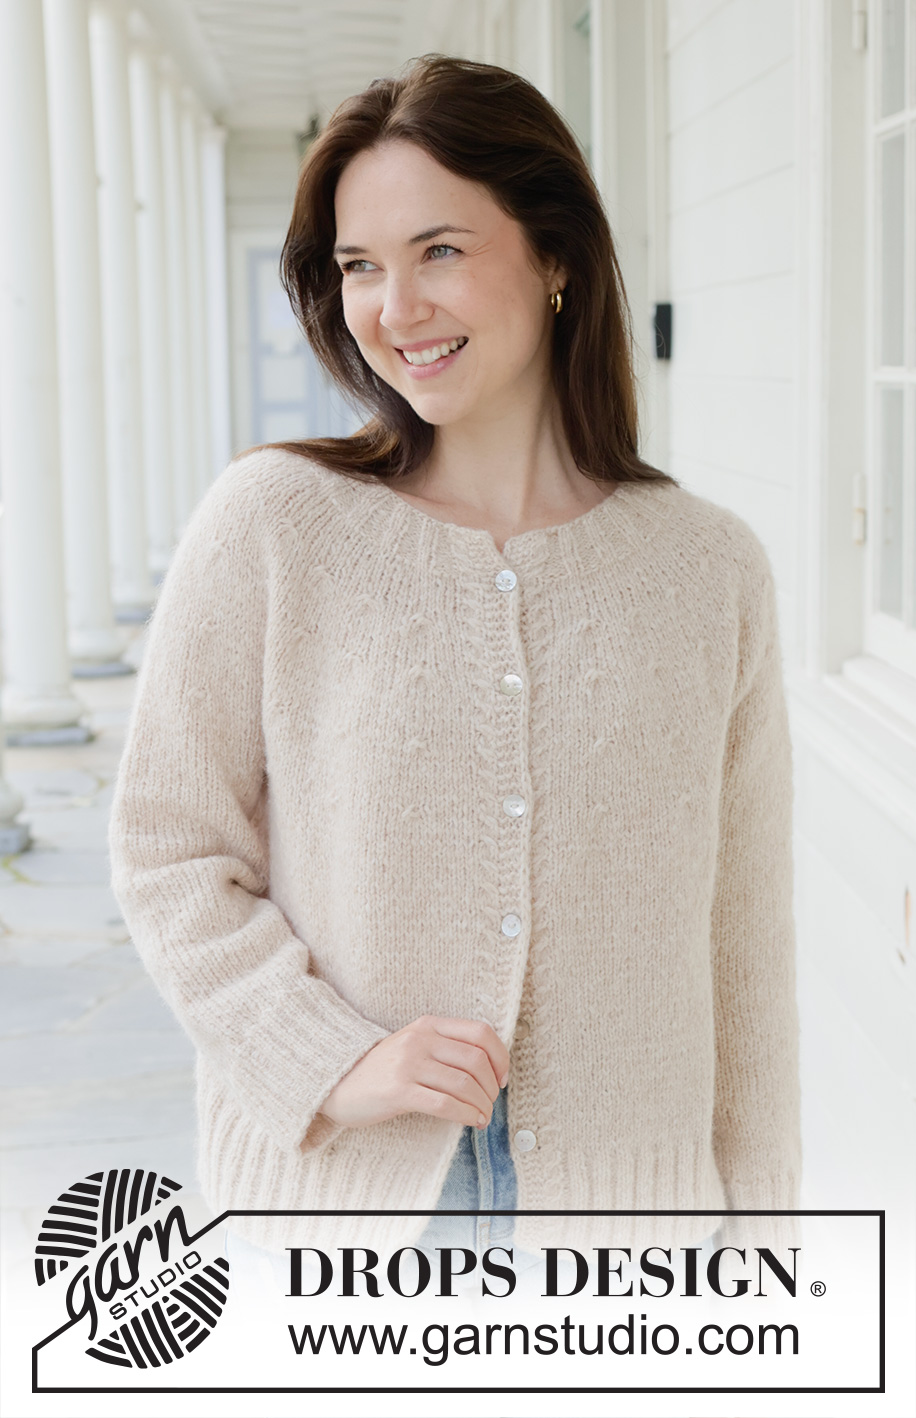
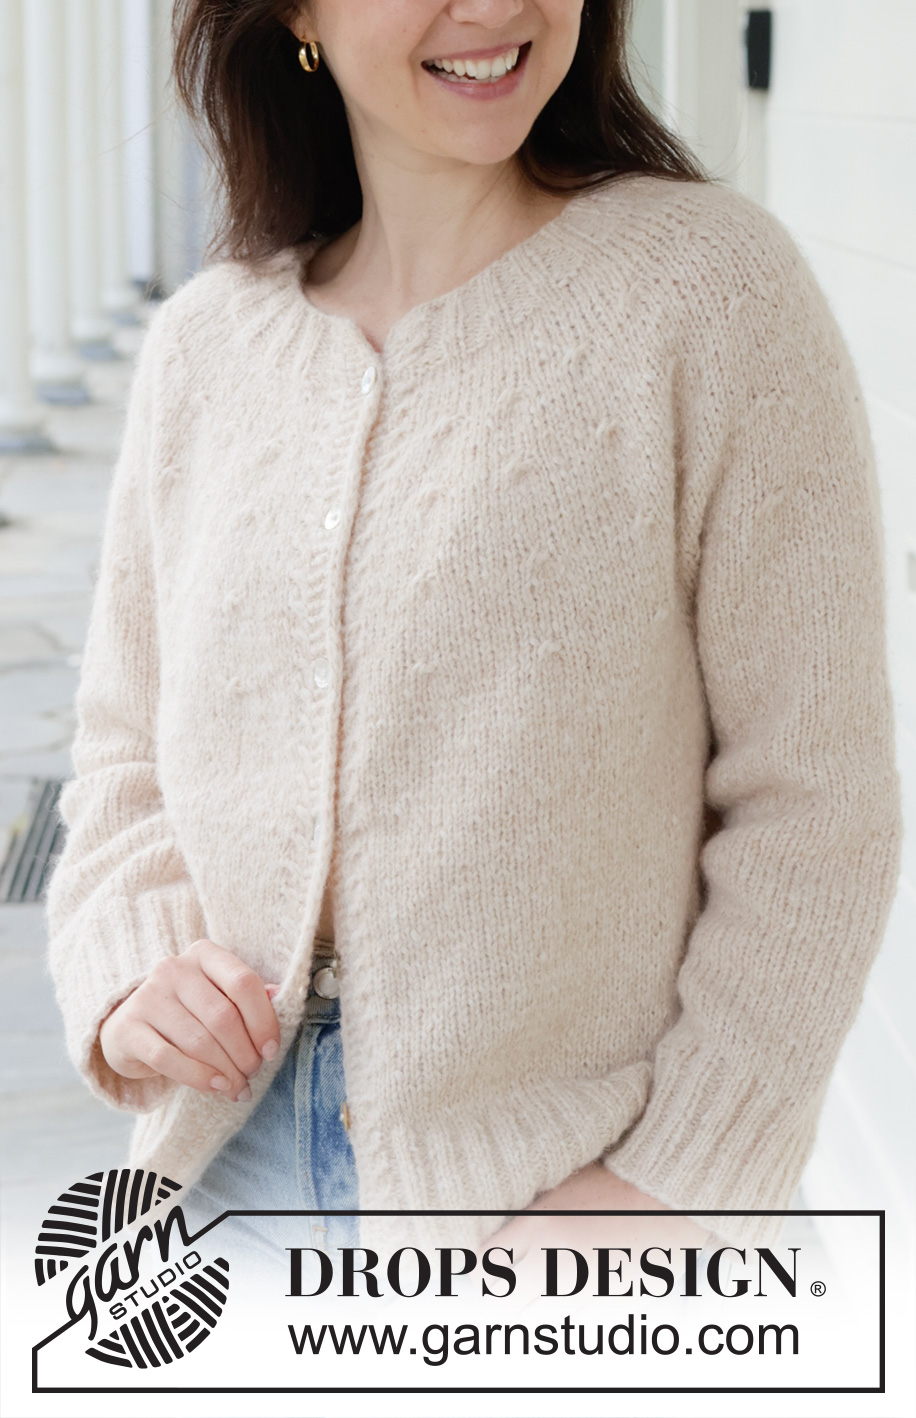
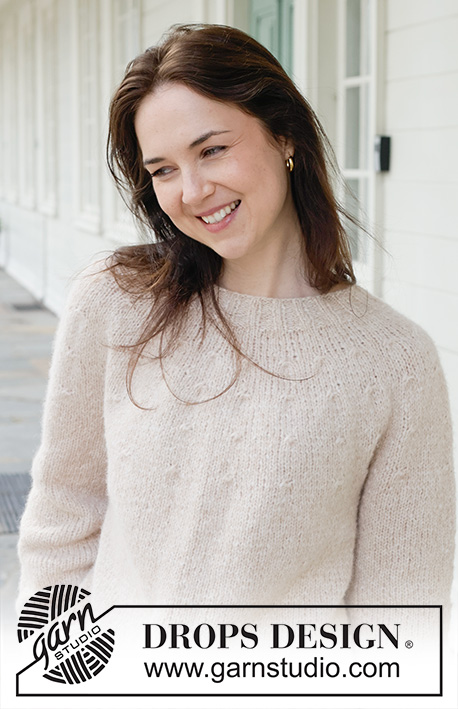
Whispering Sands Cardigan#whisperingsandscardigan |
||||||||||||||||
 |
 |
|||||||||||||||
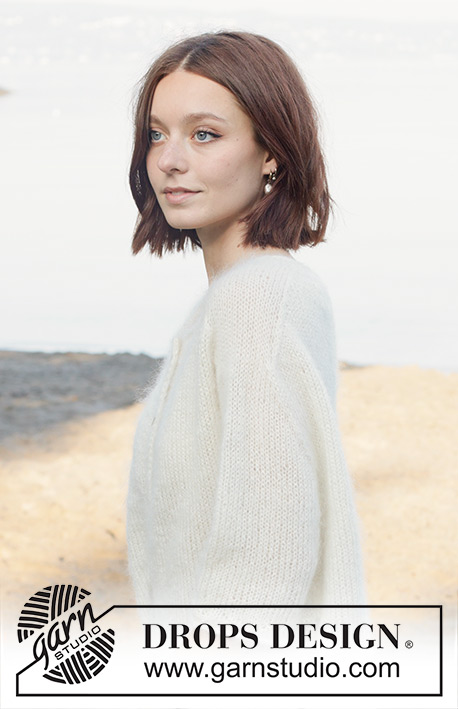
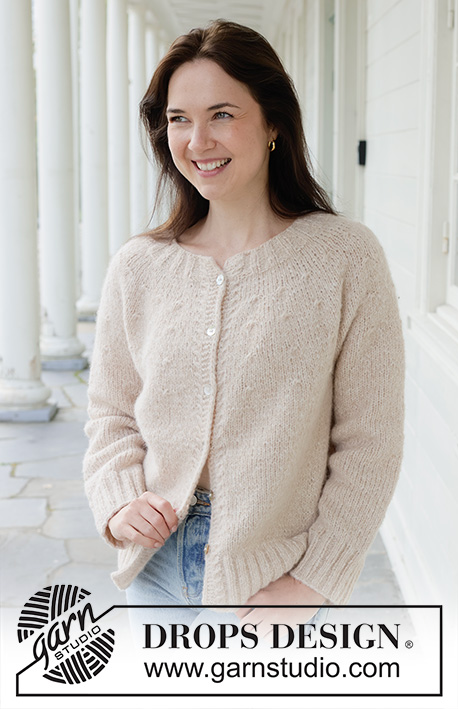
Knitted jacket in DROPS Air. The piece is worked top down in stocking stitch with round yoke, small cables and I-cord. Sizes S - XXXL.
DROPS 258-31 |
||||||||||||||||
|
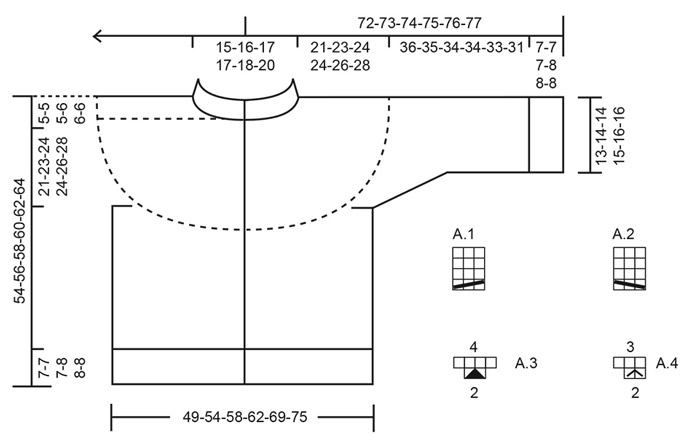
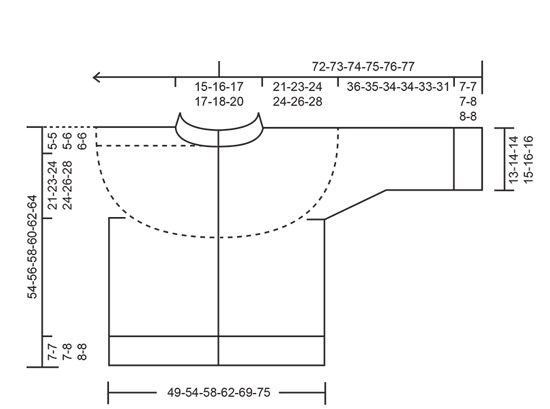
------------------------------------------------------- EXPLANATIONS FOR THE PATTERN: ------------------------------------------------------- GARTER STITCH (worked back and forth): Knit all rows, from both the right and wrong side. 1 ridge in height = knit 2 rows. BANDS WITH I-CORD BEGINNING OF ROW: Slip 1 stitch purl-wise with strand in front, knit 1, work 4 garter stitches. END OF ROW: Work until there are 6 stitches left on the row, work 4 garter stitches, slip 1 stitch purl-wise with strand in front, knit 1. Work in the same way from both the right and wrong side. PATTERN: See diagrams A.1 to A.4. The diagrams show the pattern from the right side. A.3 and A.4 include increases: A.3 = 2 increased stitches and A.4 = 1 increased stitch. BUTTONHOLES: Work the buttonholes on the right band (when garment is worn), from right side, when there are 5 stitches left on the row. ROW 1 (right side): Make 1 yarn over, knit 2 together, knit 1, slip 1 purl-wise with strand in front, knit 1. ROW 2 (wrong side): Work the band as before, knit the yarn over to leave a hole. The first buttonhole is worked on the first row from the right side after the neck is finished. Then the other 5-5-5-6-6-6 buttonholes are worked with 8½-9-9-7½-8-8½ cm between each one. The bottom buttonhole is in the transition between the stocking stitch and rib. INCREASE TIP (evenly spaced): To work out how to increase evenly, count the total number of stitches on the needle (e.g., 131 stitches) minus bands and cables (e.g., 18 stitches) and divide the remaining stitches by the number of increases to be made (e.g., 5) = 22.6. In this example, increase by making 1 yarn over after alternately each 22nd and 23rd stitch. Do not increase across bands or cables. On the next row work the yarn overs twisted to avoid holes. DECREASE TIP (for sleeves): Decrease 1 stitch on each side of the marker-thread as follows: Work until there are 3 stitches left before the marker-thread, knit 2 together, knit 2 (marker-thread sits between these 2 stitches), slip 1 stitch knit-wise, knit 1 and pass the slipped stitch over the knitted stitch (2 stitches decreased). SLEEVE TIP: When knitting up stitches under the sleeves you can be left with small holes in the transition between body and sleeves. These can be closed by picking up the strand between 2 stitches and working it twisted together with the next stitch. ------------------------------------------------------- START THE PIECE HERE: ------------------------------------------------------- JACKET – SHORT OVERVIEW OF THE PIECE. The pattern uses both long and short needles; start with the length which fits the number of stitches and change when necessary. The neck and yoke are worked back and forth with circular needle, from mid front and top down. When the yoke is finished, it is divided for the body and sleeves and the body continued back and forth, while the sleeves wait. The sleeves are worked in the round, top down. If there is a «0» in your chosen size, skip the information and go straight to the next instruction. NECK: Cast on 104-108-112-116-120-128 stitches with circular needle size 3.5 mm and DROPS Air. Purl 1 row from the wrong side, then work as follows from the right side: 6 stitches according to BANDS WITH I-CORD – read description above, work A.1, rib (purl 2, knit 2) until there are 11 stitches left on the row, purl 2, work A.2 and 6 stitches according to bands with I-cord. Continue this rib back and forth for 3-3-3-4-4-4 cm. On the next row increase 22-23-24-25-26-28 stitches by making 1 yarn over after each purled section (seen from the right side) = 126-131-136-141-146-156 stitches. Continue the new rib (knit 2, purl 3 from the right side, working the yarn overs twisted on the first row to avoid holes) until the neck measures 4-4-4-5-5-5 cm from the cast-on edge. Insert 1 marker inside one band; the piece is now measured from here. YOKE: Change to circular needle size 5 mm. Work the first row from the right side as follows: Work the band and cable as before (= 9 stitches), work 108-113-118-123-128-138 stocking stitches increasing 0-5-10-5-10-10 stitches evenly across these stitches – read INCREASE TIP, work the cable and band as before – remember the BUTTONHOLES – read description above = 126-136-146-146-156-166 stitches. Continue with stocking stitch, bands and cables. Remember to maintain the knitting tension. When the yoke measures 4-4-4-5-5-5 cm from the marker, increase by working PATTERN – read description above, as follows: Work band and cable as before, * 3 stocking stitches, A.3 *, work from *-* a total of 21-23-25-25-27-29 times, 3 stocking stitches, the cable and band as before = 168-182-196-196-210-224 stitches. Continue with stocking stitch, bands and cables until the yoke measures 8-8-9-10-10-10 cm from the marker. Work as follows from the right side: The band and cable as before, 4 stocking stitches, * A.3, 5 stocking stitches *, work from *-* a total of 20-22-24-24-26-28 times, A.3, 4 stocking stitches, the cable and band as before = 210-228-246-246-264-282 stitches. Continue with stocking stitch, bands and cables until the yoke measures 12-13-14-15-15-16 cm from the marker. FIND YOUR SIZE: Continue as described for your size below. SIZES S-M-L: Work the band and cable as before, 5 stocking stitches, * A.4, 7 stocking stitches *, work from *-* a total of 20-22-24 times, A.4, 5 stocking stitches, the cable and band as before = 231-251-271 stitches. Go to ALL SIZES. SIZES XL-XXL-XXXL: Work the band and cable as before, 5 stocking stitches, * A.3, 7 stocking stitches *, work from *-* a total of 24-26-28 times, A.3, 5 stocking stitches, the cable and band as before = 296-318-340 stitches. Go to ALL SIZES. ALL SIZES: Continue with stocking stitch, bands and cables until the yoke measures 16-18-19-20-20-22 cm from the marker. Work as follows from the right side: The band and cable as before, 5-5-5-6-6-6 stocking stitches, * A.4, 8-8-8-9-9-9 stocking stitches *, work from *-* a total of 20-22-24-24-26-28 times, A.4, 6-6-6-6-6-6 stocking stitches, the cable and band as before = 252-274-296-321-345-369 stitches. When the yoke measures 18-20-20-22-22-24 cm from the marker, increase 6-4-4-5-5-9 stitches evenly spaced – remember INCREASE TIP = 258-278-300-326-350-378 stitches. Continue with stocking stitch, bands and cables. When the yoke measures 21-23-24-24-26-28 cm from the marker, divide for the body and sleeves. DIVIDE FOR BODY AND SLEEVES: Work 45-49-51-55-60-65 stitches as before (= front piece), place the next 46-48-55-60-62-66 stitches on a thread for the sleeve, cast on 8-8-10-10-12-12 stitches (under the sleeve), work 76-84-88-96-106-116 stocking stitches (= back piece), place the next 46-48-55-60-62-66 stitches on a thread for the sleeve, cast on 8-8-10-10-12-12 stitches (under the sleeve), work the last 45-49-51-55-60-65 stitches as before (= front piece). The body and sleeves are finished separately. BODY: = 182-198-210-226-250-270 stitches. Continue with stocking stitch, bands and cables until the piece measures 42-44-46-46-48-50 cm from the marker. On the next row begin the rib and increase 46-54-58-62-66-74 stitches evenly as follows = 228-252-268-288-316-344 stitches: Change to circular needle size 3.5 mm, work the band and cable as before, rib (purl 2, knit 2 – remember to increase) until there are 11 stitches left on the row, purl 2, the cable and band as before. When the rib measures 7-7-7-8-8-8 cm, cast off a little loosely. The jacket measures approx. 49-51-53-54-56-58 cm from the marker and 54-56-58-60-62-64 cm from top of shoulder. SLEEVES: Place the 46-48-55-60-62-66 sleeve-stitches from one thread on circular needle size 5 mm and knit up 1 stitch in each of the 8-8-10-10-12-12 stitches cast on under the sleeve = 54-56-65-70-74-78 stitches. Insert a marker-thread in the middle of the 8-8-10-10-12-12 stitches under the sleeve. Start at the marker-thread and work stocking stitch in the round. When the sleeve measures 4-4-3-3-3-2 cm, decrease 2 stitches under the sleeve – read DECREASE TIP. Decrease like this every 7-7-3½-3-2½-2½ cm a total of 5-5-9-10-11-12 times = 44-46-47-50-52-54 stitches. Continue working until the sleeve measures 36-35-34-34-33-31 cm from the division. Change to double pointed needles size 3.5 mm. Work rib (knit 2, purl 2), AT THE SAME TIME increase 12-14-13-14-16-14 stitches evenly on the first round = 56-60-60-64-68-68 stitches. When the rib measures 7-7-7-8-8-8 cm, cast off a little loosely. The sleeve measures approx. 43-42-41-42-41-39 cm. ASSEMBLY: Sew the buttons onto the left band. |
||||||||||||||||
Diagram explanations |
||||||||||||||||
|
||||||||||||||||
 |
||||||||||||||||
 |
||||||||||||||||
Have you finished this pattern?Tag your pictures with #dropspattern #whisperingsandscardigan or submit them to the #dropsfan gallery. Do you need help with this pattern?You'll find 36 tutorial videos, a Comments/Questions area and more by visiting the pattern on garnstudio.com. © 1982-2026 DROPS Design A/S. We reserve all rights. This document, including all its sub-sections, has copyrights. Read more about what you can do with our patterns at the bottom of each pattern on our site. |
||||||||||||||||


With over 40 years in knitting and crochet design, DROPS Design offers one of the most extensive collections of free patterns on the internet - translated to 17 languages. As of today we count 324 catalogues and 12290 patterns translated into English (UK/cm). 12290
We work hard to bring you the best knitting and crochet have to offer, inspiration and advice as well as great quality yarns at incredible prices! Would you like to use our patterns for other than personal use? You can read what you are allowed to do in the Copyright text at the bottom of all our patterns. Happy crafting!
Post a comment to pattern DROPS 258-31
We would love to hear what you have to say about this pattern!
If you want to leave a question, please make sure you select the correct category in the form below, to speed up the answering process. Required fields are marked *.