
Popular categories
Looking for a yarn?


Comments / Questions (20)
![]() Francoise wrote:
Francoise wrote:
Je ne comprends pas les explications pour le biais des épaules. Il suffit de rabattre les mailles en prenant soin de ne pas faire d’escalier (ne pas tricoter la dernière maille du rang concerné )
18.06.2025 - 10:30DROPS Design answered:
Re-bonjour Françoise, vous pouvez tout à fait procéder ainsi si vous le préférez, à vous de voir. Bon tricot!
18.06.2025 - 16:18
![]() Francoise wrote:
Francoise wrote:
Je ne comprends pas les explications pour le biais des épaules, pourquoi ne pas faire comme pour le dos ?
18.06.2025 - 10:24DROPS Design answered:
Bonjour Françoise, le biais des épaules se fait de la même façon sur les devants et sur le dos - pour le biais de l'épaule droite du dos, vous avez mis en attente les mailles en début de rang à partir de l'emmanchure = en début de rang sur l'endroit; pour le devant droit, vous mettrez les mailles en attente en début de rang sur l'envers = à partir de l'emmanchure. Bon tricot!
18.06.2025 - 16:18
![]() Femke Zwegers wrote:
Femke Zwegers wrote:
Ik heb een vraag over het stuk hals en diagonale schouders. Ik zie niet hoe deze al gedaan kunnen worden (er wordt gesproken van een armsgat) als alleen het achterpand af is en begrijp dus niet welk onderdeel hiermee gemaakt/bedoeld wordt. Na 'Achterband' is het achterpand, inclusief schouders, toch al afgerond?
18.03.2025 - 17:21DROPS Design answered:
Dag Femke,
Nadat je voor het achterpand aan beide kanten hebt afgekant voor de armsgaten brei je verder tot de hals en kant je de middelste steken af. Dan brei je beide kanten apart verder. Die beide kanten die je apart verder breit zijn de diagonale schouders. In de 2 paragrafen die volgen na het achterpand staat beschreven hoe je aan de kant van de hals breit en hoe je de diagonale schouder breit.
18.03.2025 - 20:00
![]() Katrin wrote:
Katrin wrote:
Ich habe es aus Versehen nicht als Frage gepostet: Ich habe eine Frage zu den V-Ausschnitt-Abnahmen (Größe M). Nach 33 cm soll in der folgenden Hinreihe mit den Abnahmen begonnen werden, also nehme ich dieser Reihe schon eine Masche ab. Dann eine Abnahme in der nächsten 4. Reihe, dann 12 Abnahmen in jeder 2. Reihe und dann 3 Abnahmen in jeder 4. Reihe. Damit käme ich mit der ersten Abnahme auf 17 Abnahmen insgesamt anstatt der 16 aus der Anleitung. Habe ich da etwas missverstanden?
23.01.2025 - 15:23DROPS Design answered:
Liebe Kathrin, nach der 1. Abnahmen nach 33 cm stricken Sie 3 Reihen ohne Abnahmen, dann beginnen Sie die 12 Abnahmen in jeder 2. Reihe/in jeder Hin-Reihe, dann nehmen Sie in jeder 4. Reihe ab = 16 Abnahmen. Viel Spaß beim Stricken!
24.01.2025 - 08:07
![]() Katrin wrote:
Katrin wrote:
Ich habe eine Frage zu den V-Ausschnitt-Abnahmen (Größe M). Nach 33 cm soll in der folgenden Hinreihe mit den Abnahmen begonnen werden, also nehme ich dieser Reihe schon eine Masche ab. Dann eine Abnahme in der nächsten 4. Reihe, dann 12 Abnahmen in jeder 2. Reihe und dann 3 Abnahmen in jeder 4. Reihe. Damit käme ich mit der ersten Abnahme auf 17 Abnahmen insgesamt anstatt der 16 aus der Anleitung. Habe ich da etwas missverstanden?
23.01.2025 - 14:45
![]() Sandrine wrote:
Sandrine wrote:
Bonjour, je ne comprends pas comment se construit le biais de l'épaule. Je découvre cette nouvelle construction et serais heureuse que vous m'apportiez les explications afin de réussir. Cordialement Sandrine.
27.03.2024 - 09:58DROPS Design answered:
Bonjour Sandrine, vous allez tricoter des rangs raccourcis en mettant les mailles de l'épaule en début de rang à partir de l'emmanchure (sur l'endroit épaule droite dos/épaule gauche devant - sur l'envers épaule gauche dos/droite devant). Dans cette vidéo, nous montrons (pour un autre modèle = nombre de mailles différent) comment procéder. Bon tricot!
02.04.2024 - 10:51
![]() Nariman wrote:
Nariman wrote:
Sollen wir für den V Ausschnitt (Vorderteil) immer an der selben Stelle (11 Masche) eine Masche abnehmen oder sollen wir die Abnahme auf dem Vorderteil verteilen. Bsp. Einmal an Stelle 11 M dann 20M dann 30M …
24.02.2024 - 17:31DROPS Design answered:
Liebe Frau Nariman, die Abnahmen für den V-Halsausschnitt werden immer innerhalb die 10 ersten Maschen (rechtes Vorderteil) / die 10 letzten Maschen (linkes Vorderteil) gestrickt; Viel Spaß beim stricken!
26.02.2024 - 08:29
![]() Paula wrote:
Paula wrote:
Hei, En ymmärrä, miten olan viistotus tehdään.
18.02.2024 - 17:18DROPS Design answered:
Olan viistotus tehdään siten, että silmukoita siirretään apulangalle kerroksen lopussa (silmukat neulotaan ennen kuin niitä siirretään apulangalle). Tämän jälkeen työ käännetään ja sitten neulotaan takaisin.
20.03.2024 - 17:27
![]() Nariman wrote:
Nariman wrote:
Ich habe das Rückenteil wie beschrieben gestrickt sowie die mittleren Maschen für den Halsausschnitt abgekettet und verstehe nicht warum ich jetzt danach nur 1 Masche abketten muss die am Halsrand beginnt.
06.02.2024 - 14:36DROPS Design answered:
Liebe Nariman, für den Halsausschnitt wird man zuerst die mittleren 29 - 31 Maschen (siehe Größe) abketten, dann noch 1 Masche beidseitig von diesen Maschen, jede Schulter strickt man separat weiter und am Anfang der nächsten Reihe ab Halsausschnitt (Rückreihe für rechte Schulter/Hinreihe für linke Schulter) wird noch 1 Masche abgekettet, gleichzeitig stricken Sie die diagonale Schulter am Anfang jeder Reihe ab Armausschnitt weiter. Viel Spaß beim stricken!
07.02.2024 - 08:02
![]() Siobhan Schömig wrote:
Siobhan Schömig wrote:
Hallo, ich bin grade beim V-Ausschnitt des rechten Vorderteils und hab die erste Masche in einer Hinreihe abgenommen wie beschrieben. Jetzt steht dieses in der folgenden 4. Reihe wiederholen. Das wäre aber eine Rückreihe. Ist das richtig? Oder ist damit gemeint und der folgenden 4. Hinreihe?
14.09.2023 - 10:52DROPS Design answered:
Liebe Frau Schömig, nach dieser Abnahmen-Reihe stricken Sie jetzt 3 Reihen ohne Abnahmen, und bei der nächsten Reihe = eine Hin-Reihe, nehmen Sie noch einmal wieder ab. Viel Spaß beim stricken!
14.09.2023 - 17:12
|
||||
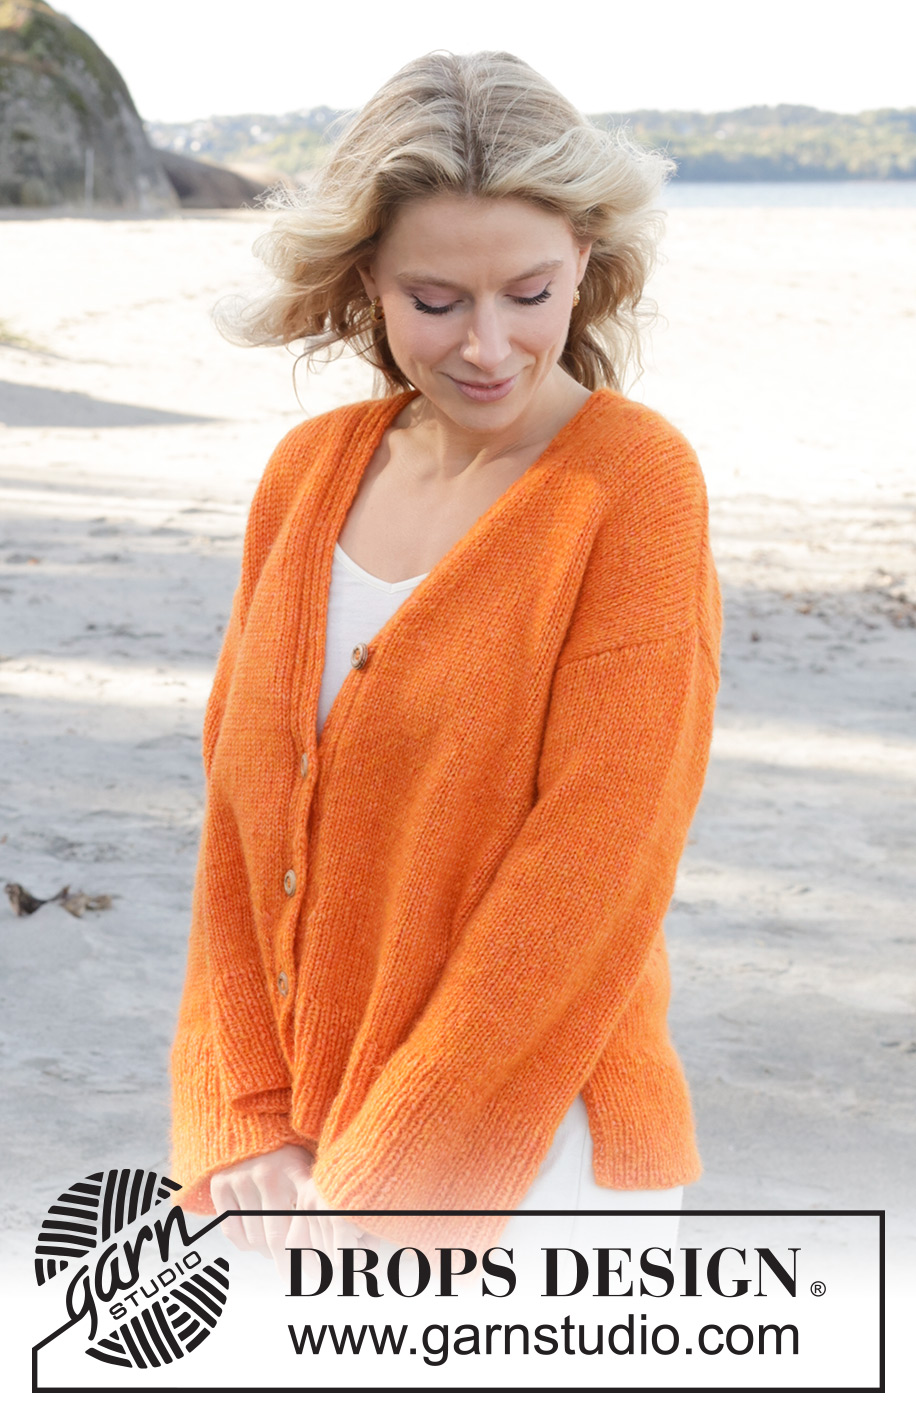
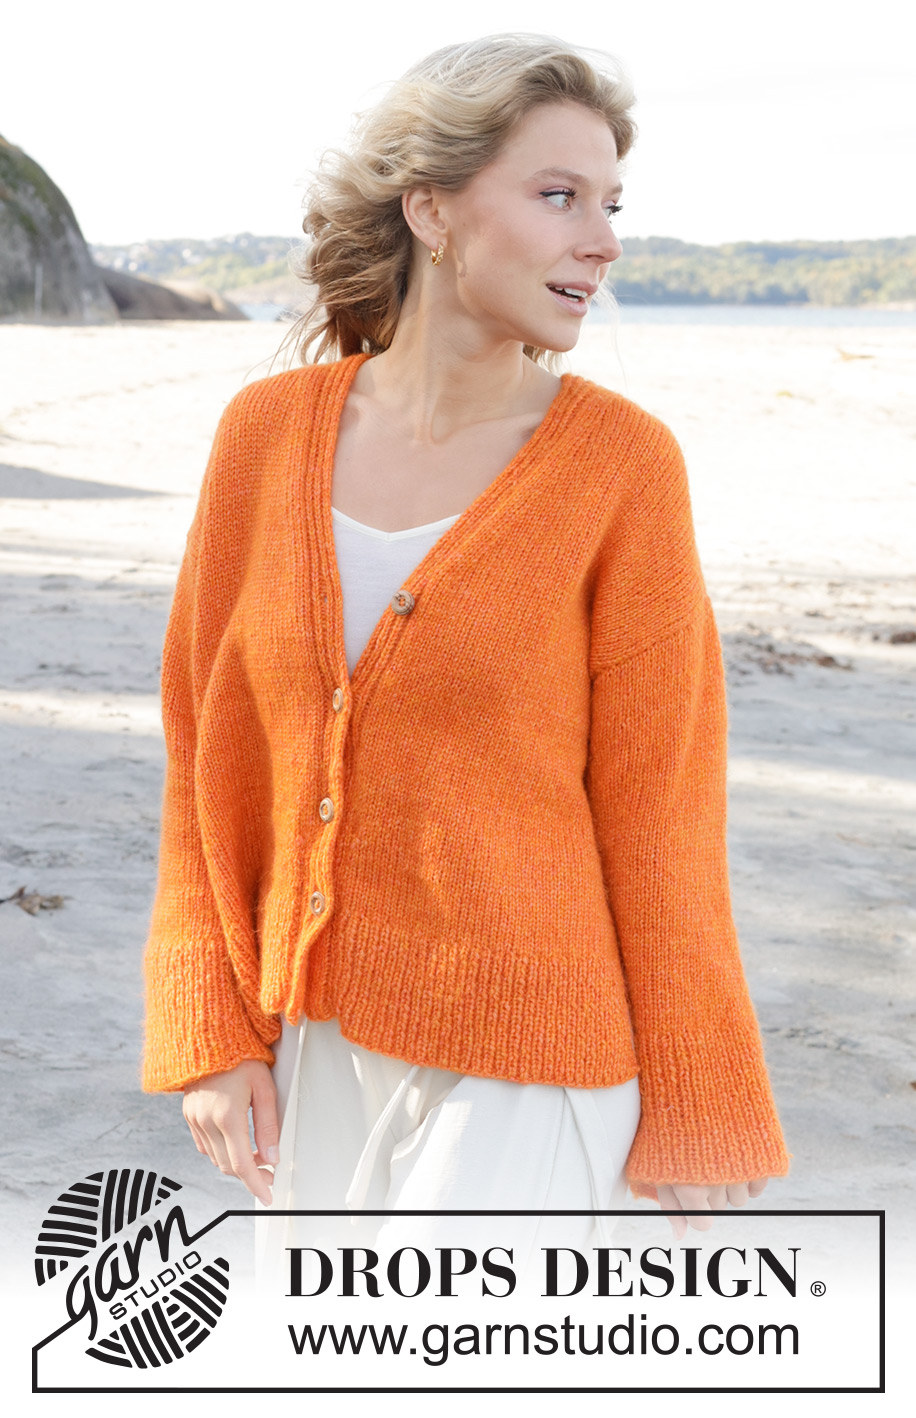
October Sun#octobersuncardigan |
||||
 |
 |
|||
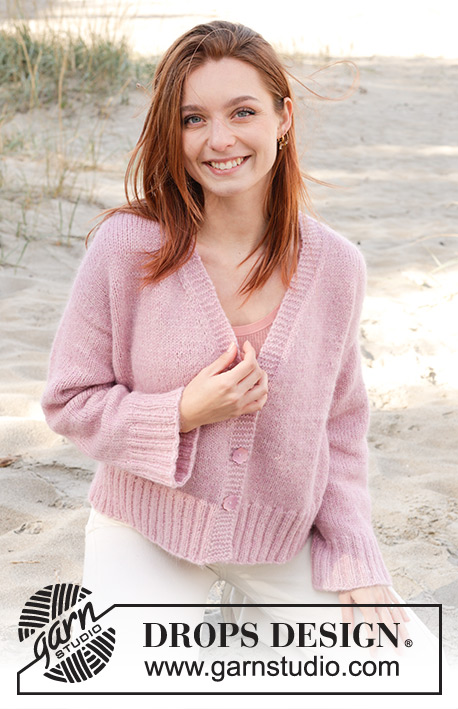
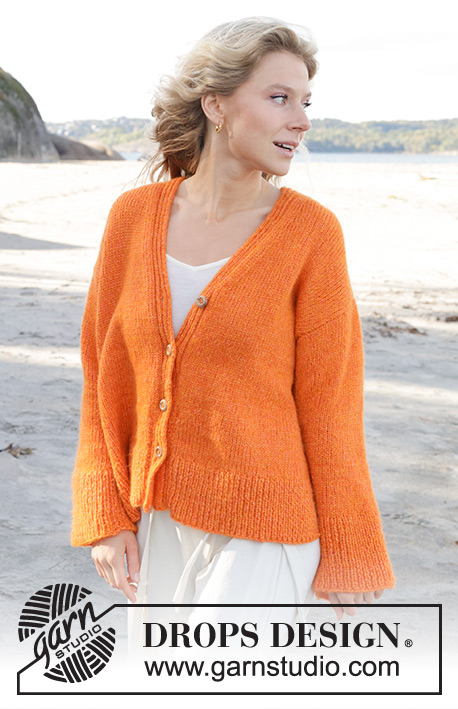
Knitted jacket in DROPS Air. The piece is worked bottom up with diagonal shoulders and split in the sides. Sizes S - XXXL.
DROPS 240-20 |
||||
|
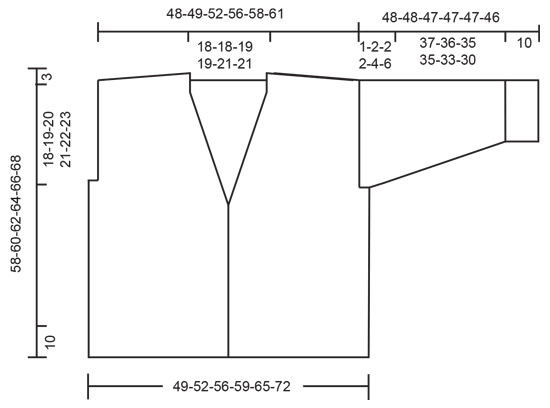
------------------------------------------------------- EXPLANATIONS FOR THE PATTERN: ------------------------------------------------------- RIDGE/GARTER STITCH (worked back and forth): Knit all rows. 1 ridge = knit 2 rows. BUTTONHOLES: Work the buttonholes on the right band. 1 BUTTONHOLE = knit together the 3rd and 4th stitch from the edge and make 1 yarn over. On the next row knit the yarn over to leave a hole. Work buttonholes when the piece measures: S: 11, 18, 25, 31 cm M: 11, 18, 25, 32 cm L: 11, 18, 25, 33 cm XL: 11, 18, 26, 34 cm XXL: 11, 19, 27, 35 cm XXXL: 11, 19, 27, 36 cm DECREASE TIP (for sleeves): Decrease 1 stitch on either side of the marker-thread as follows: Work until there are 3 stitches left before the marker-thread, knit 2 together, knit 2 (marker-thread sits between these 2 stitches), slip 1 stitch as if to knit, knit 1 and pass the slipped stitch over the knitted stitch. ------------------------------------------------------- START THE PIECE HERE: ------------------------------------------------------- JACKET – SHORT OVERVIEW OF THE PIECE. The back and front pieces are worked separately, back and forth with circular needle, from bottom up. The sleeves are worked top down, starting back and forth with circular needle for the sleeve cap then in the round with double pointed needles (2 stitches decreased). BACK PIECE: Cast on 113-119-127-135-149-165 stitches with circular needle size 4 mm and DROPS Air. Work rib as follows, starting from the right side: 2 edge stitches in GARTER STITCH – read description above, * knit 1, purl 1 *, work from *-* until there are 3 stitches left, knit 1 and 2 edge stitches in garter stitch. Continue this rib back and forth for 10 cm – finishing after a row from the wrong side. Knit 1 row and decrease 28-28-30-32-36-40 stitches evenly spaced = 85-91-97-103-113-125 stitches. Change to circular needle size 5 mm. Work stocking stitch with 1 edge stitch in garter stitch on each side until the piece measures 37-38-39-40-41-42 cm. REMEMBER THE KNITTING TENSION! At the beginning of the next 2 rows cast off 2-4-4-4-7-11 stitches for the armholes = 81-83-89-95-99-103 stitches. Continue working until the piece measures 55-57-59-61-63-65 cm. Cast off the middle 29-29-31-31-33-33 stitches for the neck and finish each shoulder separately. OVERVIEW OF THE NEXT SECTION: Decrease for the neck and place stitches on a thread for the diagonal shoulder as described below. Read NECK and DIAGONAL SHOULDERS before continuing. NECK: Cast off 1 stitch at the beginning of the next row from the neck. DIAGONAL SHOULDERS: Place the stitches by the armhole on a thread, working them first so you do not need to cut the strand. Place 8-8-9-10-10-11 stitches on the thread 2 times, then place the last 9-10-10-11-12-12 stitches on the thread. All stitches are now either cast off or placed on the thread. Place the 25-26-28-31-32-34 stitches on the thread back on needle size 5 mm. Work 1 row of stocking stitch. To avoid holes where you turned, pick up the strand between the 2 stitches and work it twisted together with the next stitch on the left needle. Loosely cast off all stitches. The piece measures approx. 58-60-62-64-66-68 cm from the cast-on edge to the top of the shoulder. Work the other shoulder in the same way. RIGHT FRONT PIECE: Cast on 66-70-76-80-88-96 stitches with circular needle size 4 mm and DROPS Air. Work rib as follows, starting from the right side: Knit 2, purl 1, * knit 1, purl 1 *, work from *-* until there are 3 stitches left, knit 1 and 2 edge stitches in garter stitch. Continue this rib back and forth for 10 cm – finishing after a row from the wrong side. Work the next row from the right side: Knit 2, purl 1, knit 1, purl 1, knit 1, purl 1 (band), work stocking stitch over the next 58-62-68-72-80-88 stitches and decrease 16-17-20-21-24-26 stitches evenly spaced, 1 edge stitch in garter stitch = 50-53-56-59-64-70 stitches. Switch to needle size 5 mm. Continue this pattern for 11 cm. Start to work the BUTTONHOLES – read description above. Work until the piece measures 32-33-34-35-36-37 cm. OVERVIEW OF THE NEXT SECTION: You now decrease for the V-neck and work the armholes. Read the next section before continuing. V-NECK: When the piece measures 32-33-34-35-36-37 cm, start to decrease for the V-neck on the next row from the right side: Work 10 stitches as before, slip 1 stitch as if to knit, knit 1 and pass the slipped stitch over the knitted stitch (1 stitch decreased), work to the end of the row. Decrease like this every 4th row 1 time (first decrease is explained above), then every 2nd row 12-12-13-13-14-14 times and then every 4th row 3 times = 16-16-17-17-18-18 stitches decreased. ARMHOLE: When the piece measures 37-38-39-40-41-42 cm, cast off 2-4-4-4-7-11 stitches for the armhole on the next row from the wrong side. When all the decreases for neck and armhole are finished, there are 32-33-35-38-39-41 stitches on the shoulder. Continue with stocking stitch and the band as before until the piece measures 55-57-59-61-63-65 cm. DIAGONAL SHOULDER: Place the stitches by the armhole on a thread, working them first so you do not need to cut the strand. Place 8-8-9-10-10-11 stitches on the thread 2 times, then place the last 16-17-17-18-19-19 stitches on the thread. All stitches are now either cast off or placed on the thread. Place the 32-33-35-38-39-41 stitches on the thread back on needle size 5 mm. Work 1 row of stocking stitch. To avoid holes where you turned, pick up the strand between the 2 stitches and work it twisted together with the next stitch on the left needle. Loosely cast off all stitches. The piece measures approx. 58-60-62-64-66-68 cm from the cast-on edge to the top of the shoulder. Cast off the 25-26-28-31-32-34 shoulder stitches = 7 band stitches left on the needle. Continue as before over these stitches for a further 9-9-10-10-11-11 cm. Cast off. LEFT FRONT PIECE: Cast on 66-70-76-80-88-96 stitches with circular needle size 4 mm and DROPS Air. Work rib as follows, starting from the right side: 2 edge stitches in garter stitch, * knit 1, purl 1*, work from *-* until there are 2 stitches left, knit 2. Continue this rib back and forth for 10 cm – finishing after a row from the wrong side. Work the next row from the right side: 1 edge stitch in garter stitch, work stocking stitch over the next 58-62-68-72-80-88 stitches and decrease 16-17-20-21-24-26 stitches evenly spaced, purl 1, knit 1, purl 1, knit 1, purl 1, knit 2 (band) = 50-53-56-59-64-70 stitches. Switch to needle size 5 mm. Continue this pattern until the piece measures 32-33-34-35-36-37 cm. OVERVIEW OF THE NEXT SECTION: You now decrease for the V-neck and work the armholes. Read the next section before continuing. V-NECK: When the piece measures 32-33-34-35-36-37 cm, start to decrease for the V-neck on the next row from the right side: Work 1 edge stitch in garter stitch, work as before until there are 12 stitches left, knit 2 together (1 stitch decreased) and work the last 10 stitches. Decrease like this every 4th row 1 time (first decrease is explained above), then every 2nd row 12-12-13-13-14-14 times and then every 4th row 3 times = 16-16-17-17-18-18 stitches decreased. ARMHOLE: When the piece measures 37-38-39-40-41-42 cm, cast off 2-4-4-4-7-11 stitches for the armhole on the next row from the right side. When all the decreases for neck and armhole are finished, there are 32-33-35-38-39-41 stitches on the shoulder. Continue with stocking stitch and the band as before until the piece measures 55-57-59-61-63-65 cm. DIAGONAL SHOULDER: Place the stitches by the armhole on a thread, working them first so you do not need to cut the strand. Place 8-8-9-10-10-11 stitches on the thread 2 times, then place the last 16-17-17-18-19-19 stitches on the thread. All stitches are now either cast off or placed on the thread. Place the 32-33-35-38-39-41 stitches on the thread back on needle size 5 mm. Work 1 row of stocking stitch. To avoid holes where you turned, pick up the strand between the 2 stitches and work it twisted together with the next stitch on the left needle. Loosely cast off all stitches. The piece measures approx. 58-60-62-64-66-68 cm from the cast-on edge to the top of the shoulder. Cast off the 25-26-28-31-32-34 shoulder stitches = 7 band stitches left on the needle. Continue as before over these stitches for a further 9-9-10-10-11-11 cm. Cast off. SLEEVES: The sleeves are worked top down. Cast on 61-65-69-71-75-79 stitches with short circular needle size 5 mm and DROPS Air. Work stocking stitch back and forth for 1-2-2-2-4-6 cm. Then continue working as follows: Insert a marker thread at the beginning of the round, which follows your work onwards – it is used when decreasing under the sleeve. Work stocking stitch in the round, changing to double pointed needles when necessary. When the sleeve measures 3-4-4-4-6-8 cm from the cast-on edge, decrease 1 stitch on each side of the marker thread – read DECREASE TIP. Decrease like this every 5½-4-3½-3½-3-2 cm a total of 6-7-8-8-9-11 times = 49-51-53-55-57-57 stitches. Continue working until the sleeve measures 38-38-37-37-37-36 cm. Knit 1 round and increase 17-17-17-19-19-19 stitches evenly spaced = 66-68-70-74-76-76 stitches. Change to double pointed needles size 4 mm and work rib (knit 1, purl 1) for 10 cm. Cast off a little loosely. The sleeve measures 48-48-47-47-47-46 cm. Work the other sleeve in the same way. ASSEMBLY: Sew the shoulder seams. Sew the bands together mid-back and sew the neck to the neckline. Sew the sleeve caps to the armholes and sew the bottoms of the armholes together – see sketch. Sew the side seams from the armholes down, inside the 1 edge stitch on each side, leaving a 10 cm split at the bottom. Sew the buttons onto the left band. |
||||
Diagram explanations |
||||
|
||||
 |
||||
 |
||||
Have you finished this pattern?Tag your pictures with #dropspattern #octobersuncardigan or submit them to the #dropsfan gallery. Do you need help with this pattern?You'll find 32 tutorial videos, a Comments/Questions area and more by visiting the pattern on garnstudio.com. © 1982-2026 DROPS Design A/S. We reserve all rights. This document, including all its sub-sections, has copyrights. Read more about what you can do with our patterns at the bottom of each pattern on our site. |
||||


With over 40 years in knitting and crochet design, DROPS Design offers one of the most extensive collections of free patterns on the internet - translated to 17 languages. As of today we count 324 catalogues and 12290 patterns translated into English (UK/cm). 12290
We work hard to bring you the best knitting and crochet have to offer, inspiration and advice as well as great quality yarns at incredible prices! Would you like to use our patterns for other than personal use? You can read what you are allowed to do in the Copyright text at the bottom of all our patterns. Happy crafting!
Post a comment to pattern DROPS 240-20
We would love to hear what you have to say about this pattern!
If you want to leave a question, please make sure you select the correct category in the form below, to speed up the answering process. Required fields are marked *.