
Popular categories
Looking for a yarn?


Comments / Questions (7)
![]() Judy wrote:
Judy wrote:
Hi, I'm having trouble connecting the under arm stitches with the rest of the sleeve. (Pick up 1 stitch of the new stitches cast on under sleeve). I can't get the corners to blend in without making an opening,hole, at the corner.
05.02.2025 - 19:05DROPS Design answered:
Dear Judy, if you get a small hole in the transition between stitches on the body and sleeve, you can close it by picking up the strand between 2 stitches and working this strand twisted with the next stitch. Happy knitting!
06.02.2025 - 16:32
![]() Ines wrote:
Ines wrote:
Hallo, ich verstehe das mit den Taschen auch nicht. Besonders das mit den 26 Maschen der Tasche auf die Nadel stricken. Die Videos kann ich leider nicht sehen. Die öffnen sich nicht. Vielen Dank!
24.01.2025 - 18:33DROPS Design answered:
Liebe Ines, Videos sollten Sie jetzt sehen können; hier für die Tasche - die 26 Maschen werden zuerst stillgelegt für die Tasche, die danach gestrickt wird, dann strickt man die 26 Maschen der Tasche die am Anfang gestrickt wurden und man strickt weiter bis zur Ende. Die 26 stillgelegten Maschen werden später für die Innenseite der Tasche gestrickt und das Abketten mit der Anschlagskante vom Anfang der Tasche zusammennähen. Viel Spaß beim Stricken!
27.01.2025 - 08:36
![]() Judy wrote:
Judy wrote:
Before I ask my knitting question again, I'm curiois to know why you have`t sent me an answer in the first place re: Daisy Lane Cardigan. Love to hear from you.
26.06.2024 - 23:10DROPS Design answered:
Dear Judy, sorry I cannot find your question listed below, can you please tell us how we can help you?
27.06.2024 - 08:31
![]() Eva Ljung wrote:
Eva Ljung wrote:
Mönster Daisy Lane Cardigan fickor på fram-bakstycke ska man sticka 20 m sen sätta 26 m på en tråd och sen sticka dem? Hur går det till? När man precis tagit av de från stickan? Med vänlig hälsning, Eva Ljung
10.04.2024 - 23:09DROPS Design answered:
Hei Eva. Det er ikke de 26 maskene du nettopp satte på en tråd, men de 26 maskene fra tråden på den ene lommen du strikket helt i begynnelsen. Se gjerne hjelpevideoen: Hur man stickar en lös ficka på insidan av ett plagg. Ikke samme plagget, men du ser da teknikken som er brukt. Klikk på VIDEOR til høyre (eller under) for bildet. mvh DROPS Design
15.04.2024 - 09:41
![]() Angela wrote:
Angela wrote:
Vorrei realizzare questo modello taglia M, con le maniche lunghe e il filato Cotton Merino. Mi serviranno quanti grammi,per le maniche lunghe, oltre ai 600gr della conversione? Grazie
27.08.2023 - 18:28DROPS Design answered:
Buonasera Angela, per un'assistenza così personalizzata può rivolgersi al suo rivenditore DROPS di fiducia. Buon lavoro!
28.08.2023 - 23:08
![]() Lieselotte Mahal wrote:
Lieselotte Mahal wrote:
Ich verstehe das Einstricken der Tasche nicht....gibt es ein Video
05.09.2022 - 18:26DROPS Design answered:
Liebe Frau Mahal, ja sicher, hier finden Sie ein Video, das erklärt, wie die Tasche gestrickt wird. Viel Spaß beim stricken!
06.09.2022 - 09:10
![]() Siv Rosberg wrote:
Siv Rosberg wrote:
Hej! I mönstret står att jag ska sticka 24cm från ärmhålet innan jag delar för sprund. På skissen visas 29 cm ner till sprundet. Vilket ska jag följa? Vänligen Siv
23.07.2022 - 21:29DROPS Design answered:
Hej Siv, Måleskitsen viser 29 cm ned til ribben, sprundet starter før ribben :)
04.08.2022 - 07:54
|
||||||||||
Daisy Lane Cardigan#daisylanecardigan |
||||||||||
 |
 |
|||||||||
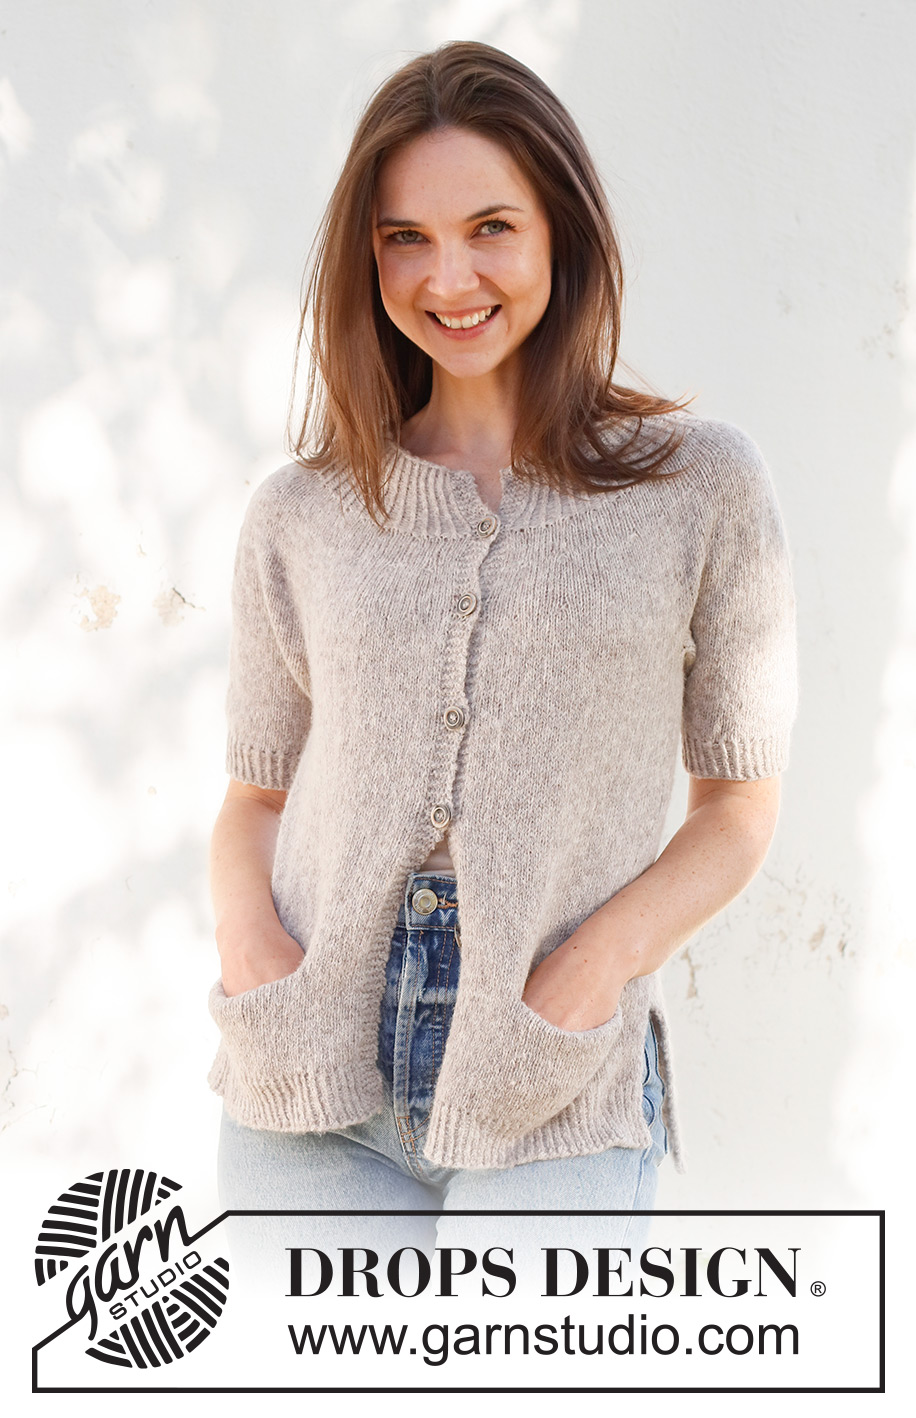
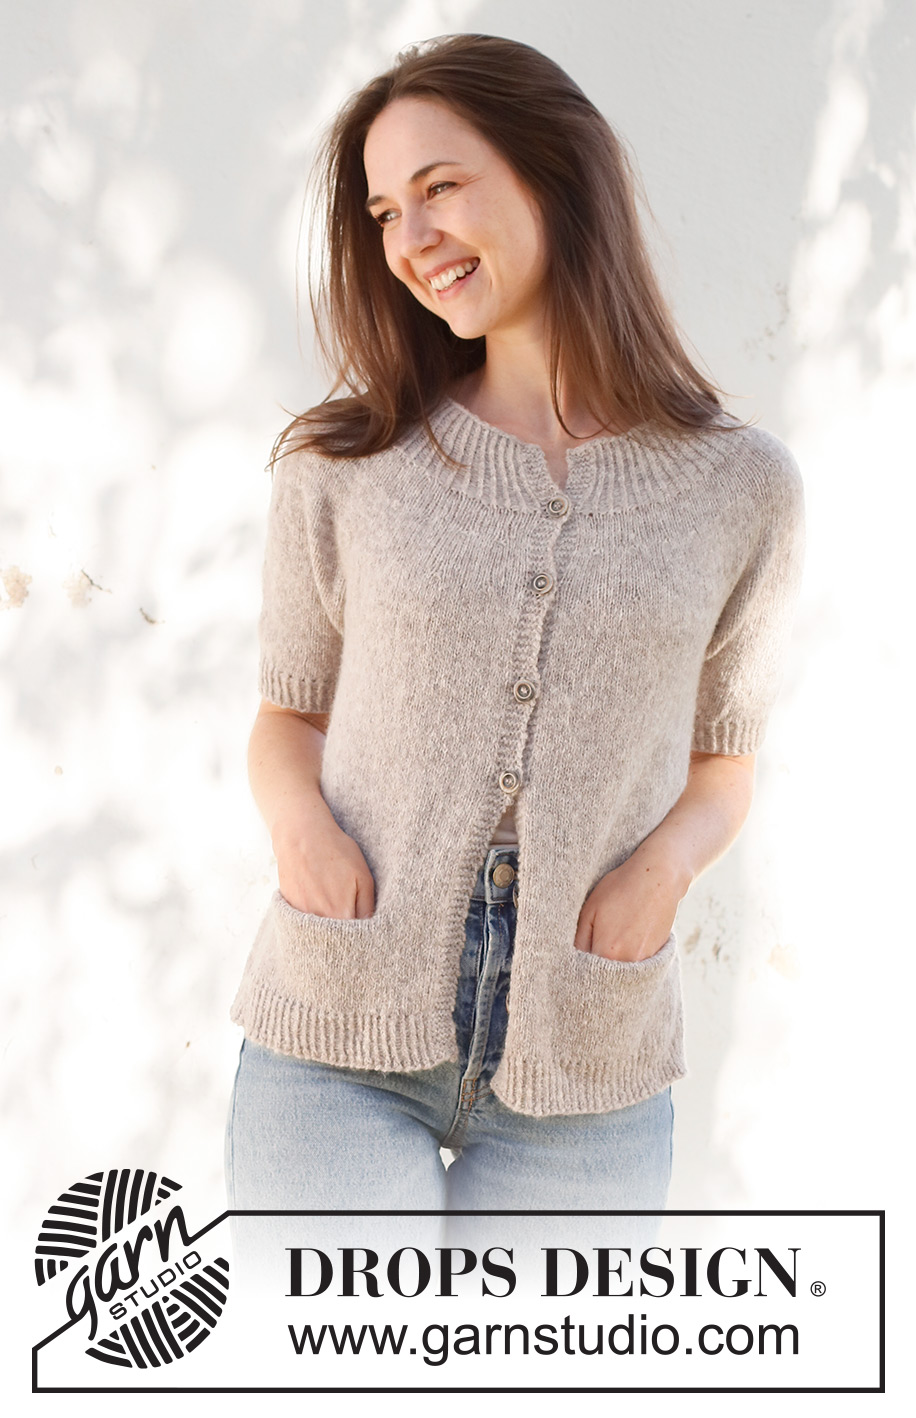
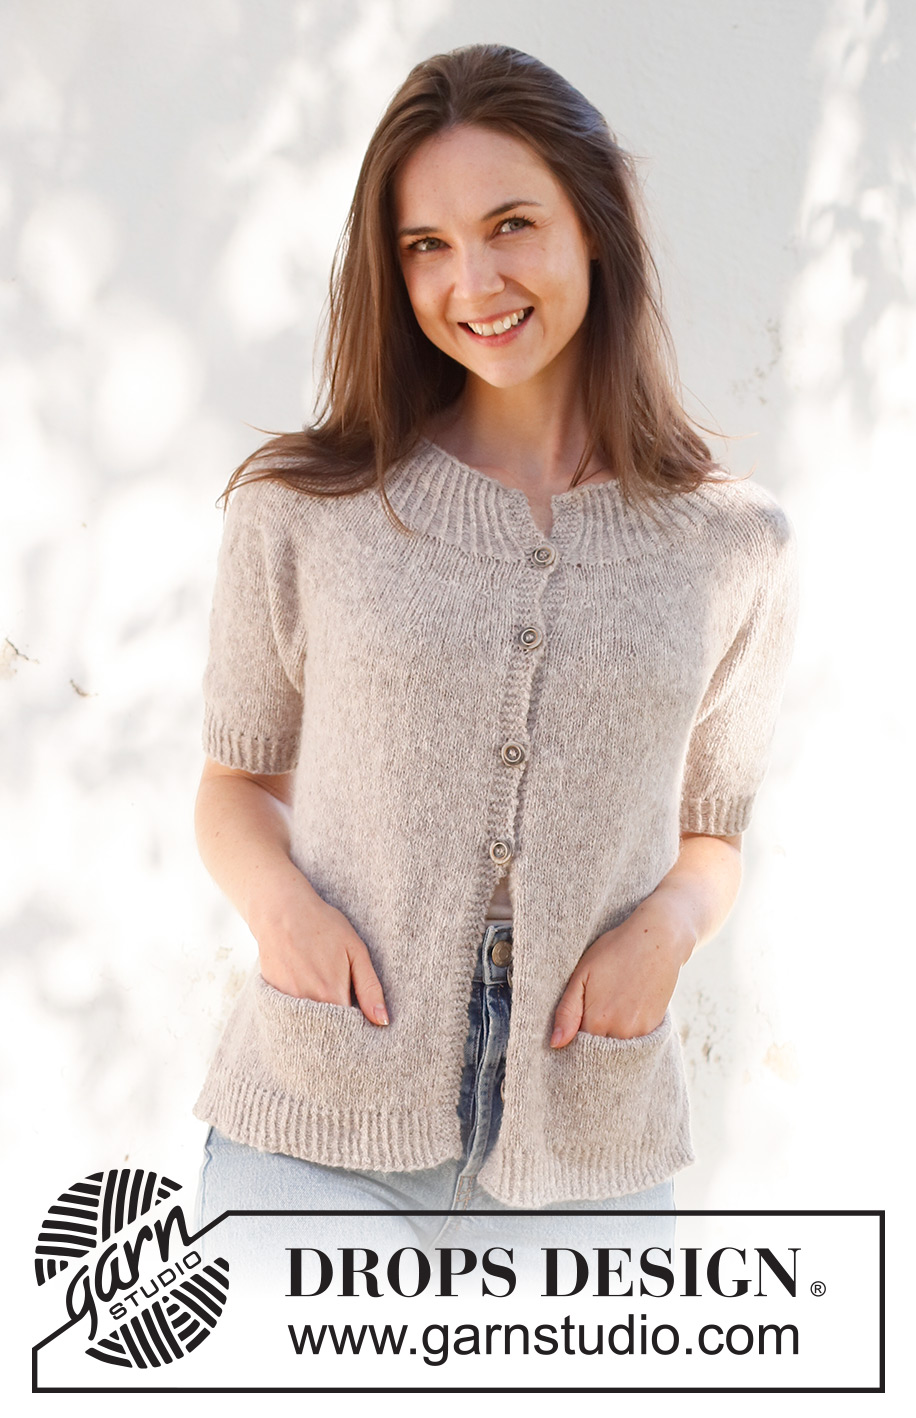
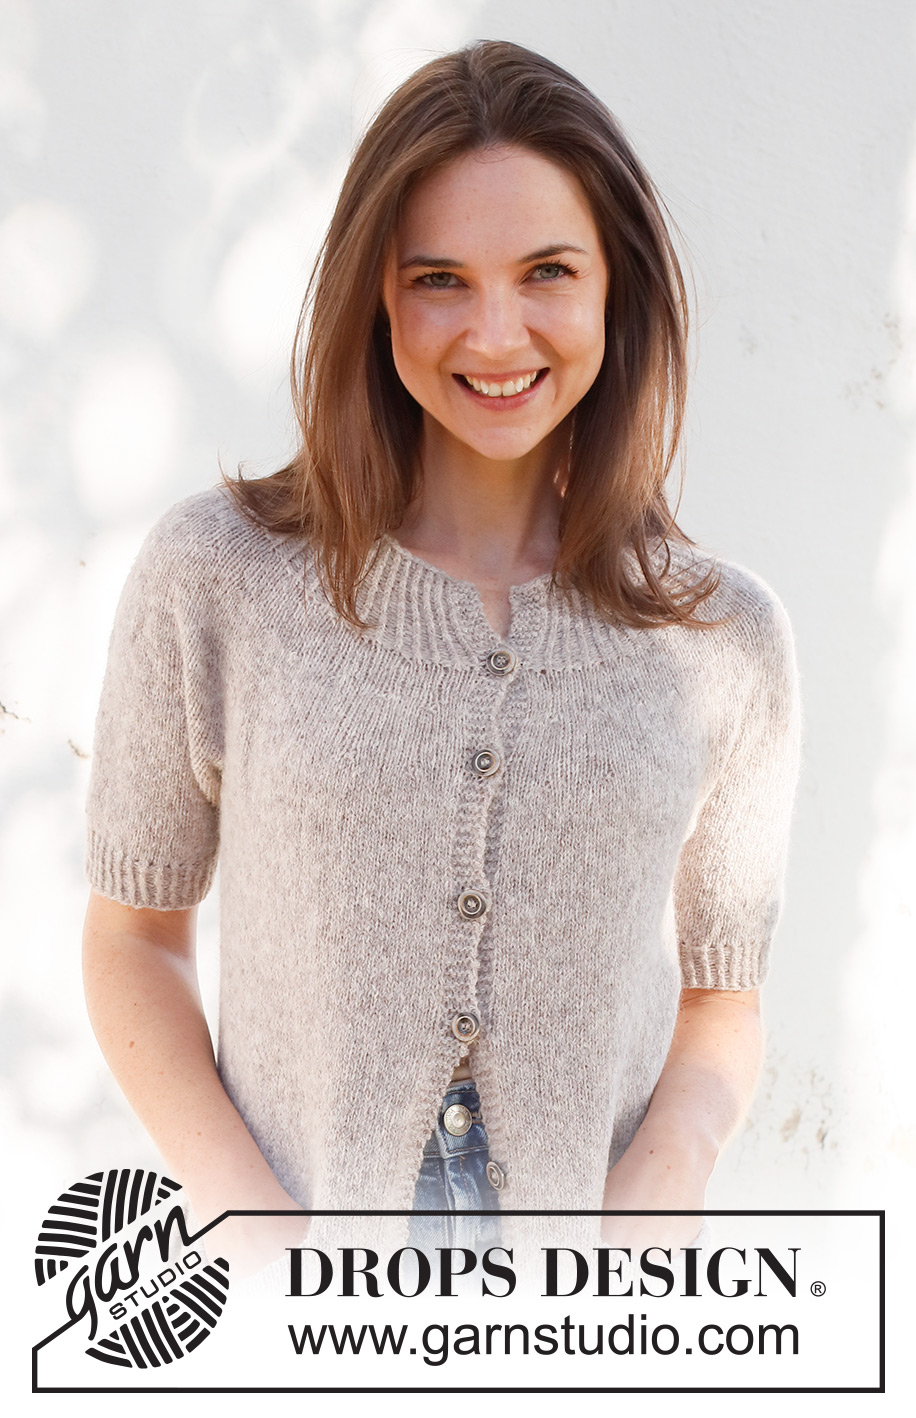
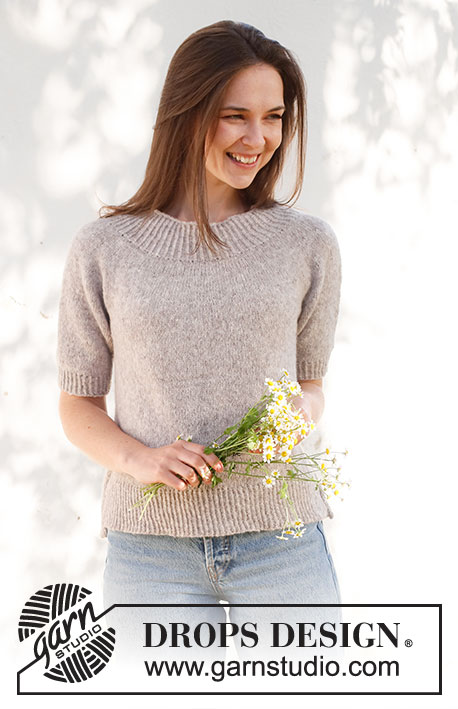
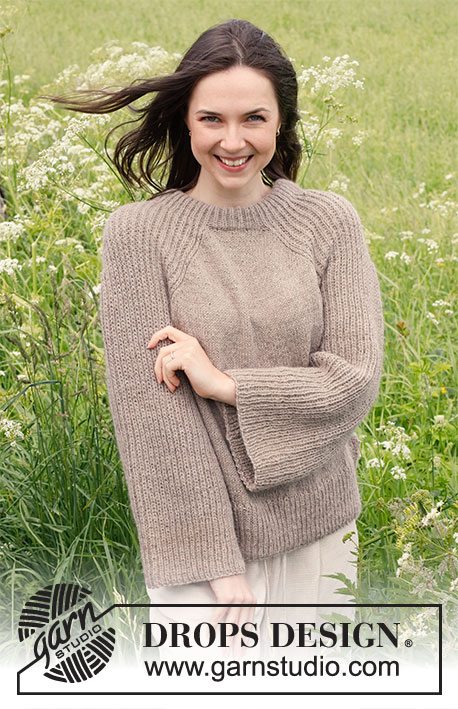
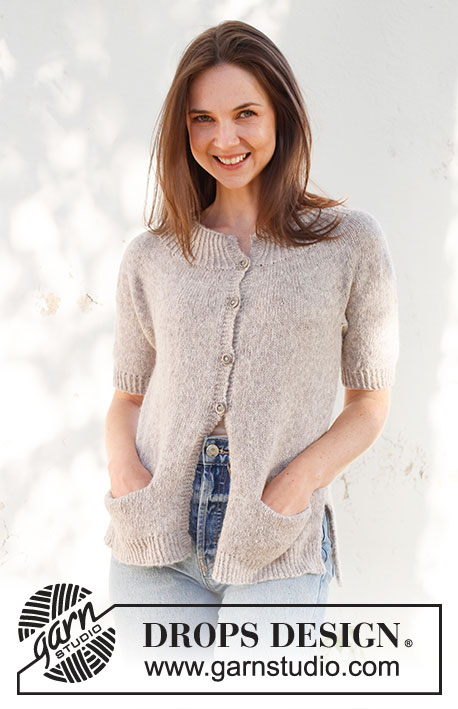
Knitted jacket in DROPS Sky. Piece is knitted top down with round yoke, stocking stitch, pockets, short sleeves and vents in the sides. Size XS – XXL.
DROPS 231-54 |
||||||||||
|
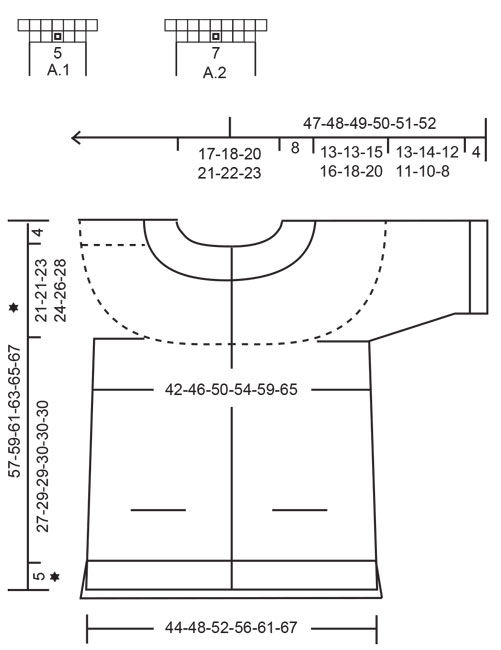
---------------------------------------------------------- EXPLANATION FOR THE PATTERN: ---------------------------------------------------------- GARTER STITCH (back and forth): Knit all rows. 1 ridge vertically = knit 2 rows. PATTERN: See diagrams A.1 and A.2. Diagrams show all rows in pattern seen from the right side. INCREASE TIP-1: All increases are done from the right side. Increase by making 1 yarn over after every other purl section. On next row work yarn overs twisted to avoid holes. INCREASE TIP-2 (applies to sides of body): All increases are done from the right side. Work until 2 stitches remain before marker thread, make 1 yarn over, knit 4 (marker thread is in the middle of these 4 stitches), make 1 yarn over (= 2 stitches increased). On next row purl yarn overs twisted to avoid holes. Then work the new stitches in stocking stitch. DECREASE/INCREASE TIP (evenly): To calculate how to increase/decrease evenly, use the total number of stitches on row (e.g. 173 stitches), minus bands (e.g. 10 stitches) , and divide the remaining 163 stitches by number of increases/decreases to be done (e.g. 5) = 32.6. In this example decrease by knitting alternately approx. every 31st and 32nd stitch and every 32nd and 33rd stitch together, and do not decrease over stitches in garter stitch. When increasing make in the example 1 yarn over alternately approx. every 32nd and 33rd stitch and do not increase over stitches in garter stitch. On next row purl yarn over twisted to avoid holes. DECREASE TIP (applies to mid under sleeves): Decrease 1 stitch on each side of marker thread as follows: Work until 3 stitches remain before marker thread, knit 2 together, knit 2 stitches (marker thread is between these 2 stitches), slip 1 stitch knitwise, knit 1, pass slipped stitch over stitch worked (= 2 stitches decreased). BUTTONHOLES: Decrease for buttonholes on right band (when garment is worn). Decrease from right side when 3 stitches remain on row as follows: Make 1 yarn over, knit the next 2 stitches together, knit last stitch. On next row (wrong side) knit the yarn over to make a hole. Decrease first buttonhole when rib in the neck measures approx. 7½-8 cm. Then decrease the next 5-5-5-6-6-6 buttonholes approx. 7½-7½-8-7½-7½-8 cm apart. CAST-OFF TIP: To avoid a tight cast-off edge when casting off, you may use a larger needle. If this still is too tight make 1 yarn over after approx. every 6th stitch while casting off (cast off yarn overs as stitches). ---------------------------------------------------------- START THE PIECE HERE: ---------------------------------------------------------- JACKET - SHORT OVERVIEW OF THE PIECE: Work neck edge and yoke back and forth on circular needle from mid front, work top down. Now divide yoke for body and sleeves. Work body back and forth on circular needle until vent. Then work front pieces and back piece back and forth separately. Back piece is 3 cm longer than front pieces. Work sleeves in the round on double pointed needles/short circular needle, top down. First work 2 parts for each pocket, work the rest of the pockets after the jacket is finished, and assemble at the end. POCKETS (first part): Cast on 28 stitches (including 1 edge stitch in each side) on double pointed needle/circular needle size 4 mm with DROPS Sky. Work in stocking stitch with 1 edge stitch in GARTER STITCH - read explanation above, in each side. REMEMBER THE KNITTING TENSION! When piece measures 11 cm, cast off the edge stitches = 26 stitches. Slip stitches on 1 thread. Work another pocket the same way. Put pockets aside and work the neck edge and yokes. Work the second half of the 2 pockets after jacket has been finished, then assemble. NECK EDGE AND YOKE: Cast on 119-123-131-135-143-147 stitches (including 5 band stitches in each side) on circular needle size 3 mm with DROPS Sky. Purl 1 row from wrong side. Then work rib as follows: Work 5 band stitches in garter stitch, rib (knit 1 twisted/purl 1) until 6 stitches remain on row, knit 1, 5 band stitches in garter stitch. When rib measures 3 cm, increase every other 1 purl stitch to 2 purl stitches - read INCREASE TIP-1 = 146-151-161-166-176-181 stitches. When piece measures 5 cm, increase the remaining 1 purl stitches to 2 purl stitches = 173-179-191-197-209-215 stitches. Remember BUTTONHOLES on right band - read explanation above. When rib measures 8 cm, work in the different sizes as follows: SIZE XS: Knit 1 row from right side while decreasing 5 stitches evenly – read DECREASE/INCREASE TIP = 168 stitches. SIZE S, M, L, XL AND XXL: Knit 1 row from right side while increasing 1-9-11-17-29 stitches evenly - read DECREASE/INCREASE TIP = 180-200-208-226-244 stitches. ALL SIZES: Insert a marker inside band in one side of piece. NOW MEASURE PIECE FROM HERE! Switch to circular needle size 4 mm. Work in stocking stitch with 5 band stitches in garter stitch in each side. When piece measures 4 cm from marker, work pattern as follows: Work 5 band stitches in garter stitch, knit 2-0-3-2-3-2, work A.1 until 6-5-7-6-8-7 stitches remain (= 31-34-37-39-42-46 repetitions of 5 stitches), knit 1-0-2-1-3-2, 5 band stitches in garter stitch. When A.1 has been worked vertically, there are 230-248-274-286-310-336 stitches on needle. Continue back and forth in stocking stitch with 5 band stitches in garter stitch in each side. When piece measures 9-9-10-11-12-13 cm from marker, work pattern as follows: Work 5 band stitches in garter stitch, knit 2-0-3-2-3-2, work A.2 until 6-5-7-6-8-7 stitches remain (= 31-34-37-39-42-46 repetitions of 7 stitches), knit 1-0-2-1-3-2, 5 band stitches in garter stitch. When A.2 has been worked vertically, there are 292-316-348-364-394-428 stitches on needle. Then work in stocking stitch and band stitches in garter stitch until piece measures 13-13-15-16-18-20 cm from marker. Now divide piece for body and sleeves as follows: Work the first 45-48-52-55-61-67 stitches (= front piece), slip the next 60-66-74-76-80-84 stitches on a thread for sleeve, cast on 8-10-10-12-12-12 new stitches on needle (= in the side under sleeve), work the next 82-88-96-102-112-126 stitches (= back piece), slip the next 60-66-74-76-80-84 stitches on a thread for sleeve, cast on 8-10-10-12-12-12 new stitches on needle (= in the side under sleeve), work the last 45-48-52-55-61-67 stitches (= front piece). Finish body and sleeves separately. NOW MEASURE THE PIECE FROM HERE! BODY: = 188-204-220-236-258-284 stitches. Work in stocking stitch with 5 band stitches in garter stitch in each side towards mid front. Insert 2 marker threads in piece in the middle of the new stitches cast-on in the side under the sleeves (= 4-5-5-6-6-6 new stitches on each side of both marker threads). Move marker threads upwards when working. Use them later when increasing. When piece measures 4 cm from division, increase 1 stitch on each side of marker threads - read INCREASE TIP-2. Repeat increase when piece measures 16 cm = 196-212-228-244-266-292 stitches. Work until piece measures 17-19-19-20-20-20 cm from division. Now make an opening for pockets and work next row as follows from right side: Work the first 17-18-19-20-21-22 stitches as before, slip the next 26 stitches on 1 thread (work the second half of pocket here later), work the 26 stitches from thread on one pocket (make sure to continue from right side of pocket), work until 43-44-45-46-47-48 stitches remain on needle, slip the next 26 stitches on 1 thread (work the other half of pocket here later), work the 26 stitches from thread on the other pocket (make sure to continue from right side of pocket), and work the last 17-18-19-20-21-22 stitches on needle as before. Continue to work until piece measures 21-23-23-24-24-24 cm. Now work 4 stitches in garter stitch at both marker threads - i.e. 2 stitches in garter stitch on each side of both marker threads. When 2 ridges have been worked over 4 stitches in each side, divide the piece for back piece and front pieces so that there are 94-102-110-118-128-142 stitches for back piece and 51-55-59-63-69-75 stitches for each front piece. Finish each part separately. BACK PIECE: Continue back and forth with stocking stitches and 2 stitches in garter stitch in each side until vent measures 6 cm. Knit 1 row from right side while increasing 15-17-19-19-21-23 stitches evenly (but not over stitches in garter stitch) 109-119-129-137-149-165 stitches. Switch to circular needle size 3 mm. Purl 1 row (work stitches in garter stitch as before). Now work rib back and forth as follows: ROW 1 (= right side): Work 2 stitches in garter stitch, * knit 1 twisted, purl 1 *, work from *-* until 3 stitches remain, knit 1 twisted, 2 stitches in garter stitch. ROW 2 (= wrong side): Work 2 stitches in garter stitch, * purl 1 twisted, knit 1 *, repeat from *-* until 3 stitches remain, purl 1 twisted, 2 stitches in garter stitch. Continue back and forth like this until rib measures 8 cm. Now cast off with knit over twisted knit and purl over purl and garter stitch over garter stitch, read CAST-OFF TIP. Jacket measures approx. 60-62-64-66-68-70 cm from shoulder and down. RIGHT FRONT PIECE: Continue back and forth with 5 band stitches in garter stitch, 2 stitches in garter stitch towards the side and stocking stitch over the remaining stitches. When vent measures 6 cm, knit 1 row from right side while increasing 7-7-9-9-9-11 stitches evenly (but not over stitches in garter stitch) 58-62-68-72-78-86 stitches. Switch to circular needle size 3 mm. Purl 1 row (work stitches in garter stitch as before). Now work rib back and forth as follows: ROW 1 (= right side): Work 5 band stitches in garter stitch, * knit 1 twisted, purl 1 *, work from *-* until 3 stitches remain, knit 1 twisted, 2 stitches in garter stitch. ROW 2 (= wrong side): Work 2 stitches in garter stitch, * purl 1 twisted, knit 1 *, repeat from *-* until 6 stitches remain, purl 1 twisted, 5 band stitches in garter stitch. Continue back and forth like this. When rib measures 5 cm, cast off with knit over twisted knit and purl over purl and garter stitch over garter stitch - remember CAST-OFF TIP. Jacket measures approx. 57-59-61-63-65-67 cm from shoulder and down. LEFT FRONT PIECE: Work the same way as on right front piece. SLEEVES: Slip the stitches 60-66-74-76-80-84 stitches from thread in one side of piece on double pointed needles/a short circular needle size 4 mm and pick in addition up 1 stitch in each of the 8-10-10-12-12-12 new stitches cast on under sleeve = 68-76-84-88-92-96 stitches. Insert a marker thread in the middle of the new stitches (= 4-5-5-6-6-6 new stitches on each side of marker thread). Move marker thread upwards when working. Use it later when decreasing under sleeve. Work in stocking stitch in the round. When piece measures 2 cm from division, decrease under sleeve - read DECREASE TIP. Decrease like this approx. every 2½-1½-1-1-1-1 cm 5-8-8-8-8-7 times in total = 58-60-68-72-76-82 stitches. Continue until sleeve measures 13-14-12-11-10-8 cm (shorter measurements in the larger sizes because of wider neck and longer yoke). Try the jacket and work to desired length. 4 cm remain until finished measurements. Knit 1 round while increasing 4-4-4-6-6-6 stitches evenly = 62-64-72-78-82-88 stitches. Switch to double pointed needles size 3 mm. Work rib (= knit 1 twisted/purl 1) for 4 cm. Cast off with knit over knit and purl over purl - remember CAST-OFF TIP. Sleeve measures 17-18-16-15-14-12 cm in total from division. Work the other sleeve the same way. POCKETS (second part): Work back and forth on circular needle. Slip the 26 stitches from thread on right front piece on circular needle size 4 mm. On first row cast on 1 edge stitch in each side = 28 stitches. Work in stocking stitch with 1 edge stitch in garter stitch in each side until piece measures 11 cm, loosely cast off. Work pocket on left front piece the same way. Sew pockets inside 1 edge stitch around the entire pocket. Then fasten pockets on the inside of jacket with a small stitch in each of the 2 bottom corners (should not be visible on right side of jacket). ASSEMBLY: Sew the buttons on to left band. |
||||||||||
Diagram explanations |
||||||||||
|
||||||||||
 |
||||||||||
Have you finished this pattern?Tag your pictures with #dropspattern #daisylanecardigan or submit them to the #dropsfan gallery. Do you need help with this pattern?You'll find 33 tutorial videos, a Comments/Questions area and more by visiting the pattern on garnstudio.com. © 1982-2026 DROPS Design A/S. We reserve all rights. This document, including all its sub-sections, has copyrights. Read more about what you can do with our patterns at the bottom of each pattern on our site. |
||||||||||


With over 40 years in knitting and crochet design, DROPS Design offers one of the most extensive collections of free patterns on the internet - translated to 17 languages. As of today we count 324 catalogues and 12290 patterns translated into English (UK/cm). 12290
We work hard to bring you the best knitting and crochet have to offer, inspiration and advice as well as great quality yarns at incredible prices! Would you like to use our patterns for other than personal use? You can read what you are allowed to do in the Copyright text at the bottom of all our patterns. Happy crafting!
Post a comment to pattern DROPS 231-54
We would love to hear what you have to say about this pattern!
If you want to leave a question, please make sure you select the correct category in the form below, to speed up the answering process. Required fields are marked *.