
Categorías populares
¿Buscas un hilo?


Comentarios / Preguntas (146)
![]() Marilyn escribió:
Marilyn escribió:
Thank you for your response! I have another question. When it says "work rib back and forth on heel sts for 5-5.5-6 cm" does that mean that the entire piece, right from the first row should measure 5 cm or just from where you started the heel part? Thanks!
27.09.2016 - 17:24DROPS Design respondió:
Dear Marilyn, the 5-5.5-6 cm apply only to heel, ie to the 21 sts worked back and forth. Happy knitting!
28.09.2016 - 08:32
![]() Marilyn escribió:
Marilyn escribió:
After the part where you pick up the 9 stitched on either side, this pattern blows my mind. I have NO IDEA how to proceed. Can you please elaborate? A video on the heel part of this slipper woukd be very helpful, the videos attached to the pattern are not specific to this pattern. Thanks
27.09.2016 - 04:55DROPS Design respondió:
Dear Marilyn, when you have 48 sts on needle, then insert a marker as follows: 1st marker, 3 sts, M.1 (= 15 sts), 3 sts, 2nd marker (= 21 sts between markers). Continue now with stocking st and M.1 dec before 1st marker and after 2nd marker a total of 6 times every other round = 36 sts remain. Happy knitting!
27.09.2016 - 10:14
![]() Chantal escribió:
Chantal escribió:
Hi Drops Design, I finally figured it out, with some assistance. For those in the same boat as I was it's marker - 23 sts - marker. Thanks :)
26.09.2016 - 03:06
![]() Chantal escribió:
Chantal escribió:
Dear Drops Design, I realize a few people have asked this question already, but the placement of the markers is still baffling me. (Insert a marker each side of the middle 21-23-25 sts on upper foot (= 3-4-5 sts each side of M.1) I am knitting the middle size of this pattern. Do I place my markers before and after the 23rd stitch? Thanks in advance for your answer.
25.09.2016 - 16:50DROPS Design respondió:
Dear Chantal, in 2nd size you should have on upper foot: 1st marker, 4 sts, 15 sts in M.1, 4 sts, 2nd marker. So that there are 23 sts for upper foot (15 sts in M.1 + 4 sts on each side of M.1). Happy knitting!
26.09.2016 - 10:51Rosalie escribió:
First time making socks and I am stuck on one place. A video from start to finish; of making these gorgeous socks; would be wonderful.please explain this part to me : Insert a marker each side of the middle 21-23-25 sts on upper foot (= 3-4-5 sts each side of M.1). Continue in stockinette st and M.1 - AT THE SAME TIME dec each side as follows: K tog into back of loop the 2 last sts before first marker on upper foot and K tog the first 2 sts after second marker on upper foot. Thank you
21.09.2016 - 00:32DROPS Design respondió:
Dear Rosalie, when all sts are on needle, insert a marker 3-4-5 sts before M.1 an 3-4-5 sts after M.1 then dec before 1st marker with K2 tog twisted and after 2nd marker with K2 tog (this will dec the number of sts you picked up along heel) = 36-38-42 sts remain. Happy knitting!
21.09.2016 - 09:23
![]() Donna escribió:
Donna escribió:
You mentioned you had no name for these how about the name (Cable Vamp.) They are very pretty. Donna
31.08.2016 - 15:52
![]() Donna escribió:
Donna escribió:
You mentioned you had no name for these how about the name (Cable Vamp.) They are very pretty. Donna
31.08.2016 - 15:16
![]() Jean Tansley escribió:
Jean Tansley escribió:
I tend to agree with Teresa in how confusing this pattern is. I have knit the toe several times and am not convinced it is correct. I had to make changes to get it to end off correctly. A friend of mine has been knitting for years as well and she had to resort to her own way of decreasing for toes. I'm debating whether I will even attempt the second slipper.
29.08.2016 - 19:21DROPS Design respondió:
Dear Mrs Tansley, this pattern is correct, I personnaly made 2 pairs of these in 2 sizes and they worked fine. Feel free to ask any question here or contact your DROPS store for any further personnal assistance. Happy knitting!
30.08.2016 - 08:31
![]() Teresa escribió:
Teresa escribió:
I have been knitting for over 40 years and have knitted many pairs of socks and slippers sweaters etc. in that time. this has to be the most confusing pattern I have ever come across. It would make it a lot easier if it was written in regular pattern form.
26.08.2016 - 16:02DROPS Design respondió:
Dear Teresa, you are always welcome to ask your questions here or to contact your DROPS store for any further personnal assistance when working a pattern. Happy knitting!
29.08.2016 - 12:39
![]() Ann Parsons escribió:
Ann Parsons escribió:
What weight is the yarn used for short socks with cables?
22.08.2016 - 11:23DROPS Design respondió:
Dear Mrs Parsons, DROPS Alaska is a 10 ply/aran - read more about this yarn on its shadecard. Happy knitting!
22.08.2016 - 13:07
|
|||||||||||||||||||||||||
Alaskan Cables |
|||||||||||||||||||||||||
 |
 |
||||||||||||||||||||||||
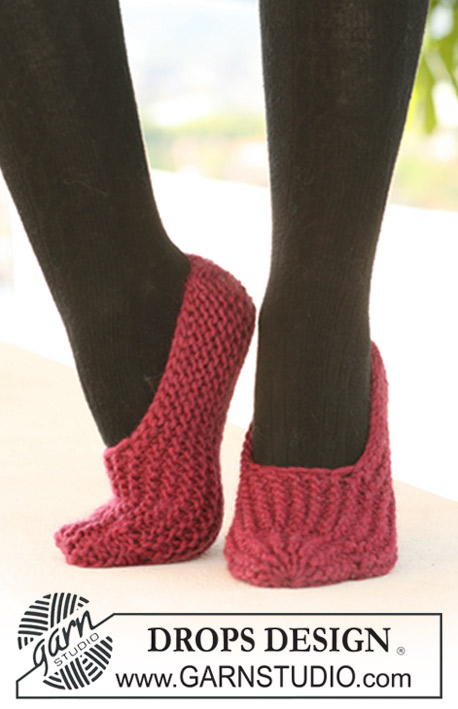
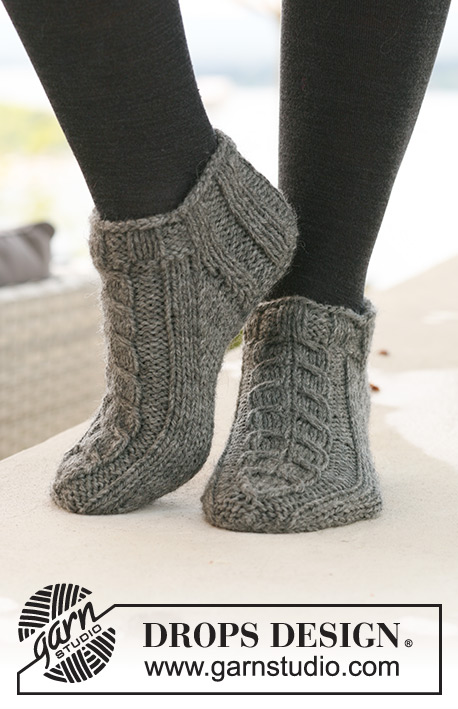
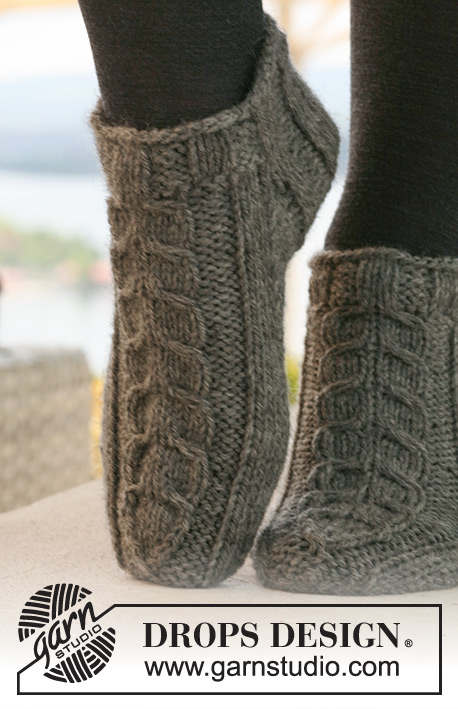
Calcetas cortas DROPS con torsadas / trenzas en “Alaska”.
DROPS 125-15 |
|||||||||||||||||||||||||
|
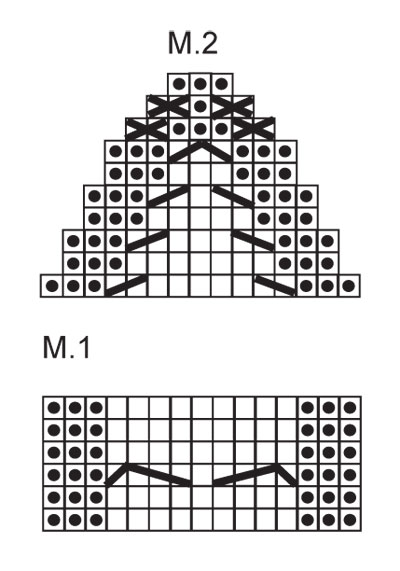
PATRÓN: Ver diagrama M.1 (= 15 pts) y M.2 (= 15 pts). El diagrama muestra el patrón por el LD. DISMINUCIONES DEL TALÓN (en pt jersey): Vuelta 1 (= LD): Tejer la vta hasta tener 6-7-7 pts restantes, desl el pt sig del derecho, 1d, pasar pt desl por encima, girar la pieza. Vuelta 2 (= LR): Tejer la vta hasta tener 6-7-7 pts restantes, desl el pt sig del revés, 1r, pasar pt desl por encima, girar la pieza. Vuelta 3 (= LD): Tejer la vta hasta tener 5-6-6 pts restantes, desl el pt sig del derecho, 1d, pasar pt desl por encima, girar la pieza. Vuelta 4 (= LR): Tejer la vta hasta tener 5-6-6 pts restantes, desl el pt sig del revés, 1r, pasar pt desl por encima, girar la pieza. Cont disminuyendo de esta manera, con 1 pt menos antes de cada dism, hasta tener 9-11-11 pts en la ag. ------------------------------------------------------ CALCETA: Se teje en redondo. Mon 42-48-48 pts en ag de doble punta tamaño 4.5 mm con Alaska. Tejer 2 vtas del derecho y tejer 5 vtas de resorte, 3d/3r. En la vta sig tejer el PATRÓN – ver arriba – como sigue: Cont en resorte 3d/3r en los primeros 18-24-24 pts, 6-6-6 derechos, M.1 (= 15 pts), 3-3-3 derechos. RECUERDE MANTENER LA MISMA TENSIÓN DE TEJIDO DE LA MUESTRA! Cont de esta manera hasta que la pieza mida 4 cm para todas las tallas. Ahora dejar los primeros 21-27-27 pts en la ag para el talón y desl los últimos 21-21-21 pts en un gancho o seguro aux (= centro del empeine). Tejer resorte de ida y vuelta en los pts del talón por 5-5.5-6 cm. NOTA! En la última vta por el LR dism como sigue: Tamaño 35/37: 1 pt en la primera y última sección de derechos, tejiendo 2 pjd. Tamaño 38/40 y 41/43: 1 pt en cada una de las 4 secciones de derechos, tejiendo 2 pjd. Todos los tamaños: = 19-23-23 pts. Colocar un marcapuntos (MP) en la pieza. Ahora tejer las DISMINUCIONES DEL TALÓN – ver arriba! Después de las dism del talón levantar 9-10-12 pts de cada lado del talón y desl los 21-21-21 pts del gancho o seguro aux de vuelta en la ag = 48-52-56 pts. Colocar un MP de cada lado de los 21-23-25 pts centrales en el empeine (= 3-4-5 pts de cada lado de M.1). Cont en pt jersey y M.1 – AL MISMO TIEMPO dism de cada lado como sigue: Tejer juntos del derecho, por atrás del pt, los 2 últimos pts antes del primer MP en el empeine, y tejer juntos del derecho los primeros 2 pts después del segundo MP en el empeine. Repetir la dism en vtas alternas un total de 6-7-7 veces = 36-38-42 pts. Cont hasta que la pieza mida 18-20-22 cm a partir del MP en el talón – ajustar después de 1 repetición completa de M.1 (= aprox 4-4-5 cm restantes). Colocar un MP de cada lado con 19-19-21 pts debajo del pie y 17-19-21 pts en el empeine (= 1-2-3 pts de cada lado de M.1). Ahora dism para los dedos. LEER TODA LA SECCIÓN SIGUIENTE ANTES DE CONTINUAR: (NOTA! dism de forma diferente debajo del pie y empeine, pero hacer las disminuciones en las mismas vueltas). Dism debajo del pie como sigue: Tejer juntos del derecho, por atrás, los 2 pts después del MP y tejer juntos del derecho los 2 pts antes del MP. Repetir la dism en vtas alternas un total de 4-4-4 veces, después en cada vta un total de 3-3-4 veces. AL MISMO TIEMPO dism en el empeine como sigue: Tejer M.2 sobre M.1 (1-2-3 pts de cada lado de M.1 tejidos en pt jersey como antes). Terminar tejiendo del revés los últimos 3 pts en la última vta para el Tamaño 41/43 = 10-12-14 pts restantes en la ag. Cortar el hilo, pasar a través de los pts restantes y asegurar. |
|||||||||||||||||||||||||
Explicaciones del diagrama |
|||||||||||||||||||||||||
|
|||||||||||||||||||||||||
 |
|||||||||||||||||||||||||
¿Terminaste este patrón?Entonces, etiqueta tus fotos con #dropspattern o envíalas a la galería #dropsfan. ¿Necesitas ayuda con este patrón?Encontrarás 17 videos tutoriales, un espacio para comentarios/preguntas y más visitando la página del patrón en garnstudio.com © 1982-2026 DROPS Design A/S. Todos los derechos reservados. Este documento, incluyendo todas sus sub-secciones, está protegido por los derechos de autor (copyright). Lee más acerca de lo que puedes hacer con nuestros patrones en la parte de abajo de cada patrón de nuestro sitio. |
|||||||||||||||||||||||||


Con más de 40 años en el diseño de modelos de punto y de ganchillo, DROPS Design ofrece una de las más vastas colecciones de patrones gratuitos en el internet - traducidos en 17 idiomas. Al día de hoy, contamos con 324 catálogos y 12291 patrones - de los cuales 11689 están traducidos en español.
Nosotros trabajamos con mucho esmero para brindarte lo mejor que las labores de punto y ganchillo tienen para ofrecer,inspiración y consejos, así como hilos de magnífica calidad a precios increíbles! Te gustaría usar nuestros patrones para otro fin además del uso personal? Puedes leer acerca de lo que estás permitida a hacer en el texto de Copyright en la parte de abajo de todos nuestros patrones. Felices labores!
Escribe un comentario sobre DROPS 125-15
¡Nos encantaría saber qué piensas acerca de este patrón!
Si quieres escribir una pregunta referente al patrón, por favor asegúrate de elegir la categoría correcta en el formulario debajo, para acelerar el proceso de respuesta. Los campos obligatorios están marcados con un *.