
Categorías populares
¿Buscas un hilo?


Comentarios / Preguntas (146)
![]() Paula Hynes escribió:
Paula Hynes escribió:
In Drops !25-15, when do you use M2 in this please . I only see where to use M1. Thanks Paula
10.02.2019 - 18:54DROPS Design respondió:
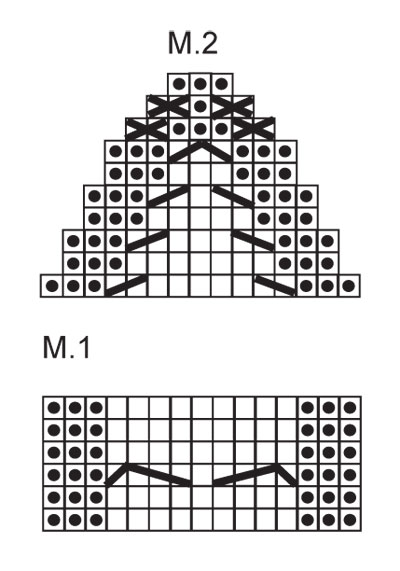
Dear Paula, you'll work M.2 at the end of the pattern, when you'll decrase on upper foot as follows: Work M.2 over M.1 (1-2-3 sts each side of M.1 worked in stocking st as before). Happy knitting!
10.02.2019 - 19:36
![]() Paula Hynes escribió:
Paula Hynes escribió:
When do you use M2 in the pattern for the Alaska socks? I only see M1 used in this pattern.
10.02.2019 - 18:50DROPS Design respondió:
Dear Paula, you'll work M.2 at the end of the pattern, when you'll decrase on upper foot as follows: Work M.2 over M.1 (1-2-3 sts each side of M.1 worked in stocking st as before). Happy knitting!
10.02.2019 - 19:36
![]() Sue McKay escribió:
Sue McKay escribió:
When u r ribbing the 21 stitches on the mid size and it says knit 21/4" is that from the top of the sock or from where u start the ribbing...if its from the top I cant pick up 10 stitches theres not enough knitted
10.02.2019 - 18:12DROPS Design respondió:
Dear Sue, after the ribbing you divide teh stitches for the foot and th eheel, and knit only on the heel stitches for 5-5.5-6 cm, and do teh decreases. The stitches for the gusset should be picked up on the two sides of this heel flap. Happy Knitting!
11.02.2019 - 03:54
![]() Dora escribió:
Dora escribió:
I'm doing the larger size after the heel is knit having some problem with the decrease for the heel .
04.02.2019 - 02:40DROPS Design respondió:
Dear Dora, can you please explain the kind of problem you have with the decrease for the heel?
04.02.2019 - 14:29
![]() Nathalie34 escribió:
Nathalie34 escribió:
Bonjour, Je ne comprends pas ou doit se mettre le marqueur au niveau du talon.
24.01.2019 - 08:31DROPS Design respondió:
Bonjour Nathalie34, le marqueur se met au niveau des mailles sur l'aiguilles, on va mesurer la longueur du pied à partir de ce marqueur, juste avant les diminutions du talon. Bon tricot!
24.01.2019 - 10:29
![]() Ida escribió:
Ida escribió:
Vad menas med "Sticka M.2 över M.1 (1-2-3 m på varje sida av M.1 slätstickas som innan)"? Ska jag sticka bara m2 på ovansidan när jag tar ihop för tå? Vad menas i så fall det i parentesen.
04.12.2018 - 08:21DROPS Design respondió:
Hei Ida. Det betyr at du skal strikke M.2 over de samme maskene som du har strikket M.1 over tidligere. Altså du strikker ikke lenger M.1, men M.2 isteden. Og du har 1-2-3 masker på hver side som strikkes i glattstrikk som før. M.2 strikkes kun på oversiden av foten, på undersiden av fotne feller du som forklart: Strikk de 2 m etter merketråden vridd rett sm og de 2 m før merketråden rett sm. Dette gjøres samtidig som du strikker M.2 og feller som anvist i diagrammet. God fornøyelse
06.12.2018 - 11:46
![]() Rose escribió:
Rose escribió:
I have just completed the decrease for the heel and I’m finding myself on the wrong side with 9 stitches. Should I turn and knit across before picking up the 9? Also can you tell me how many stitches per needle for3 needles as 9 heel stitches does not split evenly?
15.11.2018 - 20:59DROPS Design respondió:
Dear Rose, turn work so that you are from RS again to pick up the sts: work the sts from heel, pick up 9 sts on the left side of the heel sts, knit the 21 sts from upper foot back on needle, pick up 9 sts on the right side of heel. You can divide the sts with all sts from upper foot on one needle and the new sts + the sts from heel divided onto 2 needles. Happy knitting!
16.11.2018 - 09:27
![]() Rosemary escribió:
Rosemary escribió:
Hi there I’m about to decrease the heel, and it says to insert a marker. Can not figure out where or why
15.11.2018 - 18:49DROPS Design respondió:
Dear Rosemary, the marker is inserted in the sts on the row, it will be used to measure the length of the foot and when to start the decreases for toe. Happy knitting!
16.11.2018 - 09:15
![]() Ellen escribió:
Ellen escribió:
Following up on your answer to my "K4-section" question yesterday: I find no K4-section in the pattern. The places where I believe the decreases are to happen are K3-sections. Please point out where you are saying the correct K4-sections are in the pattern instructions. If they are actually K3-sections, I hope you will clarify this for everyone. Thank you.
30.08.2018 - 17:49DROPS Design respondió:
Dear Ellen, We looked again your first question and we believe that you should check again the instructions as there are no k-4 sections in the UK instructions. For decreasing, it says: NOTE! On last row from WS dec as follows: Size 35/37: 1 st in the first and last K-section by K2 tog, Size 38/40 and 41/43: . We hope this will help you out. Happy Knitting
31.08.2018 - 12:02
![]() Ellen escribió:
Ellen escribió:
I believe that the "NOTE! On last row from WS dec as follows: ... 1 st in each of the K4-section by K2 tog" is an error. I think it should be "... 1 st in each of the four K3-sections by K2 tog". By your usage (and common usage), K4 means KNIT 4, and there are no K4-sections in any part of the pattern. Is my interpretation correct? If so, I hope you will clarify the pattern for others.
29.08.2018 - 21:00DROPS Design respondió:
Dear Ellen Thank you so much for your feedback. There are many ways of phrasing pattern instructions. We will take your way into consideration but we are referring to "K4 sections" (which means sections with 4 knit stitches). Actually, we have changed our explanations for the newest patterns thanks to all the input we get from knitters. Thank you again for your feedback. Happy Knitting!
30.08.2018 - 14:26
|
|||||||||||||||||||||||||
Alaskan Cables |
|||||||||||||||||||||||||
 |
 |
||||||||||||||||||||||||
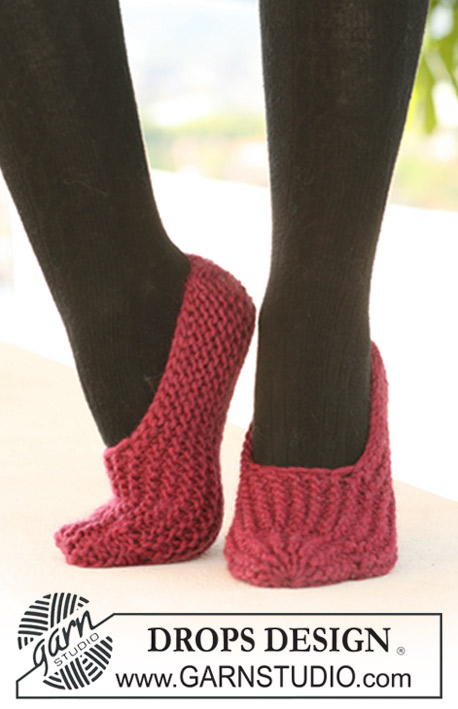
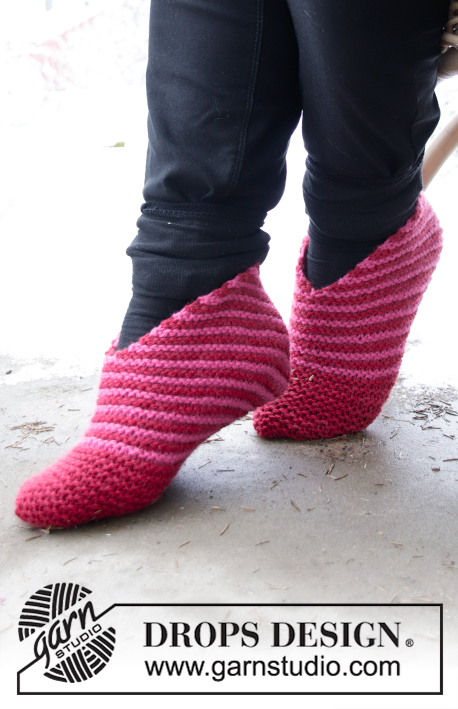
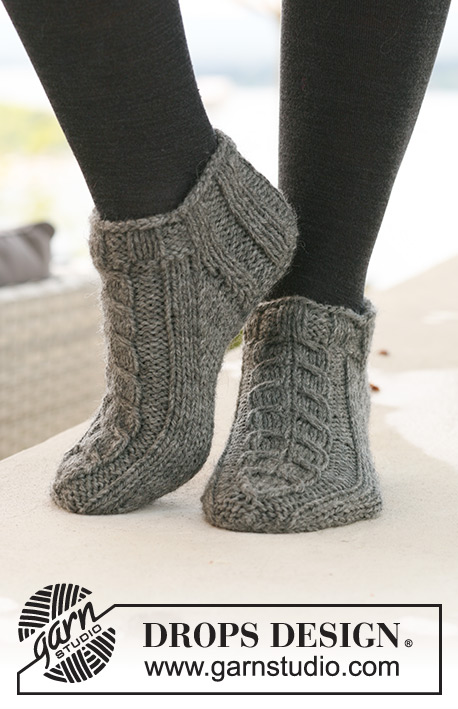
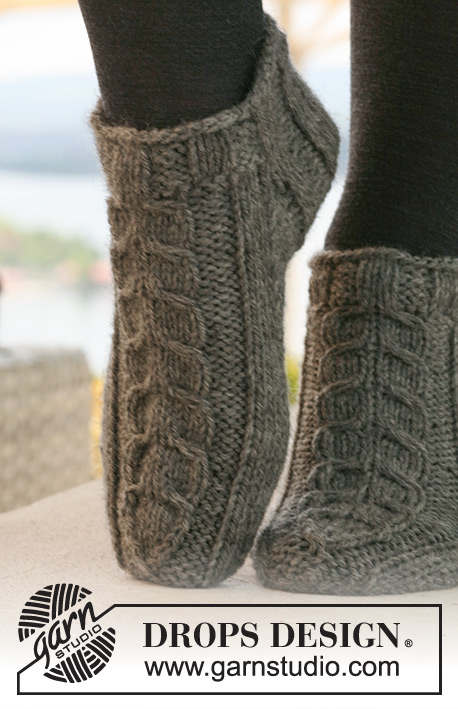
Calcetas cortas DROPS con torsadas / trenzas en “Alaska”.
DROPS 125-15 |
|||||||||||||||||||||||||
|
PATRÓN: Ver diagrama M.1 (= 15 pts) y M.2 (= 15 pts). El diagrama muestra el patrón por el LD. DISMINUCIONES DEL TALÓN (en pt jersey): Vuelta 1 (= LD): Tejer la vta hasta tener 6-7-7 pts restantes, desl el pt sig del derecho, 1d, pasar pt desl por encima, girar la pieza. Vuelta 2 (= LR): Tejer la vta hasta tener 6-7-7 pts restantes, desl el pt sig del revés, 1r, pasar pt desl por encima, girar la pieza. Vuelta 3 (= LD): Tejer la vta hasta tener 5-6-6 pts restantes, desl el pt sig del derecho, 1d, pasar pt desl por encima, girar la pieza. Vuelta 4 (= LR): Tejer la vta hasta tener 5-6-6 pts restantes, desl el pt sig del revés, 1r, pasar pt desl por encima, girar la pieza. Cont disminuyendo de esta manera, con 1 pt menos antes de cada dism, hasta tener 9-11-11 pts en la ag. ------------------------------------------------------ CALCETA: Se teje en redondo. Mon 42-48-48 pts en ag de doble punta tamaño 4.5 mm con Alaska. Tejer 2 vtas del derecho y tejer 5 vtas de resorte, 3d/3r. En la vta sig tejer el PATRÓN – ver arriba – como sigue: Cont en resorte 3d/3r en los primeros 18-24-24 pts, 6-6-6 derechos, M.1 (= 15 pts), 3-3-3 derechos. RECUERDE MANTENER LA MISMA TENSIÓN DE TEJIDO DE LA MUESTRA! Cont de esta manera hasta que la pieza mida 4 cm para todas las tallas. Ahora dejar los primeros 21-27-27 pts en la ag para el talón y desl los últimos 21-21-21 pts en un gancho o seguro aux (= centro del empeine). Tejer resorte de ida y vuelta en los pts del talón por 5-5.5-6 cm. NOTA! En la última vta por el LR dism como sigue: Tamaño 35/37: 1 pt en la primera y última sección de derechos, tejiendo 2 pjd. Tamaño 38/40 y 41/43: 1 pt en cada una de las 4 secciones de derechos, tejiendo 2 pjd. Todos los tamaños: = 19-23-23 pts. Colocar un marcapuntos (MP) en la pieza. Ahora tejer las DISMINUCIONES DEL TALÓN – ver arriba! Después de las dism del talón levantar 9-10-12 pts de cada lado del talón y desl los 21-21-21 pts del gancho o seguro aux de vuelta en la ag = 48-52-56 pts. Colocar un MP de cada lado de los 21-23-25 pts centrales en el empeine (= 3-4-5 pts de cada lado de M.1). Cont en pt jersey y M.1 – AL MISMO TIEMPO dism de cada lado como sigue: Tejer juntos del derecho, por atrás del pt, los 2 últimos pts antes del primer MP en el empeine, y tejer juntos del derecho los primeros 2 pts después del segundo MP en el empeine. Repetir la dism en vtas alternas un total de 6-7-7 veces = 36-38-42 pts. Cont hasta que la pieza mida 18-20-22 cm a partir del MP en el talón – ajustar después de 1 repetición completa de M.1 (= aprox 4-4-5 cm restantes). Colocar un MP de cada lado con 19-19-21 pts debajo del pie y 17-19-21 pts en el empeine (= 1-2-3 pts de cada lado de M.1). Ahora dism para los dedos. LEER TODA LA SECCIÓN SIGUIENTE ANTES DE CONTINUAR: (NOTA! dism de forma diferente debajo del pie y empeine, pero hacer las disminuciones en las mismas vueltas). Dism debajo del pie como sigue: Tejer juntos del derecho, por atrás, los 2 pts después del MP y tejer juntos del derecho los 2 pts antes del MP. Repetir la dism en vtas alternas un total de 4-4-4 veces, después en cada vta un total de 3-3-4 veces. AL MISMO TIEMPO dism en el empeine como sigue: Tejer M.2 sobre M.1 (1-2-3 pts de cada lado de M.1 tejidos en pt jersey como antes). Terminar tejiendo del revés los últimos 3 pts en la última vta para el Tamaño 41/43 = 10-12-14 pts restantes en la ag. Cortar el hilo, pasar a través de los pts restantes y asegurar. |
|||||||||||||||||||||||||
Explicaciones del diagrama |
|||||||||||||||||||||||||
|
|||||||||||||||||||||||||
 |
|||||||||||||||||||||||||
¿Terminaste este patrón?Entonces, etiqueta tus fotos con #dropspattern o envíalas a la galería #dropsfan. ¿Necesitas ayuda con este patrón?Encontrarás 17 videos tutoriales, un espacio para comentarios/preguntas y más visitando la página del patrón en garnstudio.com © 1982-2026 DROPS Design A/S. Todos los derechos reservados. Este documento, incluyendo todas sus sub-secciones, está protegido por los derechos de autor (copyright). Lee más acerca de lo que puedes hacer con nuestros patrones en la parte de abajo de cada patrón de nuestro sitio. |
|||||||||||||||||||||||||


Con más de 40 años en el diseño de modelos de punto y de ganchillo, DROPS Design ofrece una de las más vastas colecciones de patrones gratuitos en el internet - traducidos en 17 idiomas. Al día de hoy, contamos con 324 catálogos y 12291 patrones - de los cuales 11689 están traducidos en español.
Nosotros trabajamos con mucho esmero para brindarte lo mejor que las labores de punto y ganchillo tienen para ofrecer,inspiración y consejos, así como hilos de magnífica calidad a precios increíbles! Te gustaría usar nuestros patrones para otro fin además del uso personal? Puedes leer acerca de lo que estás permitida a hacer en el texto de Copyright en la parte de abajo de todos nuestros patrones. Felices labores!
Escribe un comentario sobre DROPS 125-15
¡Nos encantaría saber qué piensas acerca de este patrón!
Si quieres escribir una pregunta referente al patrón, por favor asegúrate de elegir la categoría correcta en el formulario debajo, para acelerar el proceso de respuesta. Los campos obligatorios están marcados con un *.