Comentarios / Preguntas (146)
![]() MAIZIE MORRIS escribió:
MAIZIE MORRIS escribió:
OK so i,m to the part were i have 56 sts. can u please do the pattern in order of rows ! To decrease do i decrease just on the upper foot or do i decrease on both the upper & lower foot ?
15.01.2020 - 04:03DROPS Design respondió:
Dear Mrs Morris, you will decrease only the stitches on lower foot: work until 2 stitches remain before the 25 sts for upper foot, knit 2 sts twisted together, work the 25 sts for upper foot, knit 2 sts together (= 2 stitches decreased). Repeat this decrease round every other round a total of 7 times = 42 sts remain. Happy knitting!
15.01.2020 - 09:39
![]() Donna escribió:
Donna escribió:
I’m confused in the section before you decrease for the toes where it says to continue until piece measures 8” from marker on heel - adjust to after a full repeat of M 1(=approx 1 1/2 “ remain). What does this mean?
15.01.2020 - 01:19DROPS Design respondió:
Dear Donna, you should work until piece measures 8" from the marker on heel, but adjust these measurement so that you worked the last row in M.1, ie you might have to work some more or few less rows, but you should finish a whole M.1 in height before starting M.2 and decrease for toe. Happy knitting!
15.01.2020 - 09:24
![]() MAIZIE MORRIS escribió:
MAIZIE MORRIS escribió:
I don,t understand this pattern either its not explained very well ....when doing the the rib do u do the the heel sts.. before M1 or do you do you continue for 1 1/2 " while doing the the pattern M1 for top top of th foot
11.01.2020 - 16:15DROPS Design respondió:
Dear Mrs Morris, you first work rib over all stitches, then work rib over the first 18-24 sts, K6, M.1 over the next 15 sts and K3 until piece measures 4 cm. Then work heel over the first 21-27 sts (slip remaining stitches on a thread). Happy knitting!
13.01.2020 - 09:14
![]() Mary Powers escribió:
Mary Powers escribió:
I have been trying to knit this pattern as written . But , it doesn't make sense to me??? After the knit 3/Purl 3 And the NOTE: After the Sizes. It says to Dec. 1 st. in each of the knit 4 Sections? What Knit 4 sections? Do you mean the K3 sections as in K3/P3? Or am I totally missing this? Jan. 04, 2020. Fist time I wrote the new year out! Many thanks in advance, Mary
04.01.2020 - 18:18DROPS Design respondió:
Dear Mrs Powers, there are now 27 sts on needle (K3, P3) x 4, K3 = there is a total of 4 sections with 3 knitted stitches seen from WS (= the purl sections, seen from RS) = decrease 1 stitch in each of these sections by K2 tog. Happy knitting!
06.01.2020 - 08:09
![]() Meintje Zwerver escribió:
Meintje Zwerver escribió:
Ik denk dat er een fout in staat. Bij Sokken in regel 3 staat : " brei 6 st recht, M1, 3 st recht. " Moet dit laatste niet" averechts" zijn? Ik kom overigens met 48 st voor de rest van de toer uit op 3 recht ipv 3 av. Met andere woorden, ik mis eigenlijk 3 st. Of heb ik dat mis? Groet Meintje Zwerver
14.10.2019 - 11:06DROPS Design respondió:
Dag Meintje
De laatste 3 steken brei je recht, zodat er aan beide kanten naast telpatroon M.1 3 rechte steken komen. Als je de eerst 24 steken in boordsteek breit, dan 6 recht, dan M.1 (15 st) en dan 3 recht, dan kom je op 48 steken (24+6+15+3).
15.10.2019 - 16:05
![]() Roxane Bay escribió:
Roxane Bay escribió:
Do you have a link to the pattern written out? I have a very difficult time with graphs :)
17.08.2019 - 02:52DROPS Design respondió:
Dear Mrs Bay, please find here how to read knitting diagrams. Happy knitting!
19.08.2019 - 09:18
![]() Sandra escribió:
Sandra escribió:
What wool gauge is this - double knit - or thicker Thanks
26.06.2019 - 06:27DROPS Design respondió:
Dear Sandra, please read more about the yarn here - for any further individual assistance, you are welcome to contact our DROPS stores shipping worldwide. Happy knitting!
26.06.2019 - 06:41
![]() Margaret Picoulin escribió:
Margaret Picoulin escribió:
I just looked at it today. Have not made it yet.
22.04.2019 - 09:47
![]() Lena escribió:
Lena escribió:
After picking up the ten stitches from the first side. Do you knit the 21 stitches across and then pick up the other 10 stitches?
27.02.2019 - 04:32DROPS Design respondió:
Dear Lena, yes correct: you first work the 23 sts from heel, then pick up 10 sts on the left side of heel, work the 21 sts from upper foot, pick up 10 sts on the right side of heel and join = 52 sts. Happy knitting!
27.02.2019 - 09:02
![]() Marcheta Gallant escribió:
Marcheta Gallant escribió:
When you start M1 , it saysto continue for 4cm. Is this from the start of the M1?
12.02.2019 - 01:26DROPS Design respondió:
Hello Marcheta. You measure 4 cm from the very start of the job. Happy knitting!
12.02.2019 - 09:24
Alaskan Cables |
|||||||||||||||||||||||||
 |
 |
||||||||||||||||||||||||
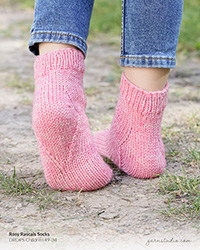
Calcetas cortas DROPS con torsadas / trenzas en “Alaska”.
DROPS 125-15 |
|||||||||||||||||||||||||
|
PATRÓN: Ver diagrama M.1 (= 15 pts) y M.2 (= 15 pts). El diagrama muestra el patrón por el LD. DISMINUCIONES DEL TALÓN (en pt jersey): Vuelta 1 (= LD): Tejer la vta hasta tener 6-7-7 pts restantes, desl el pt sig del derecho, 1d, pasar pt desl por encima, girar la pieza. Vuelta 2 (= LR): Tejer la vta hasta tener 6-7-7 pts restantes, desl el pt sig del revés, 1r, pasar pt desl por encima, girar la pieza. Vuelta 3 (= LD): Tejer la vta hasta tener 5-6-6 pts restantes, desl el pt sig del derecho, 1d, pasar pt desl por encima, girar la pieza. Vuelta 4 (= LR): Tejer la vta hasta tener 5-6-6 pts restantes, desl el pt sig del revés, 1r, pasar pt desl por encima, girar la pieza. Cont disminuyendo de esta manera, con 1 pt menos antes de cada dism, hasta tener 9-11-11 pts en la ag. ------------------------------------------------------ CALCETA: Se teje en redondo. Mon 42-48-48 pts en ag de doble punta tamaño 4.5 mm con Alaska. Tejer 2 vtas del derecho y tejer 5 vtas de resorte, 3d/3r. En la vta sig tejer el PATRÓN – ver arriba – como sigue: Cont en resorte 3d/3r en los primeros 18-24-24 pts, 6-6-6 derechos, M.1 (= 15 pts), 3-3-3 derechos. RECUERDE MANTENER LA MISMA TENSIÓN DE TEJIDO DE LA MUESTRA! Cont de esta manera hasta que la pieza mida 4 cm para todas las tallas. Ahora dejar los primeros 21-27-27 pts en la ag para el talón y desl los últimos 21-21-21 pts en un gancho o seguro aux (= centro del empeine). Tejer resorte de ida y vuelta en los pts del talón por 5-5.5-6 cm. NOTA! En la última vta por el LR dism como sigue: Tamaño 35/37: 1 pt en la primera y última sección de derechos, tejiendo 2 pjd. Tamaño 38/40 y 41/43: 1 pt en cada una de las 4 secciones de derechos, tejiendo 2 pjd. Todos los tamaños: = 19-23-23 pts. Colocar un marcapuntos (MP) en la pieza. Ahora tejer las DISMINUCIONES DEL TALÓN – ver arriba! Después de las dism del talón levantar 9-10-12 pts de cada lado del talón y desl los 21-21-21 pts del gancho o seguro aux de vuelta en la ag = 48-52-56 pts. Colocar un MP de cada lado de los 21-23-25 pts centrales en el empeine (= 3-4-5 pts de cada lado de M.1). Cont en pt jersey y M.1 – AL MISMO TIEMPO dism de cada lado como sigue: Tejer juntos del derecho, por atrás del pt, los 2 últimos pts antes del primer MP en el empeine, y tejer juntos del derecho los primeros 2 pts después del segundo MP en el empeine. Repetir la dism en vtas alternas un total de 6-7-7 veces = 36-38-42 pts. Cont hasta que la pieza mida 18-20-22 cm a partir del MP en el talón – ajustar después de 1 repetición completa de M.1 (= aprox 4-4-5 cm restantes). Colocar un MP de cada lado con 19-19-21 pts debajo del pie y 17-19-21 pts en el empeine (= 1-2-3 pts de cada lado de M.1). Ahora dism para los dedos. LEER TODA LA SECCIÓN SIGUIENTE ANTES DE CONTINUAR: (NOTA! dism de forma diferente debajo del pie y empeine, pero hacer las disminuciones en las mismas vueltas). Dism debajo del pie como sigue: Tejer juntos del derecho, por atrás, los 2 pts después del MP y tejer juntos del derecho los 2 pts antes del MP. Repetir la dism en vtas alternas un total de 4-4-4 veces, después en cada vta un total de 3-3-4 veces. AL MISMO TIEMPO dism en el empeine como sigue: Tejer M.2 sobre M.1 (1-2-3 pts de cada lado de M.1 tejidos en pt jersey como antes). Terminar tejiendo del revés los últimos 3 pts en la última vta para el Tamaño 41/43 = 10-12-14 pts restantes en la ag. Cortar el hilo, pasar a través de los pts restantes y asegurar. |
|||||||||||||||||||||||||
Explicaciones del diagrama |
|||||||||||||||||||||||||
|
|||||||||||||||||||||||||
 |
|||||||||||||||||||||||||
¿Terminaste este patrón?Entonces, etiqueta tus fotos con #dropspattern o envíalas a la galería #dropsfan. ¿Necesitas ayuda con este patrón?Encontrarás 19 videos tutoriales, un espacio para comentarios/preguntas y más visitando la página del patrón en garnstudio.com © 1982-2026 DROPS Design A/S. Todos los derechos reservados. Este documento, incluyendo todas sus sub-secciones, está protegido por los derechos de autor (copyright). Lee más acerca de lo que puedes hacer con nuestros patrones en la parte de abajo de cada patrón de nuestro sitio. |
|||||||||||||||||||||||||





Escribe un comentario sobre DROPS 125-15
¡Nos encantaría saber qué piensas acerca de este patrón!
Si quieres escribir una pregunta referente al patrón, por favor asegúrate de elegir la categoría correcta en el formulario debajo, para acelerar el proceso de respuesta. Los campos obligatorios están marcados con un *.