
Categorías populares
¿Buscas un hilo?


Comentarios / Preguntas (146)
![]() ROGET Anne escribió:
ROGET Anne escribió:
Y a-t-il moyen de tricoter ce modèle en magic loop?
21.01.2026 - 23:47DROPS Design respondió:
Bonjour Mme Roget, tout à fait, la technique du magic loop s'adapte à tous les modèles. Bon tricot!
23.01.2026 - 09:23
![]() Anna escribió:
Anna escribió:
Hej! Fantastiskt fin socka. Förstår inte ”sätt en markör på var sida av de mittersta 23 m på foten (=4m på var sida av M1). Menas det att jag ska sätta en markör ”utanför” M1? På maska 4 på båda sidor om M1? Det betyder att jag ska sätta markör på de maskorna tagit upp på sidan hälen? Stämmer detta? Undrar också vilken sida man gör vridna o vanliga på? Kan man uttrycka sig utifrån att man har sockan på foten (höger o vänster sida). 🤔 Taack!
26.12.2025 - 20:54DROPS Design respondió:
Hei Anna. Ja, du setter da 1 merke forbi den første/siste maske som ble strikket opp av de 10. I hver side. mvh DROPS Design
19.01.2026 - 12:57
![]() Sheila escribió:
Sheila escribió:
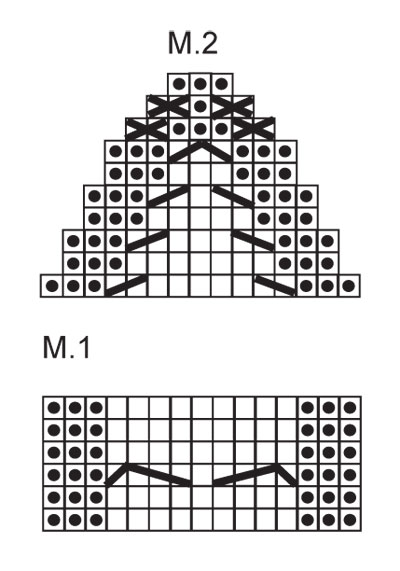
The patterns, M1 and M2 are shown from the right side. Does that mean that when knitting from the wrong side, you reverse the stitches [(ie purl where it says knit, and knit where it says purl) so that you end up with a stockinette stitch? Or do you want a garter stitch?
25.03.2025 - 17:10DROPS Design respondió:
Dear Sheila, socks are worked in the round so diagrams will always be worked from the right side, read them from the right towards the left on every round. This means first cable is worked on 3rd row then every 6th round. And stitches are worked as shown in diagram on every round; P over P and K over K. Happy knitting!
26.03.2025 - 07:44
![]() Cherie escribió:
Cherie escribió:
Your answer to my question on where to out the markers didn’t answer my question “on each side of the foot with 19-19-21 stitches for under foot and 17-19-21 stitches for top of foot” do they go before and after the 19 stitches? Or are there 4 markers on each side of the 19 stitches under and top? Repeating what’s already written on the pattern isn’t helping. Need very clear placement of where the markers are going
18.03.2025 - 14:39
![]() Cherie escribió:
Cherie escribió:
On the toe decrease it says insert marker on each side. Each side of what? Between what stitches do they go? Horribly written pattern I must say.
18.03.2025 - 03:25DROPS Design respondió:
Dear Cherie, these markers should be inserted on each side of the foot with 19-19-21 stitches for under foot and 17-19-21 stitches for top of foot. Hope it can help. Happy knitting!
18.03.2025 - 10:28
![]() Sheila escribió:
Sheila escribió:
Hi. I am confused about the rows of HEEL DECREASES. with 23 stitches, I am instructed to knit until 7 stitches remain, then slip a stitches, K1, psso, which leaves 5 stitches not yet knit on the needle. But then it says to turn piece. I assume then you go on to Row 2 of the heel decreases. But what happens to the 5 stitches not yet knit on the needle?
16.03.2025 - 22:52DROPS Design respondió:
Dear Sheila, these 5 stitches are left unworked for now but, in the next row, when you knit until less stitches remain, you will be taking 1 of these unworked stitches for the final decreases. Hereis a video example on how these decreases are worked. Happy knitting!
16.03.2025 - 23:43
![]() Anja escribió:
Anja escribió:
Hei:) veldig fint mønster:) jeg synes det er vanskelig å forstå følgende: etter jeg har strikket vrangbord og M1 en gang, skal jeg da fortsette med bare M1 en rapport til eller gå rett over til M2, og når skal jeg isåfall begynne å strikke M2? beklager om jeg spør "dumt"? På forhånd takk for svar:)
11.03.2025 - 17:45DROPS Design respondió:
Hei Anja, Når du har strikket 4 cm med vrangbord og M.1, strikker du videre kun på hælen. Og da strikker du vrangbord, fram og tilbake over hælmaskene. Når du setter sammen maskene til foten, fortsetter du med 1 rapport av M.1 over maskene på toppen av foten. Du begynner med M.2 etter den ene rapporten av M.1. God fornøyelse!
12.03.2025 - 06:22
![]() Rasha escribió:
Rasha escribió:
Dear Droos Designs, I’m working the part before the decrease for size 7.5-9 where it says “ 1 st in each of the K4-section by K2 tog.” this part is not clear, there is no k4 part in the work and also now I have 27 sts on the needle that should be decreased to 23 sts, it is not clear how I should do it, can you explain how many stitched and how many rows I should decrease? Thank you
29.12.2024 - 18:57DROPS Design respondió:
Dear Rasha, there is a typo in the pattern. It should say in each of the 4 K-sections. So in every K3/P3 in the 24 rib stitches for the heel you will decrease 1 knit stitch in each K3 by working k2tog, to get a K2/P3 rib. This way you will decrease 4 stitches, from 27 to 23. These stitches are all decreased in the same row. Happy knitting!
30.12.2024 - 23:38
![]() Rasha escribió:
Rasha escribió:
Dear Drops designs, I am currently working on this beautiful piece but I got confused by the part where it says “ Continue like this until piece measures 4 cm / 1½" for all sizes” Do you mean 4 cm from the beginning or 4 cm from the start of M1? Thank you
29.12.2024 - 08:56DROPS Design respondió:
Dear Rasha, this mean whole piece, i.e.4 cm from beginning. Happy knitting!
29.12.2024 - 11:22
![]() Omama escribió:
Omama escribió:
Hallo, Frage ... warum die gleiche Maschenzahl für die beiden größeren Modelle? Habe die mittlere Grösse angeschlagen 48 M, viel zu weit für die Füsslänge 24. Habe schon viel gestrickt aber die gleiche Maschenzahl für zwei verschiedene Größen hatte ich noch nie. Und die Maschenprobe stimmte. Ich brauche für Schuhgröße 37, Fusslänge 24, da sind 48 M der Wahnsinn. Ist das ein Druckfehler bitte? LG
18.12.2024 - 19:56DROPS Design respondió:
Liebe Frau Omama, Schuhgröße 37 ist lieber 1. Größe, dann können Sie den Fuß stricken, bis die Arbeit 20 cm (anstatt 18 cm) stricken, und dann die Spitze wie bei der 1. Größe stricken, so wird die Arbeit schmaler aber trotzdem genügend lang. Viel Spaß beim Stricken!
19.12.2024 - 09:17
|
|||||||||||||||||||||||||
Alaskan Cables |
|||||||||||||||||||||||||
 |
 |
||||||||||||||||||||||||
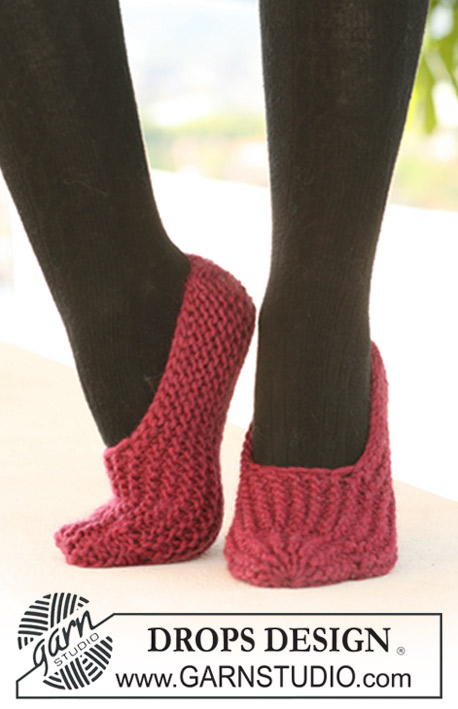
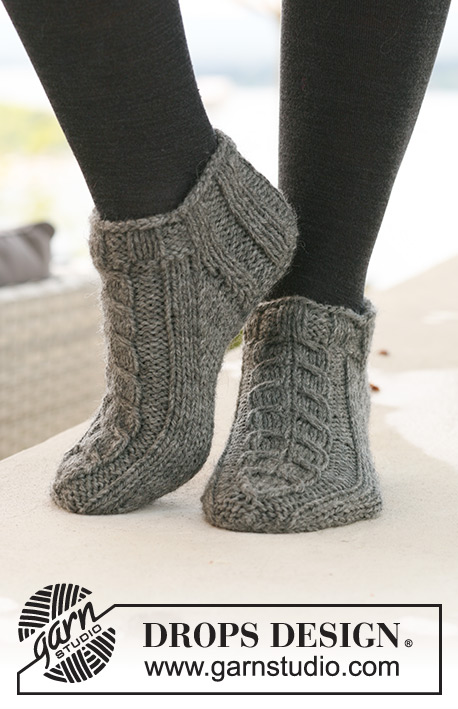
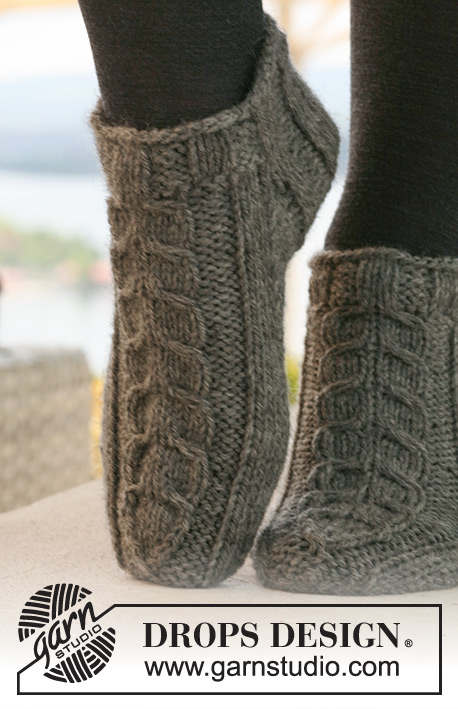
Calcetas cortas DROPS con torsadas / trenzas en “Alaska”.
DROPS 125-15 |
|||||||||||||||||||||||||
|
PATRÓN: Ver diagrama M.1 (= 15 pts) y M.2 (= 15 pts). El diagrama muestra el patrón por el LD. DISMINUCIONES DEL TALÓN (en pt jersey): Vuelta 1 (= LD): Tejer la vta hasta tener 6-7-7 pts restantes, desl el pt sig del derecho, 1d, pasar pt desl por encima, girar la pieza. Vuelta 2 (= LR): Tejer la vta hasta tener 6-7-7 pts restantes, desl el pt sig del revés, 1r, pasar pt desl por encima, girar la pieza. Vuelta 3 (= LD): Tejer la vta hasta tener 5-6-6 pts restantes, desl el pt sig del derecho, 1d, pasar pt desl por encima, girar la pieza. Vuelta 4 (= LR): Tejer la vta hasta tener 5-6-6 pts restantes, desl el pt sig del revés, 1r, pasar pt desl por encima, girar la pieza. Cont disminuyendo de esta manera, con 1 pt menos antes de cada dism, hasta tener 9-11-11 pts en la ag. ------------------------------------------------------ CALCETA: Se teje en redondo. Mon 42-48-48 pts en ag de doble punta tamaño 4.5 mm con Alaska. Tejer 2 vtas del derecho y tejer 5 vtas de resorte, 3d/3r. En la vta sig tejer el PATRÓN – ver arriba – como sigue: Cont en resorte 3d/3r en los primeros 18-24-24 pts, 6-6-6 derechos, M.1 (= 15 pts), 3-3-3 derechos. RECUERDE MANTENER LA MISMA TENSIÓN DE TEJIDO DE LA MUESTRA! Cont de esta manera hasta que la pieza mida 4 cm para todas las tallas. Ahora dejar los primeros 21-27-27 pts en la ag para el talón y desl los últimos 21-21-21 pts en un gancho o seguro aux (= centro del empeine). Tejer resorte de ida y vuelta en los pts del talón por 5-5.5-6 cm. NOTA! En la última vta por el LR dism como sigue: Tamaño 35/37: 1 pt en la primera y última sección de derechos, tejiendo 2 pjd. Tamaño 38/40 y 41/43: 1 pt en cada una de las 4 secciones de derechos, tejiendo 2 pjd. Todos los tamaños: = 19-23-23 pts. Colocar un marcapuntos (MP) en la pieza. Ahora tejer las DISMINUCIONES DEL TALÓN – ver arriba! Después de las dism del talón levantar 9-10-12 pts de cada lado del talón y desl los 21-21-21 pts del gancho o seguro aux de vuelta en la ag = 48-52-56 pts. Colocar un MP de cada lado de los 21-23-25 pts centrales en el empeine (= 3-4-5 pts de cada lado de M.1). Cont en pt jersey y M.1 – AL MISMO TIEMPO dism de cada lado como sigue: Tejer juntos del derecho, por atrás del pt, los 2 últimos pts antes del primer MP en el empeine, y tejer juntos del derecho los primeros 2 pts después del segundo MP en el empeine. Repetir la dism en vtas alternas un total de 6-7-7 veces = 36-38-42 pts. Cont hasta que la pieza mida 18-20-22 cm a partir del MP en el talón – ajustar después de 1 repetición completa de M.1 (= aprox 4-4-5 cm restantes). Colocar un MP de cada lado con 19-19-21 pts debajo del pie y 17-19-21 pts en el empeine (= 1-2-3 pts de cada lado de M.1). Ahora dism para los dedos. LEER TODA LA SECCIÓN SIGUIENTE ANTES DE CONTINUAR: (NOTA! dism de forma diferente debajo del pie y empeine, pero hacer las disminuciones en las mismas vueltas). Dism debajo del pie como sigue: Tejer juntos del derecho, por atrás, los 2 pts después del MP y tejer juntos del derecho los 2 pts antes del MP. Repetir la dism en vtas alternas un total de 4-4-4 veces, después en cada vta un total de 3-3-4 veces. AL MISMO TIEMPO dism en el empeine como sigue: Tejer M.2 sobre M.1 (1-2-3 pts de cada lado de M.1 tejidos en pt jersey como antes). Terminar tejiendo del revés los últimos 3 pts en la última vta para el Tamaño 41/43 = 10-12-14 pts restantes en la ag. Cortar el hilo, pasar a través de los pts restantes y asegurar. |
|||||||||||||||||||||||||
Explicaciones del diagrama |
|||||||||||||||||||||||||
|
|||||||||||||||||||||||||
 |
|||||||||||||||||||||||||
¿Terminaste este patrón?Entonces, etiqueta tus fotos con #dropspattern o envíalas a la galería #dropsfan. ¿Necesitas ayuda con este patrón?Encontrarás 17 videos tutoriales, un espacio para comentarios/preguntas y más visitando la página del patrón en garnstudio.com © 1982-2026 DROPS Design A/S. Todos los derechos reservados. Este documento, incluyendo todas sus sub-secciones, está protegido por los derechos de autor (copyright). Lee más acerca de lo que puedes hacer con nuestros patrones en la parte de abajo de cada patrón de nuestro sitio. |
|||||||||||||||||||||||||


Con más de 40 años en el diseño de modelos de punto y de ganchillo, DROPS Design ofrece una de las más vastas colecciones de patrones gratuitos en el internet - traducidos en 17 idiomas. Al día de hoy, contamos con 324 catálogos y 12291 patrones - de los cuales 11689 están traducidos en español.
Nosotros trabajamos con mucho esmero para brindarte lo mejor que las labores de punto y ganchillo tienen para ofrecer,inspiración y consejos, así como hilos de magnífica calidad a precios increíbles! Te gustaría usar nuestros patrones para otro fin además del uso personal? Puedes leer acerca de lo que estás permitida a hacer en el texto de Copyright en la parte de abajo de todos nuestros patrones. Felices labores!
Escribe un comentario sobre DROPS 125-15
¡Nos encantaría saber qué piensas acerca de este patrón!
Si quieres escribir una pregunta referente al patrón, por favor asegúrate de elegir la categoría correcta en el formulario debajo, para acelerar el proceso de respuesta. Los campos obligatorios están marcados con un *.