
Popular categories
Looking for a yarn?


Comments / Questions (15)
![]() Anna wrote:
Anna wrote:
Is er geen telplatroon/ Diagram voor DROPS 218-36? November Sky Jacket
28.04.2026 - 22:34DROPS Design answered:
Dag Anna,
Deze zou er wel bij horen staan. Misschien is het nodig om even de browser cache leeg te maken en de pagina opnieuw te laden.
29.04.2026 - 19:26
![]() Janny wrote:
Janny wrote:
Bonjour, Je suis étonnée qu'il n'y ait pas de différence entre le dos et le devant pour l'encolure : est-ce que le dos ne va pas être trop échancré, ou le devant trop près du cou ? Merci d'avance.
02.12.2025 - 10:26DROPS Design answered:
Bonjour Janny, c'est très fréquent dans ce type de construction; si vous voulez ajouter des rangs raccourcis pour que l'encolure dos soit plus haute que l'encolure devant, vous pouvez vous inspirer de cette vidéo (pour un pull, mais adaptable facilement pour un gilet). Bon tricot!
02.12.2025 - 17:13
![]() Marie wrote:
Marie wrote:
Er det realistisk at forsøge mig med at omsætte den fine opskrift fra knapper til lynlås? Og i så fald; har I nogle gode råd/erfaringer?
12.02.2025 - 07:43DROPS Design answered:
Hej Marie, ja det vil da være fint :) Prøv at google "sy lynlås i strik" her får du mange gode råd. Vi har desværre ikke nogle videoer med lynlåse :)
12.02.2025 - 13:00
![]() Carina wrote:
Carina wrote:
Hola Si se hacen tantas disminuciones en las mangas no quedan muy estrechas? Yo creo que no voy a hacer tantas, me la iré probando a medida que la voy tejiendo, pero me parecen demasiadas Gracias
24.01.2025 - 18:36DROPS Design answered:
Hola Carina, si trabajas correctamente con la tensión indicada deberías tener suficientes puntos para el puño y la manga no debería quedar muy estrecha. Pero puedes hacer menos disminuciones si prefieres.
25.01.2025 - 20:29
![]() Marjo wrote:
Marjo wrote:
Het patroon is gecorrigeerd Maar helaas staan er nog wel een aantal fouten in. Misschien handig om het nog eens goed na te kijken!!
21.06.2024 - 18:56
![]() Helga Eitel wrote:
Helga Eitel wrote:
Guten Tag ,\\r\\n ich möchte diese Jacke mit Fabel Print stricken ohne Streifen. Ist es richtig dass ich für die Größe XL 400 g Fabel Print benötige?\\r\\nFür eine Antwort bedanke ich mich herzlich.\\r\\nFreundliche Grüße\\r\\nHelga Eitel
24.03.2024 - 19:33DROPS Design answered:
Liebe Frau Eitel, vielleicht würden Sie etwas weniger brauchen, aber da diese Jacke mit 2 Farben gestrickt wurde, hat man nur die Garnmenge für jede Farbe (und die Jacke haben wir leider nicht mehr). Gerne kann Ihnen damit Ihr DROPS Händler - auch per Telefon oder per E-Mail - weiterhelfen. Viel Spaß beim Stricken!
02.04.2024 - 09:20
![]() Katelijne Van Gansbeke wrote:
Katelijne Van Gansbeke wrote:
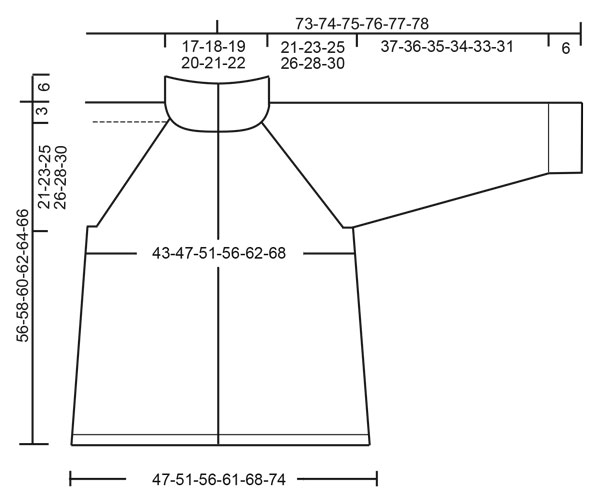
Hallo, ik zou deze vest graag breien maar ik heb moeite om mijn maat te bepalen. Ik vind geen diagram met de maten terug. Bij mijn vorige projecten van garnstudio stond ook telkens een tekening met maten van het patroon. Kan u me helpen aub?
29.09.2021 - 13:11DROPS Design answered:
Dag Katelijne,
Onderaan de beschrijving staat een tekening van het vest met de maten. Het eerste getal van de reeks getallen is maat S, het tweede getal maat M, enzovoort. Om de juiste maat te kiezen kun je een bestaand kledingstuk erbij nemen die goed zit en dan de maten vergelijken met de maten in de tekening.
30.09.2021 - 09:23
![]() Marianne wrote:
Marianne wrote:
Dank voor uw antwoord. Tot zover begreep ik het wel. Maar wat doe ik met de steek met de markeerdraad erin, aan weerszijden waarvan ik meerder. Brei ik die steek gewoon net als alle andere steken? Haal ik die af? Dat is eigenlijk mijn vraag.
25.04.2021 - 17:26DROPS Design answered:
Dag Marianne,
De steken met de markeerdraden brei je gewoon verder zoals hiervoor. Voor de raglan meerder je aan beide kanten van de steek met de markeerdraad.
25.04.2021 - 17:39
![]() Marianne wrote:
Marianne wrote:
Ik heb van dit patroon (maat M) de pas gebreid tot en met de eerste meerdering, daar waar ik markeerdraden moet invoegen. Er staat dat de markeerdraden IN de 29e, 50e etc. steek moeten. Er IN, dus niet tussen twee steken in? Ik heb 141 steken op de naald. Als ik de steken optel voor de verschillende delen - voorpanden, achterpand, mouwen- kom ik op 137. Wat doe ik dan met die 4 steken met markeerdraad erIN? Ik snap hier niets van. Graag uw uitleg.
21.04.2021 - 22:12DROPS Design answered:
Dag Marianne,
Er staat aangegeven hoeveel steken er op de voorpanden, op de mouwen en op het achterpand staan tussen de steken met de markeerdraden. Dit zijn inderdaad in totaal 137 steken. Als je daar de 4 steken met de markeerdraad bij op telt kom je op 141 steken. In de volgende paragraaf staat aangegeven hoe je meerdert (aan beide zijden van de steek met de markeerdraad).
25.04.2021 - 14:02
![]() TERNON wrote:
TERNON wrote:
Après le col, avec l'aiguille circulaire mais c'est un gilet donc ouvert devant comment faire ; sur vos explications rang 1(=sur l'endroit); rang 2(=sur l'endroit) rang3(=sur l'envers) rang 4 (=sur l'envers) comment faire deux rangs consécutifs sur l'endroit puis sur l'envers alors que le tricot est un gilet non fermé (circulaire)?
17.04.2021 - 16:48DROPS Design answered:
Bonjour Mme Ternon, Les rayures se tricotent toujours avec 2 rangs sur l'endroit suivis de 2 rangs sur l'envers: tricotez le 1er rang sur l'endroit, puis glissez les mailles de nouveau à l'autre extrémité de l'aiguille circulaire pour tricoter le 2ème rang sur l'endroit également (avec l'autre couleur), tournez et tricotez le 3ème rang sur l'envers (avec la 1ère couleur), glissez les mailles de nouveau à l'autre extrémité de l'aiguille pour tricoter le 4ème rang sur l'envers de nouveau avec la 2ème couleur. Répétez ces 4 rangs, et adaptez le point mousse comme expliqué en le tricotant soit à l'endroit, soit à l'envers. Bon tricot!
19.04.2021 - 08:14
|
|
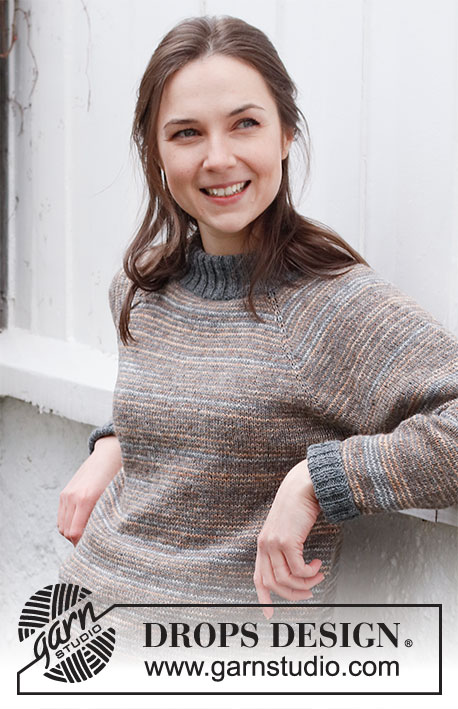
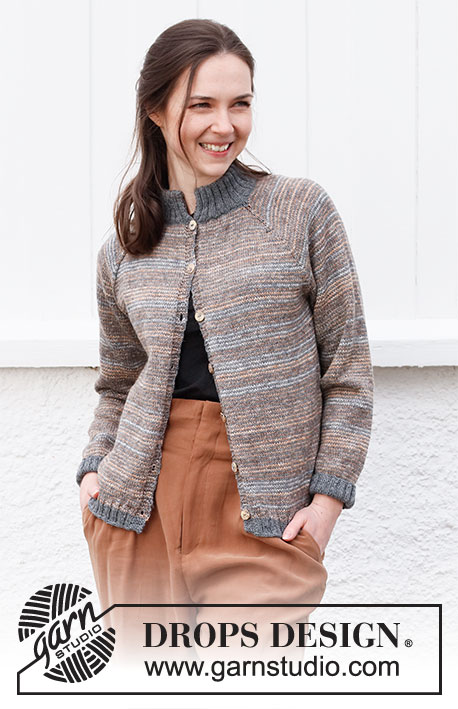
November Sky Jacket#novemberskyjacket |
|
 |
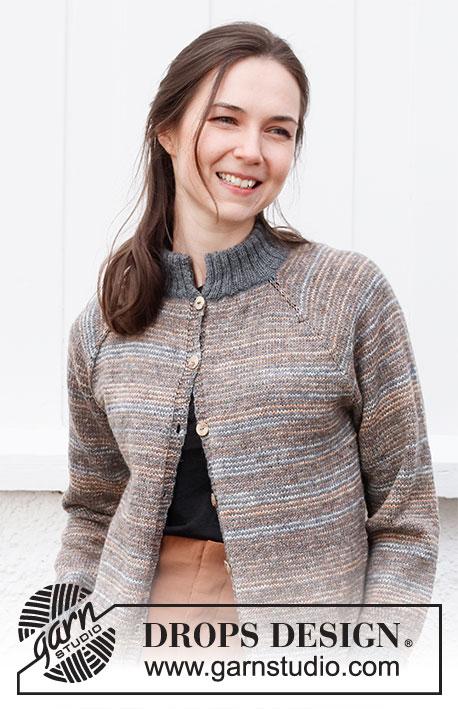 |
Knitted jacket with raglan and stripes in DROPS Fabel. Piece is knitted top down with double neck edge. Size: S - XXXL
DROPS 218-36 |
|
|
------------------------------------------------------- EXPLANATION FOR THE PATTERN: ------------------------------------------------------- GARTER STITCH/RIDGE (worked back and forth): Knit all rows. 1 ridge in height = Knit 2 rows. NOTE! When working STRIPES there is a separate explanation for garter stitch – read explanation under STRIPES. STRIPES: Work yoke and body with stripes in alternately 1 strand from each colour. To get the colour change in the same side, work 1 row sand from right side and 1 row grey from right side, then work 1 row sand from wrong side and 1 row grey from wrong side. On sleeves work alternately 1 round grey and 1 round sand to fit with yoke. NOTE! When working GARTER STITCH in stripes, do this over 4 rows as follows: ROW 1 (sand from right side): knit ROW 2 (grey from right side): purl ROW 3 (sand from wrong side): purl ROW 4 (grey from wrong side): knit INCREASE TIP-1 (evenly): To calculate how to increase evenly, use the total number of stitches on row (e.g. 116 stitches), minus bands (e.g. 10 stitches) and divide the remaining stitches by number of increases to be done (e.g. 20) = 5.3. In this example increase after approx. every 5th stitch. Do not increase over bands. Increase 1 stitch by making 1 yarn over, on next row work yarn over twisted to avoid holes. INCREASE TIP-2 (applies to sides of body): All increases are done from the right side. Begin 1 stitch before stitch with marker, make 1 yarn over, knit 1, make 1 yarn over (= 2 stitches increased). Repeat at both markers. On next row work yarn overs twisted to avoid holes. RAGLAN: Increase 1 stitch on each side of stitch with marker thread at every transition between body and sleeves. All increases are done from the right side by making 1 yarn over, work yarn over twisted on next row to avoid holes. Work the increased stitches in stocking stitch. DECREASE TIP (applies to mid under sleeves): Begin 2 stitches before stitch with marker, knit 2 twisted together, knit 1 (stitch with marker), knit 2 together (= 2 stitches decreased). BUTTONHOLES: Decrease for first buttonhole on first row from right side after rib in neck, then decrease the next 6-6-6-6-6-6 approx. 8-8½-9-9-9½-10 cm apart. Decrease for buttonholes on right band as follows: Work until 3 stitches remain on needle (seen from right side), make 1 yarn over, knit 2 together and knit 1. On next row knit yarn over to make holes. ------------------------------------------------------- START THE PIECE HERE: ------------------------------------------------------- JACKET - SHORT OVERVIEW OF THE PIECE: Work back and forth on circular needle from mid front, work top down. Work sleeves in the round on double pointed needles. Work entire piece in STRIPES - see explanation above. YOKE: Cast on 120-136-140-148-152-160 stitches on circular needle size 2.5 mm with grey. Work 1 edge stitch in GARTER STITCH – read explanation above, rib (= knit 2/purl 2) until 3 stitches remain, knit 2 and 1 edge stitch in garter stitch. When piece measures 12 cm, work 1 row from right side to increase as follows: Work 5 band stitches in garter stitch (= band), knit and increase 6-5-11-9-15-13 stitches evenly over the next 110-126-130-138-142-150 stitches - READ INCREASE TIP-1, and finish with 5 stitches in garter stitch (= band) REMEMBER BUTTONHOLES on right band – read explanation above = 126-141-151-157-167-173 stitches. Purl 1 row from wrong side with 5 band stitches in each side in garter stitch. Insert a marker on the inside of band - this is now used for measurements. Insert 4 marker threads in piece (without working the stitches): Insert first marker thread in 26th-29th-30th-33rd-34th-37th stitch on needle, second marker thread in 47th-50th-54th-54th-58th-58th stitch on needle, insert third marker thread in 80th-92nd-98th-104th-110th-116th stitch on needle and insert fourth marker thread in 101st-113rd-122nd-125th-134th-137th stitch on needle. There are now 25-28-29-32-33-36 stitches between stitches with marker thread on each front piece, 32-41-43-49-51-57 stitches on back piece and 20-20-23-20-23-20 stitches on each sleeve. REMEMBER THE KNITTING TENSION! Switch to circular needle size 3 mm- read STRIPES in explanation above, and work as follows: ROW 1 (= right side): Switch to sand. Work 5 band stitches in garter stitch, stocking stitch over the next 20-23-24-27-28-31 stitches, increase 1 stitch on each side of stitch with marker thread for RAGLAN – see explanation above, work stocking stitch over the 20-20-23-20-23-20 stitches on sleeve, increase 1 stitch on each side of stitch with marker, work stocking stitch over the 32-41-43-49-51-57 stitches on back piece, increase 1 stitch on each side of stitch with marker thread, work in stocking stitch over the 20-20-23-20-23-20 stitches on sleeve, increase 1 stitch on each side of stitch with marker thread, work stocking stitch over the next 20-23-24-27-28-31 stitches on front piece and finish with 5 band stitches in garter stitch. ROW 2 (= right side): Switch colour to grey. Work 5 band stitches in garter stitch, stocking stitch until first marker (= left front piece), increase 1 stitch on each side of stitch with marker thread, work in stocking stitch until next marker (= sleeve), increase 1 stitch on each side of stitch with marker thread, work stocking stitch until next marker (= back piece), increase 1 stitch on each side of stitch with marker thread, work stocking stitch until last stitch (= sleeve), increase 1 stitch on each side of stitch with marker thread, work stocking stitch until 5 stitches remain (= right front piece) and work 5 band stitches in garter stitch. ROW 3 (= wrong side): Switch to sand. Work 5 band stitches in garter stitch, purl until 5 stitches remains on needle and work 5 band stitches in garter stitch. ROW 4 (= wrong side): Switch colour to grey. Work 5 band stitches in garter stitch, purl until 5 stitches remains on needle and work 5 band stitches in garter stitch. Continue work and increase on every row from right side like this until 26-28-32-36-40-44 increases for raglan have been done vertically = 334-365-407-445-487-525 stitches on row. Work with stripes until piece measures 21-23-25-26-28-30 cm from marker by the neck. Adjust so that next row is worked from right side, and divide body and sleeves as follows: Work as before over the first 53-58-63-69-76-84 stitches (= left front piece), slip the next 69-75-85-93-99-103 stitches on a stitch holder for sleeve, cast on 7 new stitches under sleeve, work over the next 90-99-111-121-137-151 stitches, slip the next 69-75-85-93-99-103 stitches on a stitch holder for sleeve, cast on 7 new stitches under sleeve, work the last 53-58-63-69-76-84 stitches (= right front piece). Finish body and sleeves separately. Remove the marker threads in piece. NOW MEASURE PIECE FROM HERE! BODY: = 210-229-251-273-303-333 stitches. Insert 1 marker thread in the middle of the 7 stitches cast on under each sleeve and move the marker threads upwards when working. Continue back and forth in stocking stitch with 5 band stitches in garter stitch in each side. When piece measures 3 cm in all sizes, increase 2 stitches in each side - READ INCREASE TIP-2 (= 4 stitches increased). Increase like this every 4-4½4½-4-4-3½ cm 5-5-5-6-6-7 times in total = 230-249-271-297-327-361 stitches. When piece measures 29-29-29-30-30-30 cm, adjust so that next row is worked from right side. Switch to circular needles size 2.5 mm and use colour grey, knit 1 row and increase 6-7-5-7-5-7 stitches evenly = 236-256-276-304-332-368 stitches. Work rib with grey as follows: 5 band stitches in garter stitch, * purl 2/knit 2 *, repeat from *-* until 7 stitches remain, purl 2 and 5 band stitches in garter stitch. Work rib like this with knit over knit, purl over purl and garter stitch over garter stitch until rib measures 3 cm in all sizes – adjust so that next row is from right side. Switch back to circular needle size 3 mm and cast off by knitting. Jacket measures approx. 56-58-60-62-64-66 cm from shoulder and down. SLEEVE: Slip the 69-75-85-93-99-103 stitches from stitch holder in one side of piece on double pointed needles size 3 mm and pick in addition up 1 stitch in each of the 7 stitches cast on under sleeve = 76-82-92-100-106-110 stitches on needle. Work stocking stitch in the round with stripes (= 1 round with every colour). Insert a marker in the middle stitch under sleeve. When piece measures 2 cm in all sizes, decrease 1 stitch on each side of marker - read DECREASE TIP. Decrease like this approx. every 2½-2-1½-1-1-1 cm 12-13-16-20-21-23 times in total = 52-56-60-60-64-64 stitches. Work until sleeve measures 37-36-35-34-33-31 cm from division. Switch to double pointed needles size 2.5 mm and colour grey, work rib knit 2/purl 2 until rib measures 6 cm in all sizes. Switch back to double pointed needles size 3 mm and cast off by knitting. Work the other sleeve the same way. ASSEMBLY: Fold rib at the top of neck in towards the wrong side. Fasten rib to form a folding edge. To avoid a tight neck edge and fold it outwards, it is important not to sew the seam stitch for stitch, make instead a little longer stitches so that seam is elastic. Then sew shut the opening on each side of neck edge with small little stitches inside 1 edge stitch. Sew the buttons on to the left band. |
|
 |
|
Have you finished this pattern?Tag your pictures with #dropspattern #novemberskyjacket or submit them to the #dropsfan gallery. Do you need help with this pattern?You'll find 30 tutorial videos, a Comments/Questions area and more by visiting the pattern on garnstudio.com. © 1982-2026 DROPS Design A/S. We reserve all rights. This document, including all its sub-sections, has copyrights. Read more about what you can do with our patterns at the bottom of each pattern on our site. |
|


With over 40 years in knitting and crochet design, DROPS Design offers one of the most extensive collections of free patterns on the internet - translated to 17 languages. As of today we count 324 catalogues and 12290 patterns translated into English (UK/cm).
We work hard to bring you the best knitting and crochet have to offer, inspiration and advice as well as great quality yarns at incredible prices! Would you like to use our patterns for other than personal use? You can read what you are allowed to do in the Copyright text at the bottom of all our patterns. Happy crafting!
Post a comment to pattern DROPS 218-36
We would love to hear what you have to say about this pattern!
If you want to leave a question, please make sure you select the correct category in the form below, to speed up the answering process. Required fields are marked *.