
Popular categories
Looking for a yarn?


Comments / Questions (42)
![]() Birgitte Møller wrote:
Birgitte Møller wrote:
Til hvilke pinde gælder strikkefastheden? Der mangler mål til at kunne bestemme str.? Mvh Birgitte Møller
04.11.2025 - 09:41DROPS Design answered:
Hei Birgitte. Den pinnen du strikker mestparten av plagget med (ikke vrangbord). I denne oppskriften er det brukt pinne 4 til vrangbord, mens resten er det brukt pinne str. 5. Og den måles i glattstrikk. Alle mål til genseren finner du på målskissen helt nederst på oppskriften. mvh DROPS Design
17.11.2025 - 11:16
![]() Sabine wrote:
Sabine wrote:
Strukturmönstret är bruten resår. Beskrivingen skulle bli tydligare om det stod: 1. varv: 1 r 1 a, 2. varv: alla räta.
09.08.2025 - 19:05
![]() Anne wrote:
Anne wrote:
Hi, moet het proeflapje met de 4mm of de 5.5 mm naald 10x10 16 steken zijn?
24.01.2025 - 12:48DROPS Design answered:
Dag Anne,
Het proeflapje doe je met de grootste naald en in tricotsteek. De kleinste naald is voor de boorden.
26.01.2025 - 18:52
![]() Michelle wrote:
Michelle wrote:
I find this pattern confusing even though I have been knitting for decades. The explanation at the beginning says to make increases after the first, third and fifth markers and before the second, fourth, sixth and eighth. But in the yoke instructions say to increase before the second stitch before and after each marker. Please explain, Which is correct?
02.01.2025 - 07:04DROPS Design answered:
Hi Michelle, Increase tip-1 is for the yoke, where you increase after markers 1, 3 , 5 and 7 and before markers 2, 4, 6 and 8. The explanatory sentence afterwards describes in which sections of the yoke the increases are made. Happy New Year!
02.01.2025 - 12:34
![]() Judith Lister wrote:
Judith Lister wrote:
I find the explanation for this extremely confusing, I have been a knitter for many years. It would help if one had a proper working diagram. disappointed knitter
26.08.2024 - 10:28
![]() Hannah wrote:
Hannah wrote:
Regarding this part in the pattern..."Increase like this every other round 15-17-19-23-24-27 times in total, every 4th round 1 time in total and every 6th round 1 time in total..." Does this mean I increase row 4x in a row (3,4,5,6)? My increases are on odd rows. Thanks!
24.06.2024 - 16:47DROPS Design answered:
Hi Hannah, You increase 2 stitches on either side of each marker (8 increased stitches on each increase-round). The first set of increases is every 2nd round. When these are finished work 3 rounds and increase once more, then work 5 rounds and increase for the last time. Hope this helps and happy knitting!
25.06.2024 - 06:45
![]() Jean Strutz wrote:
Jean Strutz wrote:
Is there a chart for the textured pattern?
06.10.2023 - 16:56DROPS Design answered:
Dear Jean, this pattern is only available as published so there are no charts for this pattern. Happy knitting!
08.10.2023 - 21:17
![]() Wendy Gunn wrote:
Wendy Gunn wrote:
Can anybody explain the texture d pattern t o me I know what garter stitch is and know what stocking stitch. What makes the texture d pattern. Please explain row by row. Thank you. Wendy
25.01.2023 - 15:43DROPS Design answered:
Hi Wendy Gunn! You have to repeat knit 1/ 1 garter stitch rib over all stitches. Next row make sure the knit stitches are always above each other. Maybe this similar video gives a better idea: How to knit textured pattern . Hope it helps!
25.01.2023 - 16:38
![]() Judith wrote:
Judith wrote:
Liebes drops-Team, ich verstehe leider nicht, wie es gemeint ist, dass man bei der Passe die Markierer anbringt, die jeweiligen Maschen aber nicht strickt? Soll ich die Masche dann abheben? Vielen Dank für Ihre Hilfe! Herzliche Grüße
31.05.2022 - 22:11DROPS Design answered:
Liebe Judith, die Markierer sollen je in einer Masche eingesetzt werden, diese Masche wird gestrickt, aber die Maschen mit den Markierern werden Sie stricken - vielleicht kann Ihnen dieses Video helfen, es zeigt, wie man den Pullover anfängt. Viel Spaß beim stricken!
01.06.2022 - 08:24
![]() Helena wrote:
Helena wrote:
Hallo, ich bin gerade am Anfang der Passe. In der Beschreibung steht VOR dem 1ten Markierer zunehmen... Aber im Zunahmetipp1 steht NACH dem 1ten Markierer. Also ich gehe davon aus, dass der Zuhnametipp1 stimmt. Oder?
26.12.2021 - 20:18Helena answered:
Entschuldigung! Ich habe es nicht richtig gelesen...
28.12.2021 - 10:46
|
|
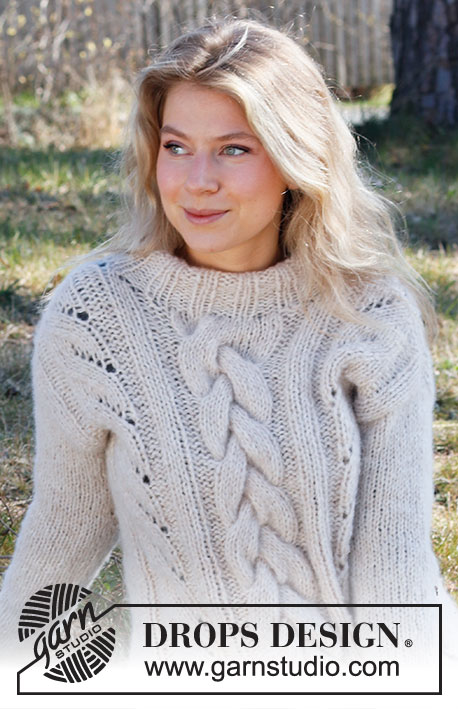
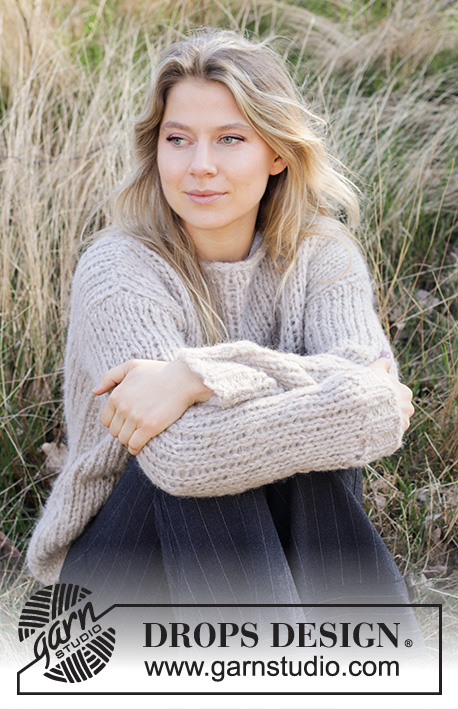
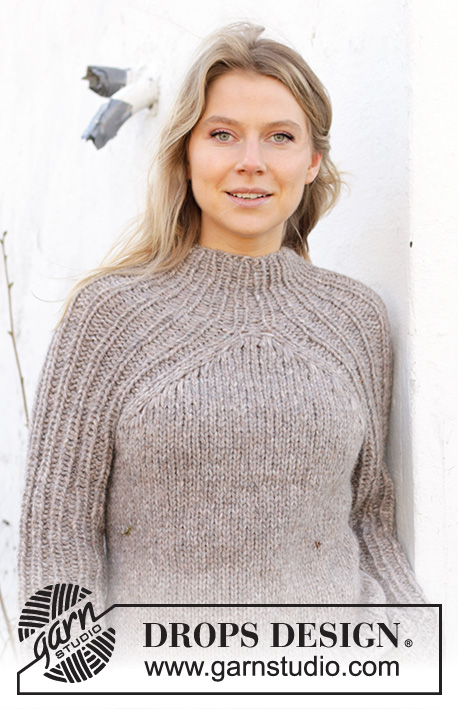
Abstract Rose#abstractrosesweater |
|
 |
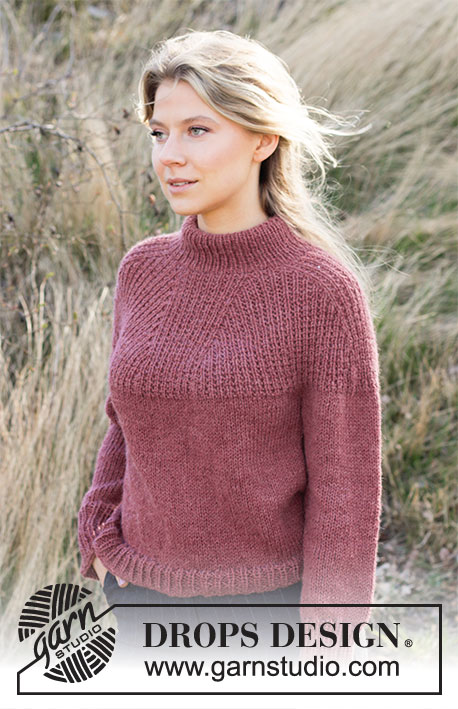 |
Knitted jumper with round yoke in DROPS Nepal. Piece is knitted top down with textured pattern and double neck edge. Size: S - XXXL
DROPS 218-27 |
|
|
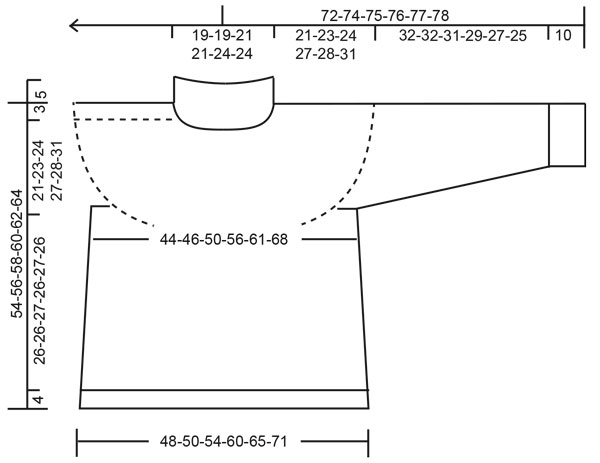
------------------------------------------------------- EXPLANATION FOR THE PATTERN: ------------------------------------------------------- INCREASE TIP-1 (applies to yoke): Increase with 1 yarn over after 1st, 3rd, 5th and 7th marker. Increase with 1 yarn over before 2nd, 4th, 6th and 8th marker. Work yarn overs twisted on next round to avoid holes. Work the increased stitches in textured pattern, i.e. work 1st increase in garter stitch, work 2nd increase in stocking stitch etc. INCREASE TIP-2 (applies to sides of body): Work until 2 stitches remain before marker thread, 1 yarn over, knit 4 (marker thread is in the middle of these stitches), 1 yarn over. On next round work yarn overs twisted to avoid holes. Then work the new stitches in stocking stitch. GARTER STITCH (worked in the round): 1 ridge vertically = 2 rounds, i.e. knit 1 round and purl 1 round. TEXTURED PATTERN: * Knit 1, 1 stitch in GARTER STITCH - read explanation above *, work from *-* over all stitches. DECREASE TIP (applies to sleeves): Decrease 1 stitch on each side of marker thread as follows: Work until 3 stitches remain before marker thread and knit 2 together, knit 2 (marker thread is between these stitches), slip 1 stitch knitwise, knit 1, pass slipped stitch over stitch worked. CAST-OFF TIP: To avoid a tight cast-off edge you may use a larger needle size. If this also is too tight – make 1 yarn over after approx. every 4th stitch and cast off these as regular stitches. ------------------------------------------------------- START THE PIECE HERE: ------------------------------------------------------- JUMPER - SHORT OVERVIEW OF THE PIECE: Work neck edge and yoke in the round on circular needle from mid back, top down. Now divide yoke for body and sleeves. Then work body in the round on circular needle, and work sleeves in the round on a double pointed needles. DOUBLE NECK EDGE: Cast on 88-88-96-96-104-104 stitches with 1 strand Nepal on circular needle size 4 mm. Work rib (knit 1/purl 1) until piece measures approx. 11 cm (fold the neck edge double later, the finish neck will measure approx. 5 cm). On next round work stocking stitch while AT THE SAME TIME decreasing 8 stitches evenly on round = 80-80-88-88-96-96 stitches. Insert 1 marker thread at the beginning of round (= approx. mid back), measure yoke from this marker thread! YOKE: Switch to circular needle size 5.5 mm. Work TEXTURED PATTERN - see explanation above. When 2 rounds have been worked, insert 8 markers on round without working (insert all markers in a knit stitch) as follows: Insert 1st marker in 7th-7th-9th-9th-9th-9th stitch. Insert 2nd marker in 13th-13th-15th-15th-15th-15th stitch. Insert 3rd marker in 27th-27th-31st-31st-33rd-33rd stitch. Insert 4th marker in 33rd-33rd-37th-37th-39th-39th stitch. Insert 5th marker in 47th-47th-53rd-53rd-57th-57th stitch. Insert 6th marker in 53rd-53rd-59th-59th-63rd-63rd stitch. Insert 7th marker in 67th-67th-75th-75th-81st-81st stitch. Insert 8th marker in 73rd-73rd-81st-81st-87th-87th stitch. On next round, increase 1 stitch at every marker – read INCREASE TIP-1 (= 8 stitches increased). I.e. Number of stitch before 1st marker, between 2nd and 3rd marker, between 4th and 5th marker, between 6th and 7th marker, and after 8th marker stays the same. Work stitches increased between 1st and 2nd marker, 3rd and 4th marker, and 5th and 6 marker and 7th and 8th marker. REMEMBER THE KNITTING TENSION! Increase like this every other round 15-17-19-23-24-27 times in total, every 4th round 1 time in total and every 6th round 1 time in total = 216-232-256-288-304-328 stitches. Piece now measures approx. 19-21-23-27-28-31 cm from marker thread. Then work in stocking stitch (size S-M-L), until piece measures 21-23-24-27-28-31 cm from marker thread. Now divide piece for body and sleeves as follows: Work the first 31-33-36-41-44-49 stitches (= half back piece), slip the next 46-50-56-62-64-66 stitches on a stitch holder for sleeve and cast on 8-8-8-8-10-10 new stitches under sleeve, work 62-66-72-82-88-98 as before (= front piece), slip the next 46-50-56-62-64-66 stitches on a stitch holder for sleeve and cast on 8-8-8-8-10-10 new stitches under sleeve, work 31-33-36-41-44-49 stitches as before (= half back piece). BODY: = 140-148-160-180-196-216 stitches. Insert 1 marker thread in the middle of the 8-8-8-8-10-10 stitches under sleeve in each side (= in the sides of body). There are 70-74-80-90-98-108 stitches between marker threads. Move the marker threads upwards when working; they should be used for increase later in the sides. When piece measures 4 cm from division, increase 1 stitch on each side of every marker thread - read INCREASE TIP-2 (= 4 stitches increased). Increase like this every 4 cm 3 times in total = 152-160-172-192-208-228 stitches. When piece measures 26-26-27-26-27-26 cm from division, increase 10-11-11-12-11-12 stitches evenly on next round= 162-171-183-204-219-240 stitches. Switch to circular needle size 4 mm and work rib = knit 1/purl 2. Cast off by knitting when rib measures 4 cm - read CAST-OFF TIP! SLEEVES: Slip the 46-50-56-62-64-66 stitches from stitch holder in one side of piece on double pointed needles size 5.5 mm, and pick up 1 stitch in each of the 8-8-8-8-10-10 stitches cast on under sleeve = 54-58-64-70-74-76 stitches. Insert 1 marker thread in the middle of the 8-8-8-8-10-10 stitches under sleeve. Move the marker thread upwards, decrease on each side of this later. Continue in the round in stocking stitch. When sleeve measures 3 cm from division, decrease 1 stitch on each side of marker thread - read DECREASE TIP (= 2 stitches decreased). Decrease like this every 3-2½-2-1½-1-1 cm 6-7-9-11-12-12 times in total = 42-44-46-48-50-52 stitches. When sleeve measures 32-32-31-29-27-25 cm from division, increase 0-1-2-0-1-2 stitches evenly = 42-45-48-48-51-54 stitches. Switch to double pointed needles size 4 mm and work rib (= knit 1/purl 2) in the round until rib measures 10 cm. Cast off by knitting. Work the other sleeve the same way. ASSEMBLY: Fold rib at the top of neck down on the inside of garment. Fasten rib to form a folding edge. To avoid a tight neck edge and avoiding the edge to tip outwards, it is important to make the seam elastic. |
|
 |
|
Have you finished this pattern?Tag your pictures with #dropspattern #abstractrosesweater or submit them to the #dropsfan gallery. Do you need help with this pattern?You'll find 26 tutorial videos, a Comments/Questions area and more by visiting the pattern on garnstudio.com. © 1982-2026 DROPS Design A/S. We reserve all rights. This document, including all its sub-sections, has copyrights. Read more about what you can do with our patterns at the bottom of each pattern on our site. |
|


With over 40 years in knitting and crochet design, DROPS Design offers one of the most extensive collections of free patterns on the internet - translated to 17 languages. As of today we count 324 catalogues and 12290 patterns translated into English (UK/cm).
We work hard to bring you the best knitting and crochet have to offer, inspiration and advice as well as great quality yarns at incredible prices! Would you like to use our patterns for other than personal use? You can read what you are allowed to do in the Copyright text at the bottom of all our patterns. Happy crafting!
Post a comment to pattern DROPS 218-27
We would love to hear what you have to say about this pattern!
If you want to leave a question, please make sure you select the correct category in the form below, to speed up the answering process. Required fields are marked *.