DROPS Air
DROPS Air
65% Alpaca, 28% Polyamide, 7% Wool
from 4.80 £ /50g
Get the yarn to make this pattern from 33.60£.

The yarn cost is calculated from the pattern’s smallest size and the yarn’s cheapest product type. Looking for an even better price? You might find it on the DROPS Deals!

DROPS SS24

Divergence

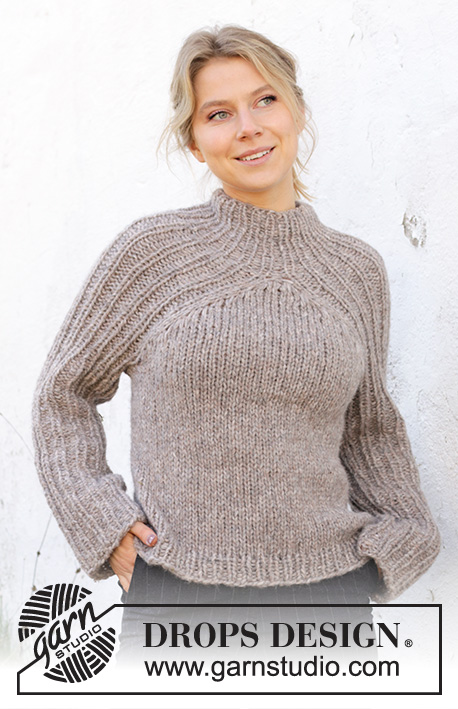
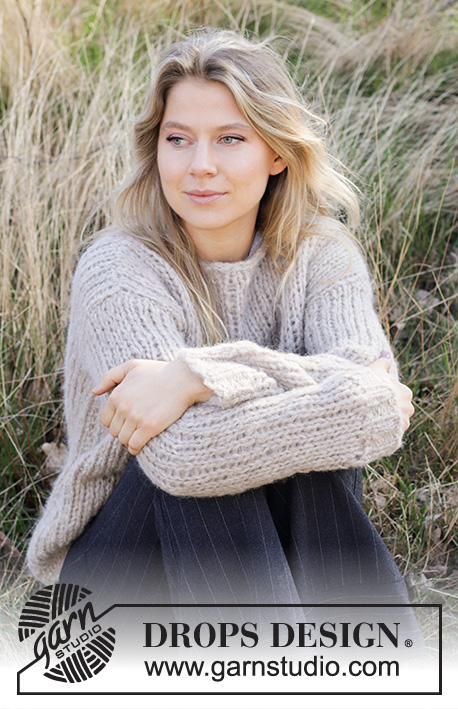
Knitted jumper in 2 strands DROPS Air or 1 strand DROPS Snow or 1 strand Wish. Piece is knitted top down with rib. Size: S - XXXL

DROPS 218-28
DROPS design: Pattern ai-274
Yarn group C + C or E
-------------------------------------------------------

SIZE:
S - M - L - XL – XXL - XXL

MATERIALS:
DROPS AIR from Garnstudio (belongs to yarn group C)
350-400-450-500-550-600 g colour no 26, beige
Or use:
DROPS SNOW from Garnstudio (belongs to yarn group E)
550-600-650-700-800-850 g colour 47, light beige
Or use
DROPS WISH from Garnstudio (belongs to yarn group E)
400-450-500-500-600-650 g colour 08 gray beige

KNITTING TENSION:
10 stitches in width and 14 rows vertically in stocking stitch and 2 strands Air or 1 strand Snow= 10 x 10 cm.

NEEDLES:
DROPS DOUBLE POINTED NEEDLES SIZE 9 mm
DROPS CIRCULAR NEEDLE SIZE 9 mm : Length 40 and 80 cm.
DROPS CIRCULAR NEEDLE SIZE 8 mm : Length 40 and 80 cm.
Needle size is only a suggestion! If you have too many stitches on 10 cm switch to a larger needle size. If you have too few stitches on 10 cm switch to a smaller needle size.

-------------------------------------------------------

Alternative Yarn – See how to change yarns here
Yarn Groups A to F – Use the same pattern and change the yarn here
Yarn usage using an alternative yarn – Use our yarn converter here

-------------------------------------------------------

DROPS Air
DROPS Air
65% Alpaca, 28% Polyamide, 7% Wool
from 4.80 £ /50g
Get the yarn to make this pattern from 33.60£.

The yarn cost is calculated from the pattern’s smallest size and the yarn’s cheapest product type. Looking for an even better price? You might find it on the DROPS Deals!

Pattern instructions

NOTE: This pattern is written in British English. All measurements in charts are in cm. For conversion from cm to inches - click here. There are different terms for crocheting in British and American English. If this pattern includes crochet, click for "crochet terms" here. For this pattern in American English, please click here.
-------------------------------------------------------

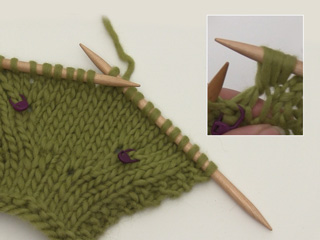
EXPLANATION FOR THE PATTERN:

-------------------------------------------------------

INCREASE TIP:
Increase in each side of front and back piece. Number of stitches on sleeves is the same (= 34-34-37-37-40-40 stitches in rib on sleeves).
Do not increase in stitch but around strand between 2 stitches.
Increase 3 stitches after stitch with marker (i.e. in transition between right sleeve and front piece and transition between left sleeve and back piece) as follows:
Knit 1 around strand between stitch with marker and next stitch (= 1 round down), knit 1 around strand between stitch with marker and next stitch 2 rounds down (make sure to pull the strand long enough not to tighten vertically), knit 1 around strand between stitch with marker and next stitch 3 rounds down (make sure to pull the strand long enough not to tighten vertically). 1 stitch has been worked on each of the last 3 rounds (= 3 stitches increased).
Increase 3 stitches before stitch with marker (i.e. in transition between front and left sleeve and in transition between back piece and right sleeve) as follows:
Work until stitch with marker, knit 1 around strand before stitch with marker 3 rounds down (make sure to pull the strand long enough not to tighten vertically), knit 1 around strand before stitch with marker and 2 rounds down (make sure not to pull the strand long enough not to tighten vertically), knit 1 around strand before stitch with marker on previous round. 1 stitch has been worked on each of the last 3 rounds (= 3 stitches increased).

DECREASE TIP (applies to sleeves): 
Work until 4-3-3-3-3-3 stitches remain before stitch with marker/marker between stitches, knit the next 2 together (= 1 stitches decreased), work the next 5-2-2-2-2-2 stitches, slip 1 stitch knitwise, knit 1, pass slipped stitch over stitch worked (= 1 stitch decreased).

CAST-OFF TIP:
To avoid a tight cast-off edge you may use a larger needle size. If this also is too tight, work a 1 yarn over after approx. every 4th stitch while casting off (cast off yarn overs as regular stitches).

-------------------------------------------------------

START THE PIECE HERE:

-------------------------------------------------------

JUMPER - SHORT OVERVIEW OF THE PIECE:
Work neck and yoke in the round on circular needle. Then divide piece for body and sleeves. Work body in the round in stocking stitch. Work sleeves in the round on a short circular needle/double pointed needles in rib.

NECK:
Cast on 48-48-52-52-56-56 stitches on a short circular needle size 8 mm with 2 strands Air or 1 strand Snow or 1 strand Wish. Insert a marker thread at beginning of round. Work rib (knit 1/purl 1) in the round for 11 cm.
Work next round as follows:
ROUND 1: * Knit 1, make 1 yarn over, purl 1 *, work from *-* over the next 22-22-24-24-26-26 stitches (= 11-11-12-12-13-13 stitches increased), knit 1, purl 1 (= middle stitch on front/back piece). Repeat 1 more time on round = 70-70-76-76-82-82 stitches.
ROUND 2: * Knit 1, purl yarn over twisted, purl 1 *, work *-* 11-11-12-12-13-13 times, knit 1, make 1 yarn over, purl 1 (= middle stitch on front/back piece), make 1 yarn over. Repeat 1 more time on round (= 4 stitches increased on round)= 74-74-80-80-86-86 stitches. Switch to circular needle size 9 mm. Insert 1 marker in middle stitch at the back, measure yoke from this marker!

YOKE:
Now insert 4 markers in the piece. Insert a marker in each of the yarn overs from previous round (= 1 marker in stitch on each side of middle stitch). There are 34-34-37-37-40-40 stitches for each of the sleeves and 3 stitches on front and back piece. REMEMBER THE KNITTING TENSION!
Now work rib (= knit 1/purl 2) over the 34-34-37-37-40-40 stitches for sleeves in each side (first and last stitch on sleeve is knit 1), and work in stocking stitch over the 3 stitches on front piece and back piece (knit yarn overs twisted to avoid holes).
When 4 round have been worked, begin increase in each side of front piece and back piece - read INCREASE TIP.
Increase like this every 4th round 6-6-7-8-9-10 times in total = 146-146-164-176-194-206 stitches. Increase in size XL, XXL and XXXL is now done.
In size S, M and L continue increase as follows. Increase 1 stitch in each side of front piece and back piece by making 1 yarn over inside stitch with marker (= 4 stitches increased on round). Increase like this every other round 1-2-1 time in total = 150-154-168 stitches. On next round knit yarn overs twisted to avoid holes. Then work the new stitches in stocking stitch.

All sizes:
Continue with knit over knit and purl over purl until piece measures 20-21-23-24-25-27 cm from marker in middle stitch at the back of neck.
Work next round as follows:
Slip the first 34-34-37-37-40-40 stitches on a stitch holder for sleeve, cast on 5-8-8-8-8-8 new stitches on needle (= in the side under sleeve), work stocking stitch over the next 41-43-47-51-57-63 stitches (= front piece), slip the next 34-34-37-37-40-40 stitches on a stitch holder (= sleeve), cast on 5-8-8-8-8-8 new stitches on needle (= in the side under sleeve), work in stocking stitch over the next 41-43-47-51-57-63 stitches. Then finish body and sleeves separately. NOW MEASURE PIECE FROM HERE!

BODY:
= 92-102-110-118-130-142 stitches. Work in stocking stitch in the round until body measures 24-25-25-26-26-26 cm. Switch to circular needle size 8 mm. Work rib (knit 1/purl 1) in the round for 4 cm. Cast off with knit over knit and purl over purl - read CAST-OFF TIP. Jumper measures approx. 54-56-58-60-62-64 cm from shoulder and down.

SLEEVES:
Slip the 34-34-37-37-40-40 stitches from stitch holder in one side of piece back on
double pointed needles/a short circular needle size 9 mm and pick in addition up 1 stitch in each of the 5-8-8-8-8-8 stitches cast on under sleeve = 39-42-45-45-48-48 stitches. Insert a marker mid under sleeve. In size S insert marker in the middle knit stitch under sleeve.
In size M, L, XL, XXL and XXXL insert marker in the middle of the middle 2 purl stitch.
Work rib (= knit 1/purl 2) in the round as before.
When piece measures 4 cm, decrease 2 stitches under sleeve - read DECREASE TIP. Decrease like this every 11-8-6-6-6-6 cm 4-5-6-6-6-6 times in total = 31-32-33-33-36-36 stitches. Continue with knit over knit and purl over purl until sleeve measures 45-45-43-43-43-42 cm - or to desired length (shorter measurements in the larger sizes because of longer yoke). Cast off with knit over knit and purl over purl - remember CAST-OFF TIP. Work the other sleeve the same way.

Diagram

diagram measurements

Each of our patterns has specific tutorial videos to help you.

Do you have a question? See a list of frequently asked questions (FAQ)

Knitting tension is what determines the final measurements of your work, and is usually measured per 10 x 10 cm. It is provided like so: number of stitches in width x number of rows in height - eg: 19 stitches x 26 rows = 10 x 10 cm.

The knitting tension is very individual; some people knit/crochet loosely while others work tightly. You adjust the knitting tension with the needle size, which is why the suggested needle size is only meant as a guide! You need to adjust this (up or down) to ensure that YOUR knitting tension matches the knitting tension provided in the pattern. If you work with a different knitting tension than provided you will have a different yarn consumption, and your work will have different measurements than what the pattern suggests.

The knitting tension also determines which yarns can replace each other. As long as you achieve the same knitting tension you can replace one yarn with another.

See DROPS lesson: How to measure your tension/gauge

See DROPS video: How to make a gauge tension swatch

The required amount of yarn is provided in grams, eg: 450 g. To calculate how many balls you’ll need you first need to know how many grams are in 1 ball (25g, 50g or 100g). This information is available if you click on the individual yarn quality on our pages. Divide the amount required with the amount of each ball. For example, if each ball is 50g (the most common amount), the calculation will be as follows: 450 / 50 = 9 balls.

The important thing when changing from one yarn to another is that the knitting/crochet tension remains the same. This is so that the measurements of the finished piece will be the same as on the sketch provided. It is easier to achieve the same knitting tension using yarns from the same yarn group. It is also possible to work with multiple strands of a thinner yarn to achieve the knitting tension of a thicker one. Please try our yarn converter. We recommend you to always work a test swatch.

Please NOTE: when changing yarn the garment might have a different look and feel to the garment in the photo, due to individual properties and qualities of each yarn.

See DROPS lesson: Can I use a different yarn than the one mentioned in the pattern?

All our yarns are categorised into yarn groups (from A to F) according to thickness and knitting tension – group A contains the thinnest yarns and group F the thickest. This makes it easier for you to find alternative yarns to our patterns, should you wish to switch yarn. All yarns within the same group have a similar knitting tension and can easily replace each other. However, different yarn qualities have different structures and properties which will give the finished work a unique look and feel.

Click here for an overview of the yarns in each yarn group

At the top of all our patterns you’ll find a link to our yarn calculator, which is a helpful tool should you wish to use a different yarn than suggested. By filling in the yarn quality you wish to replace, the amount (in your size) and number of strands, the calculator will present good alternative yarns with the same knitting tension. Additionally it will tell you how much you’ll require in the new qualities and whether you’ll need to work with multiple strands. Most skeins are 50g (some are 25g or 100g).

If the pattern is worked with multiple colours, every colour will have to be calculated separately. Similarly, if the pattern is worked with several strands of different yarns (for example 1 strand Alpaca and 1 strand Kid-Silk) you will have to find alternatives for each, individually.

Click here to see our yarn calculator

Since different yarns have different qualities and textures we have chosen to keep the original yarn in our patterns. However, you can easily find options among our available qualities by using our yarn calculator, or simply pick a yarn from the same yarn group.

It is possible that some retailers still have discontinued yarns in stock, or that someone has a few skeins at home that they would like to find patterns for.

The yarn calculator will provide both alternative yarn as well as required amount in the new quality.

If you think it's hard to decide what size to make, it can be a good idea to measure a garment you own already and like the size of. Then you can pick the size by comparing those measures with the ones available in the pattern's size chart.

You'll find the size chart at the bottom of the pattern.

See DROPS lesson: How to read size chart

The needle size provided in the pattern serves only as a guide, the important thing is to follow the knitting tension. And since knitting tension is very individual, you will have to adjust the needle size to ensure that YOUR tension is the same as in the pattern – maybe you’ll have to adjust 1, or even 2 needle sizes, up or down to achieve the correct tension. For this, we recommend that you work test swatches.

Should you work with a different knitting tension than the one provided, the measurements of the finished garment might deviate from the measurement sketch.

See DROPS lesson: How to measure your tension/gauge

See DROPS video: How to make a tension/gauge swatch

Working a garment top-down provides more flexibility and room for personal adjustment. For example it is easier to try the garment on while working, as well as making adjustments to length of yoke and shoulder caps.

The instructions are carefully explaining every step, in the correct order. Diagrams are adjusted to the knitting direction and are worked as usual.

The diagram depicts all rows/rounds, and every stitch seen from the right side. It is read from bottom to top, from right to left. 1 square = 1 stitch.

When working back and forth, every other row is worked from the right side and every other row is worked from the wrong side. When working from the wrong side, the diagram will have to be worked reversed: from left to right, knit stitches are purled, purl stitches are knit etc.

When working in the round every round is worked from the right side and the diagram are worked from right to left on all rounds.

See DROPS lesson: How to read knitting diagrams

The diagram depicts all rows/rounds, and every stitch seen from the right side. It is worked from bottom to top, from right to left.

When working back and forth every other row is worked from the right side: from right to left and every other row is worked from the wrong side: from left to right.

When working in the round, every row in the diagram are worked from the right side, from right to left.

When working a circular diagram you start in the middle and work your way outwards, counter clockwise, row by row.

The rows usually start with a given number of chain stitches (equivalent to the height of the following stitch), this will either be depicted in the diagram or explained in the pattern.

See DROPS lesson: How to read crochet diagrams

Instructions for working several diagrams after each other on the same row/round, will often be written like so: “work A.1, A.2, A.3 a total of 0-0-2-3-4 times". This means you work A.1 once, then A.2 is worked once, and A.3 is repeated (in width) the number of times provided for your size – in this case like so: S = 0 times, M = 0 times, L=2 times, XL= 3 times and XXL = 4 times.

The diagrams are worked as usual: begin with the first row in A.1, then work the first row in A.2 etc.

See DROPS lesson: How to read knitting diagrams

See DROPS lesson: How to read crochet diagrams

The total width of the garment (from wrist-to-wrist) will be larger in the larger sizes, despite the actual sleeves being shorter. The larger sizes have longer sleeve caps and wider shoulders, so there will be a good fit in all sizes.

The measurement sketch/schematic drawing provides information regarding the full length of the garment. If it’s a jumper or a jacket the length is measured from the highest point on the shoulder closest to the neckline, and straight down to the bottom of the garment. It is NOT measured from the tip of shoulder. Similarly, the length of yoke is measured from the highest point on the shoulder and down to where yoke is split into body and sleeves.

On a jacket measures are never taken along bands, unless specifically stated. Always measure inside band stitches when measuring the length.

See DROPS lesson: How to read a schematic drawing

Diagrams are often repeated on the round or in height. 1 repeat is the diagram the way it appears in the pattern. If it says to work 5 repeats of A.1 in the round, then you work A.1 a total of 5 times after/next to each other in the round. If it says to work 2 repeats of A.1 vertically/in height you work the entire diagram once, then begin again at the start and work the entire diagram one more time.

Chain stitches are slightly narrower than other stitches and to avoid working the cast-on edge too tight, we simply chain more stitches to begin with. The stitch count will be adjusted on the following row to fit the pattern and measurement sketch.

The rib edge is more elastic and will contract slightly compared to, for example, stocking stitch. By increasing before the rib edge, you avoid a visible difference in width between the rib edge and the rest of the body.

It’s very easy to cast off too tightly, and by making yarn overs while casting off (and simultaneously casting these off) you avoid a too tight cast off edge.

See DROPS video: How to bind off with yarn overs (yo)

To achieve an even increase (or decrease) you can increase on, for example: every 3rd and 4th row alternately, like so: work 2 rows and increase on the 3rd row, work 3 rows and increase on the 4th. Repeat this until the increase is complete.

See DROPS lesson: Increase or decrease 1 st on every 3rd and 4th row alternately

Should you prefer to work in the round instead of back and forth, you may of course adjust the pattern. You’ll need to add steeks mid-front (usually 5 stitches), and follow the instructions. When you would normally turn and work from the wrong side, simply work across the steek and continue in the round. At the end you’ll cut the piece open, pick up stitches to work bands, and cover the cut edges.

See DROPS video: How to knit steeks and cut open

Should you prefer to work back and forth instead of in the round, you may of course adjust the pattern so you work the pieces separately and then assemble them at the end. Divide the stitches for the body in 2, add 1 edge stitch in each side (for sewing) and work the front and back pieces separately.

See DROPS lesson: Can I adapt a pattern for circular needles into straight needles?

Pattern repeats can vary slightly in the different sizes, in order to get the correct proportions. If you’re not working the exact same size as the garment in the photo, yours might deviate slightly. This has been carefully developed and adjusted so that the complete impression of the garment is the same in all sizes.

Make sure to follow instructions and diagrams for your size!

If you have found a pattern you like which is available in women’s size it’s not very difficult to convert it to men’s size. The biggest difference will be the length of sleeves and body. Start working on the women size that you think would fit across the chest. The additional length will be worked right before you cast off for the armhole/sleeve cap. If the pattern is worked top-down you can add the length right after the armhole or before the first decrease on sleeve.

Regarding additional yarn amount, this will depend on how much length you add, but it is better with a skein too many than too few.

All yarns will have excess fibres (from production) that might come off as lint or shedding. Brushed yarns (ie hairier yarns) have more of these loose, excess fibres, causing more shedding.

Shedding also depends on what is worn under or over the garment, and whether this pulls at the yarn fibres. It’s therefore not possible to guarantee that there will be no shedding

Below are some tips on how to get the best result when working with hairier yarns:

1. When the garment is finished (before you wash it) shake it vigorously so the looser hairs come off. NOTE: do NOT use a lint roller, brush or any method that pulls at the yarn.

2. Place the garment in a plastic bag and put it in your freezer - the temperature will cause the fibres to become less attached to each other, and excess fibres will come off easier.

3. Leave in the freezer for a few hours before taking it out and shaking it again.

4. Wash the garment according to the instructions on the yarn label.

Pilling is a natural process that happens to even the most exclusive of fibers. It's a natural sign of wear and tear that is hard to avoid, and that is most visible in high friction areas of your garment like a sweater's arms and cuffs.

You can make your garment look as new by removing the pilling, using a fabric comb or a pill/lint remover.

Still can't find the answer you need? Then scroll down and leave your question so one of our experts can try to help you. This will be done normally within 5 to 10 working days.
In the meantime, you can read the questions and answers that others have left to this pattern or join the DROPS Workshop on Facebook to get help from fellow knitters/crocheters!

You might also like...

Post a comment to pattern DROPS 218-28

We would love to hear what you have to say about this pattern!

If you want to leave a question, please make sure you select the correct category in the form below, to speed up the answering process. Required fields are marked *.

Comments / Questions (35)

country flag Ioana wrote:

Hello, I have a question related to this Drops218-28 patter: when starting the yoke, after putting the 4 markers it says "When 4 round have been worked, begin increase in each side of front piece and back piece - read INCREASE TIP." Does this mean that I need to work the first 4 rows in the yoke without any increases ? The meaning of "When 4 round have been worked" is not very clear to me. thank you, have a nice day

15.01.2024 - 14:12

DROPS Design answered:

Dear Iona, you are right, just work 4 rounds on yoke before starting the increases for raglan. Happy knitting!

15.01.2024 - 16:19

country flag Bente wrote:

Holder på med denne. Men forstår ikke helt økningen midat bak og foran. Skal det økes 2 maske på hver side av kilen forann og bak? For når jeg har økt som jeg tror, så har jeg for lite masker. Har lest meg blind på oppskriften. Helt sikkert veldig enkelt

30.08.2023 - 09:27

DROPS Design answered:

Hei Bente. Lett å lese seg blind på en oppskrift :) Prøve å se en video istedenfor. Nederst på oppskriften finner du en hjelpevideo som viser hvordan det økes, ta en titt på "Hvordan øke ved å strikke om tråden 3 ganger mellom 2 masker", så kanskje det hjelper. Hvis ikke, skriv tilbake og vi vil prøve å forklare (husk å oppgi str. du strikker). mvh DROPS Design

11.09.2023 - 12:56

country flag Bella wrote:

Hallo, ich habe Schwierigkeiten bei den Zunahmen aus den Querfäden, weil mir nicht klar ist, wo ich die Zunahmen machen muss: ich habe 3 Maschen je Vorder- und Rückenteil. Die äußern beiden Maschen sind markiert. Wenn ich nun wie im Zunahmetipp beschrieben 3 Maschen vor und nach den Markierungen zunehme bin ich im Ärmel… ? Bleiben die Markierungen in den Maschen oder werden mit den Zunahmen versetzt? LG Bella

10.12.2022 - 16:53

DROPS Design answered:

Liebe Bella, haben Sie dieses Video mal geschaut? Es zeigt, wie man diese 3 Maschen zunimmt, zuerst nach der Markierung (nach der Ärmelmaschen, am Anfang Vorder- bzw Rückenteil) und vor der Markierung (am Ende Vorder- bzw Rückenteil und vor der Ärmel). Viel Spaß beim stricken!

12.12.2022 - 09:15

country flag Hansson wrote:

Jag har försökt med garnkonverteraren..... så det är inte frågan om mängden garnystan, utan hur jag ska tänka när jag då väljer storlek? Eftersom Nepal är ett tunnare garn ska jag då sticka en XL fast jag egentligen vill ha Medium. Har försökt att googla också, men förstår tyvärr inte.

05.08.2022 - 11:55

DROPS Design answered:

Hej igen, Når du bruger garnkonverteraren får du kun forslag på de kvaliteter som kan strikkes på samme strikkefasthed som det står i selve opskriften. Det vil sige at hvis du vælger at strikke med 2 tråde DROPS Nepal så skal du få 10 masker på 10 cm som det står i opskriften :)

05.08.2022 - 12:22

country flag Hansson wrote:

Jag har verkligen försökt lära mig hur man byter garn men det går inte..... Vill så gärna sticka denna tröja i 1 st tråd Nepal, men hur ska jag göra då??

03.08.2022 - 20:24

DROPS Design answered:

Hej, prøv vor garn-konverterare. Välj DROPS Air, välj antal gram i din storlek och klicka på Se alternativ ... du kan även dubbelkolla med DROPS Snow:)

05.08.2022 - 11:48

country flag Pamela Poulin wrote:

I ask you a question . But after reading your pattern I find my problem, I'm very sorry to bother you. Best regards Pam

20.06.2022 - 23:25

country flag Pamela Poulin wrote:

Hi , I have my Yarn & very happy to start but I'm having some problem..... I am doing the neck my size is L . My pattern is DROPS 218-28. ROUND 1: No problem for the beginning. But it says "Repeat 1 more time on the round " but when I do this I have a hole. Is this ok? Thank you very much for your help. I could not find a video on this.

20.06.2022 - 20:42

DROPS Design answered:

Dear Mrs Poulin, on the first round you will increase with yarn overs, and on the 2nd round you will work these yarn overs twisted to avoid holes - see video. Happy knitting!

21.06.2022 - 08:53

country flag Hanneke wrote:

Ik kom er niet uit met het schouderzadel. De voorbeelden die ik op youtube heb gevonden zijn anders dan van deze trui. 'de volgende steek eronder oppakken en dan twee eronder en drie eronder oppakken' Aan welke kant pak ik de steek dan op ? Zijkant links of rechts, of bovenkant, of in de lus van de onderkant ? Is er een video van om het duidelijk te maken. Ik kan nu niet verder.....

21.02.2022 - 15:30

DROPS Design answered:

Dag Hanneke,

Je meerdert om de draad die de steek met de markeerdraad en de steek ernaast met elkaar verbindt. In de video hieronder, die specifiek voor dit patroon is gemaakt, wordt het uitgelged.

22.02.2022 - 18:43

country flag Patrizia wrote:

Buona sera, sto lavorando questo modello e sono arrivata allo sprone e quindi devo lavorare a coste le maglie delle maniche ed a maglia rasata le 3 davanti/dietro ma non capisco cosa vuol dire: ( la 1° e ultima maglia sulla manica e 1 maglia diritto) in parentesi. Grazie infinite

04.02.2022 - 17:40

DROPS Design answered:

Buonasera Patrizia, abbiamo corretto il testo per renderlo più comprensibile. In quel punto viene indicato che la 1° e ultima maglia delle coste devono essere lavorate a diritto. Buon lavoro!

05.02.2022 - 21:00

country flag Aggie wrote:

As regards adding stitches to the yoke (size M)- "Increase like this every 4th round 6-6-7-8-9-10 times in total = 146-146-164-176-194-206 stitches". One time = 18 stitches x 4 rounds = 72 stitches. But how is this increase distributed? 18 stitches added PER round (three sets of 3 added stitches on the front/back? - if so, you can't distribute 3 sets of added stitches evenly on both sides of the stitch at the center of front/back) or 18 stitches distributed OVER 4 rounds times four?

30.01.2022 - 16:56

DROPS Design answered:

Dear Aggie, you should increase 12 sts on each increase round: 3 sts at the beg of back/front piece + 3 sts at the end of back/front piece as explained under INCREASE TIP and see also this video showing how to increase at the beg/after the marker and at the end/before the marker of front/back piece. Happy knitting!

31.01.2022 - 09:52