
Popular categories
Looking for a yarn?


Comments / Questions (24)
![]() MC wrote:
MC wrote:
Bonjour, Je suis arrivée au niveau AUGMENTATION 1 Flèche 1. Une fois les augmentations faites, je dois avoir 115 mailles, (en 5/6 ans), les mailles lisières sont-elles comprises dans ce chiffre ? Merci
15.11.2021 - 07:54DROPS Design answered:
Bonjour MC, tout à fait, vous aviez 95 mailles (y compris les mailles lisières), vous augmentez 20 mailles = vous avez 115 mailles au total. Bon tricot!
15.11.2021 - 08:42
![]() Maria Andersson wrote:
Maria Andersson wrote:
Halskant: lägg upp 85 maskor (strl3/4) inklusive 5 framkantsmaskor. Betyder det 85+5+5 plus ytterligare 1 kantmaska på var sida?
11.11.2021 - 17:03DROPS Design answered:
Hej Maria. Du lägger upp totalt 85 m (av dessa 85 är 5 maskor på varje sida framkantsmaskor). Mvh DROPS Design
12.11.2021 - 07:59
![]() Daniela wrote:
Daniela wrote:
Buongiorno e grazie per il lavoro che svolgete. Il bordo a le faccio si può fare in contemporanea al lavoro senza mettere le maglie in attesa?
23.09.2021 - 08:22DROPS Design answered:
Buonasera Daniela, il modello è stato progettato in questo modo per lavorare il bordo in seguito, se preferisce può apportare le modifiche che desidera. Buon lavoro!
26.09.2021 - 20:57
![]() Lola Milhem wrote:
Lola Milhem wrote:
Bonjour, Lorsque, après l'empiècement, je reprend toutes mes mailles au rang de la flèche 5 après avoir tricoté mes bordures aux aiguilles 3, est-ce que je reprend mes aiguilles 4 ?
25.04.2021 - 21:23DROPS Design answered:
Bonjour Mme Milhem, tout à fait, vous continuez l'empiècement (le rang 5), puis le dos/les devants avec les aiguilles 4. Bon tricot!
26.04.2021 - 08:20
![]() Saskia Haasnoot wrote:
Saskia Haasnoot wrote:
Na de eerste na als meerderen in de pas moet ik de kantines op een hulpvraag zetten volgens het patroon. Volgens het patroon moet ik bij de volgende w naalden toch weer 5 voorbiessteken breien, en ook weer op huisraad zetten. Klopt dat?
10.03.2021 - 15:29DROPS Design answered:
Dag Saskia,
Klopt, nadat je de halsboord hebt gebreid, zet je de 5 biessteken aan beide kanten op een hulpdraad en zet je aan beide kanten 1 kantsteek op. De pas wordt dan verder gebreid zonder bies. De bies wordt later los gebreid en vastgenaaid aan de pas. Bij het verdelen van het werk voor de mouwen en het lijf, worden de biessteken weer op dezelfde naald gezet en samen met het lijf gebreid.
27.03.2021 - 14:47
![]() Karin Jaensson wrote:
Karin Jaensson wrote:
Jag stickar kofta Lillesand När jag stickar räta varv avslutar jag med A2. När jag stickar aviga varv i mönsterstickning ska jag då börja med A2 efter kantmaskan? Enligt mejl har ni svarat, men länken fungerar inte. Vänliga hälsningar /Karin Jaensson
08.02.2021 - 10:16DROPS Design answered:
Hei Karin. Det er gitt et svar til deg tidligere idag, se under. Linken som ble gitt i svaret ditt fra 28.01.2021 skal fungere, Hvordan lese et diagram. Håper det har ordnet seg. mvh DROPS design
08.02.2021 - 14:46
![]() Karin Jaensson wrote:
Karin Jaensson wrote:
Jag stickar Lillesand kofta stl 134/140. Det är första gången jag stickar mönster och jag har svårt att tolka diagrammet. Jag har fastnat på varv 6. Räknas kantmaskan in i rapporten? Gäller A2 bara den sista maskan på varvet eller räknas den in i rapporten? Hur många vita maskor ska det vara mellan de mörka i varv 6? Som du förstår behöver jag både specifika och allmänna svar om att tolka mönsterrapporten. Tack på förhand Karin Jaensson
26.01.2021 - 15:00DROPS Design answered:
Hej Karin. Vi har denna lektion som säkert kan vara till hjälp om hur man läser ett stickdiagram. Kantmaskan räknas inte in i rapporten, utan du stickar en kantmaska och sedan upprepar du diagram A.1 tills det återstår 2 maskor på varvet, stickar A.2 och 1 kantmaska. A.2 gäller alltså bara den sista maskan på varvet nu. Mvh DROPS Design
28.01.2021 - 12:54
![]() Regine wrote:
Regine wrote:
Hallo, ich möchte die Jacke lillesand Stricken, wie geht dir Randmasche kraus rechts? ( in Anleitung unter „Passe“ Vielen Dank für eine Antwort! Gruß Regine
06.01.2021 - 19:58DROPS Design answered:
Liebe Regine, bei der Passe wird die erste und die letzte Masche jeder Reihe rechts gestrickt (= Krausrippe) - dieses Video zeigt, wie man die Randmaschen in Krausrippe strickt - diese Maschen werden hier mit der Hauptfarbe gestrickt. Viel Spaß beim stricken!
07.01.2021 - 10:08
![]() Monika Schiffer wrote:
Monika Schiffer wrote:
Hej, Diagram förklaring vid ifylld ruta står "= økepinne", vad betyder det? Är det bottenfärgen eftersom det står "= natur" efter den tomma rutan? Önskar tips på hur man gör med garnet i mönsterfärgen när den inte stickas på tillbakavarvet. Det blir väldigt många trådar att fästa om man måste klippa av garnet varje gång.
23.11.2020 - 16:10DROPS Design answered:
Hei Monica. På hver rad markert med pil i A.1, økes det masker jevnt fordelt som forklart i oppskriften, husk også å lese øketips -1. Det strikkes med den fargen der er vist i diagrammet. Et par-tre ganger må det klippes, så det blir ikke mange tråder å feste. Evnt lar du tråden følge med når den ikke strikkes, bruk den tråden det strikkes med å snurre rundt på baksiden ved hver 4-5 maske. mvh DROPS design
24.11.2020 - 12:01
![]() Maria Kassalia wrote:
Maria Kassalia wrote:
Vielen dank es hat mir sehr geholfen!!!!
15.10.2020 - 09:53
|
||||||||||
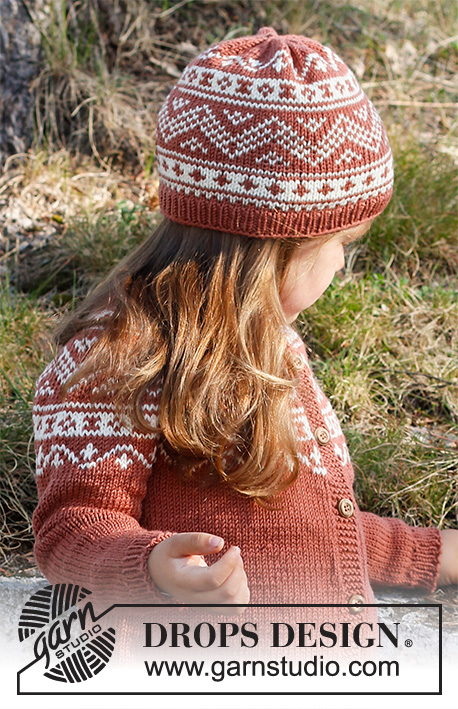
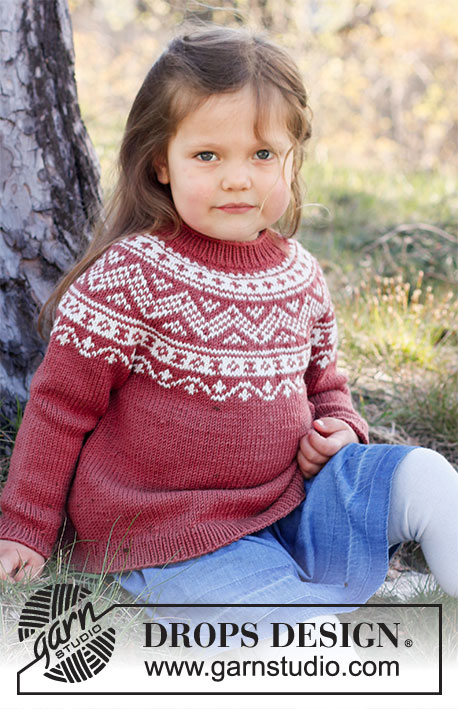
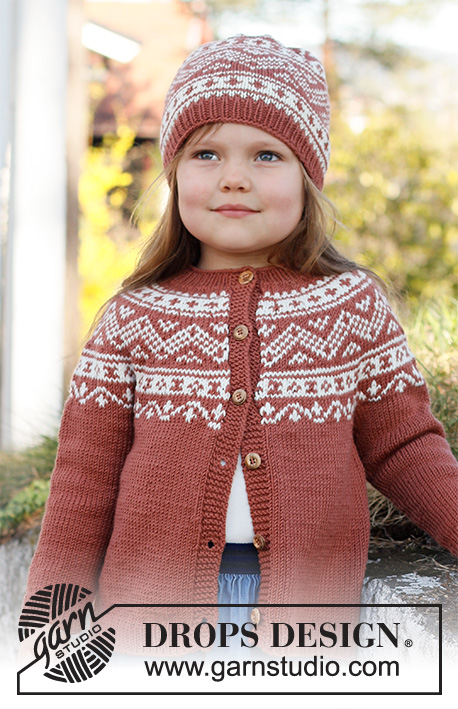
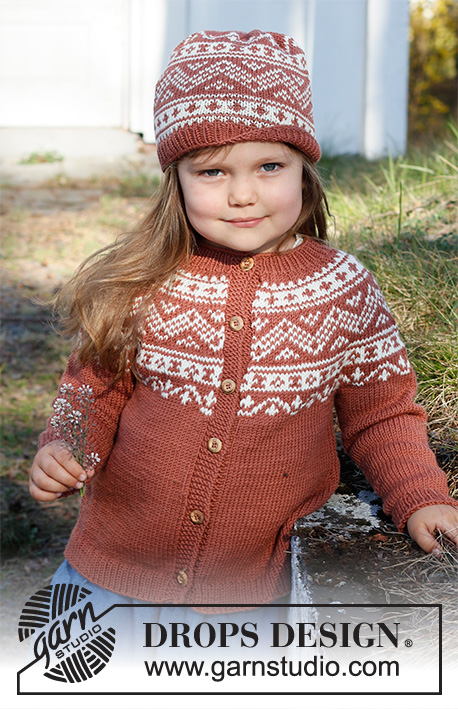
Lillesand#lillesandjacket |
||||||||||
 |
 |
|||||||||
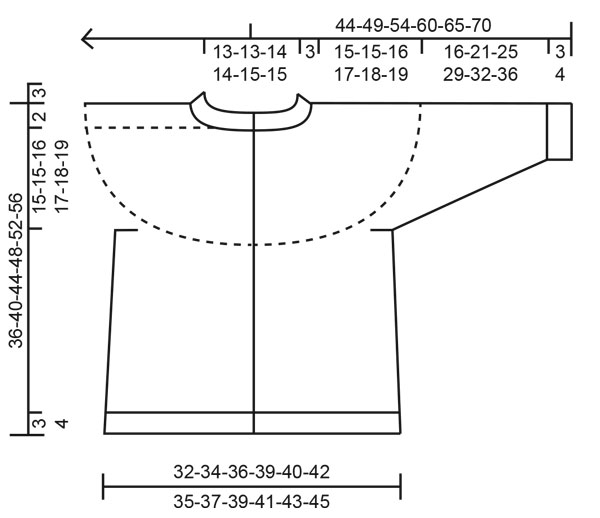
Knitted jacket for children in DROPS Merino Extra Fine. The piece is worked top down, with round yoke and Nordic pattern on the yoke. Sizes 2 – 12 years.
DROPS Children 37-6 |
||||||||||
|
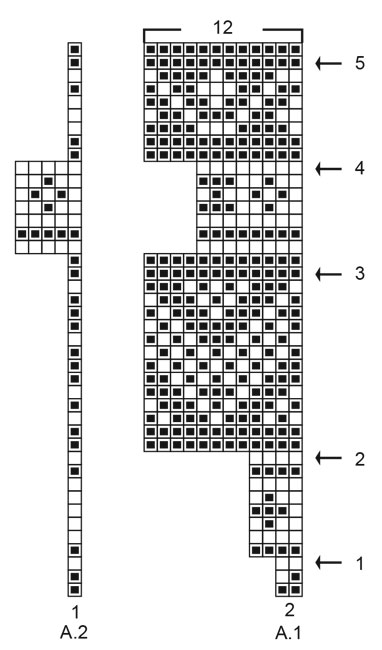
------------------------------------------------------- EXPLANATIONS FOR THE PATTERN: ------------------------------------------------------- PATTERN: See diagrams A.1 and A.2. The whole pattern is worked in stocking stitch. RIDGE/GARTER STITCH (worked back and forth): Knit all rows. 1 ridge in height = Knit 2 rows. INCREASE TIP-1 (evenly spaced): To work out how to increase evenly, count the total number of stitches on the needle (e.g. 83 stitches) minus bands (e.g. 10 stitches) and divide the remaining stitches by the number of increases to be made (e.g. 16) = 4.56. In this example, increase by making 1 yarn over after alternately each 4th and 5th stitch. Do not increase on the bands. On the next row work the yarn overs twisted to avoid holes. INCREASE TIP-2 (for sides of body): All increases are worked from the wrong side! Increase 1 stitch on each side of each marker thread as follows: Work until there are 4 stitches left before the marker thread, make 1 yarn over, purl 8 (marker thread sits in the middle of these 8 stitches), 1 yarn over (= 2 stitches increased at each marker thread; 4 stitches increased on the row). On the next row (right side), knit the yarn overs twisted to avoid holes. Then work the new stitches in stocking stitch. KNITTING TIP: To avoid the garment losing its elasticity when working pattern, it is important that the strands at the back are not tight. Increase a needle size when working pattern if this is a problem. DECREASE TIP (for mid under sleeves): Decrease 1 stitch on each side of the marker thread as follows: Work until there are 3 stitches left before the marker thread, knit 2 together, knit 2, slip 1 stitch as if to knit, knit 1 and pass the slipped stitch over the knitted stitch (= 2 stitches decreased). BUTTONHOLES: When the neck measures 1½ - 2 cm, work 1 buttonhole on the right side of the neck (when the garment is worn). Work from the right side when there are 3 stitches left on the row as follows: Make 1 yarn over, knit 2 together and knit 1. On the next row (wrong side) knit the yarn over to leave a hole. The other 5-5-5-6-6-6 buttonholes are worked with approx. 6-6½-7½-7-7½-8½ cm between each one. CASTING-OFF TIP: To avoid the cast-off edge being tight you can cast off with a larger needle size. If the edge is still tight, make 1 yarn over after approx. each 4th stitch at the same time as casting off and the yarn overs are cast off as normal stitches. ------------------------------------------------------- START THE PIECE HERE: ------------------------------------------------------- JACKET – SHORT OVERVIEW OF THE PIECE: The neck and yoke are worked back and forth with circular needle, from mid front and top down. The band stitches are placed on a thread and the rest of the yoke is continued with 1 edge stitch on each side towards mid front. The yoke is divided for body and sleeves. The body is finished back and forth with circular needle. The sleeves are worked in the round, top down, with double pointed needles. NECK: Cast on 83-85-87-89-91-93 stitches (including 5 band stitches on each side towards mid front) with circular needle size 3 mm and cedar. Purl 1 row (= wrong side). The next row is worked as follows from the right side: Work 5 band stitches in GARTER STITCH – read description above, * knit 1, purl 1 *, work from *-* until there are 6 stitches left on the row, knit 1 and finish with 5 band stitches in garter stitch. Continue this rib for 3 cm – remember the BUTTONHOLE on the right band – read description above. Change to circular needle size 4 mm. Purl 1 row from the wrong side with 5 band stitches in garter stitch on each side and increase 16-16-16-18-18-18 stitches evenly spaced – read INCREASE TIP-1 = 99-101-103-107-109-111 stitches. Now place the outermost 5 stitches on each side on a thread (= bands) and cast on 1 edge stitch on each side on the next 2 rows as follows: Work 5 band stitches in garter stitch, work in stocking stitch until 5 band stitches remain and place them on a thread without working them, cast on 1 edge stitch, turn and work stocking stitch until there are 5 band stitches left on the other side, place these 5 stitches on a thread without working them, cast on 1 edge stitch, turn = 91-93-95-99-101-103 stitches – the bands will be worked later and sewn onto the front pieces inside the 1 edge stitch. Insert 1 marker after the edge stitch at the beginning of the row; the yoke will be measured from this marker! Work the yoke as described below. YOKE: Work 0-0-2-4-6-8 rows of stocking stitch using cedar and with 1 edge stitch in garter stitch on each side towards mid front. Work the edge stitches in the same colour as first/last stitch in the pattern. Read KNITTING TIP and work the next row from the right side as follows: 1 edge stitch in garter stitch, work A.1 until there are 2 stitches left on the row (= 44-45-46-48-49-50 repeats of 2 stitches), work A.2 (so that the pattern begins and ends in the same way on both sides) and finish with 1 edge stitch in garter stitch. Continue this pattern. REMEMBER THE KNITTING TENSION! AT THE SAME TIME, on each row marked with an arrow in A.1, increase stitches evenly spaced as described below – remember INCREASE TIP-1: Arrow-1: Increase 16-18-20-20-22-24 stitches evenly spaced = 107-111-115-119-123-127 stitches (there is now room for 26-27-28-29-30-31 repeats of A.1 with 4 stitches). Arrow-2: Increase 40-36-44-40-48-44 stitches evenly spaced = 147-147-159-159-171-171 stitches (there is now room for 12-12-13-13-14-14 repeats of A.1 with 12 stitches). Arrow-3: Increase 36-44-40-48-44-52 stitches evenly spaced = 183-191-199-207-215-223 stitches (there is now room for 22-23-24-25-26-27 repeats of A.1 with 8 stitches; be aware that A.2 now consists of 5 stitches). Arrow-4: Increase 24-28-32-36-40-44 stitches evenly spaced = 207-219-231-243-255-267 stitches (there is now room for 17-18-19-20-21-22 repeats of A.1 with 12 stitches). Arrow-5: Before this row, leave the stitches on the needle and work the bands. Place the 5 band stitches from the left front piece on needle size 3 mm and work garter stitch back and forth with cedar for approx. 13-13-14-15-15-16 cm – lay the band along the front piece and check the measurement; the band should be stretched a little to match the length (finish after a row from the wrong side). Place the stitches on 1 thread. Work the right band in the same way, but remember to work the buttonholes. Then work the row marked with arrow-5 in A.1 as follows: Work the 5 band stitches from the thread in garter stitch, decrease the 1 edge stitch, knit the next 205-217-229-241-253-265 stitches AT THE SAME TIME as you increase 4-4-4-0-0-0 stitches evenly over these stitches, decrease the 1 edge stitch and work the 5 band stitches in garter stitch = 219-231-243-251-263-275 stitches. If your knitting tension is correct, the piece measures approx. 15-15-16-17-18-19 cm from the marker on the neck. If the piece is shorter than this, continue with stocking stitch and 5 band stitches in garter stitch on each side until you reach the correct length. On the next row, divide the piece for the body and sleeves as follows: Work 35-37-39-41-43-45 stitches as before (= front piece), place the next 44-46-48-48-50-52 stitches on 1 thread for the sleeve, cast on 6-6-6-8-8-8 new stitches on the needle (= in side under sleeve), work 61-65-69-73-77-81 stitches as before (= back piece), place the next 44-46-48-48-50-52 stitches on 1 thread for the sleeve, cast on 6-6-6-8-8-8 new stitches on the needle (= in side under sleeve) and work the remaining 35-37-39-41-43-45 stitches as before (= front piece). Body and sleeves are finished separately. THE PIECE IS NOW MEASURED FROM HERE! BODY: = 143-151-159-171-179-187 stitches. Insert 1 marker thread 38-40-42-45-47-49 stitches in from each side (= 67-71-75-81-85-89 stitches between threads on the back piece). Allow the threads to follow your work onwards; they will be used when increasing in the sides. Work stocking stitch back and forth using cedar and with 5 band stitches in garter stitch on each side. When the piece measures 4-4-5-5-6-6 cm from the division increase 1 stitch on each side of both marker threads – read INCREASE TIP-2 (= 4 stitches increased). Increase like this every 4-5-6-6-7-8 cm a total of 3 times = 155-163-171-183-191-199 stitches. Continue working until the piece measures 16-20-23-25-28-31 cm from the division. There is now approx. 3-3-3-4-4-4 cm left to finished length; you can try the jacket on and work to desired length. Knit 1 row from the right side, where you increase 46-48-50-54-58-60 stitches evenly spaced – remember INCREASE TIP-1 = 201-211-221-237-249-259 stitches. NOTE: The increased stitches prevent the rib being tight. Change to circular needle size 3 mm and work the first row from the wrong side as follows: 5 band stitches in garter stitch, * purl 1, knit 1 *, work from *-* until there are 6 stitches left on the row, purl 1 and finish with 5 band stitches in garter stitch. Continue this rib for 3-3-3-4-4-4 cm. Cast off with garter stitch over garter stitch, knit over knit and purl over purl – read CASTING-OFF TIP! The jacket measures approx. 36-40-44-48-52-56 cm from the shoulder down. SLEEVE: Place the 44-46-48-48-50-52 stitches from the thread on the one side of the piece on double pointed needles size 4 mm and knit up 1 stitch in each of the 6-6-6-8-8-8 stitches cast on under the sleeve = 50-52-54-56-58-60 stitches. Insert a marker thread in the middle of the 6-6-6-8-8-8 stitches under the sleeve. Allow the thread to follow your work onwards; it will be used when decreasing under the sleeve. Starting at the marker thread, work stocking stitch in the round with cedar. When the sleeve measures 3 cm from the division, decrease 2 stitches mid under the sleeve – read DECREASE TIP. Decrease like this every 2-3-3-3½-3½-4 cm a total of 6-6-7-7-8-8 times = 38-40-40-42-42-44 stitches. Continue working until the sleeve measures 16-21-25-29-32-36 cm from the division. There is now approx. 3-3-3-4-4-4 cm left to finished length; you can try the jacket on and work to desired length. Knit 1 round where you increase 6-6-8-8-8-8 stitches evenly spaced = 44-46-48-50-50-52 stitches. Change to double pointed needles size 3 mm and work rib in the round (= knit 1 / purl 1) for 3-3-3-4-4-4 cm. Cast off with knit over knit and purl over purl – remember CASTING-OFF TIP. The sleeve measures approx. 19-24-28-33-36-40 cm from the division. Work the other sleeve in the same way. ASSEMBLY: Sew the bands neatly to each front piece, inside the 1 edge stitch. Sew the buttons onto the left band. |
||||||||||
Diagram explanations |
||||||||||
|
||||||||||
 |
||||||||||
 |
||||||||||
Have you finished this pattern?Tag your pictures with #dropspattern #lillesandjacket or submit them to the #dropsfan gallery. Do you need help with this pattern?You'll find 32 tutorial videos, a Comments/Questions area and more by visiting the pattern on garnstudio.com. © 1982-2026 DROPS Design A/S. We reserve all rights. This document, including all its sub-sections, has copyrights. Read more about what you can do with our patterns at the bottom of each pattern on our site. |
||||||||||


With over 40 years in knitting and crochet design, DROPS Design offers one of the most extensive collections of free patterns on the internet - translated to 17 languages. As of today we count 324 catalogues and 12267 patterns translated into English (UK/cm).
We work hard to bring you the best knitting and crochet have to offer, inspiration and advice as well as great quality yarns at incredible prices! Would you like to use our patterns for other than personal use? You can read what you are allowed to do in the Copyright text at the bottom of all our patterns. Happy crafting!
Post a comment to pattern DROPS Children 37-6
We would love to hear what you have to say about this pattern!
If you want to leave a question, please make sure you select the correct category in the form below, to speed up the answering process. Required fields are marked *.