
Popular categories
Looking for a yarn?


Comments / Questions (24)
![]() M Ángeles wrote:
M Ángeles wrote:
Se puede hacer con agujas rectas?
30.10.2025 - 12:55DROPS Design answered:
Hola M Ángeles, se peuede. Como hacerlo puedes ver en la leccion Drops AQUI. Saludos!
17.11.2025 - 08:38
![]() Ina wrote:
Ina wrote:
Mit der Anleitung komme ich nicht zurecht,würde gern die Jacke von hinten sehen ,mit foto
09.10.2025 - 10:18DROPS Design answered:
Liebe Ina, leider können wir Ihnen kein Foto von hinten bieten. An welcher Stelle kommen Sie nicht zurecht?
23.10.2025 - 00:20
![]() Diane wrote:
Diane wrote:
Bonjour et merci beaucoup pour votre réponse. Est-ce que je dois aussi faire des augmentations parmi les mailles qui étaient en attente (bords et dos), ou non? Donc, je comprends que le premier rang ne comporte que des mailles endroit et envers si on débute au bas de 4.a et qu’il doit être tricoté sur l’endroit. Je vous remercie de votre aide précieuse. J’espère pouvoir finaliser ce projet comme il se doit, puisque c’est un très beau modèle. Bonne journée.
05.01.2025 - 01:35DROPS Design answered:
Bonjour Diane, si vous avez besoin d'augmenter, faites-le à intervalles réguliers mais continuez bien les mailles en côtes anglaises des devants sur le col. Et pensez à bien diminuer dans les torsades pour conserver la largeur souhaitée. Bon tricot!
06.01.2025 - 09:59
![]() Diane wrote:
Diane wrote:
Bonjour, je tricote ce modèle en taille S, et je ne comprends pas comment débuter le col. Doit-on faire le premier rang sur l’envers ou l’endroit? Il y a une différence entre les explications en anglais et en français. Est-ce que A.4a doit être tricoté au 1er rang si on commence par un rang endroit? Si oui, est-ce que je dois débuter la lecture du diagramme À.4a à partir du bas à droite et au rang suivant de la gauche vers la droite? Merci beaucoup pour votre aide. Bonne journée.
27.12.2024 - 19:44DROPS Design answered:
Bonjour Diane, effectivement, le 1er rang du col se tricote sur l'endroit et non sur l'envers. Tricotez A.4 sur l'endroit de droite à gauche et de gauche à droite sur l'envers. Bon tricot!
02.01.2025 - 13:38
![]() Eva-Britt Skotth wrote:
Eva-Britt Skotth wrote:
Hur gör man knapphålen när det är mönsterstickning? Svårt att få knapphålen på exakt samma ställe.
27.12.2024 - 16:38DROPS Design answered:
Hei Eva-Britt. Du feller til knappehull på stolpen ved de angitt cm som stå i oppskriften i den størrelsen du strikker. Og gjør du det fra retten hver gang blir det jo samme maske i mønstret i stolpen, slik at det blir likt. mvh DROPS Design
03.01.2025 - 12:45
![]() Isabelle wrote:
Isabelle wrote:
Bonjour je ne comprends pas pourquoi le diagramme A3 sur 31 ( la taille L) alors qu\'il se tricote sur 2 mailles. Où dois -je placer la maille en plus? Merci de votre réponse
02.11.2024 - 21:05DROPS Design answered:
Bonjour Isabelle, pour tricoter A.3 sur 31 mailles, répétez 15 fois les 2 mailes de A.3 et terminez par la 1ère maille de A.3, ainsi le motif est symétrique. Bon tricot!
04.11.2024 - 11:00
![]() Diane wrote:
Diane wrote:
Bonjour, pour les manches, puisque nous tricotons en rond, je me demande pourquoi les explications données ne sont pas comme celles qui sont dans le tutoriel vidéo « Comment tricoter des côtes anglaises en rond ». Puisque le diagramme A4 est fourni pour tricoter en aller retour, il me semble que ce serait plus pratique ainsi. Merci
16.09.2024 - 16:41
![]() Gerda wrote:
Gerda wrote:
Hallo team drops, ik heb nogal moeite met de 'engelse patentsteek'. Wat scheelt het als ik de 'gewone' patentsteek brei. Ik realiseer me dat 't wat meer wol neemt, maar maakt 't verder uit? Vriendelijke groet.
13.09.2023 - 16:38DROPS Design answered:
Dag Gerda,
Heb je ook de video's bekeken over Engelse patentsteek? Deze staan onderaan de beschrijving van het patroon. Maar je kan inderdaad ook de gewone patentsteek gebruiken.
13.09.2023 - 20:16
![]() Myrna Laupland wrote:
Myrna Laupland wrote:
Re: 218-16 Ripping Roses Cardigan. I have to abandon knitting this pattern, it comes out extremely large. Beautiful pattern & I have tried to adjust it myself but now decided to try a different one. I think it should be about 40 or ? less stitches cast on. May try again one day.
08.08.2023 - 01:26DROPS Design answered:
Dear Mrs Laupland, remember to check your tension to get the correct finished measurements. You need here more stitches in width as for stocking stitch just because cables are tigthening piece in width. Happy knitting!
08.08.2023 - 09:29
![]() Myrna Laupland wrote:
Myrna Laupland wrote:
I am knitting size small with 200 cast on stitches. It seems to be very large with 16 stitches per 4 inches gauge. Has anyone else had this problem? I have knitted quite a few Air sweaters before and they had a lot less stitches and were a perfect size. Thanks
05.08.2023 - 06:12DROPS Design answered:
Dear Myrna, we cast on more stitches for the cables, since they will take up some stitches for the pattern, but they won't occupy much space. The gauge is calculated without taking them into account, which is why the number for cast on obtained through the gauge won't match the actual number in the instructions. Happy knitting!
06.08.2023 - 21:36
|
||||||||||||||||
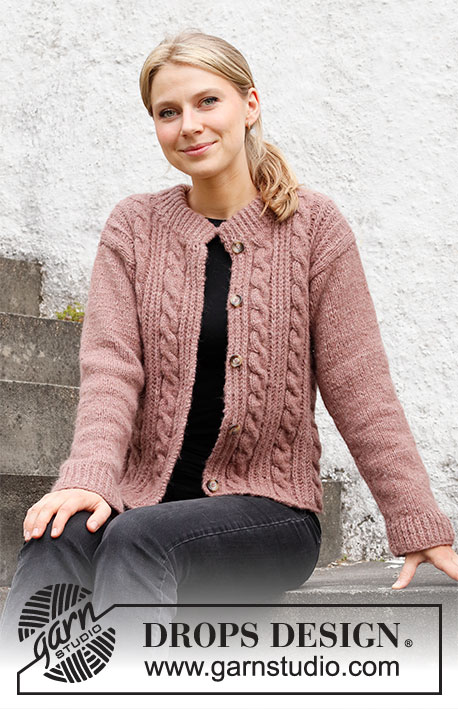
Rippling Roses Jacket#ripplingrosesjacket |
||||||||||||||||
 |
 |
|||||||||||||||
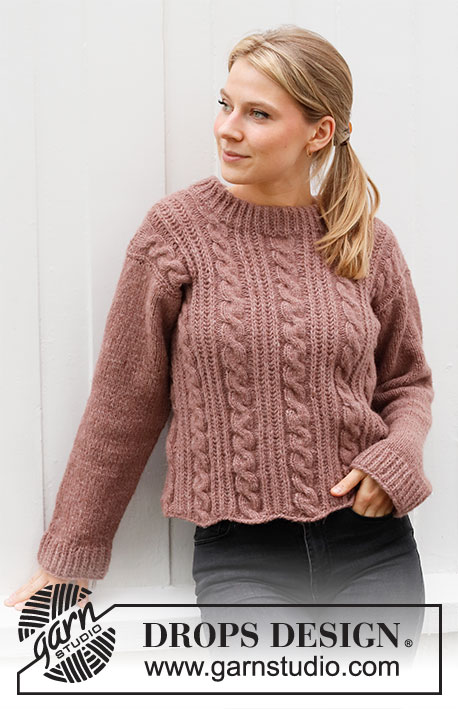
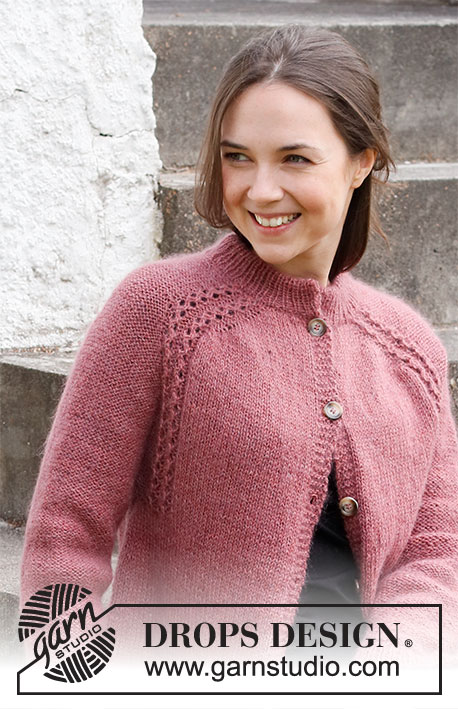
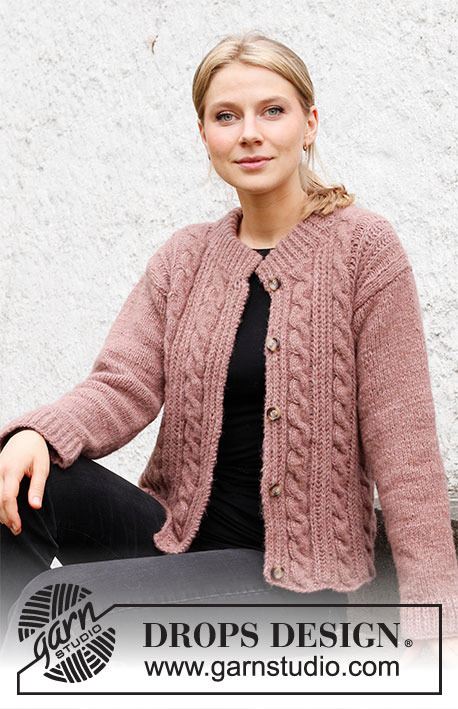
Knitted jacket with cables and English rib stitches in DROPS Air. Sizes S – XXXL.
DROPS 218-16 |
||||||||||||||||
|
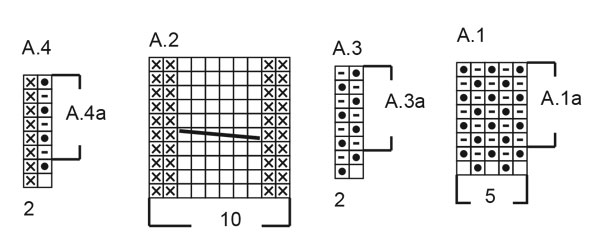
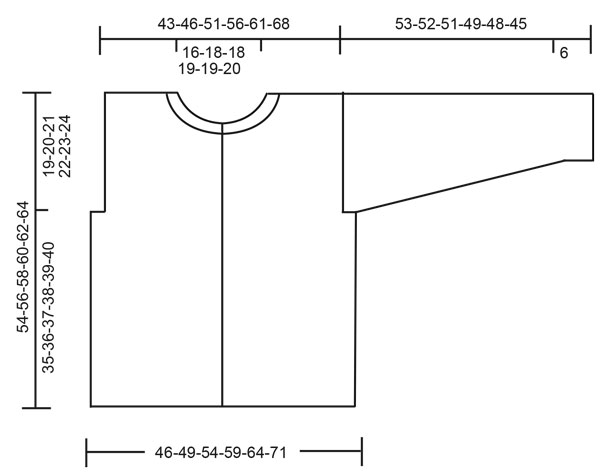
------------------------------------------------------- EXPLANATIONS FOR THE PATTERN: ------------------------------------------------------- RIDGE/GARTER STITCH (worked back and forth): Knit all rows. 1 ridge in height = Knit 2 rows. PATTERN: See diagrams A.1 to A.4. BUTTONHOLES: Work buttonholes on right band. 1 BUTTONHOLE = Knit together the second and third stitch from the edge and make 1 yarn over. On the next row knit the yarn over = hole. Work buttonholes when the piece measures: S: 3, 13, 23, 34, 45 cm M: 3, 14, 25, 36, 47 cm L: 3, 12, 21, 30, 39, 49 cm XL: 3, 12, 21, 31, 41, 51 cm XXL: 3, 13, 23, 33, 43, 53 cm XXXL: 3, 13, 23, 33, 44, 55 cm INCREASE TIP (for sleeves): Increase 1 stitch on each side of the marker thread as follows: Work until there is 1 stitch left before the marker thread, 1 yarn over, work 2 stitches as before (marker thread sits between these 2 stitches), 1 yarn over. On the next round work the yarn overs twisted to avoid holes. ------------------------------------------------------- START THE PIECE HERE: ------------------------------------------------------- JACKET – SHORT OVERVIEW OF THE PIECE: The jacket is worked back and forth with circular needle from mid front and bottom up as far as the armholes, the piece is then divided and each section finished separately. The sleeves are worked in the round with short circular needle/double pointed needles. The neck is worked to finish. BODY: Cast on 200-208-224-252-268-304 stitches with circular needle size 5.5 mm and Air. Purl 1 row from the wrong side. Then work pattern from the right side as follows: 1 edge stitch in GARTER STITCH, * A.1 (= 5 stitches), A.2 (= 10 stitches) *, work from *-* 3-3-3-4-4-5 times, work A.3 over the next 19-23-31-15-23-11 stitches, * A.2, A.1 *, work from *-* 4-4-4-6-6-8 times, A.2, work A.3 over the next 19-23-31-15-23-11 stitches, * A.2, A.1*, work from *-* 3-3-3-4-4-5 times and finish with 1 edge stitch in garter stitch. Continue this pattern; when the first 2 rows in A.1 and A.3 have been worked, repeat A.1a and A.3a onwards. Work BUTTONHOLES on the right band – read description above. Work until the piece measures 35-36-37-38-39-40 cm from the cast-on edge. REMEMBER THE KNITTING TENSION! The next row is worked as follows from the right side: Work the first 53-55-59-66-70-79 stitches, cast off the next 5-5-5-5-5-5 stitches, work the next 84-88-96-110-118-136 stitches, cast off the next 5-5-5-5-5-5 stitches and work the last 53-55-59-66-70-79 stitches. Front and back pieces are finished separately. RIGHT FRONT PIECE: = 53-55-59-66-70-79 stitches. Work A.1, A.2 and A.3 as before, but with 1 edge stitch in garter stitch towards the armhole. When the piece measures 46-48-50-52-54-56 cm, place the first 19-20-20-21-21-22 stitches on a thread for the neck (make sure stitches are worked from wrong side before placed on thread), then cast off for the neck on each row from the right side as follows: 2 stitches 1 time, 1 stitch 3 times = 29-30-34-40-44-52 stitches left on the shoulder. Cast off when the piece measures 54-56-58-60-62-64 cm (19-20-21-22-23-24 cm from the bottom of the armhole). LEFT FRONT PIECE: Work as the right front piece, but reversed; cast off stitches for the neck at the beginning of each row from the wrong side. BACK PIECE: = 84-88-96-110-118-136 stitches. Continue with A.1, A.2 and A.3 as before, but with 1 edge stitch in garter stitch on each side. Continue until the piece measures 52-54-56-58-60-62 cm. Place the middle 24-26-26-28-28-30 stitches on a thread for the neck (make sure stitches are worked from wrong side before placed on thread) and finish each shoulder separately. On the next row cast off 1 stitch towards the neck = 29-30-34-40-44-52 stitches left on the shoulder. Cast off when the piece measures 54-56-58-60-62-64 cm (= 19-20-21-22-23-24 cm from the bottom of the armhole). SLEEVE: Cast on 50-52-54-56-58-60 stitches with double pointed needles size 4.5 mm. Knit 1 round, then work A.4 over all stitches. When the first 2 rounds in A.4 have been worked, repeat A.4a onwards. Continue this pattern until the piece measures 6 cm. Knit 1 round where you decrease 6 stitches evenly spaced = 44-46-48-50-52-54 stitches. Change to double pointed needles size 5.5 mm. Knit 1 round. Insert a marker thread at the beginning of the round (= mid under the sleeve). Work stocking stitch. When the piece measures 8 cm from the cast-on edge, begin to increase mid under the sleeve – read INCREASE TIP. Increase every 5½-5-4½-4-3½-3 cm a total of 8-9-10-10-11-12 times = 60-64-68-70-74-78 stitches. Continue working until the sleeve measures 53-52-51-49-48-45 cm. Cast off. Work the other sleeve in the same way. ASSEMBLY: Sew the shoulder seams. NECK: Using circular needle size 4.5 mm pick up 65 to 85 stitches around the neck (including the stitches from the threads). Make sure the number of stitches is divisible by 2 + 1. Start from right side and work pattern as follows: Work 1 edge stitch in garter stitch, A.4a until there is 1 stitch left (on first round the picked-up stitches are worked without yarn overs) and 1 edge stitch in garter stitch, AT THE SAME TIME decrease 1 stitch in cable in A.2 from thread by knitting 3rd and 4th stitch from cable together. NOTE! A.4a should match the stitches from the threads so the English rib pattern continues up the neck. If necessary adjust the number of stitches between the threads! Continue this pattern until the neck measures 10 cm. Cast off with knit from the right side. ASSEMBLY: Fold the neck double to the wrong side and sew the cast-off edge to the row with the knitted up stitches; the neck is now approx. 5 cm. Sew the neck edge together on both sides. Sew in the sleeves, inside the 1 edge stitch on the front/back pieces. Sew the buttons onto the left band. |
||||||||||||||||
Diagram explanations |
||||||||||||||||
|
||||||||||||||||
 |
||||||||||||||||
 |
||||||||||||||||
Have you finished this pattern?Tag your pictures with #dropspattern #ripplingrosesjacket or submit them to the #dropsfan gallery. Do you need help with this pattern?You'll find 33 tutorial videos, a Comments/Questions area and more by visiting the pattern on garnstudio.com. © 1982-2026 DROPS Design A/S. We reserve all rights. This document, including all its sub-sections, has copyrights. Read more about what you can do with our patterns at the bottom of each pattern on our site. |
||||||||||||||||


With over 40 years in knitting and crochet design, DROPS Design offers one of the most extensive collections of free patterns on the internet - translated to 17 languages. As of today we count 325 catalogues and 12298 patterns translated into English (UK/cm).
We work hard to bring you the best knitting and crochet have to offer, inspiration and advice as well as great quality yarns at incredible prices! Would you like to use our patterns for other than personal use? You can read what you are allowed to do in the Copyright text at the bottom of all our patterns. Happy crafting!
Post a comment to pattern DROPS 218-16
We would love to hear what you have to say about this pattern!
If you want to leave a question, please make sure you select the correct category in the form below, to speed up the answering process. Required fields are marked *.