
Popular categories
Looking for a yarn?


Comments / Questions (104)
![]() Bonnie Banfield wrote:
Bonnie Banfield wrote:
Yes, very helpful! Thank you sooo much. I really appreciate your ongoing assistance and your very prompt responses! I couldn’t have gotten this far without your help. Your instructions are much clearer than those given in the pattern.
17.02.2025 - 16:07
![]() Bonnie Banfield wrote:
Bonnie Banfield wrote:
I must be the thickest person knitting this vest! ;-) Another question - and I hope my last - Purling back from picking up stitches for the button band, where do the extra stitches go? Do you do all the purl stitches and yarn overs go in the same stitch or start like two stitches before the actual pivot and do you purl one, yarn over in each of the two stitches before and after. If you can make any sense of what I’m asking. You’ve been VERY helpful and I so appreciate it. Thank you!
17.02.2025 - 10:19DROPS Design answered:
Dear Mrs Banfield, after you have picked up stitches from RS, purl 1 row increasing where V-increases rises on the front piece, ie at the "tip" after last increase for V-neck, increasing 4 sts to make the V-neck nicer. So in the one stitch just work (P1, YO, P1, YO, P1) = you have now 5 stitches instead of just one on left needle (4 sts increased). Can this help? Happy knitting!
17.02.2025 - 14:32
![]() Nancy Kremin wrote:
Nancy Kremin wrote:
Hi…. I’m confused… when I put together the 2 shoulders, each of them are about 5 cm. I put the left stitches on the needle and then cast on for the neck and then put the stitches for the right shoulder on. How do the neck stitches catch up in length with the right and left back? I hope this question makes sense. Thanks so much, Nancy
12.02.2025 - 16:26DROPS Design answered:
Dear Nancy, at the beginning you will have a 5cm neck depth in the back but, after working the right/left bands with rib, the neck will be pulled upwards and will be much less deeper (as shown in the size chart). Happy knitting!
17.02.2025 - 01:21
![]() Maja Tuncel wrote:
Maja Tuncel wrote:
Jag vill sticka Boston väst 219-3, men när jag läser stick beskrivningen förstår jag inte hur man stickar framstycket i 2 delar efter V-halsen. Jag hittar bara beskrivning till västen utan knappar/knapphål.
11.02.2025 - 11:36DROPS Design answered:
Hej Maja, du starter med at vælge størrelse, slår det antal masker op som står under højre forstykke, nu er det bare at følge opskriften. Hvis noget er uklart skriver du hvilken størrelse du strikker og nøjagtig hvor du er i opskriften og hvad du ikke forstår :)
12.02.2025 - 15:13
![]() Nancy Kremin wrote:
Nancy Kremin wrote:
My question is: when you cast on 22 stitches for the right front piece including 1edge stitch on each side, does this mean a total of 24 stitches or does the 22 stitches include the the edge stitches? Thank you, Nancy
08.02.2025 - 13:07DROPS Design answered:
Dear Nancy, the 22 stitches include the edge stitches. Happy knitting!
09.02.2025 - 13:42
![]() Bonnie Banfield wrote:
Bonnie Banfield wrote:
Hi! Bonnie again - re stitch count. XXL instructions begin w 22 sts per each front side, adding 1 st per side every 2nd and 4th row for the V and 16 sts total per side for underarms. My calculations: 22+42+16 = 80 sts ea front side, 118 sts for the back, plus 5 sts ea side after decreases on the 15 added underarm sts. That’s 160+118+10, which equals 288 stitches. I’m way off - again! Please help. Thanks
19.01.2025 - 20:26DROPS Design answered:
Dear Bonnie, you have 118 stitches for the back and 15 stitches cast on under each arm. You also had 16 sts increased for each armhole. However, you increase 1 stitch every 2nd and 4th row alternately 21 times in total. This means that the total number of increases is 21 and you increase 11 times every 2nd row and 10 every 4th (or viceversa, alternating between them). So that would be: Front piece (22 sts + 21 V-neck increases + 16 armhole increases) x 2 (for each front piece) + 15 sts cast on for each sleeve (30 in total) + 118 back piece stitches = 59x2 (=118) +30 + 118 = 266 sts. Happy knitting!
19.01.2025 - 23:23
![]() Bonnie Banfield wrote:
Bonnie Banfield wrote:
Hi! Thanks so much for responding to my previous question! I’m back with more questions. Which might take 2 emails. The first is: I’m knitting the XXL size and I’m at about 14cm from the underarm cast-on sts. I still have about 10 more Vneck increases left. According to the diagram that is way off. It shows those increases completed by 23cm around the start of the underarm. I’ve been increasing on the 2nd and 4th rows as instructed. Where have I gone wrong? Help! ;-) Thanks!
19.01.2025 - 20:03DROPS Design answered:
Dear Bonnie, you start at 6cm the V-neck increases. Then you work approx. 62 rows with V-neck increases. The 6cm and V-neck total increases should be approx. 78 rows (if you calculate it with the gauge) and 64 rows for the armhole (23 cm as in the size chart). So, in those 14 rows difference (78-64 = 14), you could have at max around 5 more increases for the V-neck left when you finish the armhole increases. But not 10. Check the number of worked rows and if you have increased alternately correctly (increase, 1 normal row, increase, 3 normal rows; repeat these 6 rows) Happy knitting!
19.01.2025 - 23:11
![]() Bonnie Banfield wrote:
Bonnie Banfield wrote:
I am knitting the XXL size. After joining the back and shoulder pieces the pattern says to start decreases when piece measures 5cm. Is this 5cm after joining, or 5cm after all of the increases for the V-neck are completed? Since the instruction comes after it says what the stitch count should be when all V-neck increases are complete, I’m not sure where to start the decreases. Thanks!
13.01.2025 - 18:45DROPS Design answered:
Dear Mrs Banfield, under BODY measure the 5 cm from after the division, ie from the new stitches cast on on each side for armhole. Happy knitting!
14.01.2025 - 10:14
![]() Ruth Mason wrote:
Ruth Mason wrote:
When measuring the BACK PIECE after joining the shoulder pieces do you measure from the top of the shoulders or from the top of the joint section ? 7" in my case...
31.12.2024 - 20:07DROPS Design answered:
Dear Mrs Mason, measure from the stitches cast on for shoulders. Happy knitting!
02.01.2025 - 15:35
![]() ANGE32 wrote:
ANGE32 wrote:
Bonjour, Je souhaiterai remplacer Karisma par Alpaca. Comment dois-je faire ? Merci par avance. Bonne journée
31.12.2024 - 09:11DROPS Design answered:
Bonjour Ange32, Alpaca n'est pas vraiment une alternative à Karisma, retrouvez grâce à notre convertisseur les alternatives possibles (y compris en laine comportant de l'alpaga: ici par ex..). Bon tricot!
02.01.2025 - 15:22
|
||||
Boston Vest#bostonvest |
||||
 |
 |
|||
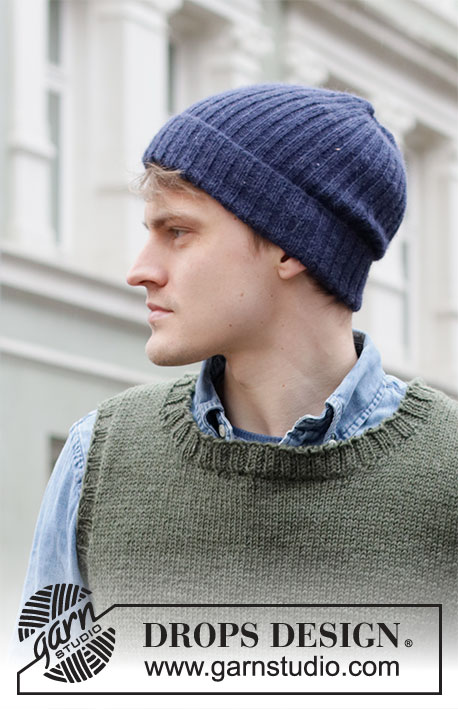
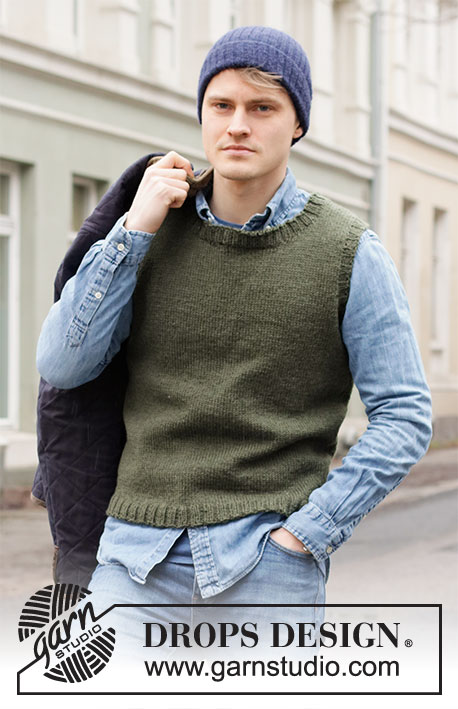
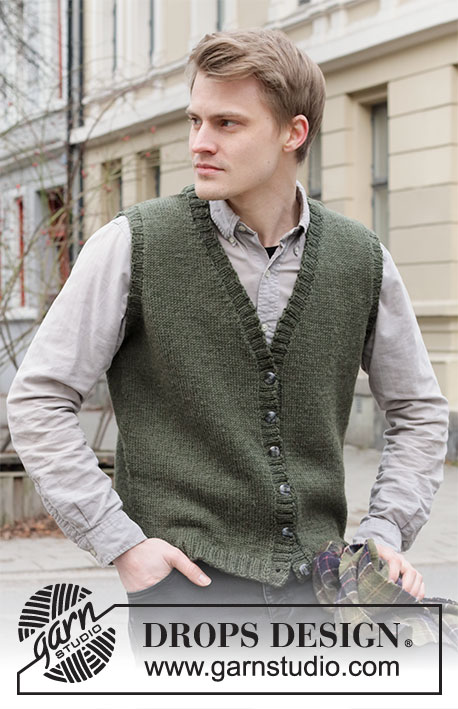
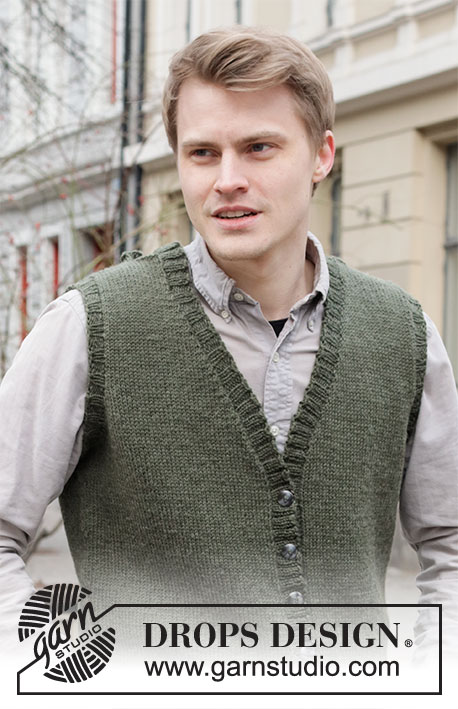
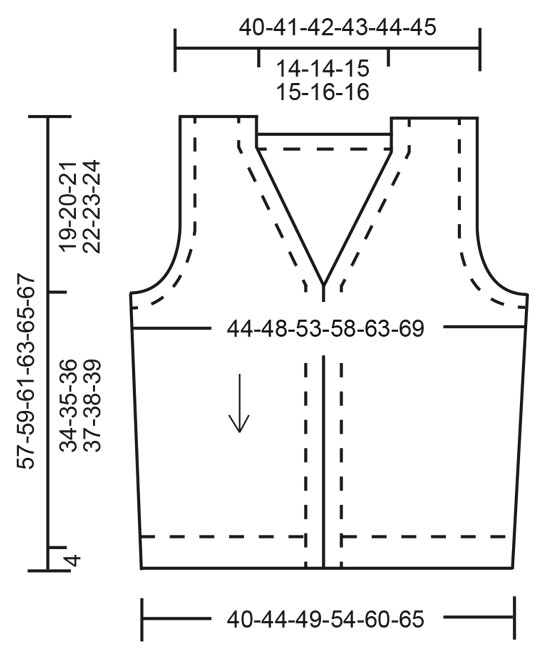
Knitted vest for men in DROPS Karisma or DROPS Soft Tweed. The piece is worked top down with V-neck and ribbed edges. Sizes S - XXXL.
DROPS 219-3 |
||||
|
------------------------------------------------------- EXPLANATIONS FOR THE PATTERN: ------------------------------------------------------- RIDGE/GARTER STITCH (worked back and forth): Knit all rows. 1 ridge in height = Knit 2 rows. INCREASE TIP (for V-neck): Make 1 yarn over between 2 stitches. On the next row, work the yarn over twisted to avoid a hole. DECREASE TIP (for sides of body): Decrease 1 stitch on each side of the stitch with the marker thread as follows: Work until there are 3 stitches left before the stitch with the marker thread, knit 2 together, knit 2, slip 1 stitch as if to knit, knit 1 and pass the slipped stitch over the knitted stitch. BUTTONHOLES: Work buttonholes from the right side and on the right band. The bottom buttonhole is worked approx. 2 cm from the bottom edge, the top buttonhole approx.1 cm from the beginning of the v-neck (approx. 32-33-34-35-36-37 cm measured from the bottom of the vest). Work a total of 6 buttonholes with approx. 6-6-6½-6½-7-7 cm between each one. Position them in the purled sections (seen from the right side). 1 buttonhole = purl 2 together, 1 yarn over. On the next row (wrong side) knit the yarn to leave a hole. CASTING-OFF TIP: To avoid the cast-off edge being tight you can cast off with a larger size needle. If the edge is still tight, make 1 yarn over after approx. each 4th stitch at the same time as casting off; the yarn overs are cast off as normal stitches. ------------------------------------------------------- START THE PIECE HERE: ------------------------------------------------------- VEST – SHORT OVERVIEW OF THE PIECE: The vest is worked top down. Each shoulder is worked separately, back and forth, and stitches are increased/cast on for the V-neck and armholes. Then all pieces are joined together and the body finished working back and forth. Stiches are picked up for the neck, sleeve edges and bands, which are worked in rib to finish. FRONT PIECES: Right front piece: Cast on 20-21-21-22-22-23 stitches (including 1 edge stitch on each side) using circular needle size 4 mm and Karisma or Soft Tweed. Work 1 edge stitch in GARTER STITCH – read description above, work stocking stitch until there is 1 stitch left on the row and then 1 edge stitch in garter stitch. Continue like this back and forth. When the piece measures 4-5-5-6-6-7 cm, start to increase for the V-neck and when the piece measures 18-18-18-17-17-16 cm, increase for the armholes, read description below: V-neck: Increase 1 stitch inside the last 2 stitches on the next row from the right side – read INCREASE TIP. Increase like this alternately every 2nd and 4th row a total of 19-19-20-20-21-21 times (increases for the V-neck are not finished when the armhole is finished, but are continued on the body). REMEMBER THE KNITTING TENSION! Armhole: Increase 1 stitch inside the first 2 stitches on every row from the right side 2-1-1-3-4-4 times, then cast on new stitches at the end of every row from the wrong side as follows: Cast on 2 stitches 0-2-2-3-3-4 times and 3 stitches 0-0-1-1-2-3 times (= a total of 2-5-8-12-16-21 stitches increased). Lay the piece to one side and work the left front piece. Left front piece: Cast on 20-21-21-22-22-23 stitches (including 1 edge stitch on each side) using circular needle size 4 mm and Karisma or Soft Tweed. Work 1 edge stitch in garter stitch, stocking stitch until there is 1 stitch left on the row and then 1 edge stitch in garter stitch. Continue like this back and forth. When the piece measures 4-5-5-6-6-7 cm, start to increase for the V-neck and when the piece measures 18-18-18-17-17-16 cm, increase for the armholes, read description below: V-neck: Increase 1 stitch inside the first 2 stitches on the next row from the right side – remember INCREASE TIP. Increase like this alternately every 2nd and 4th row a total of 19-19-20-20-21-21 times. Armhole: Increase 1 stitch inside the last 2 stitches on each row from the right side 2-1-1-3-4-4 times, then cast on new stitches at the end of every row from the right side as follows: Cast on 2 stitches 0-2-2-3-3-4 times and 3 stitches 0-0-1-1-2-3 times (= a total of 2-5-8-12-16-21 stitches increased). Lay the piece to one side and work the back piece. BACK PIECE: Each shoulder is worked separately before being joined together. Right shoulder: Cast on 20-21-21-22-22-23 stitches (including 1 edge stitch on each side) using circular needle size 4 mm and Karisma or Soft Tweed. Work 1 edge stitch in garter stitch, stocking stitch until there is 1 stitch left on the row and then 1 edge stitch in garter stitch. Continue like this back and forth. When the piece measures 4 cm increase 1 stitch inside the first 2 stitches on the next row from the right side = 21-22-22-23-23-24 stitches. Work 1 row back from the wrong side. Lay the piece to one side and work the left shoulder. Left shoulder: Cast on 20-21-21-22-22-23 stitches (including 1 edge stitch on each side) using circular needle size 4 mm and Karisma or Soft Tweed. Work 1 edge stitch in garter stitch, stocking stitch until there is 1 stitch left on the row and then 1 edge stitch in garter stitch. Continue like this back and forth. When the piece measures 4 cm increase 1 stitch inside the last 2 stitches on the next row from the right side = 21-22-22-23-23-24 stitches. Work 1 row back from the wrong side. Now work the 2 shoulders together as follows: Work the 21-22-22-23-23-24 stitches from the left shoulder as before, cast on 36-36-38-38-40-40 stitches (= neck) work the 21-22-22-23-23-24 stitches from the right shoulder as before = 78-80-82-84-86-88 stitches. Work stocking stitch back and forth with 1 stitch in garter stitch on each side. When the piece measures 18-18-18-17-17-16 cm, increase/cast on stitches on each side of the piece for the armholes, in the same way as on the front pieces (= a total of 2-5-8-12-16-21 stitches increased for each armhole) = 82-90-98-108-118-130 stitches. When all the increases are finished, work the body. THE PIECE IS NOW MEASURED FROM HERE! BODY: Now join all the pieces together from the right side as follows: Starting with the left front piece, work 1 edge stitch in garter stitch and stocking stitch as before, then cast on 11-11-13-13-15-15 new stitches (= in side under sleeve), stocking stitch over the 82-90-98-108-118-130 stitches on the back piece, cast on 11-11-13-13-15-15 new stitches (= in side under sleeve), stocking stitch over the right front piece until there is 1 stitch left and finish with 1 edge stitch in garter stitch. The number of stitches on the needle is dependent on how many increases still remain for the V-neck. Insert 1 marker in the middle stitch of the 11-11-13-13-15-15 new stitches in each side. Allow the markers to follow your work onwards; stitches will later be decreased on each side of both markers. When all the increases for the V-neck are finished there are = 186-202-222-242-266-290 stitches on the needle. When the piece measures 5 cm, decrease on both sides of each marker – read DECREASE TIP (= 4 stitches decreased). Decrease like this every 9-9-10-10-10-11 cm a total of 4 times = 170-186-206-226-250-274 stitches. When the piece measures 34-35-36-37-38-39 cm increase 26-26-30-34-38-42 stitches evenly spaced = 196-212-236-260-288-316 stitches. Change to circular needle size 3 mm and work rib, starting from the right side (= knit 2 / purl 2) with 1 edge stitch in garter stitch on each side until the rib measures 4 cm. Cast off with knit over knit and purl over purl – read CASTING-OFF TIP. The vest measures approx.57-59-61-63-65-67 cm from the shoulder down. ASSEMBLY: Sew the shoulder seams with grafting stitches. ARMHOLE EDGE: Knit up 88-132 stitches inside the 1 edge stitch around the armhole with short circular needle size 3 mm and Karisma or Soft Tweed; adjust so the number of stitches is divisible by 4. Work rib in the round (= knit 2 / purl 2) for 2 cm. Cast off with knit over knit and purl over purl – remember CASTING-OFF TIP! Work the other sleeve edge in the same way. RIGHT BAND AND NECK: Starting from the right side at the bottom of the right front piece, knit up 144-172 stitches with short circular needle size 3 mm and Karisma or Soft Tweed, inside the 1 edge stitch, and as far as mid-back of the neck. Adjust so the number of stitches is divisible by 4. Purl 1 row from the wrong side and increase using yarn overs just where the V-neck finishes (i.e. the point, approx. 33-34-35-36-37-38 cm from the cast-off edge upwards), * purl 1, 1 yarn over *, work from *-* a total of 4 times (= 4 stitches increased). On the next row from the right side work as follows: 2 edge stitches in garter stitch, then rib (= knit 2 / purl 2) to end of row (yarn overs worked twisted to avoid holes). Make sure the band is neither too tight nor too loose for the length of the front piece; knit up more/less stitches if necessary. When the band measures 1 cm work the BUTTONHOLES – read description above. When the band/neck measures 2½ cm, Cast off with knit over knit and purl over purl – remember CASTING-OFF TIP. LEFT BAND AND NECK: Starting mid-back of neck with circular needle size 3 mm and Karisma or Soft Tweed and working from the right side, knit up the same number of stitches as on the right band and neck inside the 1 edge stitch down the left front piece. Purl 1 row from the wrong side and increase with yarn overs just where the V-neck finishes (i.e. the point, approx. 33-34-35-36-37-38 cm from the cast-off edge upwards), * purl 1, 1 yarn over *, work from *-* a total of 4 times (= 4 stitches increased). On the next row from the right side work as follows: Work rib (= knit 2 / purl 2) until there are 2 stitches left and finish with 2 stitches in garter stitch (yarn overs worked twisted to avoid holes). When the band/neck measures 2½ cm, Cast off with knit over knit and purl over purl – remember CASTING-OFF TIP. ASSEMBLY: Sew buttons onto the left band. |
||||
Diagram explanations |
||||
|
||||
 |
||||
Have you finished this pattern?Tag your pictures with #dropspattern #bostonvest or submit them to the #dropsfan gallery. Do you need help with this pattern?You'll find 26 tutorial videos, a Comments/Questions area and more by visiting the pattern on garnstudio.com. © 1982-2026 DROPS Design A/S. We reserve all rights. This document, including all its sub-sections, has copyrights. Read more about what you can do with our patterns at the bottom of each pattern on our site. |
||||


With over 40 years in knitting and crochet design, DROPS Design offers one of the most extensive collections of free patterns on the internet - translated to 17 languages. As of today we count 325 catalogues and 12298 patterns translated into English (UK/cm).
We work hard to bring you the best knitting and crochet have to offer, inspiration and advice as well as great quality yarns at incredible prices! Would you like to use our patterns for other than personal use? You can read what you are allowed to do in the Copyright text at the bottom of all our patterns. Happy crafting!
Post a comment to pattern DROPS 219-3
We would love to hear what you have to say about this pattern!
If you want to leave a question, please make sure you select the correct category in the form below, to speed up the answering process. Required fields are marked *.