
Popular categories
Looking for a yarn?


|
||||
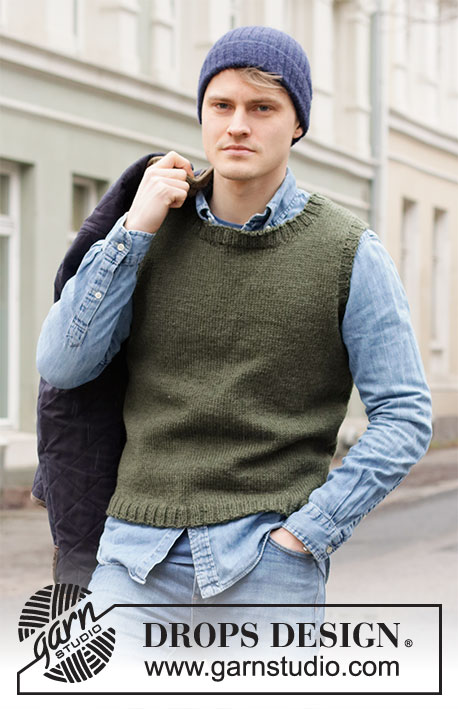
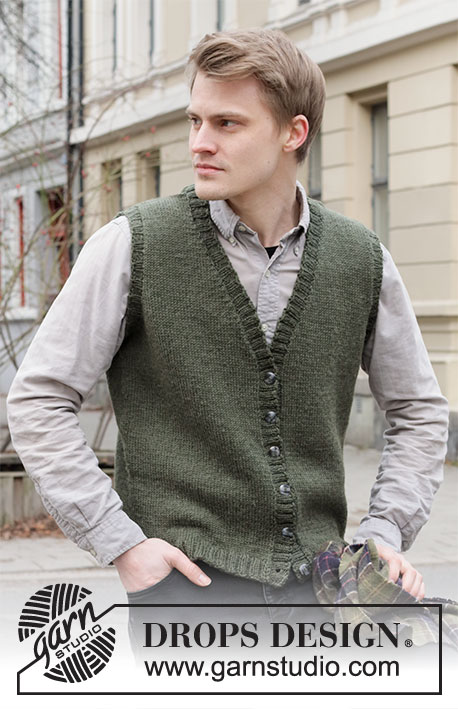
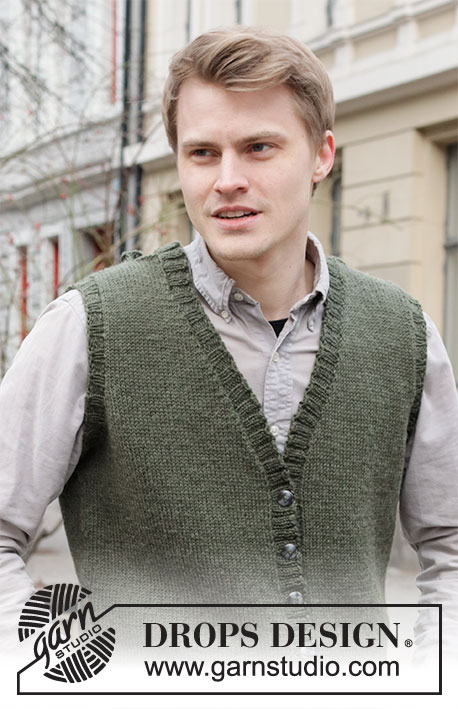
Boston Vest |
||||
 |
 |
|||
Knitted vest for men in DROPS Karisma or DROPS Soft Tweed. The piece is worked top down with V-neck and ribbed edges. Sizes S - XXXL.
DROPS 219-3 |
||||
|
------------------------------------------------------- EXPLANATIONS FOR THE PATTERN: ------------------------------------------------------- RIDGE/GARTER STITCH (worked back and forth): Knit all rows. 1 ridge in height = Knit 2 rows. INCREASE TIP (for V-neck): Make 1 yarn over between 2 stitches. On the next row, work the yarn over twisted to avoid a hole. DECREASE TIP (for sides of body): Decrease 1 stitch on each side of the stitch with the marker thread as follows: Work until there are 3 stitches left before the stitch with the marker thread, knit 2 together, knit 2, slip 1 stitch as if to knit, knit 1 and pass the slipped stitch over the knitted stitch. BUTTONHOLES: Work buttonholes from the right side and on the right band. The bottom buttonhole is worked approx. 2 cm from the bottom edge, the top buttonhole approx.1 cm from the beginning of the v-neck (approx. 32-33-34-35-36-37 cm measured from the bottom of the vest). Work a total of 6 buttonholes with approx. 6-6-6½-6½-7-7 cm between each one. Position them in the purled sections (seen from the right side). 1 buttonhole = purl 2 together, 1 yarn over. On the next row (wrong side) knit the yarn to leave a hole. CASTING-OFF TIP: To avoid the cast-off edge being tight you can cast off with a larger size needle. If the edge is still tight, make 1 yarn over after approx. each 4th stitch at the same time as casting off; the yarn overs are cast off as normal stitches. ------------------------------------------------------- START THE PIECE HERE: ------------------------------------------------------- VEST – SHORT OVERVIEW OF THE PIECE: The vest is worked top down. Each shoulder is worked separately, back and forth, and stitches are increased/cast on for the V-neck and armholes. Then all pieces are joined together and the body finished working back and forth. Stiches are picked up for the neck, sleeve edges and bands, which are worked in rib to finish. FRONT PIECES: Right front piece: Cast on 20-21-21-22-22-23 stitches (including 1 edge stitch on each side) using circular needle size 4 mm and Karisma or Soft Tweed. Work 1 edge stitch in GARTER STITCH – read description above, work stocking stitch until there is 1 stitch left on the row and then 1 edge stitch in garter stitch. Continue like this back and forth. When the piece measures 4-5-5-6-6-7 cm, start to increase for the V-neck and when the piece measures 18-18-18-17-17-16 cm, increase for the armholes, read description below: V-neck: Increase 1 stitch inside the last 2 stitches on the next row from the right side – read INCREASE TIP. Increase like this alternately every 2nd and 4th row a total of 19-19-20-20-21-21 times (increases for the V-neck are not finished when the armhole is finished, but are continued on the body). REMEMBER THE KNITTING TENSION! Armhole: Increase 1 stitch inside the first 2 stitches on every row from the right side 2-1-1-3-4-4 times, then cast on new stitches at the end of every row from the wrong side as follows: Cast on 2 stitches 0-2-2-3-3-4 times and 3 stitches 0-0-1-1-2-3 times (= a total of 2-5-8-12-16-21 stitches increased). Lay the piece to one side and work the left front piece. Left front piece: Cast on 20-21-21-22-22-23 stitches (including 1 edge stitch on each side) using circular needle size 4 mm and Karisma or Soft Tweed. Work 1 edge stitch in garter stitch, stocking stitch until there is 1 stitch left on the row and then 1 edge stitch in garter stitch. Continue like this back and forth. When the piece measures 4-5-5-6-6-7 cm, start to increase for the V-neck and when the piece measures 18-18-18-17-17-16 cm, increase for the armholes, read description below: V-neck: Increase 1 stitch inside the first 2 stitches on the next row from the right side – remember INCREASE TIP. Increase like this alternately every 2nd and 4th row a total of 19-19-20-20-21-21 times. Armhole: Increase 1 stitch inside the last 2 stitches on each row from the right side 2-1-1-3-4-4 times, then cast on new stitches at the end of every row from the right side as follows: Cast on 2 stitches 0-2-2-3-3-4 times and 3 stitches 0-0-1-1-2-3 times (= a total of 2-5-8-12-16-21 stitches increased). Lay the piece to one side and work the back piece. BACK PIECE: Each shoulder is worked separately before being joined together. Right shoulder: Cast on 20-21-21-22-22-23 stitches (including 1 edge stitch on each side) using circular needle size 4 mm and Karisma or Soft Tweed. Work 1 edge stitch in garter stitch, stocking stitch until there is 1 stitch left on the row and then 1 edge stitch in garter stitch. Continue like this back and forth. When the piece measures 4 cm increase 1 stitch inside the first 2 stitches on the next row from the right side = 21-22-22-23-23-24 stitches. Work 1 row back from the wrong side. Lay the piece to one side and work the left shoulder. Left shoulder: Cast on 20-21-21-22-22-23 stitches (including 1 edge stitch on each side) using circular needle size 4 mm and Karisma or Soft Tweed. Work 1 edge stitch in garter stitch, stocking stitch until there is 1 stitch left on the row and then 1 edge stitch in garter stitch. Continue like this back and forth. When the piece measures 4 cm increase 1 stitch inside the last 2 stitches on the next row from the right side = 21-22-22-23-23-24 stitches. Work 1 row back from the wrong side. Now work the 2 shoulders together as follows: Work the 21-22-22-23-23-24 stitches from the left shoulder as before, cast on 36-36-38-38-40-40 stitches (= neck) work the 21-22-22-23-23-24 stitches from the right shoulder as before = 78-80-82-84-86-88 stitches. Work stocking stitch back and forth with 1 stitch in garter stitch on each side. When the piece measures 18-18-18-17-17-16 cm, increase/cast on stitches on each side of the piece for the armholes, in the same way as on the front pieces (= a total of 2-5-8-12-16-21 stitches increased for each armhole) = 82-90-98-108-118-130 stitches. When all the increases are finished, work the body. THE PIECE IS NOW MEASURED FROM HERE! BODY: Now join all the pieces together from the right side as follows: Starting with the left front piece, work 1 edge stitch in garter stitch and stocking stitch as before, then cast on 11-11-13-13-15-15 new stitches (= in side under sleeve), stocking stitch over the 82-90-98-108-118-130 stitches on the back piece, cast on 11-11-13-13-15-15 new stitches (= in side under sleeve), stocking stitch over the right front piece until there is 1 stitch left and finish with 1 edge stitch in garter stitch. The number of stitches on the needle is dependent on how many increases still remain for the V-neck. Insert 1 marker in the middle stitch of the 11-11-13-13-15-15 new stitches in each side. Allow the markers to follow your work onwards; stitches will later be decreased on each side of both markers. When all the increases for the V-neck are finished there are = 186-202-222-242-266-290 stitches on the needle. When the piece measures 5 cm, decrease on both sides of each marker – read DECREASE TIP (= 4 stitches decreased). Decrease like this every 9-9-10-10-10-11 cm a total of 4 times = 170-186-206-226-250-274 stitches. When the piece measures 34-35-36-37-38-39 cm increase 26-26-30-34-38-42 stitches evenly spaced = 196-212-236-260-288-316 stitches. Change to circular needle size 3 mm and work rib, starting from the right side (= knit 2 / purl 2) with 1 edge stitch in garter stitch on each side until the rib measures 4 cm. Cast off with knit over knit and purl over purl – read CASTING-OFF TIP. The vest measures approx.57-59-61-63-65-67 cm from the shoulder down. ASSEMBLY: Sew the shoulder seams with grafting stitches. ARMHOLE EDGE: Knit up 88-132 stitches inside the 1 edge stitch around the armhole with short circular needle size 3 mm and Karisma or Soft Tweed; adjust so the number of stitches is divisible by 4. Work rib in the round (= knit 2 / purl 2) for 2 cm. Cast off with knit over knit and purl over purl – remember CASTING-OFF TIP! Work the other sleeve edge in the same way. RIGHT BAND AND NECK: Starting from the right side at the bottom of the right front piece, knit up 144-172 stitches with short circular needle size 3 mm and Karisma or Soft Tweed, inside the 1 edge stitch, and as far as mid-back of the neck. Adjust so the number of stitches is divisible by 4. Purl 1 row from the wrong side and increase using yarn overs just where the V-neck finishes (i.e. the point, approx. 33-34-35-36-37-38 cm from the cast-off edge upwards), * purl 1, 1 yarn over *, work from *-* a total of 4 times (= 4 stitches increased). On the next row from the right side work as follows: 2 edge stitches in garter stitch, then rib (= knit 2 / purl 2) to end of row (yarn overs worked twisted to avoid holes). Make sure the band is neither too tight nor too loose for the length of the front piece; knit up more/less stitches if necessary. When the band measures 1 cm work the BUTTONHOLES – read description above. When the band/neck measures 2½ cm, Cast off with knit over knit and purl over purl – remember CASTING-OFF TIP. LEFT BAND AND NECK: Starting mid-back of neck with circular needle size 3 mm and Karisma or Soft Tweed and working from the right side, knit up the same number of stitches as on the right band and neck inside the 1 edge stitch down the left front piece. Purl 1 row from the wrong side and increase with yarn overs just where the V-neck finishes (i.e. the point, approx. 33-34-35-36-37-38 cm from the cast-off edge upwards), * purl 1, 1 yarn over *, work from *-* a total of 4 times (= 4 stitches increased). On the next row from the right side work as follows: Work rib (= knit 2 / purl 2) until there are 2 stitches left and finish with 2 stitches in garter stitch (yarn overs worked twisted to avoid holes). When the band/neck measures 2½ cm, Cast off with knit over knit and purl over purl – remember CASTING-OFF TIP. ASSEMBLY: Sew buttons onto the left band. |
||||
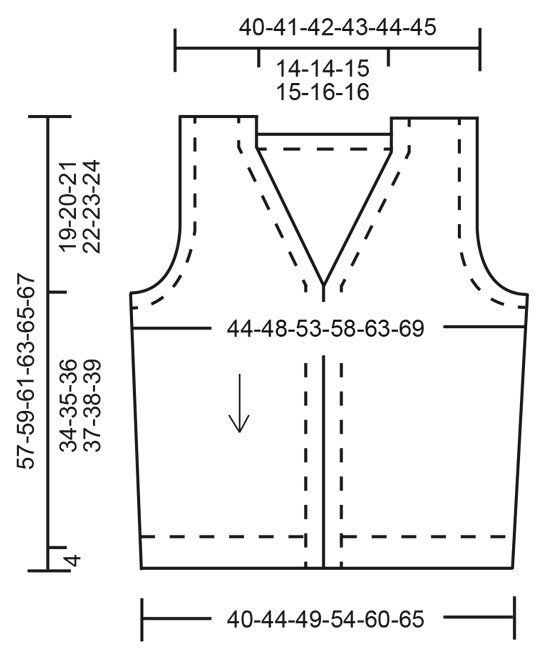
Diagram explanations |
||||
|
||||
|
||||
|
Have you made this or any other of our designs? Tag your pictures in social media with #dropsdesign so we can see them! Do you need help with this pattern?You'll find tutorial videos, a Comments/Questions area and more by visiting the pattern on garnstudio.com. © 1982-2024 DROPS Design A/S. We reserve all rights. This document, including all its sub-sections, has copyrights. Read more about what you can do with our patterns at the bottom of each pattern on our site. |
||||


With over 40 years in knitting and crochet design, DROPS Design offers one of the most extensive collections of free patterns on the internet - translated to 17 languages. As of today we count 304 catalogues and 11422 patterns - 11422 of which are translated into English (UK/cm).
We work hard to bring you the best knitting and crochet have to offer, inspiration and advice as well as great quality yarns at incredible prices! Would you like to use our patterns for other than personal use? You can read what you are allowed to do in the Copyright text at the bottom of all our patterns. Happy crafting!
Comments / Questions (60)
Hello. Sorry, but how should I read the diagram? And I don't understand the size chart :( Can you please help me?
03.10.2021 - 17:33DROPS Design answered:
Dear Narcissus, please see THIS lesson about how to read diagram. For sizing, you can see all the relevant measurements of the finished item on the shcematic drawing just below the pattern. We suggest that you take a garnment that fits the intended user and compare the measurements. Happy Stitching!
04.10.2021 - 00:35When it says "Increase like this alternately every 2nd and 4th row" does this mean on every other row, or on the 2nd row, then fourth row, then 2nd row? Option 1: increase (right side) no increase (wrong side) increase (right side) no increase (wrong side) Option 2: increase (right side) no increase (wrong side) increase (right side) no increase (wrong side) no increase (right side) no increase (wrong side) increase (right side)
29.05.2021 - 21:02DROPS Design answered:
Dear Maja, it is option 2. Happy Knitting!
29.05.2021 - 22:46Jeg skal strikke Boston Vesten. der står omk. retstrikning: "RETSTRIK (strikkes frem og tilbage): Strik ret på alle pinde." Skal jeg ikke strikke ret på retsiden og vrang på vrangsiden?
24.05.2021 - 22:53DROPS Design answered:
Hei Kaja. Jo, vesten strikkes i glattstrikk (rett fra rettsiden og vrang fra vrangsiden), men kantmaskene strikkes i retstrikk (RETSTRIK = når det strikkes frem og tilbage = Strik ret på alle pinde). Står det i oppskriften at 1 kantmaske skal strikkes i retstrik, skal denne masken strikkes rett fra retten og rett fra vrangen. mvh DROPS design
26.05.2021 - 10:15Buongiorno, è la prima volta che mi cimento in un lavoro di questo genere, cioè senza cuciture laterali. E allora mi chiedo: fatto il davanti destro e messo da parte. Fatto il davanti sinistro e messo da parte ...ed ecco la domanda ma il filo si deve tagliare o lasciare col suo gomitolo? Chiedo perdono per la mia ignoranza e spero in una risposta celere. Ciao
19.03.2021 - 10:06DROPS Design answered:
Buonasera Maria Giovanna, può tagliare il filo e poi ripartire. Buon lavoro!
19.03.2021 - 23:11Hoe moet ik het achterpand breien? Ik heb een linker en een rechter schouder gemaakt, zoals aangegeven. Welke 23 steken moet ik oppakken, de steken aan de rand die ik gemeerderd heb? Of moet ik de de opzet steken van linker pakken, extra steken opzetten voor hals en dan de opzet steken van rechts? Moet ik dan als het ware tussen de twee gemaakte schouders in breiden en deze verbinden met de kantsteek?
24.02.2021 - 20:02DROPS Design answered:
Dag Chantal,
Je breit eerst de steken van de linker schouder, aan het eind van die steken zet je 38 steken op en daarna brei je de 23 steken van de rechter schouder. Dus je hebt dan alle steken van beide schouders op de naald met daartussenin 38 steken opgezet.
26.02.2021 - 12:01Det er virkelig mærkeligt at alle modeller til herre i jeres opskrifter er lukket mod venstre side. Der er mange mænd der vil protestere over dette Normalt knapper mænd deres trøjer, jakker og skjorterne venstre mod højre. Ergo skal knaphullerne strikkes i venstre side
27.01.2021 - 15:55Ciao Drops, Bisogna partire dal davanti sinistro, certo. Ma il davanti sinistro ha due capi; uno che è lavorazione del collo a V (dove ho fatto aumenti alternati), l’altro la lavorazione dello scalfo (che ho terminato con l’aggiunta di 3 maglie). Da dove devo partire?
24.01.2021 - 13:25DROPS Design answered:
Buongiorno Irene, deve iniziare dalla parte finale che ha lasciato in sospeso. Buon lavoro!
24.01.2021 - 14:21Ciao, scusate un’altra domanda. Quando inizio a lavorare il corpo partendo dal davanti sinistro, ricomincio dall’inizio del pezzo (dalla parte del collo) aggiungendo un nuovo gomitolo? Oppure devo riprendere dalla fine della prima lavorazione (dallo scalfo)? Grazie!
24.01.2021 - 12:00DROPS Design answered:
Buongiorno Irene, quando inizia il corpo deve partire dal davanti sinistro, non dal collo. Buon lavoro!
24.01.2021 - 13:19Non capisco: Aumenti collo V lato destro: lavoro a dritto, aumento alla fine del rovescio, dritto, aumento alla fine del rovescio, lavoro 4 righe senza aumenti e ricomincio??? Inoltre, come è possibile che l’aggiunta delle maglie per lo scaldo vada fatta alla fine del ferro rovescio? Li non sto aumentando per lo scollo? Grazie
21.01.2021 - 00:48DROPS Design answered:
Buonasera Irene, gli aumenti per il collo sul davanti destro vanno lavorati sui ferri dal diritto del lavoro prima delle ultime 2 maglie. Buon lavoro!
21.01.2021 - 20:04Bästa Drops, Jag har idag stickat klart Boston Vest, storlek M. Den blev alldeles för liten, tyvärr. Enligt era mått borde jag ha valt stl XL, men personen använder inte sådana storlekar normalt. Jag vill gärna sticka samma mönster en gång till, men med ett tunnare garn. Vilket garn kan jag välja? Och med ett tunt garn kanske stl L räcker till?
18.01.2021 - 16:31