
Popular categories
Looking for a yarn?


Comments / Questions (45)
![]() Elwira wrote:
Elwira wrote:
Początkowa liczba oczek do tego wzoru została błędnie podana, nie zgadza się z kolejnymi wyliczeniami we wzorze.
20.08.2025 - 14:21DROPS Design answered:
Witaj Elwiro, o jaką liczbę i rozmiar chodzi?
20.08.2025 - 17:04
![]() Karen wrote:
Karen wrote:
Hi, I can I knit this with just baby merino? I really don’t like the feeling of kid-silk. Also if I can knit this with just the baby merino, can I change the needle size to a 4.5, because the 5 mm seems too big. Thank you for any help.
10.08.2025 - 12:25DROPS Design answered:
Dear Karen, you can work with double thread of DROPS Baby Merino (since you have DROPS Alpaca + DROPS Kid-Silk = A+A). Otherwise, the gauge of 1 thread of DROPS Baby Merino will be too different from the one in the pattern and you will need to recalculate the whole pattern. To check which needle size you will need you need to work the swatch and check that the gauge matches that of the pattern. If you have too few stitches when working with 5mm you can change to a smaller needle. Happy knitting!
10.08.2025 - 18:33
![]() Liza wrote:
Liza wrote:
Hola! Muy lindo el cardigan, gracias por el diseño y patrón! En el punto de incremento de raglán, cómo “me llevo” el marcador a la sgte corrida si está puesto dentro de un punto? Siempre los he usado entre puntos. Gracias!
20.07.2025 - 02:37DROPS Design answered:
Hola Liza, cuando el marcapuntos está dentro del punto, quitas el marcapuntos cuando llegues al punto con marcapuntos, trabajas este punto y pones el marcapuntos en este nuevo punto trabajado encima.
27.07.2025 - 22:07
![]() Lucy Winter wrote:
Lucy Winter wrote:
Do you knit 2 strands at same time?
18.05.2025 - 17:52DROPS Design answered:
Dear Mrs Winter, correct you work with both Alpaca and Kid-Silk as if there were just one strand/yarn. Happy knitting!
19.05.2025 - 09:52
![]() Anja wrote:
Anja wrote:
Hallo, wunderschönes Muster! Ich habe die Wolle gekauft und eine Frage zum Zopfmuster: Wird die Rückreihe jeweils links gestrickt oder auch nach Muster? Weil meine Probe sieht sehr langgezogen aus, wenn ich die Rückreihe einfach entsprechend links abstricke... Vielen Dank, Liebe Grüße
10.03.2025 - 15:19DROPS Design answered:
Liebe Anja, im Diagramm sind alle Reihen gezeichnet, die Hin- sowie die Rückreihen, so stricken Sie Zöpfe in jeder 4. Reihe. Folgen Sie Zeichenerklärung "in Rück-Reihen" für beide erste Symbole. Viel Spaß beim Stricken!
10.03.2025 - 15:42
![]() Gabrielle wrote:
Gabrielle wrote:
Bonjour, Je débute en tricot, je fais du S. 250g d'Alpaca, ça veut dire 5 pelotes ? Ca me parait peu. Ou j'ai mal compris ? Merci!
12.01.2025 - 17:52DROPS Design answered:
Bonjour Gabrielle, vous allez tricoter ici avec 2 laines en même temps: Alpaca et Kid-Silk, en taille S, il vous faudra effectivement 5 pelotes de 50 g DROPS Alpaca mais aussi 4 pelotes de 25 g Kid-Silk. Bon tricot!
13.01.2025 - 10:02
![]() Carmen wrote:
Carmen wrote:
Je ne comprends pas le nombre de mailles de base. Je fais la grandeur L. Je dois monter 84 mailles. Pour placer les marqueur, je compte 1 maille lisière, 3 mailles devant, 26 mailles manche, 22 mailles dos, 26 mailles manche, 3 mailles devant et 1 maille lisière. J’arrive à 82 mailles et non pas 84. Qu’est-ce que je n’ai pas compris?
12.12.2024 - 16:36DROPS Design answered:
Bonjour Carmen, notez que les marqueurs doivent être placés dans une maille (pas entre les mailles), et que les mailles lisières sont comprises dans les 3 m des devants, autrement dit, comptez ainsi: 3 m (devant), 1 m avec un marqueur, 26 m (manche), 1 m avec un marqueur, 22 m (dos), 1 m avec un marqueur, 26 m (manche), 1 m avec un marqueur, 3 m (devant) = 3+1+26+1+22+1+26+1+3=84 m. Bon tricot!
13.12.2024 - 07:24
![]() Christine wrote:
Christine wrote:
Bonjour, j’aimerais faire ce modèle mais sans les torsades sur les manches est ce possible avec le même nombre de mailles ? Merci pour votre réponse.
16.11.2024 - 18:42DROPS Design answered:
Bonjour Christine, pas vraiment car on prend ici en compte les torsades (on a plus de mailles que pour du jersey car les torsades ont besoin de davantage de mailles pour la même largeur); mais vous trouverez ici tous nos gilets et vestes avec encolure V, tricotés en jersey; l'un d'eux vous inspirera peut-être. Bon tricot!
18.11.2024 - 07:55
![]() Marie wrote:
Marie wrote:
Bonjour, Tout d'abord, un grand merci pour tous ces modèles gratuits faciles à exécuter grâce à vos explications super claires pour moi qui ne suis pas une experte en tricot ! ensuite pour ce modèle deep woods peut-on tricoter avec 2 fils alpaca au lieu d'un fil alpaca et 1 fil kid silk ? et si oui combien de grammes d'alpaca je devrai acheter en plus ? merci, marie
09.10.2024 - 12:51DROPS Design answered:
Bonjour Marie et merci. Vous pouvez tout à fait tricoter avec 2 fils Alpaca, il vous suffit dans ce cas de doubler la quantité indiquée pour votre taille, si vous tricotez avec la même couleur, il vous en faudra probablement un peu moins, mais si vous en prenez moins vous risquez d'en manquer. Bon tricot!
09.10.2024 - 15:43
![]() Amanda wrote:
Amanda wrote:
Hej! När man gör de sista 12 minskningarna på ärmen innan resåren, ska man göra dem endast på de 26 maskorna i A.1 eller ska man fördela minskningarna över hela varvet? Tack på förhand!
15.02.2024 - 19:25DROPS Design answered:
Hej Amanda. Du minskar de endast på de maskorna i A.1. Mvh DROPS Design
16.02.2024 - 08:15
|
|||||||||||||||||||
Deep Woods#deepwoodscardigan |
|||||||||||||||||||
 |
 |
||||||||||||||||||
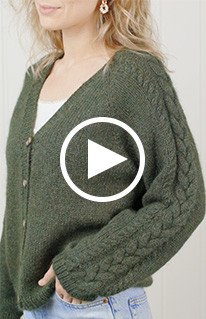
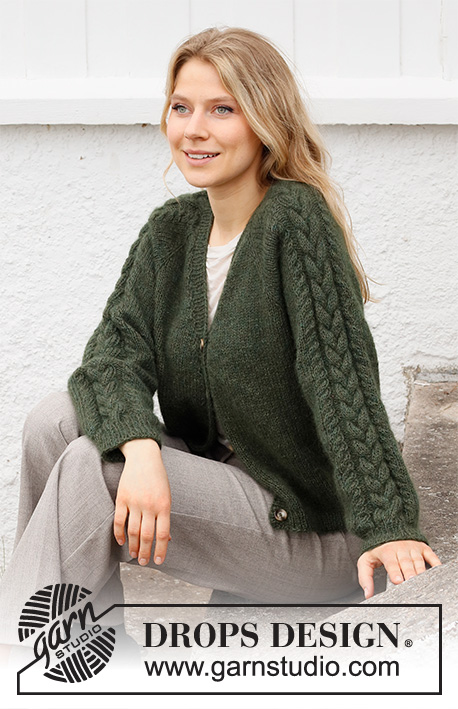
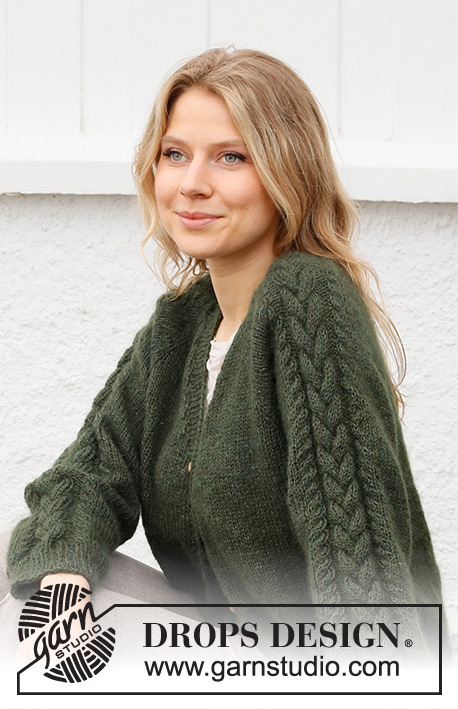
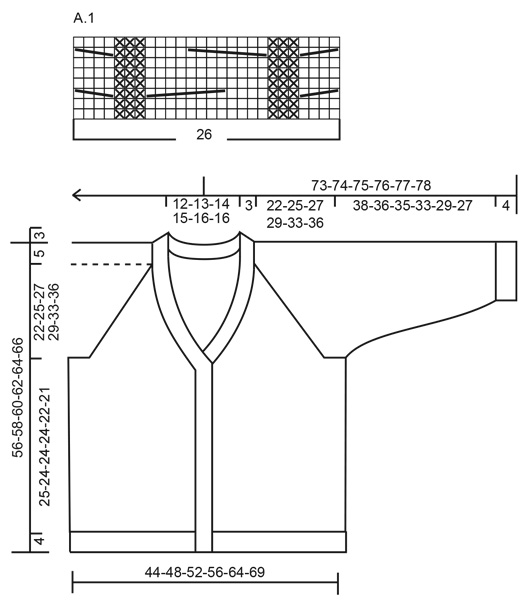
Knitted jacket in DROPS Alpaca and DROPS Kid-Silk. The piece is worked top down with raglan, cable-pattern and V-neck. Sizes S - XXXL.
DROPS 215-6 |
|||||||||||||||||||
|
------------------------------------------------------- EXPLANATIONS FOR THE PATTERN: ------------------------------------------------------- RIDGE/GARTER STITCH (worked back and forth): Knit all rows. 1 ridge in height = Knit 2 rows. PATTERN: See diagram A.1. RAGLAN: Increase 1 stitch on each side of the stitch in stocking stitch (stitch with marker thread) in each transition between body and sleeves (= 8 stitches increased on the row). Increase 1 stitch by making 1 yarn over. On the next row purl the yarn overs twisted to avoid holes. Then work the new stitches in stocking stitch. V-NECK: All increases are worked from the right side! Make 1 yarn over on the inside of the edge stitch on each side. On the next row (wrong side) purl the yarn over twisted to avoid a hole. Then work the new stitch in stocking stitch. 2 stitches increased on each increase-row (1 stitch each side) DECREASE TIP (for sleeves): Decrease 1 stitch on either side of the marker thread as follows: Work until there are 3 stitches left before the marker thread, knit 2 together, knit 2 (marker thread sits between these 2 stitches), slip 1 stitch as if to knit, knit 1 and pass the slipped stitch over the knitted stitch. CASTING-OFF TIP: To avoid the cast-off edge being tight you can cast off with a larger size needle. If the edge is still tight, make 1 yarn over after approx. each 4th stitch at the same time as casting off; the yarn overs are cast off as normal stitches. BUTTONHOLES: Work 5 buttonholes on the right band (when the garment is worn). 1 buttonhole = knit 2 stitches together and make 1 yarn over. On the next row knit the yarn over to leave a hole. The bottom buttonhole is worked approx. 2 cm from the bottom edge and the top buttonhole where the V-neck begins. The other 4 buttonholes are worked evenly between them (with approx. 8 cm between each one). ------------------------------------------------------- START THE PIECE HERE: ------------------------------------------------------- JACKET – SHORT OVERVIEW OF THE PIECE: The yoke is worked back and forth with circular needle from mid front and top down. AT THE SAME TIME increases are made for the V-neck and raglan. The yoke is divided for body and sleeves and the body continued back and forth. The sleeves are worked in the round with short circular needle/double pointed needles, top down. The neck/bands are worked to finish. YOKE: Cast on 80-82-84-86-88-90 stitches (including 1 edge stitch on each side towards mid front) with circular needle size 5 mm and 1 strand Kid-Silk and 1 strand Alpaca (= 2 strands). Purl 1 row from the wrong side. READ THE WHOLE OF THE NEXT SECTION BEFORE CONTINUING: Insert 4 marker threads in the piece as follows (without working the stitches): Count 3 stitches (= front piece), insert 1 marker thread in the next stitch, count 26 stitches (= sleeve), insert 1 marker thread in the next stitch, count 18-20-22-24-26-28 stitches (= back piece), insert 1 marker thread in the next stitch, count 26 stitches (= sleeve), insert 1 marker thread in the next stitch, there are 3 stitches left after the last marker thread (= front piece). Continue with 1 edge stitch in garter stitch and stocking stitch over the stitches on both front pieces, stocking stitch on the back piece and A.1 (= 26 stitches) over each sleeve, AT THE SAME TIME on the first row from the right side increase to RAGLAN in each transition between body and sleeves – read description above. Continue this increase every 2nd row (i.e. each row from the right side) a total of 22-25-27-29-33-36 times on both sides of all 4 marker threads. Continue the increase 2 more times on the front and back pieces (do not increase any more on the sleeves). AT THE SAME TIME on row 6 (i.e. the 3rd row from the right side) increase for the V-NECK on each side towards mid front – read description above, as follows: Increase every 6th row a total of 4-5-6-7-8-9 times and every 4th row a total of 3 times (= a total of 7-8-9-10-11-12 stitches increased on each side towards mid front). REMEMBER THE KNITTING TENSION! After the last increase to raglan, continue working without further increases until the piece measures 22-25-27-29-33-36 cm; the increases for the V-neck should now be finished. There are 278-306-326-346-382-410 stitches on the needle. The next row is worked as follows: Work the first 35-39-42-45-50-54 stitches (= front piece), place the next 70-76-80-84-92-98 stitches on 1 thread for the sleeve and cast on 6-6-6-8-10-12 new stitches on the needle (= in side under the sleeve), work the next 68-76-82-88-98-106 stitches (= back piece), place the next 70-76-80-84-92-98 stitches on 1 thread for the sleeve and cast on 6-6-6-8-10-12 new stitches on the needle (= in side under the sleeve), work the remaining 35-39-42-45-50-54 stitches (= front piece). THE PIECE IS NOW MEASURED FROM HERE! BODY: = 150-166-178-194-218-238 stitches. Continue with stocking stitch and 1 edge stitch in garter stitch on each side. When the piece measures 25-24-24-24-22-21 cm from the division, knit 1 row from the right side where you increase 1 stitch = 151-167-179-195-219-239 stitches. Change to circular needle size 4 mm. The next row is worked as follows from the wrong side: 1 edge stitch in garter stitch, * purl 1, knit 1 *, work from *-* until there are 2 stitches left on the row, purl 1 and finish with 1 edge stitch in garter stitch. Continue this rib for 4 cm. Loosely cast off with knit over knit and purl over purl, read CASTING-OFF TIP. The jacket measures approx. 56-58-60-62-64-66 cm from the shoulder. SLEEVE: Place the 70-76-80-84-92-98 stitches from the thread on the one side of the piece on double pointed needles/short circular needle size 5 mm and knit up 1 stitch in each of the 6-6-6-8-10-12 stitches cast on under the sleeve = 76-82-86-92-102-110 stitches. Insert a marker thread in the middle of the 6-6-6-8-10-12 stitches under the sleeve. Allow the thread to follow your work onwards; it will be used when decreasing under the sleeve. Start at the marker thread and continue with stocking stitch and A.1 in the round. When the piece measures 3 cm from the division, decrease 2 stitches under the sleeve – read DECREASE TIP. Decrease like this every 3½-3-2-1½-1-1 cm a total of 10-11-13-16-19-21 times = 56-60-60-60-64-68 stitches. Continue working until the sleeve measures 38-36-34-33-29-27 cm from the division (or to desired length; shorter measurements in larger sizes due to longer yoke). Work 1 round where you decrease 12 stitches evenly over the stitches in A.1 = 44-48-48-48-52-56 stitches. Change to double pointed needles size 4 mm and work rib (= knit 1, purl 1) for 4 cm. Loosely cast off with knit over knit and purl over purl but to avoid the cast-off edge being tight, use double pointed needles size 5 mm. Work the other sleeve in the same way. BANDS/NECK: Insert 1 marker, middle-back of the neck, to help you knit up half the stitches around the jacket. The bands are knitted up inside the 1 edge stitch on the front pieces and the stitches around the neck are knitted up inside the first row worked. Start from the right side at the bottom of the right front piece – knit up approx. 119-125-131-137-143-149 stitches, up the front piece and halfway around the neck, using circular needle size 4 mm and 1 strand of each quality – leave the marker here. Knit up approx. 120-126-132-138-144-150 stitches around the other half of the neck and down the left front piece; the number of stitches should be divisible by 2 + 1 = approx. 239-251-263-275-287-299 stitches. It is important that the bands are neither too loose or too tight. The next row is worked as follows from the wrong side: 2 stitches in garter stitch, * purl 1, knit 1 *, work from *-* until there are 3 stitches left, purl 1 and finish with 2 stitches in garter stitch. Continue this rib for 1½ cm. Now work the BUTTONHOLES on the right band – read description above. Continue the rib until the bands measure 3 cm. Loosely cast off with knit over knit and purl over purl, remember the CASTING-OFF TIP ASSEMBLY: Sew the buttons onto the left band. |
|||||||||||||||||||
Diagram explanations |
|||||||||||||||||||
|
|||||||||||||||||||
 |
|||||||||||||||||||
Have you finished this pattern?Tag your pictures with #dropspattern #deepwoodscardigan or submit them to the #dropsfan gallery. Do you need help with this pattern?You'll find 30 tutorial videos, a Comments/Questions area and more by visiting the pattern on garnstudio.com. © 1982-2026 DROPS Design A/S. We reserve all rights. This document, including all its sub-sections, has copyrights. Read more about what you can do with our patterns at the bottom of each pattern on our site. |
|||||||||||||||||||


With over 40 years in knitting and crochet design, DROPS Design offers one of the most extensive collections of free patterns on the internet - translated to 17 languages. As of today we count 324 catalogues and 12258 patterns translated into English (UK/cm).
We work hard to bring you the best knitting and crochet have to offer, inspiration and advice as well as great quality yarns at incredible prices! Would you like to use our patterns for other than personal use? You can read what you are allowed to do in the Copyright text at the bottom of all our patterns. Happy crafting!
Post a comment to pattern DROPS 215-6
We would love to hear what you have to say about this pattern!
If you want to leave a question, please make sure you select the correct category in the form below, to speed up the answering process. Required fields are marked *.