
Popular categories
Looking for a yarn?


Comments / Questions (71)
![]() Cheryl wrote:
Cheryl wrote:
Thank you for this beautiful free pattern. I am excited to learn to crochet from charts. I am struggling with row 4 of A2. Mine comes out with 12 square holes whereas yours looks to have 14. I have pulled it back and restarted three times, counting really carefully and following your videos. Any suggestions on what I might be doing wrong would be very gratefully recieved. Or maybe it doesn’t matter that mine looks different and I should just keep going?
28.08.2022 - 10:45DROPS Design answered:
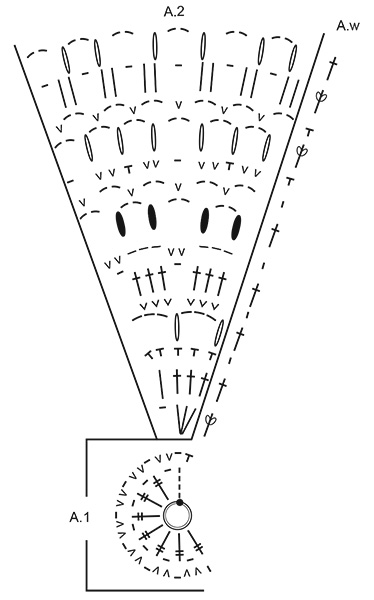
Dear Cheryl, A.2 is worked 7 times on the round. Each A.2 has 2 "squares" so, if you work it 7 times, you should have 14 "squares". Happy crochetting!
29.08.2022 - 00:05
![]() Elizabeth Little wrote:
Elizabeth Little wrote:
Very frustrated with this chart and the videos have no sound which makes it hard to follow. It's great that people are learning to read charts but for those who are visually impaired, a chart is hard to follow and a video without sound is useless.
27.08.2022 - 10:06
![]() Doris wrote:
Doris wrote:
Liebes Drops-Team, vielen Dank für eure vielen schönen Anleitungen. Ich habe bisher nur gestrickt und mich dank eurer Videos an das Häkeln der Tasche getraut. Sie ist super geworden und ich habe viel lernen können, jetzt werde ich auch häufiger häkeln. Ganz lieben Dank für die Videos, ohne die ich es bestimmt nicht geschafft hätte.
04.07.2022 - 16:18
![]() Nicoletta wrote:
Nicoletta wrote:
Bellissimo modello ho iniziato a fare i 2 semicerchi..Dove sbaglio che il diametro bin rimane diritto ma si incurva? Grazie
25.04.2022 - 10:50DROPS Design answered:
Buonasera Nicoletta, probabilmente sta stringendo un po' troppo la lavorazione. Buon lavoro!
25.04.2022 - 21:08
![]() Aleksandra Chylak wrote:
Aleksandra Chylak wrote:
Nigdzie nie jest podane jak ułożyć półkola do zszywania? Na lewej czy na prawej stronie?
09.03.2022 - 12:23DROPS Design answered:
Witaj Aleksandro, na lewej. Pozdrawiamy!
09.03.2022 - 17:05
![]() Judy Caira wrote:
Judy Caira wrote:
Is there a non diagram pattern available for this item?
12.02.2022 - 19:55DROPS Design answered:
Dear Judy, this is the only format of this pattern available. Happy crocheting!
13.02.2022 - 18:58
![]() CS wrote:
CS wrote:
Ik weet niet wie er bij jullie patronen tekent en uitschrijft, maar jullie zijn een eiland apart hoor. Wat een chaotische boel toch altijd. Kan er niets van lezen, terwijl ik zelf al jaren patronen ontwerp voor prive gebruik en vrienden. Ongezien dit.
21.11.2021 - 00:07
![]() Frances Rhea wrote:
Frances Rhea wrote:
What is the point of having patterns on the Internet if you don't allow printing of the images with the printed pattern. I like to print my pattern out so it is in front of me, especially when it contains charts. Great patterns though!
28.08.2021 - 09:57
![]() Sandra wrote:
Sandra wrote:
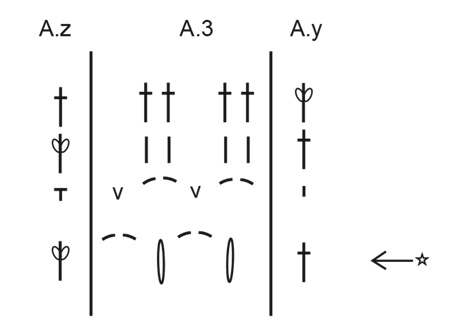
Frage zum Boden, Diagramm A3: Die 2. Reihe endet im Diagramm mit einem Stäbchen in die 1. Steigeluftmasche der Vorreihe. Im Video häkelt sie dieses Stäbchen aber in die 3. Luftmasche! Das gibt einen unschönen Knick in der Arbeit. Ich denke, das Diagramm ist korrekt und der kleine Fehler passiert im Video. Können Sie das bestätigen bitte? Ansonsten sind alle Anleitungen top, es macht viel Freude!
22.07.2021 - 12:26DROPS Design answered:
Liebe Sandra, oops das würde ich auch sagen, am ende der 2. Runde häkeln Sie das letzte Stäbchen (= A.y) in die 1. Luftmasche von der vorrigen Reihe. Viel Spaß beim häkeln!
22.07.2021 - 13:33
![]() Judy Breen wrote:
Judy Breen wrote:
Love this. Can't wait to get going on it. Love the video tutorials, so helpful and easy to follow and I'm learning how to read charts too for future patterns. Thank you.
23.06.2021 - 10:46
|
||||||||||||||||||||||||||||||||||||||||
Garden Paths#gardenpathsbag |
||||||||||||||||||||||||||||||||||||||||
 |
 |
|||||||||||||||||||||||||||||||||||||||
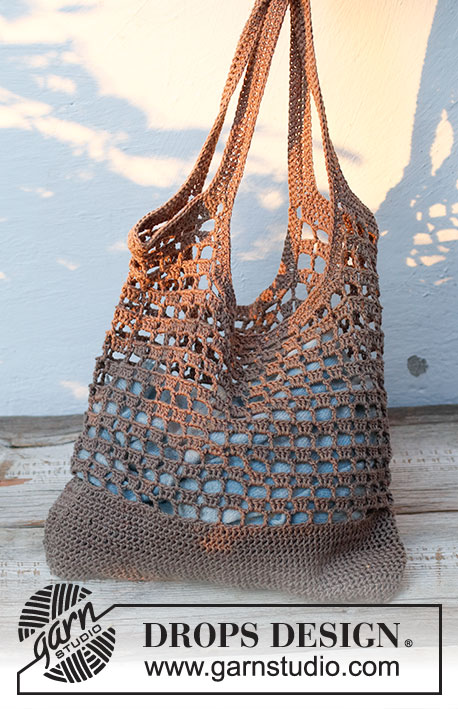
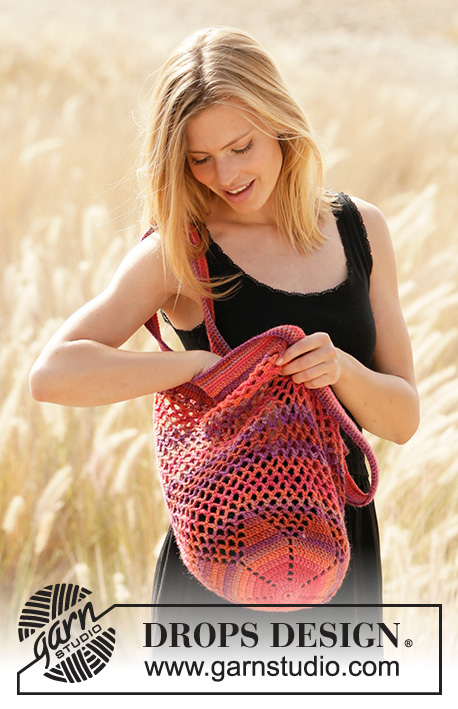
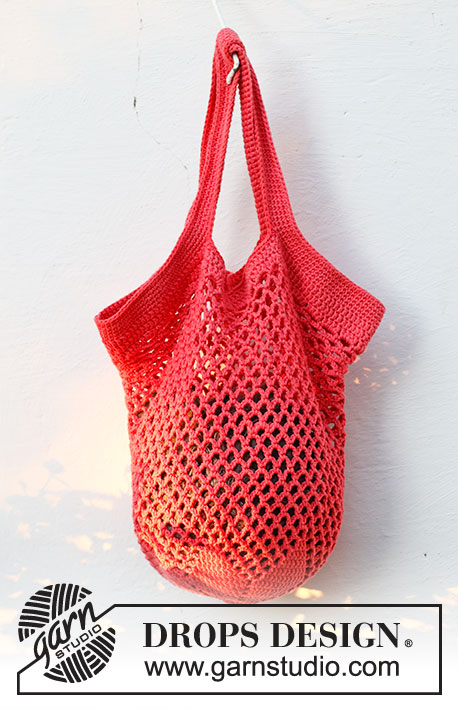
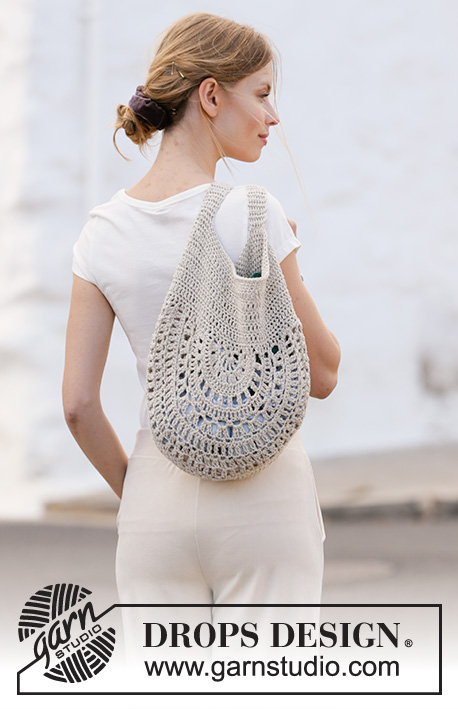
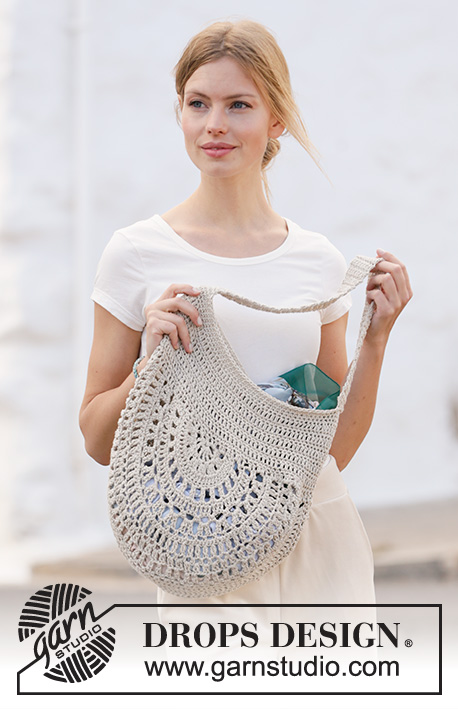
Crocheted bag in DROPS Bomull-Lin or DROPS Paris.
DROPS 211-25 |
||||||||||||||||||||||||||||||||||||||||
|
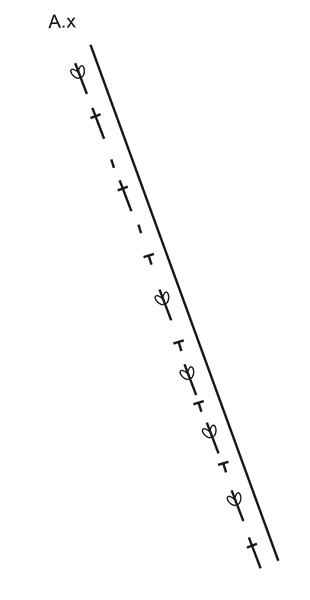
---------------------------------------------------------- EXPLANATION FOR THE PATTERN: ---------------------------------------------------------- PATTERN: See diagram A.1, A.2 and A.3 (A.w to A.z shows how rows in A.2 and A.3 begin and end). CROCHET TIP (applies to chain stitches): 1 chain stitch should equal 1 double crochet/treble crochet/double treble crochet in width. Make sure that loop made in chain stitch is pull on the crochet hook to avoid it being too tight. If the chain stitches are worked too tight, the pattern will tighten the sections with many chain stitches. CROCHET INFORMATION: At beginning of every round with double crochet work 1 chain stitch, this chain stitch replace first double crochet, i.e. skip first stitch on previous round Finish round with 1 slip stitch in 1st chain stitch at beginning of round. At beginning of every round with treble crochet work 3 chain stitches, these 3 chain stitches replace first treble crochet, i.e. skip 1 treble crochet from previous round Finish round with 1 slip stitch in 3rd chain stitch at beginning of round. DECREASE TIP (evenly): To calculate how to decrease evenly, use the total number of stitches decreases are done over (e.g. 110 stitches) , and divide by number of decreases to be done (e.g. 10 stitches) = 11. In this example decrease by working every 10th and 11th double crochet together as follows: insert hook through next stitch, get the yarn, insert hook through next stitch, get the yarn, make 1 yarn over and pull yarn through all 3 loops on hook (= 1 stitch decreased). ---------------------------------------------------------- START THE PIECE HERE: ---------------------------------------------------------- BAG - SHORT OVERVIEW OF THE PIECE: Work bag back and forth in 2 parts that look like half circles. Sew these 2 part together along the outermost arch. Then work an edge around the opening at the top of bag until finished measurements. Finally work a handle. Work handle back and forth and fasten in each side on opening. HALF CIRCLE: Begin on hook size 5 mm with Bomull-Lin or Paris, work 5 chain stitches and form a ring with 1 slip stitch in first chain stitch worked - read CROCHET TIP! Work diagram A.1 (A.1 = 1 row from right side and 1 row from wrong side). When the two rows in A.1 has been worked, work next row as follows: Work A.w over first stitch (A.w shows how row begins from right side and ends from wrong side), work diagram A.2 7 times in total in width, and finish with A.x over last stitch (A.x shows how row ends from right side and begins from wrong side). When A.2 have been worked vertically, there are 42 chain spaces on row. Insert 1 marker in the middle of the row - measure piece from this marker later. Now work what will be bottom of bag, i.e. work A.y over first stitch, work A.3 21 times in total in width and finish with A.z over last stitch. Fasten off when A.3 has been worked. Work another half circle the same way. ASSEMBLY: Sew the two half circles together along the outermost arch - sew edge to edge with neat, little stitches. EDGE AROUND OPENING: Begin at seam in one side of bag, work 1 slip stitch, work 3 chain stitches (equals 1 treble crochet), and then work 109 treble crochets around the edge at the top of bag (to get an even distribution of treble crochet, work approx. 2 treble crochets around every treble crochet and 1 treble crochet around every double crochet) = 110 treble crochets. Read CROCHET INFORMATION and work in the round as follows: ROUND 1: Work 1 double crochet in every treble crochet. ROUND 2: Work 1 treble crochet in every double crochet. Repeat round 1 and 2 until piece measures approx. 28 cm from marker. Work 1 round with double crochets and decrease at the same time 10 double crochets evenly - read DECREASE TIP and approx. 100 double crochets. Then work double crochets in the round for 2 cm, with 1 double crochet in every stitch. Cut and fasten the yarn. Bag measures approx. 30 cm from marker. STRAP: Begin in one side on bag, and work 1 double crochet in each of the middle 8 double crochets in the side. Work double crochets back and forth over these 8 double crochets until strap measures approx. 40 cm (or desired length). Fasten strap in the opposite side of bag with 1 double crochet in each of the middle 8 double crochets in the side (work through both layers). Fasten off. |
||||||||||||||||||||||||||||||||||||||||
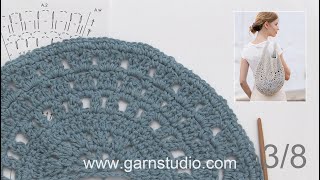
Diagram explanations |
||||||||||||||||||||||||||||||||||||||||
|
||||||||||||||||||||||||||||||||||||||||
 |
||||||||||||||||||||||||||||||||||||||||
 |
||||||||||||||||||||||||||||||||||||||||
 |
||||||||||||||||||||||||||||||||||||||||
Have you finished this pattern?Tag your pictures with #dropspattern #gardenpathsbag or submit them to the #dropsfan gallery. Do you need help with this pattern?You'll find 21 tutorial videos, a Comments/Questions area and more by visiting the pattern on garnstudio.com. © 1982-2026 DROPS Design A/S. We reserve all rights. This document, including all its sub-sections, has copyrights. Read more about what you can do with our patterns at the bottom of each pattern on our site. |
||||||||||||||||||||||||||||||||||||||||


With over 40 years in knitting and crochet design, DROPS Design offers one of the most extensive collections of free patterns on the internet - translated to 17 languages. As of today we count 324 catalogues and 12290 patterns translated into English (UK/cm).
We work hard to bring you the best knitting and crochet have to offer, inspiration and advice as well as great quality yarns at incredible prices! Would you like to use our patterns for other than personal use? You can read what you are allowed to do in the Copyright text at the bottom of all our patterns. Happy crafting!
Post a comment to pattern DROPS 211-25
We would love to hear what you have to say about this pattern!
If you want to leave a question, please make sure you select the correct category in the form below, to speed up the answering process. Required fields are marked *.