
Popular categories
Looking for a yarn?


Comments / Questions (126)
![]() Eveliina wrote:
Eveliina wrote:
Alussa kun laitetaan neljä merkkiä kaarrokkeen ensimmäisen kerroksen jälkeen niin silmukoiden määrä ei täsmää. Epäselvää myös mihin tätä aiemmin mainittu merkki tulee laittaa (”Kiinnitä 1 merkki kerroksen alkuun, etureunan sisäpuolelle ”)
25.07.2024 - 13:33
![]() Andrea Schulna wrote:
Andrea Schulna wrote:
Vielen Dank für Ihre schnelle Antwort. Ja ich stricke mit 2 Fäden wie in der Anleitung beschrieben. Dann werde ich noch weiter probieren. Welche MaPro sollte unbedingt genau passen? Glatt rechts oder Vollpatent? Herzlichen Dank Andrea Schulna
21.06.2024 - 09:34
![]() Andrea Schulna wrote:
Andrea Schulna wrote:
Liebes Team, ich habe Probleme mit der MaPro und der NS. Ich habe bei NS 7,00 mm im Vollpatent noch 17 Maschen auf 10 cm. Ich kann doch nicht mit 8 oder 9 stricken wenn ihr 5,00 vorschlagt. Mache ich was falsch? Liebe Grüße Andrea
20.06.2024 - 21:34DROPS Design answered:
Liebe Frau Schulna, stricken Sie mit den 2 Fäden, dh 1 Faden Alpaca +.1 Faden Kid-Silk? Die Maschenprobe glatt rechts muss 17 M x 22 Reihen sein, und die für Patentmuster wird etwas locker mit 14 M x 36 Reihen sein, am besten sollen Sie die richtige Maschenprobe haben, sonnst bekommen Sie die richtigen Maßen nicht. Viel Spaß beim Stricken!
21.06.2024 - 07:46
![]() Kettel Susanne wrote:
Kettel Susanne wrote:
Hallo, ist die Maschenprobe vor dem messen gewaschen worden? Patent wird nach dem waschen ja deutlich größer? VG
20.03.2024 - 09:51DROPS Design answered:
Liebe Frau Kettel, Maschenprobe wird nicht gewaschen; die fertige Jacke sollte nach Waschen nicht grösser werden - bei der Farbkarte lesen Sie Pflegehinweise - Viel Spaß beim Stricken!
20.03.2024 - 15:17
![]() Susanne wrote:
Susanne wrote:
Vorrei sapere se esiste un video per le diminuzioni sotto la manica di un cardigan topdown lavorato a maglia inglese. Grazie
29.02.2024 - 19:58DROPS Design answered:
Buonasera Susanne, al momento non abbiamo un video specifico per l'argomento. Buon lavoro!
11.03.2024 - 23:53
![]() Hermine wrote:
Hermine wrote:
Dus knoopsgaten links en de knopen ook links? Dat gaat moeilijk zijn om te sluiten vrees ik….. Leuke trui overigens !👌
01.02.2024 - 22:21
![]() Lena wrote:
Lena wrote:
Ich glaube sie haben mich falsch verstanden ich meinte die Raglanmasche zwischen den Raglanzunahmen. Wird sie einfach links gestrickt oder so wie vorher im Muster mit Umschlag und links abgehoben?
27.11.2023 - 17:04DROPS Design answered:
Liebe Lena, sorry fürs Misverständnis, die Maschen mit den Markierungen / die Raglanmasdchen werden wie die 2. Masche in A.1 gestrickt, dh bei den Rückreihen wird diese Masche rechts zusammen mit dem Umschlag gestrickt (sieht bei der Vorderseite wie eine linke Masche aus). Viel Spaß beim stricken!
28.11.2023 - 08:30
![]() Lena wrote:
Lena wrote:
Hallo ich versuche diese schöne Strickjacke zu stricken und frage mich gerade ob die Raglanmasche einfach links gestrickt wird oder muss sie wie im Muster mit Umschlg und links abgehoben werden ? Liebe Grüße Lena
27.11.2023 - 12:42DROPS Design answered:
Liebe Lena, bei den Blenden gibt es keine extra Randmaschen, stricken Sie die 7 Maschen einfach wie beschrieben, dann bei der Passe stricken Sie die 7 BlendenMaschen wie zuvor (die 1. und die letzte von diesen 7 Maschen wird krausrechts gestrickt: rechts bei den Hin- sowie bein den Rückreihen). Viel Spaß beim stricken!
27.11.2023 - 15:59
![]() Lenka wrote:
Lenka wrote:
Dobrý den, chtěla bych se zeptat, jak mam dosáhnout počtu 257 ok (vel. M)? Když přidávám podle návodu, tak nahodim sice 16 nových ok v řadě, ale ve skutečnosti jich mam 8, protože je spletám podle vzoru A1, takže 2 oka stejně spletu. Asi jsem nepochopila ten návod přidávání u raglanu :( stejně tak moc nechápu, kde mam ty oka přidávat, protože když se snažím je přidat v hladkém oku s nahozenim u všech značek, tak mi potom nevychází vzor A1. Moc děkuju za radu.
14.10.2023 - 18:32
![]() ALLEMAND GISELE wrote:
ALLEMAND GISELE wrote:
Bonjour, je suis désespérée! sur le point de laisser tomber mon ouvrage! j'ai fais toutes mes augmentations raglan et encolure 5 x 2 avec (40 augmentations) pour l'encolure et 8 x 2 pour les raglans (64 augmentations) et je me retrouve avec 169 mailles! taille xs . j'ai bien monté 51 mailles au début entre les deux bordures d'encolure de 7 mailles.
04.10.2022 - 15:39DROPS Design answered:
Bonjour Mme Allemand, vous démarrez l'empiècement avec 65 mailles, vous devez augmenter pour le raglan 8 fois 16 mailles (= 2 m avant chaque marqueur + 2 m après chaque marqueur x 4 marqueurs = 16 m x 8 = 128 mailles au total = ) et vous augmentez 5 fois 2 mailles pour l'encolure V (= 10 m x 2 devants = 20 m), vous devez ainsi avoir: 65+128+20= 213 mailles. En espérant que ceci puisse vous aider. Bon tricot!
04.10.2022 - 16:28
|
||||||||||
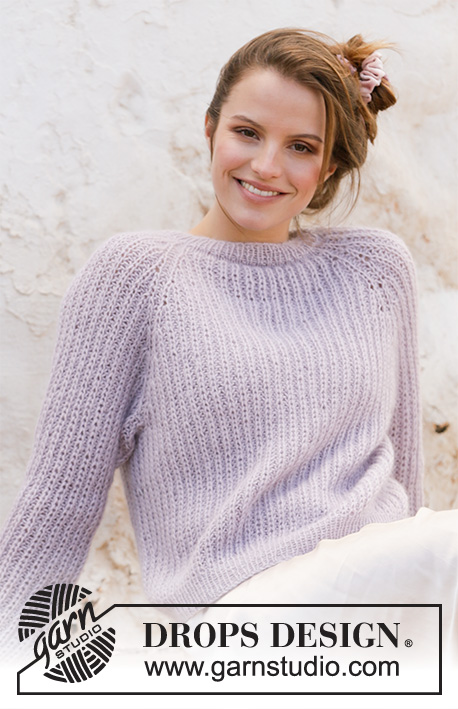
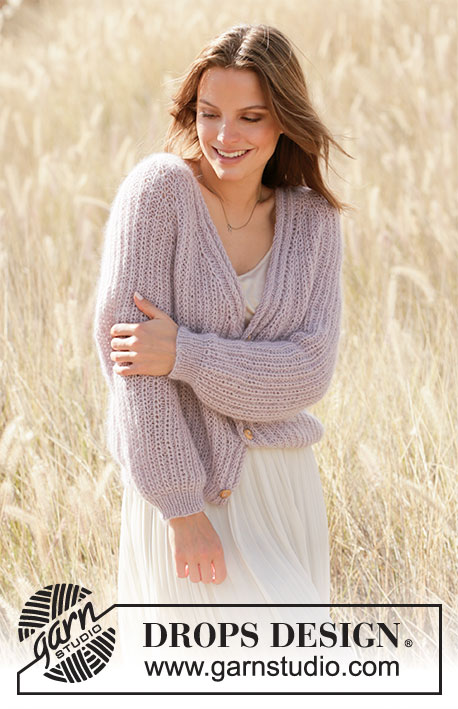
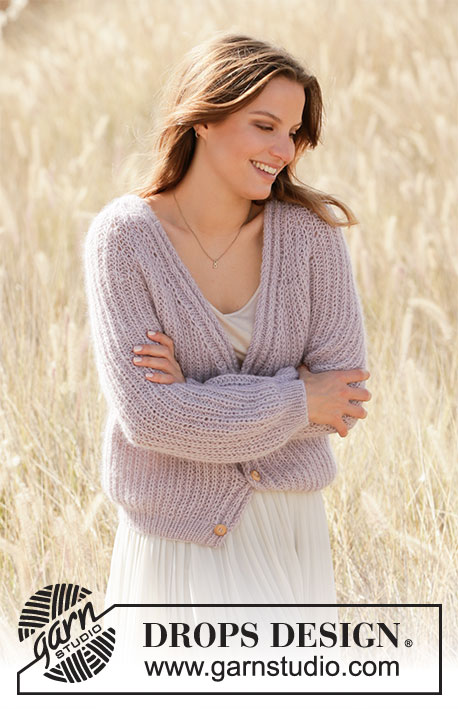
Lavender Breeze#lavenderbreezecardigan |
||||||||||
 |
 |
|||||||||
Knitted jacket in DROPS Alpaca and DROPS Kid-Silk. The piece is worked top down with English rib, raglan and v-neck. Sizes XS - XXL.
DROPS 213-7 |
||||||||||
|
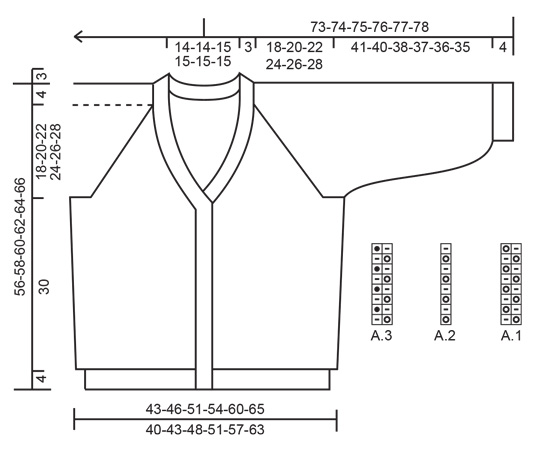
------------------------------------------------------- EXPLANATIONS FOR THE PATTERN: ------------------------------------------------------- ENGLISH RIB STITCH (on bands): From right side: Knit 1 under the next stitch. From wrong side: Purl the stitch. PATTERN: See diagrams A.1 and A.2. The diagrams show all rows in the pattern seen from the right side. INCREASE TO RAGLAN: Increase to raglan on each side of the purled stitch with marker (= raglan-stitch), i.e. increase in the knitted stitch and yarn over closest to the raglan-stitch. Increase 2 stitches on each side of all raglan-stitches (= 16 stitches increased on an increase-row). All increases are worked from the right side! Increase 2 stitches in the knitted stitch by working 3 stitches in the stitch and yarn over as follows: Knit together the stitch and yarn over but do not slip them onto the right needle, make 1 yarn over the right needle and knit together the stitch and yarn over 1 more time (= 2 stitches increased). Then work the new stitches in English rib (A.1/A.2) but be aware that on the first row after the increase the one increased stitch is knitted without a yarn over as there is no yarn over for this stitch. INCREASE TO V-NECK: Increase to v-neck in the knitted stitch and yarn over closest to the bands on each side towards mid front. All increases are worked from the right side! Increase 2 stitches in the knitted stitch and yarn over in the same way as described for increasing to raglan. DECREASE TIP (for sides of body and mid under the sleeves): Decrease in stitches closest to the purled stitches with markers mid under the sleeve and in the sides of the body. All decreases are worked on a row/round where the knitted stitches and yarn overs are knitted together! DECREASE 2 STITCHES TOWARDS THE LEFT AS FOLLOWS (i.e. start after the purled stitch with marker): Slip the first knitted stitch and yarn over onto the right needle as if to knit together, knit the next 2 stitches together (i.e. 1 purled + knitted stitch and yarn over), then pass the slipped stitch and yarn-over over the knitted together stitches (= 2 stitches decreased). DECREASE 2 STITCHES TOWARDS THE RIGHT AS FOLLOWS (i.e. start 3 stitches + 2 yarn overs before the purled stitch with marker): Slip the first knitted stitch and yarn over onto the right needle as if to knit together, purl 1, pass the slipped stitch and yarn-over over the purled stitch, slip the stitch back onto the left needle, pass the stitch and yarn-over over the stitch which was slipped back onto the left needle, and finally slip the remaining stitch onto the right needle (= 2 stitches decreased). BUTTONHOLES: Work buttonholes on the left band (when the garment is worn). Work from the right side at the beginning of the row as follows: Work the first 3 stitches as before, make 1 yarn over, knit 2 together and then continue as before. On the next row (wrong side), knit the yarn over to leave a hole. The first buttonhole is worked approx. 2 cm after the last increase for v-neck. Then work the next 3-3-4-4-4-4 buttonholes with approx. 9½-10-8½-9-8-8 cm between each one. NOTE: If the knitting tension is not correct in height this will affect the positioning of the buttonholes. Measure the piece when the v-neck is finished and adjust the position of the 4-4-5-5-5-5 buttonholes if necessary. CASTING-OFF TIP: To avoid the cast-off edge being tight you can cast off with a larger size needle. If the edge is still tight, make 1 yarn over after approx. each 4th stitch at the same time as casting off and the yarn overs are cast off as normal stitches. ------------------------------------------------------- START THE PIECE HERE: ------------------------------------------------------- JACKET – SHORT OVERVIEW OF THE PIECE: First you work 2 loose neck-edges (one for each front piece). These are placed on the circular needle and stitches are cast on for the neck as described in the text (the neck-edges are later sewn together mid-back and sewn to the neck-line at the back). The yoke is worked back and forth with circular needle from mid front, top down. AT THE SAME TIME you increase to v-neck and raglan. The sleeves are worked in the round with double pointed needles/short circular needle, top down. NOTE: All stitch counts given when working English rib are without the yarn overs; these are counted together with their respective stitches as 1 stitch. RIGHT NECK-EDGE (when the garment is worn): Cast on 7 stitches with needle size 4 mm and 1 strand Alpaca and 1 strand Kid-Silk (= 2 strands). Work as follows: ROW 1 (wrong side): Purl. ROW 2 (right side): Knit 1, 1 ENGLISH RIB STITCH – read description above, knit 2, 1 English rib stitch, knit 2. ROW 3 (wrong side): Knit 2, purl 1, knit 2, purl 1, knit 1. Repeat rows 2 and 3 until the neck-edge measures approx. 13-13-13-16-16-16 cm (adjust after a row from the wrong side). Cut the strand and lay the piece to one side. LEFT NECK-EDGE (when the garment is worn): Cast on 7 stitches with needle size 4 mm and 1 strand Alpaca and 1 strand Kid-Silk (= 2 strands). Work as follows: ROW 1 (wrong side): Purl. ROW 2 (right side): Knit 2, 1 English rib stitch, knit 2, 1 English rib stitch, knit 1. ROW 3 (wrong side): Knit 1, purl 1, knit 2, purl 1, knit 2. Repeat rows 2 and 3 until the neck-edge measures approx. 13-13-13-16-16-16 cm (adjust after a row from the right side). Place these 7 stitches on circular needle size 5 mm, do not cut the strand but cast on 51-53-59-59-59-59 new stitches on the needle (= sleeves and back piece) and then work the 7 stitches from the right neck-edge as before = 65-67-73-73-73-73 stitches on the needle. The outermost 7 stitches on each side are now called the band stitches. Insert 1 marker after the band at the beginning of the row. Then work the yoke as described below; the yoke is measured from the marker. YOKE: Change to circular needle size 5 mm and work the first row from the wrong side as follows: Work the 7 band stitches as before, * make 1 yarn over, slip 1 stitch as if to purl, knit 1 *, work from *-* until there are 8 stitches left on the row, 1 yarn over, slip 1 stitch as if to purl and finish with 7 band stitches as before. Now insert 4 markers in the piece as described below (without working the stitches); these markers are used when increasing to raglan. Count 8 stitches (= front piece), insert 1 marker in the next stitch (= raglan-stitch), count 11-11-13-13-13-11 stitches (= sleeve), insert 1 marker in the next stitch (= raglan-stitch), count 23-25-27-27-27-31 stitches (= back piece), insert 1 marker in the next stitch (= raglan-stitch), count 11-11-13-13-13-11 stitches (= sleeve), insert 1 marker in the next stitch (= raglan-stitch). There are 8 stitches left for the front piece after the last marker. The next row is worked as follows from the right side: Work the 7 band stitches as before, A.1 until there are 8 stitches left on the row (= 25-26-29-29-29-29 repeats of 2 stitches), A.2 (= 1 stitch) and finish with 7 band stitches as before. Continue this pattern back and forth. AT THE SAME TIME increase to RAGLAN and V-NECK as described below. REMEMBER THE KNITTING TENSION! RAGLAN: When you have worked 6-6-6-6-4-4 rows of A.1/A.2 (and the next row is to be worked from the right side), increase to RAGLAN – read description above (= 16 stitches increased on this increase-row). Increase like this every 8th-8th-8th-8th-6th-6th row (i.e. every 4th-4th-4th-4th-3rd-3rd row with visible English rib stitches in height) a total of 8-9-10-11-13-14 times. V-NECK: AT THE SAME TIME when you increase to raglan the 3rd-3rd-2nd-2nd-5th-5th time, increase to the V-NECK on each side as well – read description above. Increase to v-neck on every 8th-8th-8th-8th-6th-6th row a total of 5-5-6-6-6-7 times (when the increases to v-neck are finished there are 1-2-3-4-3-3 increases left to raglan). When all the increases to raglan and v-neck are finished there are 213-231-257-273-305-325 stitches on the needle. Continue A.1/A.2 back and forth with 7 band stitches on each side as before - remember BUTTONHOLES on left band - read explanation above. When the piece measures 18-20-22-24-26-28 cm from the marker in the neck (the piece measures approx. 22-24-26-28-30-32 cm from the shoulder), divide the yoke for body and sleeves as follows from the wrong side: Work 34-36-40-42-46-50 stitches as before (= front piece), place the next 45-49-55-59-67-69 stitches on 1 thread for the sleeve, cast on 5 new stitches on the needle (= in side under the sleeve), work 55-61-67-71-79-87 stitches as before (= back piece), place the next 45-49-55-59-67-69 stitches on 1 thread for the sleeve, cast on 5 new stitches on the needle (= in side under the sleeve) and work the remaining 34-36-40-42-46-50 stitches as before (= front piece). Body and sleeves are finished separately. THE PIECE IS NOW MEASURED FROM HERE! BODY: = 133-143-157-165-181-197 stitches. Insert 1 marker in the middle stitch of the 5 stitches cast on under each sleeve. Allow the markers to follow your work onwards; they will be used when decreasing in the sides. Continue back and forth with English rib and 7 band stitches on each side as before. DECREASE IN SIDES: When the piece measures 8 cm from the division, decrease on each front piece by decreasing 2 stitches in the English rib stitch closest to the purled stitch with the marker on each side – read DECREASE TIP; i.e. on the left front piece (when the garment is worn) decrease 2 stitches towards the right and on the right front piece decrease 2 stitches towards the left = 129-139-153-161-177-193 stitches. When the piece measures 18 cm from the division, decrease in the same way on the back piece (i.e. decrease 2 stitches towards the left at the beginning and 2 stitches towards the right at the end of the back piece) = 125-135-149-157-173-189 stitches. Continue working until the piece measures 30 cm from the division in all sizes (there is 4 cm left to finished length. You can try the garment on a work to the desired length). Change to circular needle size 4 mm and work rib back and forth (= knit 1 / purl 1) with 7 band stitches on each side as before – on the first row the yarn-overs are knitted together with the knitted stitches. When the rib measures 4 cm, loosely cast off with knit over knit and purl over purl – read CASTING-OFF TIP! The jacket measures approx. 56-58-60-62-64-66 cm from the shoulder down. SLEEVE: Place the 45-49-55-59-67-69 stitches from the thread on the one side of the piece on double pointed needles or short circular needle size 5 mm and knit up 1 stitch in each of the 5 stitches cast on under the sleeve = 50-54-60-64-72-74 stitches. Insert a marker thread in the middle stitch of the 5 stitches cast on under the sleeve. Allow the thread to follow your work onwards; it will be used when decreasing under the sleeve. Work A.3 in the round. AT THE SAME TIME on round 8 (i.e. on the 4th round of visible English rib stitches), decrease 4 stitches mid under the sleeve – read DECREASE TIP (decrease 2 stitches towards the left after the stitch with the marker and decrease 2 stitches towards the right before the stitch with the marker). Decrease like this every 8th-8th-8th-8th-6th-6th round (i.e. every 4th-4th-4th-4th-3rd-3rd round of visible English rib stitches) a total of 3-3-4-5-5-5 times = 38-42-44-44-52-54 stitches. Continue working until the sleeve measures 41-40-38-37-36-35 cm from the division (there is 4 cm left to finished length. You can try the garment on a work to the desired length). Change to double pointed needles size 4 mm. Work rib (= knit 1 / purl 1) – on the first round the yarn overs are knitted together with the knitted stitches. When the rib measures 4 cm, cast off with knit over knit and purl over purl – remember CASTING-OFF TIP! The sleeve measures approx. 45-44-42-41-40-39 cm from the division. Work the other sleeve in the same way. ASSEMBLY: Sew the neck-edge together mid back with the seam turning inwards. Stretch the neck-edge slightly and sew it to the neck-line at the back. Sew the buttons onto the left band. |
||||||||||
Diagram explanations |
||||||||||
|
||||||||||
 |
||||||||||
Have you finished this pattern?Tag your pictures with #dropspattern #lavenderbreezecardigan or submit them to the #dropsfan gallery. Do you need help with this pattern?You'll find 27 tutorial videos, a Comments/Questions area and more by visiting the pattern on garnstudio.com. © 1982-2026 DROPS Design A/S. We reserve all rights. This document, including all its sub-sections, has copyrights. Read more about what you can do with our patterns at the bottom of each pattern on our site. |
||||||||||


With over 40 years in knitting and crochet design, DROPS Design offers one of the most extensive collections of free patterns on the internet - translated to 17 languages. As of today we count 324 catalogues and 12291 patterns translated into English (UK/cm).
We work hard to bring you the best knitting and crochet have to offer, inspiration and advice as well as great quality yarns at incredible prices! Would you like to use our patterns for other than personal use? You can read what you are allowed to do in the Copyright text at the bottom of all our patterns. Happy crafting!
Post a comment to pattern DROPS 213-7
We would love to hear what you have to say about this pattern!
If you want to leave a question, please make sure you select the correct category in the form below, to speed up the answering process. Required fields are marked *.