DROPS Air
DROPS Air
65% Alpaca, 28% Polyamide, 7% Wool
from 4.80 £ /50g
Get the yarn to make this pattern from 28.80£.

The yarn cost is calculated from the pattern’s smallest size and the yarn’s cheapest product type. Looking for an even better price? You might find it on the DROPS Deals!

DROPS Super Sale

Calming Moments

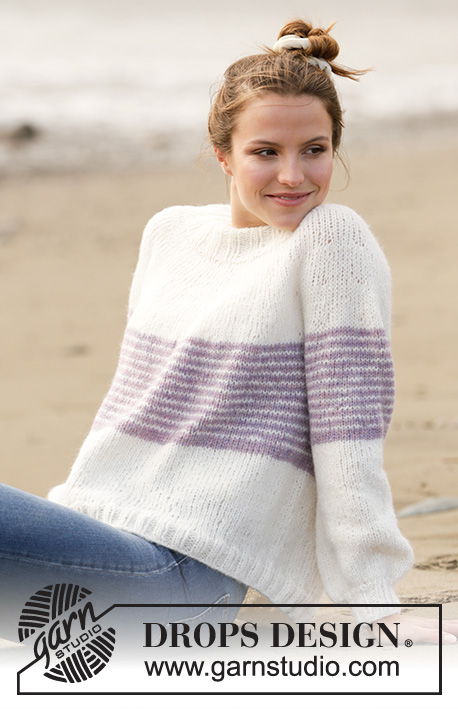
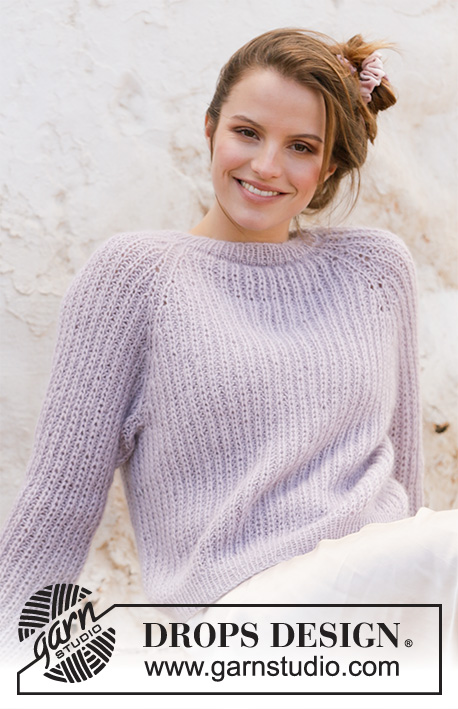
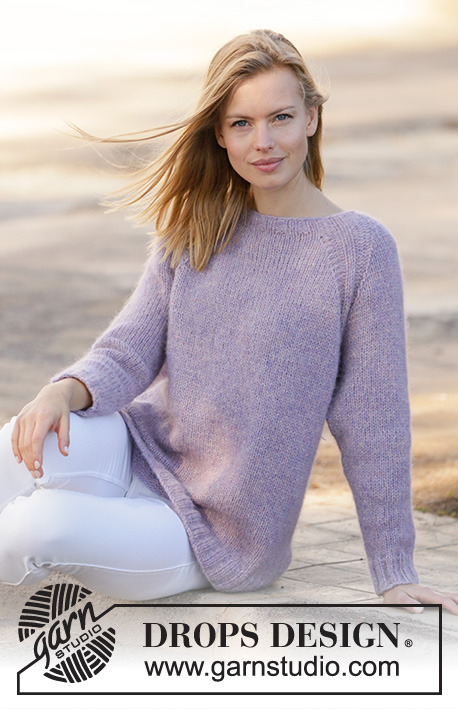
Knitted jumper with raglan in DROPS Air. Piece is knitted top down with rib in raglan increase. Size: S - XXXL

DROPS 213-14
DROPS design: Pattern ai-244
Yarn group A + A or C
----------------------------------------------------------

SIZE:
S - M - L - XL - XXL – XXXL

MATERIALS:
DROPS AIR from Garnstudio (belongs to yarn group C)
300-350-400-400-450-500 g colour 15, purple haze

KNITTING TENSION:
16 stitches in width and 20 rows vertically in stocking stitch = 10 x 10 cm.

NEEDLES:
DROPS DOUBLE POINTED NEEDLES SIZE 5.5 mm
DROPS CIRCULAR NEEDLE SIZE 5.5 mm : Length 40 and 60 or 80 cm for stocking stitch.
DROPS DOUBLE POINTED NEEDLES SIZE 4.5 mm
DROPS CIRCULAR NEEDLE SIZE 4.5 mm: Length 80 cm for rib.
Needle size is only a suggestion! If you have too many stitches on 10 cm switch to a larger needle size. If you have too few stitches on 10 cm switch to a smaller needle size.

-------------------------------------------------------

Alternative Yarn – See how to change yarns here
Yarn Groups A to F – Use the same pattern and change the yarn here
Yarn usage using an alternative yarn – Use our yarn converter here

-------------------------------------------------------

DROPS Air
DROPS Air
65% Alpaca, 28% Polyamide, 7% Wool
from 4.80 £ /50g
Get the yarn to make this pattern from 28.80£.

The yarn cost is calculated from the pattern’s smallest size and the yarn’s cheapest product type. Looking for an even better price? You might find it on the DROPS Deals!

DROPS Super Sale

SAVE 30% on 6 cotton favourites!
Valid until 12.04.2024

Pattern instructions

NOTE: This pattern is written in British English. All measurements in charts are in cm. For conversion from cm to inches - click here. There are different terms for crocheting in British and American English. If this pattern includes crochet, click for "crochet terms" here. For this pattern in American English, please click here.
----------------------------------------------------------

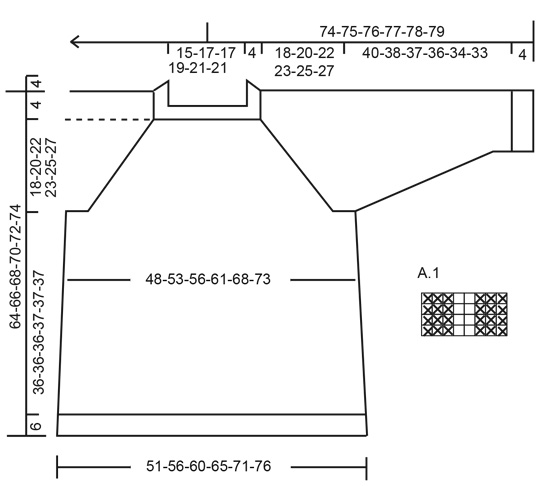
EXPLANATION FOR THE PATTERN:

----------------------------------------------------------

PATTERN: 
See diagram A.1.

INCREASE TIP-1 (applies to sides of body):
Work until 2 stitches remain before marker thread, 1 yarn over, knit 4 (marker thread is in the middle of these stitches), 1 yarn over. On next round knit yarn overs twisted to avoid holes. Then work the new stitches in stocking stitch

INCREASE TIP-2 (evenly):
To calculate how to increase/decrease evenly, use the total number of stitches on row (e.g. 164 stitches) , and divide stitches by number of increases to be done (e.g. 32) = 5.1. 
In this example increase by making 1 yarn over after approx. every 5th stitch. On next round work yarn overs twisted to avoid holes.

RAGLAN:
Increase 1 stitch on each side of 8 stitches (= A.1) in every transition between body and sleeves (= 8 stitches increased on round). Increase 1 stitch by making 1 yarn over. On next round knit yarn overs twisted to avoid holes. Then work the new stitches in stocking stitch. 

DECREASE TIP (applies to sleeves): 
Decrease 1 stitch on each side of marker thread as follows: Work until 3 stitches remain before marker thread and knit 2 together, knit 2 (marker thread is between these stitches), slip 1 stitch knitwise, knit 1, pass slipped stitch over stitch worked.

CAST-OFF TIP:
To avoid a tight cast-off edge you may use a larger needle size.

----------------------------------------------------------

START THE PIECE HERE:

----------------------------------------------------------

JUMPER - SHORT OVERVIEW OF THE PIECE:
Work neck edge and yoke in the round on circular needle from mid back, top down. Now divide yoke for body and sleeves. Body is worked in the round on circular needle, top down. Work sleeves in the round on double pointed needles/short circular needle, top down.

NECK EDGE:
Cast on 88-96-96-104-112-112 stitches on circular needle size 4.5 mm with Air. Knit 1 round. Work next round as follows from mid back:
Size: S and XL: Knit 1, * purl 2, knit 2 *, work from *-* over the next 8-12 stitches, A.1 (= 8 stitches), knit 2, purl 2, knit 2, purl 2, knit 2, A.1 * knit 2, purl 2 *, work from *-* over the next 16-24 stitches, knit 2, A.1, knit 2, purl 2, knit 2, purl 2, knit 2, A.1, * knit 2, purl 2 *, work from *-* over the next 8-12 stitches, knit 1.
Size M-L-XXL and XXXL:
Purl 1, * knit 2, purl 2 *, work from *-* over the next 8-8-12-12 stitches, knit 2, A.1, knit 2, purl 2, knit 2, purl 2, knit 2, A.1, * knit 2, purl 2 *, work from *-* over the next 20-20-28-28 stitches, knit 2, A.1, knit 2, purl 2, knit 2, purl 2, knit 2, A.1, * knit 2, purl 2 *, work from *-* over the next 8-8-12-12 stitches, knit 2, purl 1.
When rib measures 4 cm, insert 1 marker in piece. NOW MEASURE PIECE FROM HERE!

YOKE:
Switch to circular needle size 5.5 mm and work as follows: Knit 9-11-11-13-15-15, A.1, knit 10, A.1, knit 18-22-22-26-30-30, A.1, knit 10, A.1, knit 9-11-11-13-15-15. Continue this pattern AT THE SAME TIME on next round increase 1 stitch on each side of every A.1 (= 8 stitches increased). Increase on every other round 18-20-22-25-26-28 times in total = 232-256-272-304-320-336 stitches.

Work without increase until piece measures 18-20-22-23-25-27 cm from marker thread. Work next round as follows:
Work the first 35-39-41-45-49-52 stitches as before (= half back piece), slip the next 46-50-54-62-62-64 stitches on a stitch holder for sleeve and cast on 6-6-8-8-10-12 new stitches on row (= in the side under sleeve), work the next 70-78-82-90-98-104 stitches (= front piece), slip the next 46-50-54-62-62-64 stitches on a stitch holder for sleeve and cast on 6-6-8-8-10-12 new stitches on row (= in the side under sleeve), work the remaining 35-39-41-45-49-52 stitches as before (= half back piece).

BODY:
= 152-168-180-196-216-232 stitches. Insert 1 marker thread in each side, in the middle of the 6-6-8-8-10-12 stitches that were cast on under each sleeve. Move the marker threads upwards when working; they should be used for increase later. Work in stocking stitch. When piece measures 4 cm from division, increase 1 stitch on each side of both marker threads - read INCREASE TIP-1 = 4 stitches increased. Increase like this every 12 cm 3 times in total = 164-180-192-208-228-244 stitches. When piece measures 36-36-36-37-37-37 cm from division, increase 32-36-40-40-48-48 stitches evenly – READ INCREASE TIP-2 = 196-216-232-248-276-292 stitches. Switch to circular needle size 4.5 mm. Work rib knit 2/purl 2 over all stitches. Work rib for 6 cm, then cast off with knit over knit and purl over purl. Jumper measures approx. 64-66-68-70-72-74 cm from shoulder and down.

SLEEVE:
Slip the 46-50-54-62-62-64 stitches from stitch holder in one side of piece back on a circular needle/double pointed needles size 5.5 mm, and pick in addition up 1 stitch in each of the 6-6-8-8-10-12 stitches cast on under sleeve = 52-56-62-70-72-76 stitches. Insert a marker thread in the middle of the new stitches. Work in stocking stitch, AT THE SAME TIME when piece measures 4 cm, decrease 2 stitches under sleeve – read DECREASE TIP. Decrease like this approx. every 5-4½-3½-2½-2-2 cm 7-8-10-13-14-15 times in total = 38-40-42-44-44-46 stitches. When piece measures 40-38-37-36-34-33 cm, increase 6-4-6-4-8-6 stitches evenly = 44-44-48-48-52-52 stitches. Switch to double pointed needles size 4.5 mm. Work rib = knit 2/purl 2 for 4 cm. Cast off stitches with knit over knit and purl over purl. Fasten off. Sleeve measures approx. 44-42-41-40-38-37 cm from division. Work the other sleeve the same way.

Diagram

symbols = knit
symbols = purl
diagram

Each of our patterns has specific tutorial videos to help you.

Do you have a question? See a list of frequently asked questions (FAQ)

Knitting tension is what determines the final measurements of your work, and is usually measured per 10 x 10 cm. It is provided like so: number of stitches in width x number of rows in height - eg: 19 stitches x 26 rows = 10 x 10 cm.

The knitting tension is very individual; some people knit/crochet loosely while others work tightly. You adjust the knitting tension with the needle size, which is why the suggested needle size is only meant as a guide! You need to adjust this (up or down) to ensure that YOUR knitting tension matches the knitting tension provided in the pattern. If you work with a different knitting tension than provided you will have a different yarn consumption, and your work will have different measurements than what the pattern suggests.

The knitting tension also determines which yarns can replace each other. As long as you achieve the same knitting tension you can replace one yarn with another.

See DROPS lesson: How to measure your tension/gauge

See DROPS video: How to make a gauge tension swatch

The required amount of yarn is provided in grams, eg: 450 g. To calculate how many balls you’ll need you first need to know how many grams are in 1 ball (25g, 50g or 100g). This information is available if you click on the individual yarn quality on our pages. Divide the amount required with the amount of each ball. For example, if each ball is 50g (the most common amount), the calculation will be as follows: 450 / 50 = 9 balls.

The important thing when changing from one yarn to another is that the knitting/crochet tension remains the same. This is so that the measurements of the finished piece will be the same as on the sketch provided. It is easier to achieve the same knitting tension using yarns from the same yarn group. It is also possible to work with multiple strands of a thinner yarn to achieve the knitting tension of a thicker one. Please try our yarn converter. We recommend you to always work a test swatch.

Please NOTE: when changing yarn the garment might have a different look and feel to the garment in the photo, due to individual properties and qualities of each yarn.

See DROPS lesson: Can I use a different yarn than the one mentioned in the pattern?

All our yarns are categorised into yarn groups (from A to F) according to thickness and knitting tension – group A contains the thinnest yarns and group F the thickest. This makes it easier for you to find alternative yarns to our patterns, should you wish to switch yarn. All yarns within the same group have a similar knitting tension and can easily replace each other. However, different yarn qualities have different structures and properties which will give the finished work a unique look and feel.

Click here for an overview of the yarns in each yarn group

At the top of all our patterns you’ll find a link to our yarn calculator, which is a helpful tool should you wish to use a different yarn than suggested. By filling in the yarn quality you wish to replace, the amount (in your size) and number of strands, the calculator will present good alternative yarns with the same knitting tension. Additionally it will tell you how much you’ll require in the new qualities and whether you’ll need to work with multiple strands. Most skeins are 50g (some are 25g or 100g).

If the pattern is worked with multiple colours, every colour will have to be calculated separately. Similarly, if the pattern is worked with several strands of different yarns (for example 1 strand Alpaca and 1 strand Kid-Silk) you will have to find alternatives for each, individually.

Click here to see our yarn calculator

Since different yarns have different qualities and textures we have chosen to keep the original yarn in our patterns. However, you can easily find options among our available qualities by using our yarn calculator, or simply pick a yarn from the same yarn group.

It is possible that some retailers still have discontinued yarns in stock, or that someone has a few skeins at home that they would like to find patterns for.

The yarn calculator will provide both alternative yarn as well as required amount in the new quality.

If you think it's hard to decide what size to make, it can be a good idea to measure a garment you own already and like the size of. Then you can pick the size by comparing those measures with the ones available in the pattern's size chart.

You'll find the size chart at the bottom of the pattern.

See DROPS lesson: How to read size chart

The needle size provided in the pattern serves only as a guide, the important thing is to follow the knitting tension. And since knitting tension is very individual, you will have to adjust the needle size to ensure that YOUR tension is the same as in the pattern – maybe you’ll have to adjust 1, or even 2 needle sizes, up or down to achieve the correct tension. For this, we recommend that you work test swatches.

Should you work with a different knitting tension than the one provided, the measurements of the finished garment might deviate from the measurement sketch.

See DROPS lesson: How to measure your tension/gauge

See DROPS video: How to make a tension/gauge swatch

Working a garment top-down provides more flexibility and room for personal adjustment. For example it is easier to try the garment on while working, as well as making adjustments to length of yoke and shoulder caps.

The instructions are carefully explaining every step, in the correct order. Diagrams are adjusted to the knitting direction and are worked as usual.

The diagram depicts all rows/rounds, and every stitch seen from the right side. It is read from bottom to top, from right to left. 1 square = 1 stitch.

When working back and forth, every other row is worked from the right side and every other row is worked from the wrong side. When working from the wrong side, the diagram will have to be worked reversed: from left to right, knit stitches are purled, purl stitches are knit etc.

When working in the round every round is worked from the right side and the diagram are worked from right to left on all rounds.

See DROPS lesson: How to read knitting diagrams

The diagram depicts all rows/rounds, and every stitch seen from the right side. It is worked from bottom to top, from right to left.

When working back and forth every other row is worked from the right side: from right to left and every other row is worked from the wrong side: from left to right.

When working in the round, every row in the diagram are worked from the right side, from right to left.

When working a circular diagram you start in the middle and work your way outwards, counter clockwise, row by row.

The rows usually start with a given number of chain stitches (equivalent to the height of the following stitch), this will either be depicted in the diagram or explained in the pattern.

See DROPS lesson: How to read crochet diagrams

Instructions for working several diagrams after each other on the same row/round, will often be written like so: “work A.1, A.2, A.3 a total of 0-0-2-3-4 times". This means you work A.1 once, then A.2 is worked once, and A.3 is repeated (in width) the number of times provided for your size – in this case like so: S = 0 times, M = 0 times, L=2 times, XL= 3 times and XXL = 4 times.

The diagrams are worked as usual: begin with the first row in A.1, then work the first row in A.2 etc.

See DROPS lesson: How to read knitting diagrams

See DROPS lesson: How to read crochet diagrams

The total width of the garment (from wrist-to-wrist) will be larger in the larger sizes, despite the actual sleeves being shorter. The larger sizes have longer sleeve caps and wider shoulders, so there will be a good fit in all sizes.

The measurement sketch/schematic drawing provides information regarding the full length of the garment. If it’s a jumper or a jacket the length is measured from the highest point on the shoulder closest to the neckline, and straight down to the bottom of the garment. It is NOT measured from the tip of shoulder. Similarly, the length of yoke is measured from the highest point on the shoulder and down to where yoke is split into body and sleeves.

On a jacket measures are never taken along bands, unless specifically stated. Always measure inside band stitches when measuring the length.

See DROPS lesson: How to read a schematic drawing

Diagrams are often repeated on the round or in height. 1 repeat is the diagram the way it appears in the pattern. If it says to work 5 repeats of A.1 in the round, then you work A.1 a total of 5 times after/next to each other in the round. If it says to work 2 repeats of A.1 vertically/in height you work the entire diagram once, then begin again at the start and work the entire diagram one more time.

Chain stitches are slightly narrower than other stitches and to avoid working the cast-on edge too tight, we simply chain more stitches to begin with. The stitch count will be adjusted on the following row to fit the pattern and measurement sketch.

The rib edge is more elastic and will contract slightly compared to, for example, stocking stitch. By increasing before the rib edge, you avoid a visible difference in width between the rib edge and the rest of the body.

It’s very easy to cast off too tightly, and by making yarn overs while casting off (and simultaneously casting these off) you avoid a too tight cast off edge.

See DROPS video: How to bind off with yarn overs (yo)

To achieve an even increase (or decrease) you can increase on, for example: every 3rd and 4th row alternately, like so: work 2 rows and increase on the 3rd row, work 3 rows and increase on the 4th. Repeat this until the increase is complete.

See DROPS lesson: Increase or decrease 1 st on every 3rd and 4th row alternately

Should you prefer to work in the round instead of back and forth, you may of course adjust the pattern. You’ll need to add steeks mid-front (usually 5 stitches), and follow the instructions. When you would normally turn and work from the wrong side, simply work across the steek and continue in the round. At the end you’ll cut the piece open, pick up stitches to work bands, and cover the cut edges.

See DROPS video: How to knit steeks and cut open

Should you prefer to work back and forth instead of in the round, you may of course adjust the pattern so you work the pieces separately and then assemble them at the end. Divide the stitches for the body in 2, add 1 edge stitch in each side (for sewing) and work the front and back pieces separately.

See DROPS lesson: Can I adapt a pattern for circular needles into straight needles?

Pattern repeats can vary slightly in the different sizes, in order to get the correct proportions. If you’re not working the exact same size as the garment in the photo, yours might deviate slightly. This has been carefully developed and adjusted so that the complete impression of the garment is the same in all sizes.

Make sure to follow instructions and diagrams for your size!

If you have found a pattern you like which is available in women’s size it’s not very difficult to convert it to men’s size. The biggest difference will be the length of sleeves and body. Start working on the women size that you think would fit across the chest. The additional length will be worked right before you cast off for the armhole/sleeve cap. If the pattern is worked top-down you can add the length right after the armhole or before the first decrease on sleeve.

Regarding additional yarn amount, this will depend on how much length you add, but it is better with a skein too many than too few.

All yarns will have excess fibres (from production) that might come off as lint or shedding. Brushed yarns (ie hairier yarns) have more of these loose, excess fibres, causing more shedding.

Shedding also depends on what is worn under or over the garment, and whether this pulls at the yarn fibres. It’s therefore not possible to guarantee that there will be no shedding

Below are some tips on how to get the best result when working with hairier yarns:

1. When the garment is finished (before you wash it) shake it vigorously so the looser hairs come off. NOTE: do NOT use a lint roller, brush or any method that pulls at the yarn.

2. Place the garment in a plastic bag and put it in your freezer - the temperature will cause the fibres to become less attached to each other, and excess fibres will come off easier.

3. Leave in the freezer for a few hours before taking it out and shaking it again.

4. Wash the garment according to the instructions on the yarn label.

Pilling is a natural process that happens to even the most exclusive of fibers. It's a natural sign of wear and tear that is hard to avoid, and that is most visible in high friction areas of your garment like a sweater's arms and cuffs.

You can make your garment look as new by removing the pilling, using a fabric comb or a pill/lint remover.

Still can't find the answer you need? Then scroll down and leave your question so one of our experts can try to help you. This will be done normally within 5 to 10 working days.
In the meantime, you can read the questions and answers that others have left to this pattern or join the DROPS Workshop on Facebook to get help from fellow knitters/crocheters!

You might also like...

Post a comment to pattern DROPS 213-14

We would love to hear what you have to say about this pattern!

If you want to leave a question, please make sure you select the correct category in the form below, to speed up the answering process. Required fields are marked *.

Comments / Questions (30)

country flag Eva Arnström Sundman wrote:

Jag stickar tröjan i st XXL med 112 maskor i halskanten. Men maskorna räcker inte till när jag följer beskrivningen. Det saknas 12 maskor för att kunna följa mönstret korrekt. Står det fel i beskrivningen?

03.03.2024 - 19:21

DROPS Design answered:

Hej Eva,Sticka 1 avigmaska, * 2 rätmaskor, 2 avigmaskor *, sticka *-* över de nästa 12 maskorna, 2 rätmaskor, A.1=8m, 2 rätmaskor, 2 avigmaskor, 2 rätmaskor, 2 avigmaskor, 2 rätmaskor, A.1=8m, * 2 rätmaskor, 2 avigmaskor *, sticka *-* över de nästa 28 maskorna, 2 rätmaskor, A.1=8, 2 rätmaskor, 2 avigmaskor, 2 rätmaskor, 2 avigmaskor, 2 rätmaskor, A.1=8, * 2 rätmaskor, 2 avigmaskor *, sticka *-* över de nästa 8-8-12-12 maskorna, 2 rätmaskor, 1 avigmaska. (1+12+2+8+2+2+2+2+2+8+28+2+8+2+2+2+2+2+8+12+2+1=112 masker)

05.03.2024 - 15:11

country flag Pat Buirski wrote:

Help with the sizing of the garment what is Xl or xxl?

16.03.2023 - 10:32

country flag Pat Buirski wrote:

How do you know what size to knit s- xxl?

16.03.2023 - 07:43

DROPS Design answered:

Dear Mrs Buirski, measure a similar garment you have and like the shape and compare them to the measurements in the chart, this is the best way to find out the appropriate size. Read more here. Happy knitting!

16.03.2023 - 09:15

country flag Josefa Olivares wrote:

Hi, when i knit the yoke im confused because i have to increase every other round, but i dont know what to do when i dont have to increase do i just do knits? Hope you are having a great day

12.02.2023 - 04:51

DROPS Design answered:

Dear Josefa, the increased stitches are knitted in the next round. Happy knitting!

12.02.2023 - 22:45

country flag Catherine wrote:

Bonjour, je fais le modèle XL et je suis rendue à mettre les mailles en attente pour les manches donc j'ai 304 mailles et 23 cm depuis le marqueur. Le patron indique: tricoter 45 mailles et glisser 62 mailles en attente. Si je tricote 45 mailles j'arrive à la 7e mailles d'un A1...Question: est-ce que nous poursuivons à tricoter les A1 lorsque nous glissons les mailles en attente et si oui, est-ce normal que je sois sur la 7e maille et non la 8e?

12.11.2022 - 13:44

DROPS Design answered:

Bonjour Catherine, vous tricotez les mailles comme avant, autrement dit, tricotez les mailles de A.1 comme auparavant; elles seront ensuite tricotées en jersey pour le bas du pull). Bon tricot!

14.11.2022 - 09:23

country flag Kirsti wrote:

Hei! Olen aloittanut mallin Calming moments l- koossa. en pääse alkua pitemmälle, koska en saa pääntien resorin silmukkamäärää mitenkään täsmäämään näillä ohjeilla. Aloituksessa on 96 silmukkaa. Mitä tarkoittaa *2s oikein, 2 s nurin*, toista *-* 8 silmukalla? Tuleeko *-*.stä lopputulokseksi 8 vai 16 silmukkaa? Olen yrittänyt vaikka mitä, enkä saa millään noilla ohjeilla lopputulokseksi 96 silmukkaa. Minkä virheen teen? Mitä en huomaa? Yst. terv. Kirsti

26.04.2022 - 10:47

DROPS Design answered:

Hei, kun ohjeessa lukee esim. toista *-* 8 silmukalla, tämä tarkoittaa että 8 silmukalla neulotaan näin: 2 s oikein, 2 s nurin, 2 s oikein ja 2 s nurin. Silmukkaluvuksi tulee tällöin lopuksi 96 silmukkaa.

04.05.2022 - 17:38

country flag Céline wrote:

Bonjour, Je ne comprends pas quelque chose, je fais la taille L mon échantillon est bon mais je n'ai pas encore fini mes 22 tours d'augmentations que je suis déjà à 22cm depuis le marqueur.... Que dois je faire?

10.04.2022 - 22:57

DROPS Design answered:

Bonjour Céline, mesurez bien après les côtes du col, vous augmentez 22 fois tous les 2 rangs soit 44 rangs rangs et donc 22 cm au total (20 rangs = 10 cm). Si votre tension en hauteur n'est pas juste, vous pouvez augmenter plus fréquemment; ainsi, la hauteur de l'empiècement sera juste. Bon tricot!

19.04.2022 - 08:01

country flag Catalina wrote:

Hola. Me gustaría intentar hacer una talla XS, la S a veces me queda un poco grande. He empezado el trabajo con los puntos para la talla S, me pregunto si podría hacer menos aumentos en el canesu, por ejemplo en vez de 18 repeticiones hacer 16 , acabar con 216 puntos, le parece correcto?

13.03.2022 - 18:42

DROPS Design answered:

Hola Catalina. Sí, puedes ajustar las medidas, probandote el jersey a medida que trabajes, hasta alcanzar el largo deseado.

13.03.2022 - 21:55

country flag Ferial wrote:

Bonjour Je suis au col qui me rend folle pour la taille XL j aime les pulls super large...mais apres le diagramme etc ca dis " Quand les côtes mesurent 4 cm, placer 1 marqueur. MESURER DÉSORMAIS À PARTIR D'ICI!"...je continue en cote 2 a 2 ou je repete avec le diagramme? ...merci ×××

05.03.2022 - 03:50

DROPS Design answered:

Bonjour Mme Ferial, en XL, vous tricotez pour le col en côtes 2/2 et A.1 en même temps jusqu'à ce que l'ouvrage mesure 4 cm, puis vous placez un marqueur et tricotez ensuite l'empiècement en tricotant toujours A.1 mais les autres mailles en jersey, en augmentant pour le raglan de chaque côté de chaque A.1. Bon tricot!

07.03.2022 - 08:28

country flag Rita wrote:

Buongiorno…sto eseguendo il maglione nella tg L e nel fare il bordo del collo non mi trovo con il conteggio delle maglie. Partendo da 96 maglie montate, nel secondo giro seguendo le vs indicazioni, ne risultano 108 da lavorare….non capisco…grazie

13.01.2022 - 12:20

DROPS Design answered:

Buonasera Rita, quando segue il paragrafo per le taglie M-L-XXL e XXXL, deve seguire le indicazioni per il secondo numero (taglia L). Il numero di maglie complessivo del giro è corretto. Buon lavoro!

13.01.2022 - 21:53