
Popular categories
Looking for a yarn?


Comments / Questions (29)
![]() GAUTARD Annie wrote:
GAUTARD Annie wrote:
Merci pour votre réponse néanmoins j'aimerais une petite précision les augmentations faites pour les manches après et avant A1 comment les tricoter au rang trois du motif ? Merci
21.11.2024 - 17:11DROPS Design answered:
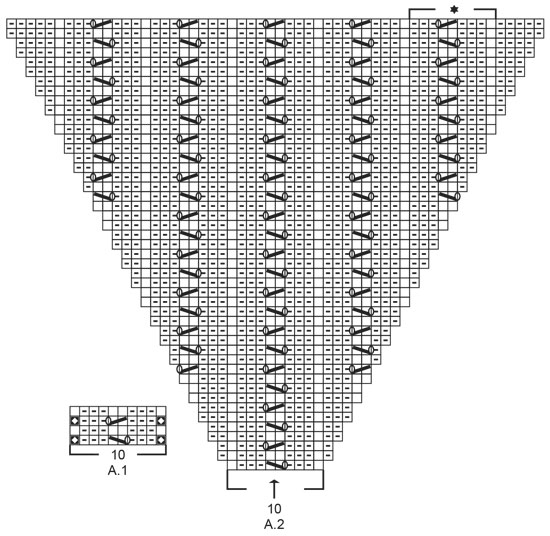
Bonjour Mme Gautard, les augmentations des devants et du dos se tricotent en jersey, celles des manches en suivant le diagramme A.2 = ces nouvelles mailles figurent déjà dans le diagramme, les jetés = augmentations des raglans n'y figurent pas, mais au rang suivant, vous avez déjà ces mailles: au 1er rang de A.2 vous avez 10 mailles, au 2ème rang vous avez 12 mailles, au 3ème rang tricotez 1 jeté, les 10 mailles de A.2, 1 jeté et ainsi de suite. Bon tricot!
22.11.2024 - 08:53
![]() GAUTARD Annie wrote:
GAUTARD Annie wrote:
Bonjour après avoir fais les deux premiers rangs du motif en taille XL pour le 3eim rang les motifs se sont pas en face du premier je suis perdue merci pour votre réponse
21.11.2024 - 12:55DROPS Design answered:
Bonjour Mme Gautard, continuez simplement à suivre les diagrammes comme indiqué, en augmentant avant/après A.1 comme vous avez fait au 1er rang; les mailles augmentées figurent dans A.2, autrement, dit, au 3ème rang, augmentez 1 m pour le raglan, tricotez A.1 (= les mailles du raglan) et augmentez 1 m pour le raglan; les augmentations des devants et du dos se tricotent en jersey, celles de A.2 figurent dans les diagrammes. Bon tricot!
21.11.2024 - 16:04
![]() Jennifer Carvalho wrote:
Jennifer Carvalho wrote:
After the three increase stitches, there are 108 stitches. The band stitches being 12 altogether leaves 96 stitches to insert the four markers....20+20+28+20+20 ends up with 108 stitches (which is the total number of stitches that includes the band stitches). I am short 12 stitches. Where did i go wrong? Am i missing something? Thank you
12.12.2023 - 03:33DROPS Design answered:
Dear Mrs Carvalho, the 6 band stitches are included in the 20 sts for each front piece, so that you have: 20 sts (left front piece, including 6 front band sts), 20 sts (sleeve), 28 sts (back piece), 20 sts (sleeve) and 20 sts (right front piece, including 6 front band sts). Happy knitting!
12.12.2023 - 09:17
![]() Jennifer Carvalho wrote:
Jennifer Carvalho wrote:
After the three increase stitches, there are 108 stitches. The band stitches being 12 altogether leaves 96 stitches to insert the four markers....20+20+28+20+20 ends up with 108 stitches (which is the total number of stitches that includes the band stitches). I am short 12 stitches. Where did i go wrong? Am i missing something? Thank you
12.12.2023 - 03:29
![]() Francesca wrote:
Francesca wrote:
Bjr, en taille S quand on arrive à la séparation à19cm, pouvez-vous me dire combien de maille je dois avoir pour les devant, Manche et dos s'il vous plaît? Merci Franseca
23.12.2022 - 16:06DROPS Design answered:
Bonjour Francesca, vous avez augmenté 23 fois pour le raglan, vous aurez: 20+23 = 43 m pour le devant gauche/le devant droit; 20+(23x2)=66 m pour chaque manche et 28+(23x2)=74 m pour le dos soit 43+66+74+66+43=292 mailles. Bon tricot!
02.01.2023 - 08:31
![]() ESTER MARTINEZ wrote:
ESTER MARTINEZ wrote:
Gracias. Me di cuenta después que habia leido los puntos de la talla S. Gracias por la rapidez
12.12.2022 - 07:47
![]() ESTER MARTINEZ wrote:
ESTER MARTINEZ wrote:
Voy a tejer la manga. No entiendo como hacerlo. Porque si tejo 46 puntos en A.2 y luego 22 en punto revés. Son 68 puntos. Si tengo 72 puntos en la aguja. ¿Que hago con los otros 4 ?
08.12.2022 - 08:52DROPS Design answered:
Hola Ester, qué talla estás trabajando? Para la talla S, tienes 68 pts y trabajas 46 en A.2 y 22 pts de revés = 68 pts. Para la talla M, tienes 72 pts y trabajar 46 en A.2 y 26 de revés = 72 pts.
11.12.2022 - 20:51
![]() Chris wrote:
Chris wrote:
Bonjour pouvez vous me dire ce que je fais quand j'ai fini d'augmenter pour le raglan, dois-je continuer à augmenter pour le dos ou juste continuer jusqu'à 19cm sans aucune augmentation ? Merci pour votre éclairage ! Bien cordialement
02.08.2022 - 15:31DROPS Design answered:
Bonjour Chris, lorsque vous avez terminé les augmentations, vous avez 292 mailles (en taille S), si votre ouvrage ne mesure pas encore 19 cm à partir du col, tricotez comme avant: la bordure des devants, les devants et le dos en jersey et les points fantaisie aussi comme avant, mais vous ne faites plus de jetés pour le raglan de chaque côté de A.1. Bon tricot!
02.08.2022 - 17:21
![]() Monika wrote:
Monika wrote:
Hallo, können Sie mir bitte helfen? Ich bin jetzt mit dem Körper fertig und frage mich, wie ich das Muster, das zuerst in Reihen gestrickt wurde, jetzt in Runden weiterstricke? Nach der Strickschrift kann ich ja nicht gehen, da die Rückreihen jetzt anders gestrickt werden müssen. Wie mache ich das richtig? Danke, Monika
05.03.2022 - 17:41DROPS Design answered:
Liebe Monika, bei den Ärmeln lesen Sie das Diagram immer rechts nach links, und die Maschen werden dann so gestrickt, wie sie von der Vorderseihte (bei Hinreihen) aussehen sollen. Viel Spaß beim stricken!
07.03.2022 - 08:35
![]() Chris wrote:
Chris wrote:
Bonjour, J'ai du mal à comprendre le rangs 2, je suis toujours décalée. Pouvez vous me dire si je me trompe: 6m bordure , 9 m envers, 1 m Envers torse, A1envers= 1m envers, 3 endroits, 2 envers 3 endroit, 1 envers 1 envers torse A2envers= 1 endroit, 1 envers 3 endroit 2 envers 3 endroits 1 envers 1 endroit 1 envers torse Etc.... Merci pour vos explications car ce modèle est vraiment superbe mais je débute avec un diagramme 🙃.
26.01.2022 - 09:42DROPS Design answered:
Bonjour Chris, les augmentations des raglans se tricotent soit en jersrey = devants et dos), soit dans A.2 pour les manches, autrement dit, au 2ème rang sur l'envers, les augmentations figurent dans A.2 soit: 1 m torse à l'end (= le jeté = 1ère m de A.2 sur l'envers), 1 m env, 3 m end, 2 m env, 3 m end, 1 m env, 1 m torse à l'endroit (= le jeté = dernière m de A.2 sur l'envers). Ainsi, vous ne devriez plus être décalée. Bon tricot!
26.01.2022 - 09:51
|
||||||||||||||||||||||
Evening Glow Jacket#eveningglowjacket |
||||||||||||||||||||||
 |
 |
|||||||||||||||||||||
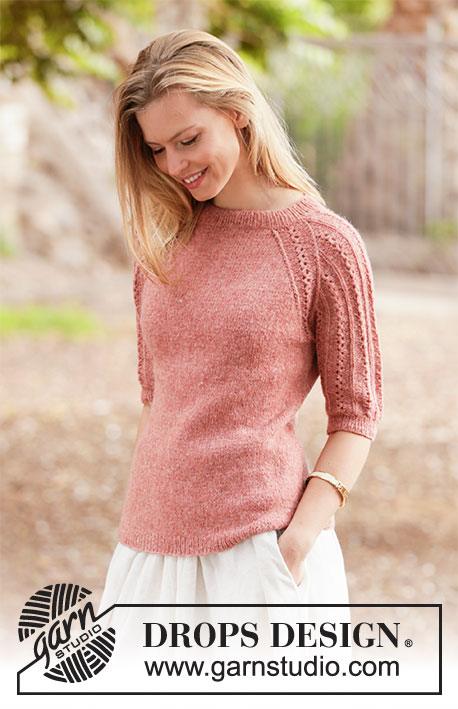
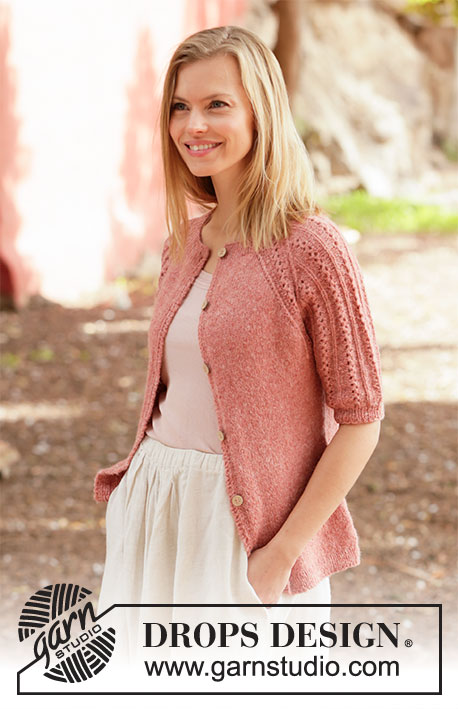
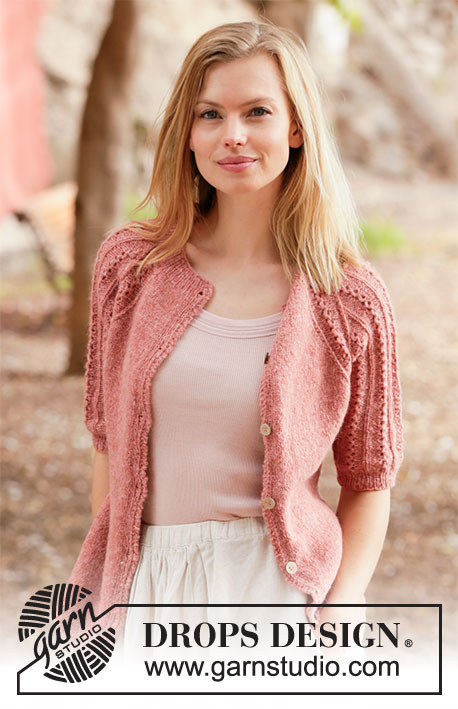
Knitted jacket in DROPS Sky. The piece is worked top down with raglan, short sleeves and lace pattern. Sizes S - XXXL.
DROPS 212-2 |
||||||||||||||||||||||
|
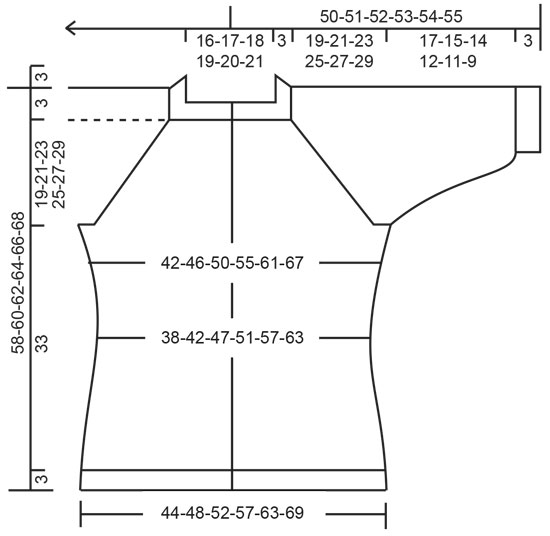
------------------------------------------------------- EXPLANATIONS FOR THE PATTERN: ------------------------------------------------------- RIDGE/GARTER STITCH (worked back and forth): Knit all rows. 1 ridge in height = Knit 2 rows. LEFT BAND (= 6 stitches): Work as follows from the right side: 2 stitches in garter stitch, 1 stitch in stocking stitch, 1 stitch in garter stitch, 1 stitch in stocking stitch, 1 stitch in garter stitch. Continue with garter stitch over garter stitch stocking stitch over stocking stitch. RIGHT BAND (= 6 stitches): Work as follows from the right side: 1 stitch in garter stitch, 1 stitch in stocking stitch, 1 stitch in garter stitch, 1 stitch in stocking stitch and 2 stitches in garter stitch. Continue with garter stitch over garter stitch and stocking stitch over stocking stitch. INCREASE/DECREASE TIP (evenly spaced): To work out how to increase/decrease evenly, count the total number of stitches on needle (e.g. 105 stitches), minus the bands (e.g. 12 stitches) and divide the remaining stitches with number of increases/decreases to be made (e.g. 3) = 31. In this example, increase by making 1 yarn over after each 31st stitch (do not increase on the bands; they are worked as before). On the next row work the yarn overs twisted to avoid holes. When decreasing, knit together each 30th and 31st stitch. PATTERN: See diagrams A.1 (raglan-line) and A.2 (pattern on sleeves). The diagrams show all rows in the pattern seen from the right side. RAGLAN: Increase 1 stitch on each side of the 10 stitches in A.1, in each transition between front/back pieces and sleeves (= 8 stitches increased on an increase-row). Increase by making 1 yarn over. On the next row (wrong side) purl the yarn overs twisted to avoid holes. Then work the new stitches in stocking stitch on the front/back pieces and in A.2 on the sleeves. DECREASE TIP-1 (for sides of body): Decrease 1 stitch on each side of the marker thread as follows: Work until there are 3 stitches left before the marker thread, knit 2 together, knit 2 (marker thread sits between these 2 stitches) slip 1 stitch as if to knit, knit 1 and pass the slipped stitch over the knitted stitch (= 2 stitches decreased). DECREASE TIP-2 (for mid under sleeves): Decrease 1 stitch on each side of the marker thread as follows: Work until there are 3 stitches left before the marker thread, purl 2 together, purl 2 (marker thread sits between these 2 stitches), purl 2 twisted together (= 2 stitches decreased). INCREASE TIP (for sides of body): All increases are worked from the wrong side! Work until there is 1 stitch left before the marker thread, make 1 yarn over, work 2 stitches in stocking stitch (marker thread sits between these 2 stitches) make 1 yarn over (= 2 stitches increased). On the next row (right side) knit the yarn overs twisted to avoid holes. Then work the new stitches in stocking stitch. BUTTONHOLES: Work buttonholes on the right band (when the garment is worn). Work from the right side when there are 4 stitches left on the row as follows: Make 1 yarn over, knit 2 together and work the last 2 stitches in garter stitch. On the next row (wrong side), knit the yarn over to leave a hole. The first buttonhole is worked when the rib on the neck measures approx. 2 cm. Then work the other 5-5-6-6-7-7 buttonholes with approx. 9-9½-8½-9-8-8 cm between each one. CASTING-OFF TIP: To avoid the cast-off edge being tight you can cast off with a larger size needle. If the edge is still tight, make 1 yarn over after approx. each 8th stitch at the same time as casting off and the yarn overs are cast off as normal stitches. ------------------------------------------------------- START THE PIECE HERE: ------------------------------------------------------- JACKET – SHORT OVERVIEW OF THE PIECE: The neck and yoke are worked back and forth with circular needle from mid front and top down. The yoke is divided for body and sleeves and the body continued back and forth. The sleeves are worked in the round with short circular needle/double pointed needles, top down. NECK: Cast on 105-109-113-119-123-127 stitches (including 6 band stitches on each side towards mid front) with circular needle size 3 mm and Sky. Purl 1 row (= wrong side). The next row is worked as follows from the right side: Work LEFT BAND (= 6 stitches) – read description above, * knit 1, purl 1 *, work from *-* until there are 7 stitches left on the row, knit 1 and finish by working RIGHT BAND (= 6 stitches) – read description above. Continue this rib for 3 cm, remember BUTTONHOLES on right band – read description above. NOTE: The bands are worked as described above to finished length. When the rib is finished, knit 1 row from the right side (bands worked as before) where you increase 3-7-7-5-1-5 stitches evenly spaced – read INCREASE/DECREASE TIP = 108-116-120-124-124-132 stitches. Insert 1 marker after the band at the beginning of the row; the yoke will be measured from this marker. Change to circular needle size 4 mm and purl 1 row from the wrong side with 6 band stitches on each side as before (yarn overs are purled twisted). Then work the yoke as described below. REMEMBER THE KNITTING TENSION! YOKE: Insert 4 marker threads in the piece as described below (without working the stitches): Count 20-22-23-24-24-26 stitches (= left front piece), insert 1 marker thread before the next stitch, count 20 stitches (= sleeve), insert 1 marker thread before the next stitch, count 28-32-34-36-36-40 stitches (= back piece), insert 1 marker thread before the next stitch, count 20 stitches (= sleeve), insert 1 marker thread before the next stitch. There are 20-22-23-24-24-26 stitches on the right needle after the last thread. On the next row begin the pattern as described below, AT THE SAME TIME increase to RAGLAN – read description above. Work the next row as follows from the right side: Work 6 band stitches as before, 9-11-12-13-13-15 stitches in stocking stitch, increase 1 stitch to raglan, work A.1 (= 10 stitches with marker thread in the middle), increase 1 stitch to raglan, work A.2 (= 10 stitches), increase 1 stitch to raglan, work A.1 (= 10 stitches with marker thread in the middle), increase 1 stitch to raglan, work 18-22-24-26-26-30 stitches in stocking stitch, increase 1 stitch to raglan, work A.1 (= 10 stitches with marker thread in the middle), increase 1 stitch to raglan, work A.2 (= 10 stitches), increase 1 stitch to raglan, work A.1 (= 10 stitches with marker thread in the middle), increase 1 stitch to raglan, work 9-11-12-13-13-15 stitches in stocking stitch and finish with 6 band stitches as before. Continue this pattern and increase to raglan every 2nd row (i.e. each row from the right side) a total of 23-25-29-33-37-40 times in height including the increase on the first row. NOTE: The increased stitches on the sleeves are worked into the pattern until there are a total of 5-5-7-7-7-7 repeats in width across the sleeve, then the next increased stitches are purled from the right side and knitted from the wrong side to finished length (A.2 shows the sleeves with all the increases in size S). After the last increase to raglan there are 292-316-352-388-420-452 stitches on the needle. Continue working without further increases until the piece measures 19-21-23-25-27-29 cm from the marker on the neck. Now divide the yoke for the body and sleeves by working the next row as follows: Work 46-50-55-60-66-72 stitches as before (= front piece), place the next 60-64-72-80-84-88 stitches on 1 thread for the sleeve, cast on 8 new stitches on the needle (= in side under the sleeve), work 80-88-98-108-120-132 stitches as before (= back piece), place the next 60-64-72-80-84-88 stitches on 1 thread for the sleeve, cast on 8 new stitches on the needle (= in side under the sleeve) and work the remaining 46-50-55-60-66-72 stitches as before (= front piece). Body and sleeves are finished separately. BODY: = 188-204-224-244-268-292 stitches. Insert 1 marker thread 50-54-59-64-70-76 stitches in from each side (= sides of body). There are 88-96-106-116-128-140 stitches between marker threads on the back piece. Allow the threads to follow your work onwards; they will be used when decreasing and increasing in the sides. Continue back and forth with stocking stitch and 6 band stitches on each side towards mid front as before. When the piece measures 3 cm from the division, decrease 1 stitch on each side of both marker threads – read DECREASE TIP-1 (= 4 stitches decreased). Decrease like this every 3 cm a total of 4 times on each side = 172-188-208-228-252-276 stitches. Continue working until the piece measures 16 cm from the division. On the next row from the wrong side increase 1 stitch on each side of both marker threads – read INCREASE TIP (= 4 stitches increased). Increase like this every 2½ cm a total of 6 times on each side = 196-212-232-252-276-300 stitches. Continue working until the piece measures 33 cm from the division (there is approx. 3 cm left to finished length; you can try the jacket on and work to desired length). Change to circular needle size 3 mm. Knit 1 row from the right side (bands worked as before) and increase at the same time 37-41-45-49-53-57 stitches evenly spaced – remember INCREASE/DECREASE TIP = 233-253-277-301-329-357 stitches. Work rib as follows from the wrong side: 6 band stitches as before, * purl 1, knit 1 *, work from *-* until there are 7 stitches left on the row, purl 1 and finish with 6 band stitches as before. Continue this rib for 3 cm. Cast off with garter stitch over garter stitch, knit over knit and purl over purl – read CASTING-OFF TIP! The jacket measures approx. 58-60-62-64-66-68 cm from the shoulder down. SLEEVES: Place the 60-64-72-80-84-88 stitches from the thread on the one side of the piece on short circular needle size 4 mm and knit up 1 stitch in each of the 8 stitches cast on under the sleeve = 68-72-80-88-92-96 stitches. Insert a marker thread in the middle of the 8 stitches under the sleeve. Allow the thread to follow your work onwards; it will be used when decreasing under the sleeve. Start the round at the marker thread and continue the pattern in the round with A.2 over the middle 46-46-64-64-64-64 stitches on top of the sleeve and the remaining 22-26-16-24-28-32 stitches purled. When the sleeve measures 2 cm from the division in all sizes, decrease 2 stitches mid under the sleeve – read DECREASE TIP-2. Decrease like this every 3-2-1½-1-½-½ cm a total of 5-6-8-10-12-13 times = 58-60-64-68-68-70 stitches. Continue working until the sleeve measures 17-15-14-12-11-9 cm from the division (there is approx. 3 cm left to finished length; you can try the jacket on and work to desired length). NOTE: Shorter measurements in larger sizes due to wider neck and longer yoke. Knit 1 row where you decrease 6-6-8-10-8-8 stitches evenly spaced – remember INCREASE/DECREASE TIP = 52-54-56-58-60-62 stitches. Change to double pointed needles size 3 mm and work rib in the round (= knit 1, purl 1) for 3 cm. Cast off with knit over knit and purl over purl – read CASTING-OFF TIP! The sleeve measures approx. 20-18-17-15-14-12 cm from the division. Work the other sleeve in the same way. ASSEMBLY: Sew buttons onto left band. |
||||||||||||||||||||||
Diagram explanations |
||||||||||||||||||||||
|
||||||||||||||||||||||
 |
||||||||||||||||||||||
 |
||||||||||||||||||||||
Have you finished this pattern?Tag your pictures with #dropspattern #eveningglowjacket or submit them to the #dropsfan gallery. Do you need help with this pattern?You'll find 30 tutorial videos, a Comments/Questions area and more by visiting the pattern on garnstudio.com. © 1982-2026 DROPS Design A/S. We reserve all rights. This document, including all its sub-sections, has copyrights. Read more about what you can do with our patterns at the bottom of each pattern on our site. |
||||||||||||||||||||||


With over 40 years in knitting and crochet design, DROPS Design offers one of the most extensive collections of free patterns on the internet - translated to 17 languages. As of today we count 324 catalogues and 12290 patterns translated into English (UK/cm).
We work hard to bring you the best knitting and crochet have to offer, inspiration and advice as well as great quality yarns at incredible prices! Would you like to use our patterns for other than personal use? You can read what you are allowed to do in the Copyright text at the bottom of all our patterns. Happy crafting!
Post a comment to pattern DROPS 212-2
We would love to hear what you have to say about this pattern!
If you want to leave a question, please make sure you select the correct category in the form below, to speed up the answering process. Required fields are marked *.