
Popular categories
Looking for a yarn?


Comments / Questions (38)
![]() Jette Ottesen wrote:
Jette Ottesen wrote:
Kære Drops Design. Jeg fatter ganske enkelt ikke denne opskrift. Der står i starten, man skal strikke på rundpind op til ærmegabet (efter 31 cm i S). Derefter står der, at man skal strikke mønster frem og tilbage (ret og vrang) efter 26 cm i S. Det giver da slet ikke mening. Jeg er blevet nødt til at starte mønster og lukke til ærmegab samtidigt for at kunne finde ud af det. Kan I evt. forklare?
30.09.2020 - 16:19DROPS Design answered:
Hej Jette, Nej du deler først arbejdet når det måler 31 cm altså når du lukker af til ærmegab. Men når arbejdet måler 26 cm strikker du 1.pind af A.1 over de midterste 22 masker (resten af maskerne i glatstrik), på næste omgang strikker du 2.pind i diagrammet og resten i glatstrik osv. God fornøjelse!
02.10.2020 - 13:32
![]() Esther wrote:
Esther wrote:
Hallo Drops Design. Herzlichen Dank für die tolle Anleitung! Verstehe Ich es richtig, dass der Pullover ab dem Muster A1 am Vorderteil nicht mehr in runden, sondern in Hin- und Rückreihen weitergestrickt wird?
03.09.2020 - 11:40DROPS Design answered:
Liebe Esther, die Arbeit wird in Runden gestrickt, bis sie 31-32-33-34-35-36 cm misst. Dann stricken Sie weiter Vorder- (mit A.1) und Rückenteil hin und zurück separat gestrickt. Vorderteil wird in 2 Teilen gestrickt, nach A.1 gestrickt wurde. Viel Spaß beim stricken!
03.09.2020 - 13:55
![]() WiChevy wrote:
WiChevy wrote:
Sanierung der baddecke
07.08.2020 - 07:51
![]() MIREILLE wrote:
MIREILLE wrote:
Bonjour , commencer le diagramme A1 à 26 cm ne me semble pas correspondre à la photo c'est très bas ! est-ce normal ? Cordialement
10.01.2020 - 16:31DROPS Design answered:
Bonjour Mireille, vous pouvez tout à fait ajuster la hauteur à celle que vous voulez. Bon tricot!
13.01.2020 - 08:06
![]() Marjan wrote:
Marjan wrote:
Bij uitleg van telpatroon staat bij het open hokje" recht aan de goede kant en averecht aan de verkeerde kant. Maar de trui wordt rondgebreid, betekent de uitleg dat elke hokje voor 2 naalden breien staat
21.11.2019 - 14:42DROPS Design answered:
Dag Marjan,
Nee, elk hokje is 1 steek, dus alle naalden zijn aangegeven in het telpatroon. Vanaf de splitsing voor de hals wordt het werk overigens wel heen en weer gebreid.
23.11.2019 - 16:36
![]() Myriam Dorekens wrote:
Myriam Dorekens wrote:
Hallo ik vindt dat jullie heel mooie patronen hebben ,graag had ik geweten of dat ook gebreid kan worden op de breimachine ,want jullie werken veel met een rondbreinaald ?
08.10.2019 - 18:29DROPS Design answered:
Dag Myriam,
Helaas zijn onze patronen alleen uitgeschreven om met de hand te breien.
11.10.2019 - 20:16
![]() Heike wrote:
Heike wrote:
Thank you for your prompt answer, which, however, was not very helpful. If I had saved settings the other patterns would not print correctly.
20.09.2019 - 18:33
![]() Heike wrote:
Heike wrote:
Hello everybody - I am trying to print the pattern and can only get the first page. Could you please check the file? I have never had problems printing your patterns before and another pattern printed just fine. So Iam assuming it may an error in the printing file. Thanks for helping -Heike
19.09.2019 - 14:26DROPS Design answered:
Dear Heike, we could succesfully print all pages to this pattern, make sure your printer didn't save previous settings, so that all pages will be print. Happy knitting!
19.09.2019 - 15:21
![]() Marie Hélène wrote:
Marie Hélène wrote:
Je suis étonnée qu'il faille à la fin des côtes diminuer de 60 mailles au moment d'entamer le jersey. Le modèle a l'air droit et d'habitude on augmente à ce moment là , on ne diminue pas. Pouvez vous m'expliquer l'interet de diminuer de 60 mailles à ce moment là ? Merci
16.09.2019 - 16:51DROPS Design answered:
Bonjour Marie-Hélène, il faut plus de mailles avec les aiguilles 3 qu'avec les aiguilles 4 pour obtenir la même largeur (= circonférence), pour que le modèle reste droit après les côtes, on va donc diminuer avant de commencer le jersey et ainsi obtenir la bonne largeur. Bon tricot!
17.09.2019 - 10:29
![]() Béatrice wrote:
Béatrice wrote:
Bonjour, Êtes vous sûre que les symboles du diagramme correspondent au diagramme ?
12.09.2019 - 07:54DROPS Design answered:
Bonjour Béatrice, qu'est-ce qui vous fait penser le contraire?
12.09.2019 - 09:04
|
||||||||||||||||||||||||||||||||||
Harvest Gold#harvestgoldsweater |
||||||||||||||||||||||||||||||||||
 |
 |
|||||||||||||||||||||||||||||||||
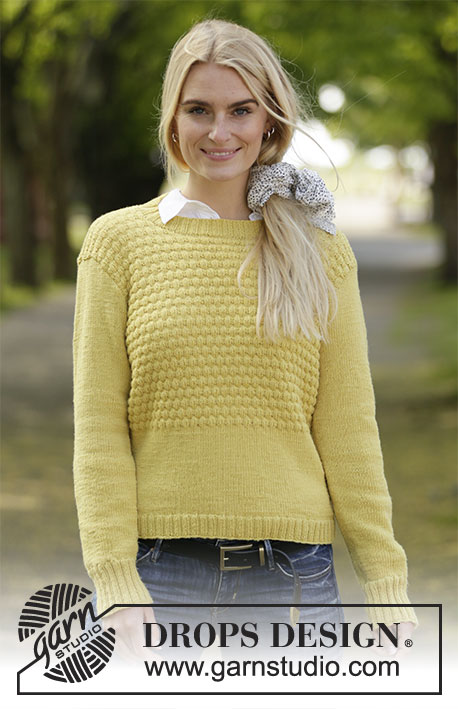
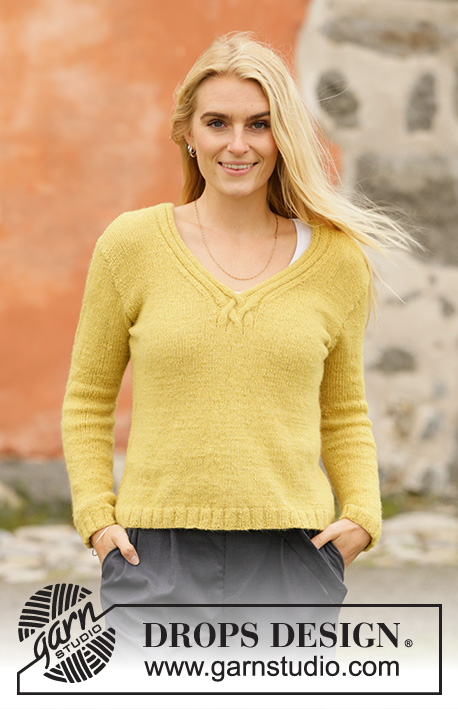
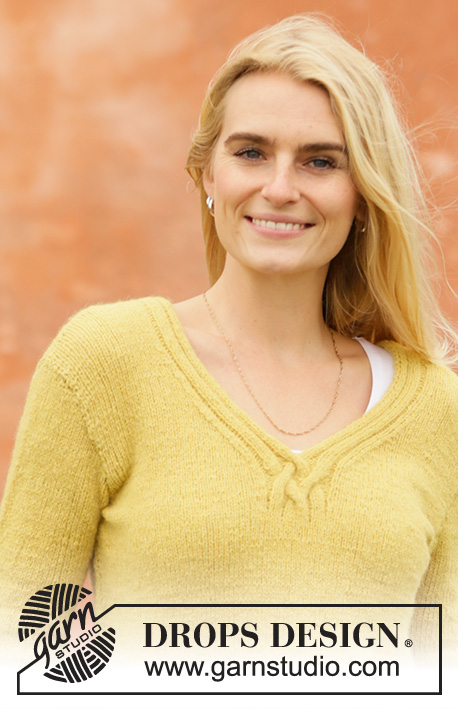
Knitted jumper in DROPS Sky. The piece is worked with v-neck and cables. Sizes S - XXXL.
DROPS 207-7 |
||||||||||||||||||||||||||||||||||
|
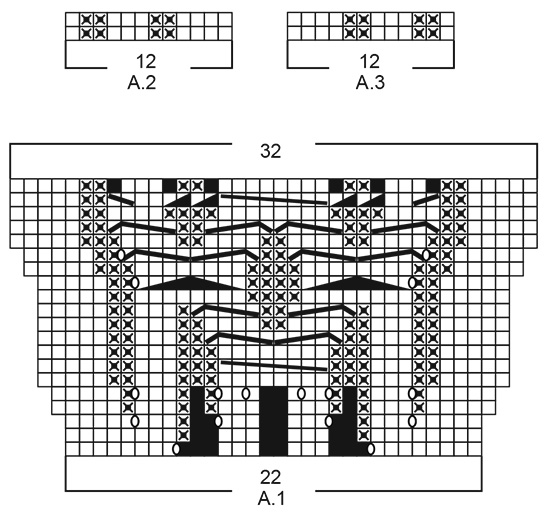
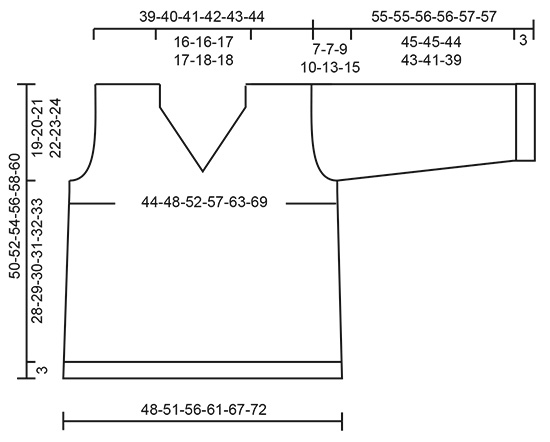
------------------------------------------------------- EXPLANATIONS FOR THE PATTERN: ------------------------------------------------------- RIDGE/GARTER STITCH (worked back and forth): Knit all rows. 1 ridge in height = Knit 2 rows. PATTERN: See diagrams A.1 to A.3. The diagrams show all rows in the pattern seen from the right side. DECREASE TIP-1 (evenly spaced): To work out how to decrease evenly, count the total number of stitches on needle (e.g. 240 stitches) and divide by number of decreases to be made (e.g. 40) = 6. In this example decrease by knitting each 5th and 6th stitch together. DECREASE TIP-2 (for sides of body): Decrease 1 stitch on each side of the marker thread as follows: Work until there are 3 stitches left before the marker thread, knit 2 together, knit 2 (marker thread sits between these 2 stitches) slip 1 stitch as if to knit, knit 1 and pass the slipped stitch over the knitted stitch. V-NECK: All decreases are worked from the right side! Decrease after A.2 as follows: Slip 1 stitch as if to knit, knit 1 and pass the slipped stitch over the knitted stitch (= 1 stitch decreased). Decrease before A.3 as follows: Work until there are 2 stitches left before A.3, knit 2 together (= 1 stitch decreased). INCREASE TIP (for sleeves): Work until there are 2 stitches left before the marker thread, 1 yarn over, knit 4 (marker thread sits between these 2 stitches), 1 yarn over. On the next round knit the yarn overs twisted to avoid holes. Then work the new stitches in stocking stitch. ------------------------------------------------------- START THE PIECE HERE: ------------------------------------------------------- JUMPER – SHORT OVERVIEW OF THE PIECE: The piece is worked in the round with circular needle as far as the armholes, then front and back pieces are finished separately. The sleeves are worked in the round with double pointed needles/short circular needle. BODY: Cast on 240-260-285-310-335-365 stitches with circular needle size 3 mm and Sky. Knit 1 round then work rib (= knit 3 / purl 2) for 3 cm. Knit 1 round where you decrease 40-44-49-54-55-61 stitches evenly spaced - read DECREASE TIP-1 = 200-216-236-256-280-304 stitches. Change to circular needle 4 mm. Insert 1 marker thread in both sides of the piece (= 100-108-118-128-140-152 stitches on both front and back piece). Start the round at one of the marker threads (= in the side). Work stocking stitch in the round. REMEMBER THE KNITTING TENSION. When the piece measures 6-7-8-6-7-8 cm from the cast-on edge decrease 1 stitch on each side of both marker threads – read DECREASE TIP-2. Decrease like this every 7-7-7-8-8-8 cm a total of 4 times = 184-200-220-240-264-288 stitches (= 92-100-110-120-132-144 stitches between the 2 marker threads on front and back pieces). When the piece measures 26-27-28-29-30-31 cm work pattern A.1 over the middle 22 stitches on the front piece. The remaining stitches are worked in stocking stitch as before (= 35-39-44-49-55-61 stitches in stocking stitch on each side of A.1 on the front piece). When the piece measures 31-32-33-34-35-36 cm cast off 2-3-4-5-7-9 stitches on each side of both marker threads (= 4-6-8-10-14-18 stitches cast off for the armhole on each side). There are 88-94-102-110-118-126 stitches left on the back piece and the number of stitches on the front piece varies according to your knitting tension and how many rows of A.1 have been worked in height. Front and back pieces are now finished separately. FRONT PIECE: Continue back and forth with A.1, stocking stitch and 1 edge stitch in GARTER STITCH on each side – read description above; AT THE SAME TIME cast off for armholes and v-neck as follows: Armholes: Cast off stitches at the beginning of each row from the armhole on each side as follows: Cast off 2 stitches 0-0-1-2-3-5 times and 1 stitch 3-4-5-6-7-6 times (= a total of 5-7-11-15-20-25 stitches cast off on each side including the first 2-3-4-5-7-9 stitches cast off on each side of both marker threads). V-neck: When A.1 has been completed in height divide the front piece in the middle for the left and right shoulder. There should be the same number of stitches on both shoulders and the piece should divide in the middle of diagram A.1. Place the stitches for the left shoulder on a thread and work the right shoulder as follows: Right shoulder: Start from the right side and work pattern from the neck as follows: A.2 over the first 12 stitches, stocking stitch until there is 1 stitch left on the row and finish with 1 stitch in garter stitch. Continue like this back and forth (the decreases for the armhole are continued if they are not finished) and on the next row from the right side start decreasing for the V-NECK – read description above. Decrease every 2nd row 8-7-7-6-6-5 times and then every 4th row 5-6-7-8-9-10 times (a total of 13-13-14-14-15-15 stitches decreased) = 33-35-35-36-36-36 stitches. Continue with knit over knit and purl over purl until the piece measures 50-52-54-56-58-60 cm (the armhole measures approx. 19-20-21-22-23-24 cm). On the next row from the right side work as follows: knit over knit and purl over purl for the first 12 stitches (= neck-edge), knit the remaining 21-23-23-24-24-24 stitches and decrease at the same time 5-5-5-5-5-4 stitches evenly over these stitches = 16-18-18-19-19-20 stitches + the 12 stitches for the neck-edge. Turn and cast off the 16-18-18-19-19-20 stitches on the shoulder. Work A.2 back and forth over the other 12 stitches (= neck-edge). When the piece measures 2 cm from where the shoulder stitches were cast off, work short rows with pattern as before, starting from the right side as follows: * work all stitches, turn and work the first 8 stitches, turn and work back, turn and work the first 3 stitches, turn and work back, turn and work all stitches *, work from *-* 2 times. (This is so the neck edge fits nicely around neck – the edge furthest away from neck is slightly longer than edge closest to neck) Continue with A.2 until the neck edge measures approx. 14-14-15-15-15-15 cm along the longest side from where the stitches were cast off for the shoulder. Cast off with knit over knit and purl over purl. Left shoulder: Start from the right side and work pattern from the armhole as follows: 1 edge stitch in garter stitch, stocking stitch until there are 12 stitches left on the row, A.3 over the last 12 stitches (= towards the v-neck). Continue like this back and forth at the same time as the decreases for the armhole continue and you start to decrease for the v-neck on the next row from the right side – read description above. Decrease every 2nd row 8-7-7-6-6-5 times and every 4th row 5-6-7-8-9-10 times (a total of 13-13-14-14-15-15 stitches decreased) = 33-35-35-36-36-36 stitches. Continue with knit over knit and purl over purl until the piece measures 50-52-54-56-58-60 cm (the armhole measures approx. 19-20-21-22-23-24 cm). On the next row from the right side work as follows: Knit the first 21-23-23-24-24-24 stitches and decrease 5-5-5-5-5-4 stitches evenly over these stitches, then work A.3 over the remaining 12 stitches (= neck-edge) = 16-18-18-19-19-20 stitches + the 12 stitches in A.3. Turn and work the first 12 stitches then cast off the remaining 16-18-18-19-19-20 stitches for the shoulder. Cut the strand. Start from the right side and work A.3 back and forth over the 12 stitches. When the piece measures 2 cm from where the shoulder stitches were cast off, work short rows with the pattern as before and starting from the right side as follows: * work all stitches, turn and work back, turn and work the first 8 stitches, turn and work back, turn and work the first 3 stitches, turn and work back *, work from *-* 2 times. (This is so the neck edge fits nicely around neck – the edge furthest away from neck is slightly longer than edge closest to neck. Continue with A.3 until the neck edge measures approx. 14-14-15-15-15-15 cm along the longest side from where the stitches were cast off for the shoulder. Cast off with knit over knit and purl over purl. BACK PIECE: There are 88-94-102-110-118-126 stitches on the back piece. Work stocking stitch back and forth with 1 edge stitch in garter stitch on each side; at the same time cast off stitches for the armholes in the same way as on the front piece (= a total of 5-7-11-15-20-25 stitches cast off for each armhole) = 82-86-88-90-92-94 stitches. When the piece measures 44-46-48-50-52-54 cm cast off the middle 42-42-44-44-46-46 stitches for neck and each shoulder is finished separately. Then cast off stitches on each row from the neck as follows: Cast off 2 stitches 1 time and 1 stitch 2 times = 16-18-18-19-19-20 stitches. Continue back and forth with 1 edge stitch in garter stitch at the armhole until the piece measures 50-52-54-56-58-60 cm (armhole measures 19-20-21-22-23-24 cm). Cast off. Work the other shoulder in the same way SLEEVE: Cast on 50-55-55-60-60-65 stitches with double pointed needles size 3 mm and Sky. Knit 1 round then work rib (= knit 3 / purl 2) for 3 cm. Knit 1 round where you decrease 7-11-9-12-10-12 stitches evenly spaced = 43-44-46-48-50-53 stitches. Change to double pointed needles size 4 mm. Insert a marker thread at the beginning of the round (= mid under sleeve). Work stocking stitch in the round. At the same time when the sleeve measures 11-11-12-11-11-9 cm from the cast-on edge increase 2 stitches under the sleeve – read INCREASE TIP. Increase like this every 7-6-5-5-4-4 round a total of 14-16-18-19-21-22 times = 71-76-82-86-92-97 stitches. Continue working until the sleeve measures 48-48-47-46-44-42 cm. Now cast off the middle 4-6-8-10-14-14 stitches under the sleeve for the armhole (= 2-3-4-5-7-7 stitches on each side of the marker thread). Then continue back and forth with stocking stitch, AT THE SAME TIME at the beginning of each row cast off for the sleeve cap as follows: Cast off 2 stitches 4-4-3-3-2-2 times, 1 stitch 0-0-5-7-12-16 times, 2 stitches 4-4-3-2-2-1 times and 3 stitches 2-2-2-2-1-1 times = 23-26-28-30-32-33 stitches left. Cast off the remaining stitches. The sleeve measures a total of 55-55-56-56-57-57 cm. Work the other sleeve in the same way. ASSEMBLY: Sew the shoulder seams with grafting stitches inside the cast-off edge. Sew the 2 neck-edges together inside the cast-off edge. Then sew the neck-edge to the back piece. Sew inside the 1 edge stitch in garter stitch on the neck-edge and inside the cast-off edge on the back piece. Sew the sleeves to the body inside the 1 edge stitch in garter stitch on the body and inside the cast-off edge on the sleeves. |
||||||||||||||||||||||||||||||||||
Diagram explanations |
||||||||||||||||||||||||||||||||||
|
||||||||||||||||||||||||||||||||||
 |
||||||||||||||||||||||||||||||||||
 |
||||||||||||||||||||||||||||||||||
Have you finished this pattern?Tag your pictures with #dropspattern #harvestgoldsweater or submit them to the #dropsfan gallery. Do you need help with this pattern?You'll find 29 tutorial videos, a Comments/Questions area and more by visiting the pattern on garnstudio.com. © 1982-2026 DROPS Design A/S. We reserve all rights. This document, including all its sub-sections, has copyrights. Read more about what you can do with our patterns at the bottom of each pattern on our site. |
||||||||||||||||||||||||||||||||||


With over 40 years in knitting and crochet design, DROPS Design offers one of the most extensive collections of free patterns on the internet - translated to 17 languages. As of today we count 324 catalogues and 12290 patterns translated into English (UK/cm).
We work hard to bring you the best knitting and crochet have to offer, inspiration and advice as well as great quality yarns at incredible prices! Would you like to use our patterns for other than personal use? You can read what you are allowed to do in the Copyright text at the bottom of all our patterns. Happy crafting!
Post a comment to pattern DROPS 207-7
We would love to hear what you have to say about this pattern!
If you want to leave a question, please make sure you select the correct category in the form below, to speed up the answering process. Required fields are marked *.