
Popular categories
Looking for a yarn?


Comments / Questions (49)
![]() Odile wrote:
Odile wrote:
Bonjour , J ai du mal avec le raglan , n'y a t'il pas une video qui explique ceci adaptée à ce modèle ? Je ne l'ai pas trouvee. Merci
02.09.2019 - 08:22DROPS Design answered:
Bonjour Odile, cette vidéo montre comment tricoter un raglan de haut en bas. Au lieu d'avoir 4 mailles entre chaque augmentation du raglan comme dans la vidéo, on aura pour ce modèle seulement 3 mailles (= 2 mailles du dos/devant + 1 m de la manche), les augmentation se feront de la même façon, on va juste tricoter le dos et le devant comme dans les diagrammes (les augmentations se tricotent en jersey, puis en point fantaisie), celles des manches se tricotent seulement en jersey. Bon tricot!
02.09.2019 - 11:04
![]() Maeva wrote:
Maeva wrote:
Bonjour , J'ai besoin de votre aide :après les côtes du col, j'ai fait le premier tour ou l 'on place les fils marqueurs, et à la fin du tour , il me reste 2 mailles avant le fil marqueur du debut du dos ,est ce normal? et ces 2 mailles doivent elles servir aux 2 mailles endoit , un jeté que l'on fait a chaque debut de dos devant ? Et faut reprendre A1 après cela ? Je susis un peu perdue .Merci
01.08.2019 - 14:08DROPS Design answered:
Bonjour Maeva, vérifiez bien votre nombre de mailles avant ce premier tour puis au premier tour, vous devez avoir 3 mailles pour chacun des raglans (2 m end côté dos/devant + 1 m end côté manche). Le tour doit se terminer par 1 m end (maille du raglan manche) et il commence par les 2 m end du raglan du dos. Bon tricot!
07.08.2019 - 09:08
![]() Odile wrote:
Odile wrote:
Bonjour , J ai commencé ce joli modèle mais je suis deja perdue . Par ex quand on tricote en rond, a quelle partie correspond la premiere maille ? Dos ? Devant ? Et les augmentations du raglans , tous les deux tours , ca veut dire quoi ? Puisque dans un tour on fait plusieurs A1 a A3 ? Merci de vis explications , grace a vous j ai déjà pu tricoté 2 jolis gilets ! Cordialeemnt
08.07.2019 - 11:00DROPS Design answered:
Bonjour Odile, on commence par le dos (= 2 m end = raglan, 1 jeté, puis les diagrammes A.1, A.2, A.3, 1 jeté, 2 m raglan, marqueur) puis la manche (= 1 m end, 1 jeté, 15 m end, 1 jeté, 1 m end) et on répète ces mailles pour le devant (= comme pour le dos) et la 2ème manche. Augmenter tous les 2 tours signifie qu'après le 1er tour décrit, on tricote toutes les mailles comme elles se présentent (et comme dans les diagrammes), puis on augmente au tour suivant. Les augmentations se tricotent en jersey sur les manches et comme indiqué dans A.1/A.3 sur le devant et le dos. Bon tricot!
08.07.2019 - 11:29
![]() Elisabeth wrote:
Elisabeth wrote:
I'm knitting size S and I'm confused here: Yoke = room for 2 more repeats of A.2a in width. I do have 28 sts over on both sides but where to put those repeats? I don't seem to get is so it matches the pattern. Is it K2, yo, A1, A.2a, A.2a, A.2b, A.2a, A3, yo, K2? But that doesn't seem to match the pattern... Please help!
05.06.2019 - 21:55DROPS Design answered:
Dear Elisabeth, when A.2a, A.2b (= over 11 stitches = one repeat in width), A.3 have been worked one time in height, you will now repeat the diagrams in height: start with A.2a as before, and you have now enough stitches to repeat A.2b a total of 3 times (= 2 more times) before working A.3, ie repeat A.2b a total of 3 times in width, then finish with A.3. Happy knitting!
06.06.2019 - 10:01
![]() Katrien wrote:
Katrien wrote:
Beste, Graag wil ik het patroon breien maar met 2 naalden, kan je mij daar bij helpen? Kan ik gelijk welk patroon breien met 2 naalden? Pulls of vesten of topjes in het rondbreien zie ik niet zitten dit is precies wat te moeilijk voor mij. Ik brei nog steeds op de oude manier met 2 naalden. Je spreekt ook over het patroon van boven naar onder breien, bedoel je dan beginnen bij de hals? Dit is ook iets wat voor mij nieuw is! Graag hoor ik het en alvast bedankt! Groetjes Katrien
26.05.2019 - 22:43DROPS Design answered:
Dag Katrien,
Omdat dit patroon van boven naar beneden wordt gebreid (dus inderdaad bij de hals beginnen) heb je heel veel steken op de naald en dus is het niet geschikt om met rechte naalden te breien.
31.05.2019 - 16:11
![]() Sophie wrote:
Sophie wrote:
Bonjour , est ce que le dos est aussi en point fantaisie ou bien en jersey ? Merci !
29.04.2019 - 16:51DROPS Design answered:
Bonjour Sophie, le point fantaisie se trouve sur le dos et le devant. Bon tricot!
29.04.2019 - 17:23
![]() Joanna wrote:
Joanna wrote:
Witam! Moje pytanie dotyczy etapu wykonywania karczku. Czy narzut robimy w każdym okrążeniu powtarzając od *do* (Mam na myśli narzuty, o których mowa w instrukcji. Co do tych robionych w celu dodaniu oczka w kolejnym okrążeniu zgodnie z rozrysowanymi schematami nie mam wątpliwości) czy też robimy go co w co drugim okrążeniu? Skąd liczba 24 oczek (rozmiar S) na reglan dodawanych co dwa okrążenia?
13.04.2019 - 12:06DROPS Design answered:
Witaj Joanno! Narzuty na reglan są wykonywane do 2 okrążenia > jest dodanych 8 o. w każdym okrążeniu (od *do* dodane 4 o. x 2=8 o.). Oczka na reglan (na karczku ) są dodawane w rozmiarze S w sumie 24 razy, tzn. w okr. 1 dodajemy 8 o. na reglan, dalej w okr. 3 dodajemy 8 o., itd., a ostatni raz dodajemy o. na reglan w okr. 47 (24x8=192, 192+104=296 o.). Narzuty w schematach, na tyle i przodzie są wykonywane zgodnie ze schematami, np. w schemacie A.1 narzuty są w okr. 9,11,23 i 25, ale narzuty te nie zwiększają ogólnej liczby oczek w okrążeniu, ponieważ jednocześnie jest tam zamknięta taka sama liczba oczek jaka jest dodana. Powodzenia!
16.04.2019 - 00:23
![]() Monica wrote:
Monica wrote:
Buonasera, sono arrivata al punto in cui si rimettono le 65 m sui ferri a doppia punta per le maniche (taglia s) ma riprendendo solo 8m sotto la manica ho dei buchini ai lati, è possibile riprendere più di 8maglie? grazie.
10.04.2019 - 18:57DROPS Design answered:
Buonasera Monica, deve distribuire meglio la ripresa delle maglie in modo da avere meno buchi possibili. Se dovessero comunque rimanere si possono chiudere con un ago alla fine del lavoro. Buon lavoro!
10.04.2019 - 19:04
![]() Magda wrote:
Magda wrote:
Hej! To drobiazg, ale zapytam: w schemacie wzoru fantazyjnego A4 w następnym okrążeniu po przerobieniu dwóch oczek razem i narzucie przerabiam oczko przekręcone w miejscu narzutu czy normalnie? Wydaje mi się, że to drugie, żeby powstało ażurowe oczko. Poza tym to świetny wzór. Dzięki!
05.04.2019 - 23:08DROPS Design answered:
Witaj Magdo! Każdy drobiazg jest ważny, dobrze, że pytasz. Przerabiasz to oczko normalnie, czyli w następnym okrążeniu przerabiasz narzut na prawo, w tym miejscu powstanie dziurka. Miłej pracy!
06.04.2019 - 11:05
![]() Monica wrote:
Monica wrote:
Grazie, però non capisco come proseguire i diagrammi in verticale una volta completati tutti i ferri..
02.04.2019 - 09:42DROPS Design answered:
Buongiorno Monica. Deve assicurarsi che i motivo traforati siano correttamente incolonnati e distanziati tra loro, sia come numero di righe che come numero di maglie tra un motivo e l'altro. Lavora le altre maglie a maglia rasata. Buon lavoro!
02.04.2019 - 10:26
|
||||||||||||||||
Raspberry Kiss Jumper#raspberrykissjumper |
||||||||||||||||
 |
 |
|||||||||||||||
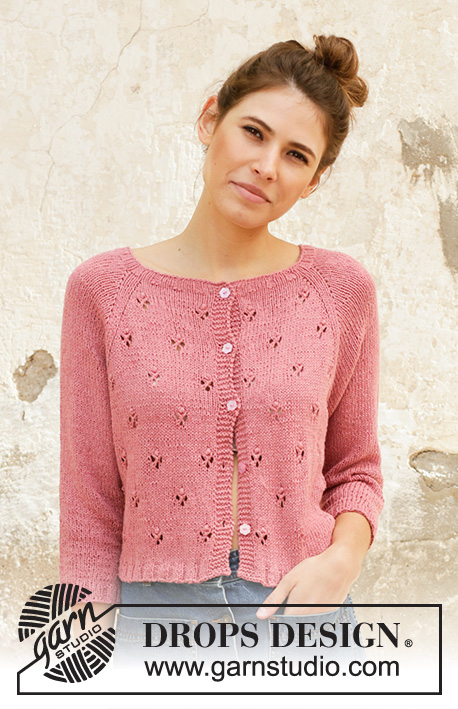
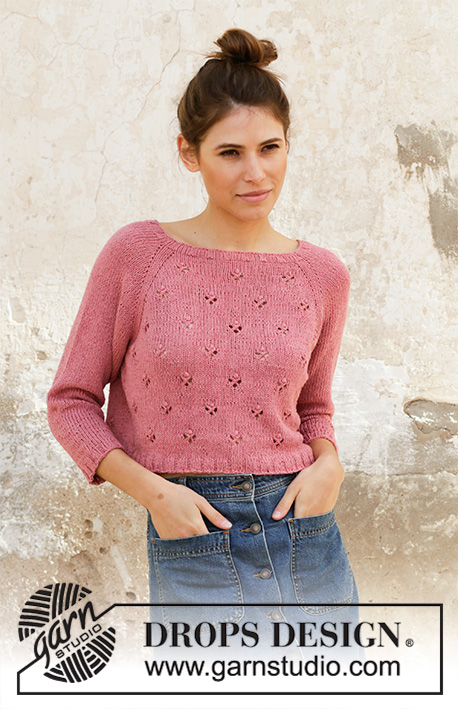
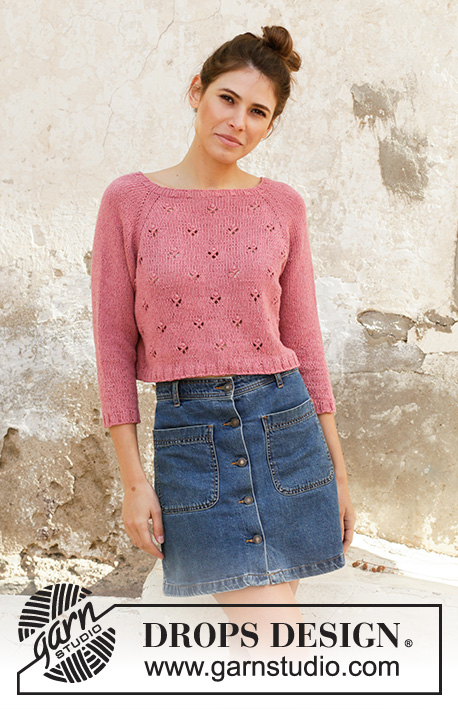
Knitted jumper with raglan in DROPS Belle. The piece is worked top down with lace pattern. Sizes S - XXXL.
DROPS 202-5 |
||||||||||||||||
|
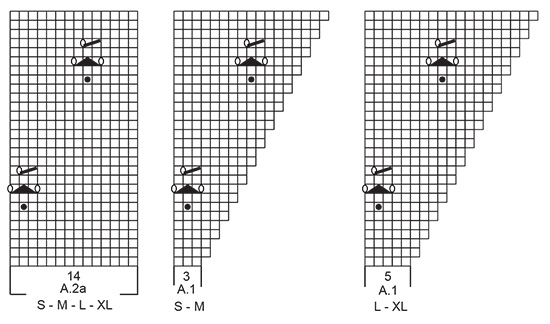
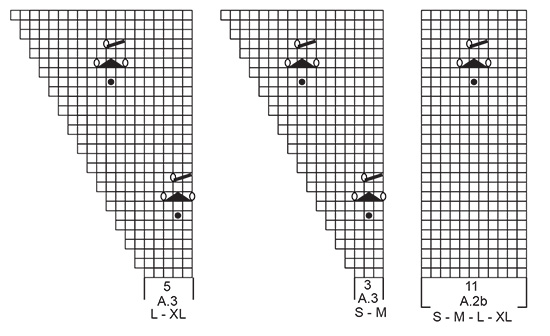
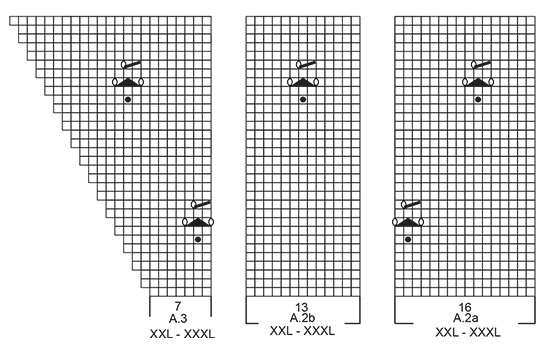
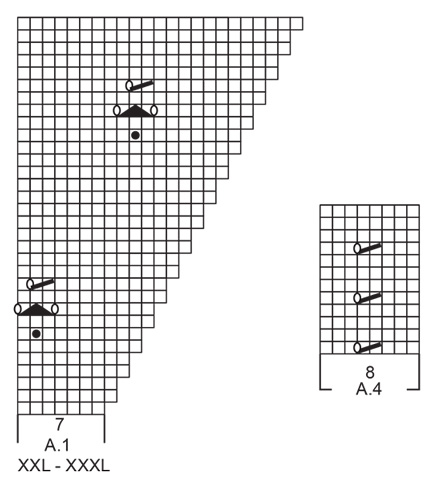
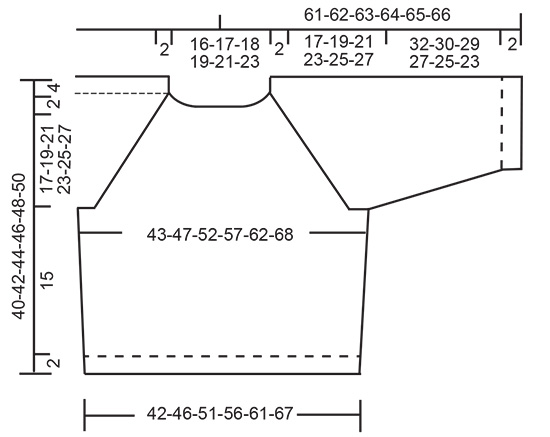
------------------------------------------------------- EXPLANATIONS FOR THE PATTERN: ------------------------------------------------------- PATTERN: See diagrams A.1 to A.4. Choose diagram for your size. DECREASE TIP-1 (evenly spaced): To work out how to decrease evenly, count the total number of stitches on the needle (e.g. 110 stitches) and divide by the number of decreases to be made (e.g. 6) = 18.3. In this example, decrease by knitting together approx. each 17th and 18th stitch. DECREASE TIP-2 (for body and sleeves): Decrease 1 stitch on each side of A.4 as follows: Work until there are 2 stitches left before A.4, knit 2 together, work A.4, slip 1 stitch as if to knit, knit 1 and pass the sipped stitch over the knitted stitch. INCREASE TIP (evenly spaced): To work out how to increase evenly, count the total number of stitches on the needle (e.g. 82 stitches) and divide by the number of increases to be made (e.g. 4) = 20.5. In this example, increase by making 1 yarn over after alternately each 20th stitch and each 21st stitch. On the next round knit the yarn overs twisted to avoid holes. RAGLAN: Increase 1 stitch on each side of the 3 knitted stitches in each transition between body and sleeves (= 8 stitches increased on round). Increase 1 stitch by making 1 yarn over. On the next round knit the yarn overs twisted to avoid holes. Then work the new stitches in stocking stitch on the sleeves and in pattern on front and back pieces. ------------------------------------------------------- START THE PIECE HERE: ------------------------------------------------------- JUMPER - SHORT OVERVIEW OF THE PIECE: The piece is worked in the round with circular needle, top down. The sleeves are worked in the round with short circular needle/double pointed needles, top down. JUMPER: NECK: Cast on 105-110-115-120-130-135 stitches with circular needle size 3 mm and Belle. Knit 1 round. Then work rib (knit 3, purl 2) for 2 cm. Knit 1 round where you decrease 1-6-3-8-2-7 stitches evenly spaced – read DECREASE TIP-1 = 104-104-112-112-128-128 stitches. YOKE: Change to circular needle size 4 mm. Work PATTERN – read description above, as follows: * Insert a marker thread here, knit 2, 1 yarn over, work A.1 over the next 3-3-5-5-7-7 stitches, A.2a over the next 14-14-14-14-16-16 stitches, A.2b over the next 11-11-11-11-13-13 stitches, A.3 over the next 3-3-5-5-7-7 stitches, 1 yarn over, knit 2 and insert a marker thread here (= back/front piece), knit 1, 1 yarn over, knit 15 , 1 yarn over, knit 1 (= sleeve) *, work from *-* 1 more time on the round. You have increased 8 stitches to RAGLAN – read description above. Continue this pattern in the round and increase to raglan every 2nd round a total of 24-26-29-32-35-38 times = 296-312-344-368-408-432 stitches. REMEMBER THE KNITTING TENSION. When A.1 to A.3 have been completed in height, continue the pattern in the same way; i.e. work A.1/A.3 towards each raglan on front/back piece; there is room for 2 more repeats of A.2a in width. When all the increases to raglan are finished, the piece measures approx. 19-21-23-25-27-29 cm from the cast-on edge and down mid front. The next round is worked as follows: NOTE: in sizes S and L the piece is now divided for sleeves and body at the marker threads. In sizes M, XL, XXL and XXXL work a few stitches (= 1-2-1-3 stitches) from the sleeves onto the needle for the body, so that the transition between body and sleeves is no longer by the marker threads: Work the first 83-88-97-105-118-126 stitches, place the next 65-67-75-77-85-87 stitches on a thread (= sleeve), cast on 8-10-12-12-12-14 new stitches on the needle (= in side under sleeve), work the next 83-89-97-107-119-129 stitches, place the next 65-67-75-77-85-87 stitches on a thread (= sleeve), cast on 8-10-12-12-12-14 new stitches on the needle (= in side under sleeve) and work the remaining 0-1-0-2-1-3 stitches on the round. THE PIECE IS NOW MEASURED FROM HERE! BODY: = 182-198-218-238-262-286 stitches. Work pattern A.4 (= 8 stitches) over the middle 8 stitches under the sleeves and continue with as many repeats of lace pattern in A.2a/A.2b as there is room for out towards the sides (the pattern should be directly over the pattern on the yoke!) and the remaining stitches are worked in stocking stitch. When the piece measures 4 cm decrease 1 stitch on each side of A.4 on each side – read DECREASE TIP-2 = 178-194-214-234-258-282 stitches. When the piece measures 15 cm – adjust so that you finish after a complete repeat of lace pattern in height (or a few rounds of stocking stitch if necessary) knit 1 round where you increase 27-31-36-41-47-48 stitches evenly spaced – read INCREASE TIP = 205-225-250-275-305-330 stitches. Change to circular needle size 3 mm. Work rib (knit 3, purl 2) for 2 cm. Cast off with knit over knit and purl over purl. Make sure the cast-off edge is not tight; you can increases a needle size when casting off if this is a problem. The jumper measures approx. 40-42-44-46-48-50 cm from the shoulder down. SLEEVE: Place the 65-67-75-77-85-87 stitches from the thread on one side of the piece on short circular needle/double pointed needles size 4 mm and knit up 1 stitch in each of the 8-10-12-12-12-14 stitches under the sleeve = 73-77-87-89-97-101 stitches. Continue in the round with stocking stitch and work A.4 over the middle 8 stitches under the sleeve. When the piece measures 4-4-3-3-3-2 cm decrease 2 stitches under the sleeve - remember DECREASE TIP-2. Decrease in the different sizes as follows: Size S: Decrease like this alternately every 2 and 3 cm a total of 11 times. Size M: Decrease like this every 2 cm a total of 12 times. Size L: Decrease like this on every 1.5 cm a total of 16 times. Size XL: Decrease like this every 1.5 cm a total of 16 times. Size XXL: Decrease like this every cm a total of 19 times. Size XXXL: Decrease like this every cm a total of 20 times. When all the decreases are finished there are 51-53-55-57-59-61 stitches on the needles. Continue working until the sleeve measures 32-30-29-27-25-23 cm. Now increase 4-7-5-8-6-9 stitches evenly spaced = 55-60-60-65-65-70 stitches. Change to double pointed needles size 3 mm. Work rib (knit 3, purl 2) for 2 cm. Cast off with knit over knit and purl over purl. Make sure the cast-off edge is not tight; you can increases a needle size when casting off if this is a problem. The sleeve measures approx. 34-32-31-29-27-25 cm. Work the other sleeve in the same way. |
||||||||||||||||
Diagram explanations |
||||||||||||||||
|
||||||||||||||||
 |
||||||||||||||||
 |
||||||||||||||||
 |
||||||||||||||||
 |
||||||||||||||||
 |
||||||||||||||||
Have you finished this pattern?Tag your pictures with #dropspattern #raspberrykissjumper or submit them to the #dropsfan gallery. Do you need help with this pattern?You'll find 27 tutorial videos, a Comments/Questions area and more by visiting the pattern on garnstudio.com. © 1982-2026 DROPS Design A/S. We reserve all rights. This document, including all its sub-sections, has copyrights. Read more about what you can do with our patterns at the bottom of each pattern on our site. |
||||||||||||||||


With over 40 years in knitting and crochet design, DROPS Design offers one of the most extensive collections of free patterns on the internet - translated to 17 languages. As of today we count 324 catalogues and 12290 patterns translated into English (UK/cm).
We work hard to bring you the best knitting and crochet have to offer, inspiration and advice as well as great quality yarns at incredible prices! Would you like to use our patterns for other than personal use? You can read what you are allowed to do in the Copyright text at the bottom of all our patterns. Happy crafting!
Post a comment to pattern DROPS 202-5
We would love to hear what you have to say about this pattern!
If you want to leave a question, please make sure you select the correct category in the form below, to speed up the answering process. Required fields are marked *.