
Popular categories
Looking for a yarn?


Comments / Questions (25)
![]() Miriam wrote:
Miriam wrote:
Me gustaría hacer este patrón pero solo con una hebra de Drops Air, ya que no lo quiero tan grueso. ¿Cómo podría hacerlo?
07.01.2026 - 13:33DROPS Design answered:
Hi Miria, Unfortunately we are not able to adjust our patterns to any individual requests. Should you need any individual assistance, please contact the store where you bought the yarn, even per mail or telephone. Happy knitting!
12.01.2026 - 11:35
![]() MelvinTob wrote:
MelvinTob wrote:
выигрывал онлайн казино
12.11.2023 - 06:10
![]() Agata wrote:
Agata wrote:
Dzień dobry, Dlaczego przy podwyższeniu dekoltu, jak obracam robotkę, i robię 10 oczek lewych ostatnich i zaczynam karczek to robi się dziurka ? Może trzeba przerobić wszystkie oczka w okrążeniu? I potem robić karczek. Nie mogę tego zapisu zrozumieć, ostatniego etapu podwyższania dekoltu, j początku karczka. pozdrawiam
06.10.2022 - 00:37DROPS Design answered:
Witaj Agato, jak obracasz robótkę w środku rzędu (tak jak w przypadku podwyższenia dekoltu z tyłu) wykonujesz klasyczne rzędy skrócone. Nie przerabiaj pierwszego oczka po obróceniu robótki, tylko przełóż je na prawy drut i mocno zaciśnij nitkę, wtedy dziurka (uskok między 2 rzędami) będzie mniejsza i słabiej widoczna. Zobacz video TUTAJ. Pozdrawiamy!
06.10.2022 - 08:14
![]() Laura wrote:
Laura wrote:
I tried to follow your yarn sub instructions but I can’t do the maths! Would this need 9 or 17 balls of Andes for Med/Lge please? Neither answer seems right to me.
08.02.2022 - 19:02DROPS Design answered:
Dear Laura, in size M, 450 g DROPS Air worked with 2 strands will give you 751 g DROPS Andes /100 g a ball = 7.5 = 8 balls Andes in M; and in L the 500 g Air will be 834 g Andes = 9 balls. - read more on the yarn converter here. Happy knitting!
09.02.2022 - 08:42
![]() Nancy Elliott wrote:
Nancy Elliott wrote:
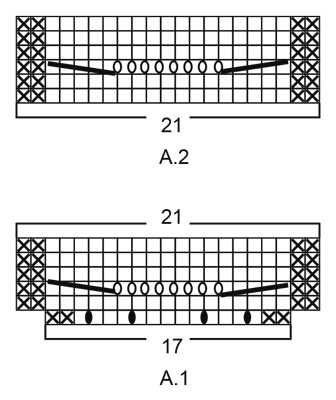
Children's Pattern 34-4 Clover I am having a difficult time following the pattern for the front of this sweater. I have tried everything I can think of and can not get it to fit the diagram. I can not find the video to see how to do it with the yarn over increases. the A1 row 1 is 2 purl k1 yo 1 k3 yo k5 yo 1 k3 yo 1 . Is there any where I can find the video on how to do it correctly? k1 purl 2 that is to 17 stitches without the increases
12.11.2021 - 09:36DROPS Design answered:
Dear Mrs Elliott, in this pattern A.1 is worked over 17 sts as you described increasing in the knit sts so that there are a total of 21 sts (= P2, K17, P2) in A.1. Can this help?
12.11.2021 - 14:08
![]() Anne wrote:
Anne wrote:
J'ai déjà réalisé ce pull en taille enfant, avec un seul fil air. Comment le faire en taille adulte avec un seul fil également ? Merci par avance pour votre réponse.
20.10.2021 - 09:48DROPS Design answered:
Bonjour Anne, avec 1 seul fil Air votre tension sera différente, il vous faudra recalculer complètement ce modèle pour l'adapter à votre échantillon et aux mesures souhaitées; nous ne sommes malheureusement pas en mesure de pouvoir adapter chacun de nos modèles à chaque demande; vous pouvez vous inspirer d'un modèle existant avec l'échantillon que vous souhaitez - votre magasin pourra probablement vous aider, même par mail ou téléphone. Merci pour votre compréhension, bon tricot!
20.10.2021 - 14:57
![]() David González Gude wrote:
David González Gude wrote:
Hola. En las vueltas cortas para la forma del cuello, en un lado llegan hasta el delantero, mientras en el otro solamente llegan al centro de la manga. He leído como los comentarios anteriores al respecto y creo que el diseñador no está dando respuestas adecuadas. Algo comprensible al ser gratuito el patrón. Alguna idea para que esas vueltas cortas queden equilibradas en ambos lados? Hay una vuelta más en un lado que en el otro.
18.02.2021 - 09:19DROPS Design answered:
Hola David, las vueltas cortas son equilibradas en ambos lados. Trabajas cada vez 6 puntos mas y al final tienes 18 puntos de cado lado del centro de la espalda. Despues trabajar 10 puntos de revés y mover el mercador aqui. Buen trabajo!
19.02.2021 - 10:22
![]() Annika wrote:
Annika wrote:
Stickar storlek L. Har kommit till uppdelningen till ärmar och bak/framstycke, ser att antalet maskor i beskrivningen inte riktigt stämmer. 57 m till bakstycke, ärmar 43 m och framstycke 63 m blir 206 m totalt inte 208. Dessutom har man 45 mossstickade m till ärm (9+18+18) och endast 61 slätstickade m till framstycke (17+4+18+18+4 (raglanmaskorna)). Då har jag antagit att man inte vill använda några av de mossstickade m till framstycket eller har jag fel?
31.01.2020 - 13:45DROPS Design answered:
Hej Du har även 2 maskor i slätstickning till bakstycket: "sticka de sista 1-1-2-3-4-5 maskorna i slätstickning (= på bakstycket)", då ska du få antalet maskor att stämma på varvet. Efter att oket är färdigstickat och du börjar på fram- & bakstycket så stickas en del av de tidigare ärmmaskorna som en del av fram & bakstycket, dvs i slätstickning. Lycka till!
05.02.2020 - 07:35
![]() Susanne Damgaard wrote:
Susanne Damgaard wrote:
Hej igen. Til andre der ønsker at strikke denne sweater, vil jeg gøre opmærksom på at der er en lille fejl i opskriften. Det drejer sig om afsnittet “Forhøjning bag i nakken”. På næstsidste linje i afsnittet står der ...”strik derefter 10 masker vrang forbi mærket, vend.” Det skal ikke være 10 m, men istedet 18 m for at man kan få forhøjningen i midten af nakken. Mvh Susanne Damgaard
12.01.2020 - 16:01DROPS Design answered:
Hej Susanne, De sidste 10 masker strikkes fra midt bagpå, for at komme hen til overgangen mellem ærmet og bagstykket, så det stemmer med det som står i opskriften. God fornøjelse!
31.01.2020 - 10:51
![]() Lucia wrote:
Lucia wrote:
Posso sapere come è il dietro del maglione? manca la foto grazie
14.11.2019 - 12:36DROPS Design answered:
Buongiorno Lucia. Il dietro è lavorato a maglia rasata. Buon lavoro!
14.11.2019 - 14:52
|
|||||||||||||||||||
Clover#cloversweater |
|||||||||||||||||||
 |
 |
||||||||||||||||||
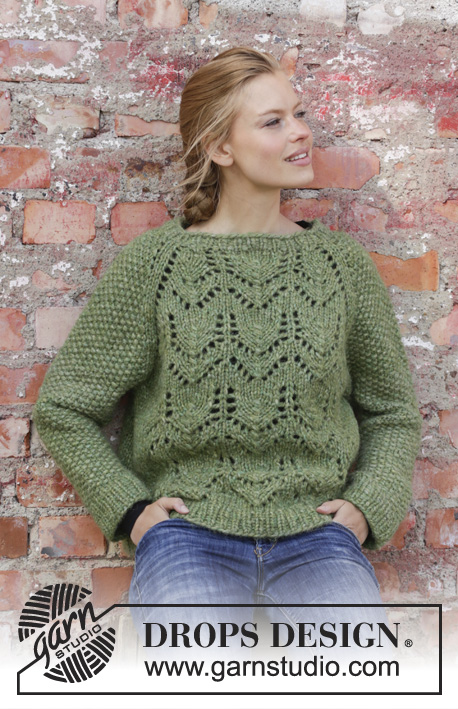
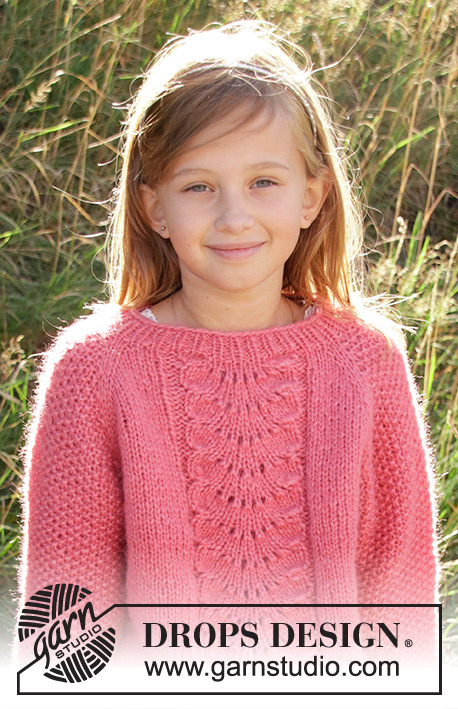
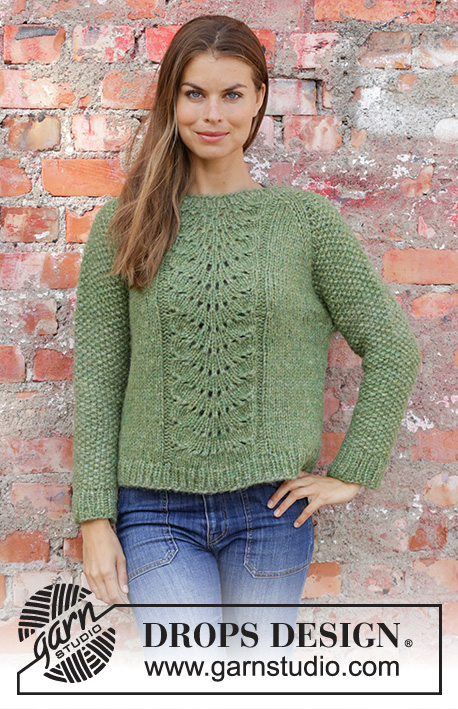
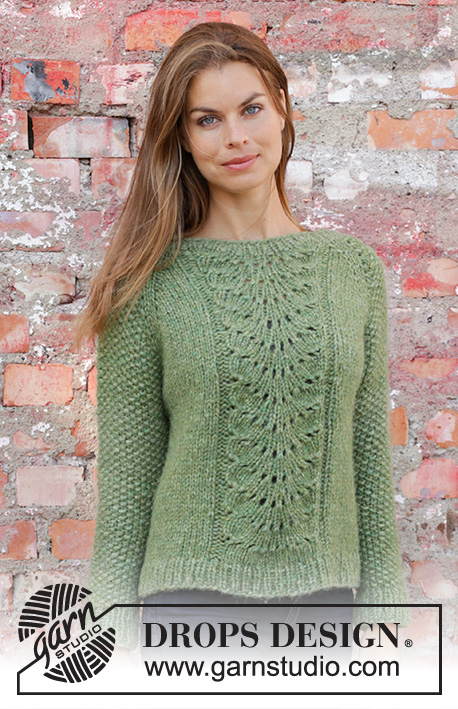
Knitted jumper with raglan in 2 strands DROPS Air. The piece is worked top down with wave pattern and moss stitch. Sizes S - XXXL.
DROPS 196-4 |
|||||||||||||||||||
|
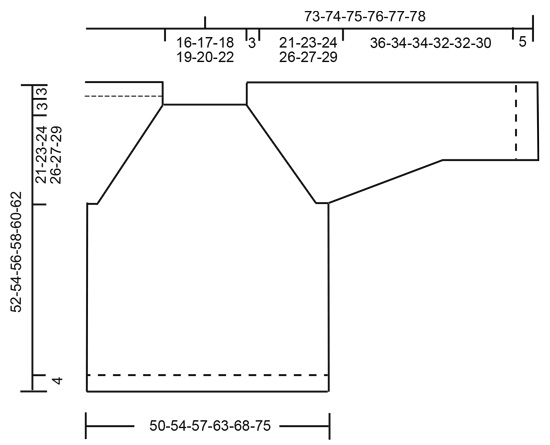
------------------------------------------------------- EXPLANATIONS FOR THE PATTERN: ------------------------------------------------------- INCREASE/DECREASE TIP (evenly spaced): To work out how to increase/decrease evenly, count the total number of stitches on the needle (e.g. 50 stitches) and divide by the number of increases/decreases to be made (e.g. 6) = 8.3. In this example, increase by making 1 yarn over after approximately each 8th stitch. On the next round work the yarn overs twisted to avoid holes. When decreasing, in this example, knit each 7th and 8th stitch together (approx.). MOSS STITCH: ROUND 1: * Knit 1, purl 1 *, work from *-*. ROUND 2: Knit over purl and purl over knit. Repeat round 2. PATTERN: See diagrams A.1 and A.2. RAGLAN: Increase 1 stitch on each side of the 2 knitted stitches in each transition between body and sleeves (= 8 stitches increased on round). Increase 1 stitch by making 1 yarn over. On the next round work the yarn overs twisted to avoid holes. Then work the new stitches in moss stitch on the sleeves and in stocking stitch on the front and back pieces. DECREASE TIP (for sleeves): Decrease 1 stitch on each side of the marker thread as follows: Work until there is 1 stitch left before the marker thread, knit 3 together = 1 stitch (move marker thread to before this stitch). ------------------------------------------------------- START THE PIECE HERE: ------------------------------------------------------- JUMPER - SHORT OVERVIEW OF THE PIECE: The piece is worked in the round with circular needle, top down. You can work an elevation in the back of the neck for a better fit, so that the yoke is slightly higher at the back. This elevation can be left out; the neck is then the same front and back – read description of elevation further down the text. After the yoke the body is worked in the round with circular needle. The sleeves are worked in the round with short circular needle/double pointed needles. NECK: Cast on 50-50-52-56-58-60 stitches with circular needle size 7 mm and 2 strands Air. Knit 1 round. Then work rib (= knit 1 / purl 1) for 3 cm. Knit 1 round where you increase 6-6-8-4-6-0 stitches evenly on round – read INCREASE/DECREASE TIP = 56-56-60-60-64-60 stitches. Change to circular needle size 8 mm. Now you can work an elevation in the back of the neck or go straight to yoke if you do not want an elevation. ELEVATION IN BACK OF NECK: Skip this section if you do not want an elevation. Insert 1 marker at the beginning of the round (mid back). Start from the right side and knit 6-6-6-7-7-7 stitches past the marker, turn, tighten the strand and purl 12-12-12-14-14-14 stitches. Turn, tighten the strand and knit 18-18-18-21-21-21 stitches, turn, tighten the strand and purl 24-24-24-28-28-28 stitches. Turn, tighten the strand and knit 30-30-30-35-35-35 stitches, turn, tighten the strand and purl 36-36-36-42-42-42 stitches, turn, tighten strand and knit to mid back. Turn, tighten strand and purl 10 stitches past the marker, turn. Start the next round (i.e. the yoke) here. YOKE: Insert 1 marker here - THE PIECE IS NOW MEASURED FROM HERE! Now insert 4 marker threads in the piece as follows (without working the stitches): Insert the first marker thread at the beginning of the round (= in transition between sleeve and back piece), 2nd marker thread is inserted after the next 19 stitches (= back piece), 3rd marker thread is inserted after the next 9-9-11-11-13-11 stitches (= sleeve) and 4th marker thread is inserted after the next 19 stitches (= front piece). There are 9-9-11-11-13-11 stitches left to the first marker thread (= sleeve). The next round is worked as follows: The round starts at the first marker thread, in the transition between sleeve and back piece. Knit 1, make 1 yarn over, work 17 stitches in stocking stitch (= back piece), make 1 yarn over, knit 2 (the marker thread sits in the middle of these 2 stitches), make 1 yarn over, work 7-7-9-9-11-9 stitches MOSS STITCH – read description above (= sleeve), make 1 yarn over, knit 2 (the marker thread sits in the middle of these 2 stitches), make 1 yarn over, work A.1 (= 17 stitches = front piece), make 1 yarn over, knit 2 (the marker thread sits in the middle of these 2 stitches), make 1 yarn over, work 7-7-9-9-11-9 stitches in moss stitch (= sleeve), make 1 yarn over, knit 1. The first increase to RAGLAN – read description above, is now finished (= 8 stitches increased on the round). Continue this pattern and increase to raglan every 2nd round a total of 15-17-18-19-20-22 times (including the first round described above). NOTE: When A.1 has been completed in height, work A.2 (= 21 stitches) over A.1. RepeatA.2 in height to finished length. REMEMBER THE KNITTING TENSION! After the last increase to raglan there are 180-196-208-216-228-240 stitches on the needle. Continue with pattern as before, without increases, until the piece measures 21-23-24-26-27-29 cm from the marker at the beginning of the yoke. The next round is worked in pattern and stocking stitch as before as follows: Work 50-54-57-60-63-68 stitches in stocking stitch (= on back piece), place the next 37-41-43-43-45-45 stitches on 1 thread for sleeve, cast on 4-4-4-6-8-10 new stitches on the needle (= in side under sleeve), continue with stocking stitch and pattern as before over the next 55-59-63-67-71-77 stitches (= front piece), place the next 37-41-43-43-45-45 stitches on 1 thread for sleeve, cast on 4-4-4-6-8-10 new stitches on the needle (= in side under sleeve), work the last 1-1-2-3-4-5 stitches in stocking stitch (= on back piece). Body and sleeves are finished separately. THE PIECE IS NOW MEASURED FROM HERE! BODY: = 114-122-130-142-154-170 stitches. Insert a marker thread in the middle of the 4-4-4-6-8-10 new stitches cast on under the sleeve in each side. Start the round by one of the marker threads and allow the marker threads to follow your work onwards. Continue with stocking stitch and pattern A.2. When the piece measures 24-24-25-25-26-26 cm from the division (approx. 48-50-52-54-56-58 cm from the shoulder) knit 1 round where you increase 16-18-18-20-22-24 stitches evenly on round = 130-140-148-162-176-194 stitches. Change to circular needle size 7 mm and work rib (= knit 1 / purl 1) for 4 cm. Cast off with knit over knit and purl over purl – to avoid the cast-off edge being tight, you can cast off with a needle size 8 mm. The jumper measures approx. 52-54-56-58-60-62 cm from the shoulder. SLEEVE: Place the 37-41-43-43-45-45 stitches from the thread on the one side of the piece on short circular needle or double pointed needles size 8 mm and knit up 1 stitch in each of the 4-4-4-6-8-10 stitches cast on under the sleeve = 41-45-47-49-53-55 stitches. Insert 1 marker thread in the middle of the 4-4-4-6-8-10 stitches under the sleeve and start the round here. Work moss stitch. When the piece measures 2 cm from the division, decrease 2 stitches mid under sleeve - read DECREASE TIP. Decrease like this every 4-3½-2½-3-2-2 cm a total of 7-8-9-9-11-11 times = 27-29-29-31-31-33 stitches. Continue working until the piece measures 36-34-34-32-32-30 cm from the division (shorter measurements in larger sizes due to longer yoke). Knit 1 round where you increase 5 stitches evenly on round = 32-34-34-36-36-38 stitches. Change to double pointed needles size 7 mm and work rib (=knit 1/ purl 1) for 5 cm. The sleeve measures approx. 41-39-39-37-37-35 from the division. Cast off with knit over knit and purl over purl - to avoid the cast-off edge being tight, you can cast off with a needle size 8 mm. Work the other sleeve in the same way. |
|||||||||||||||||||
Diagram explanations |
|||||||||||||||||||
|
|||||||||||||||||||
 |
|||||||||||||||||||
 |
|||||||||||||||||||
Have you finished this pattern?Tag your pictures with #dropspattern #cloversweater or submit them to the #dropsfan gallery. Do you need help with this pattern?You'll find 31 tutorial videos, a Comments/Questions area and more by visiting the pattern on garnstudio.com. © 1982-2026 DROPS Design A/S. We reserve all rights. This document, including all its sub-sections, has copyrights. Read more about what you can do with our patterns at the bottom of each pattern on our site. |
|||||||||||||||||||


With over 40 years in knitting and crochet design, DROPS Design offers one of the most extensive collections of free patterns on the internet - translated to 17 languages. As of today we count 324 catalogues and 12290 patterns translated into English (UK/cm).
We work hard to bring you the best knitting and crochet have to offer, inspiration and advice as well as great quality yarns at incredible prices! Would you like to use our patterns for other than personal use? You can read what you are allowed to do in the Copyright text at the bottom of all our patterns. Happy crafting!
Post a comment to pattern DROPS 196-4
We would love to hear what you have to say about this pattern!
If you want to leave a question, please make sure you select the correct category in the form below, to speed up the answering process. Required fields are marked *.