
Popular categories
Looking for a yarn?


Comments / Questions (35)
![]() Elinor wrote:
Elinor wrote:
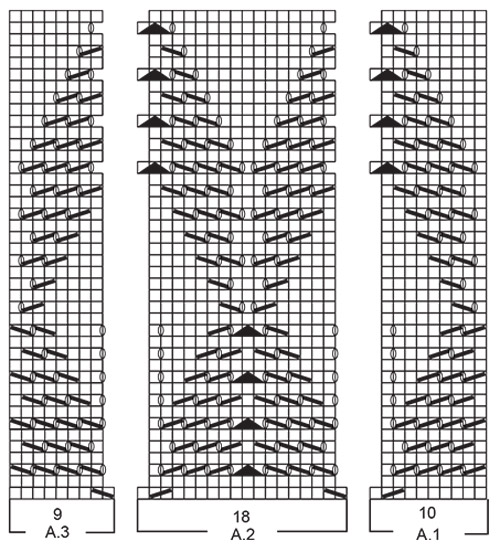
Når jeg starter med 99 m og skal strikke 1. pind, står der jeg skal strikke: 4 m ret, så mønster A.1 (10 masker, A2 18 masker dette er 28 m i alt. Derefter skal jeg strikke A 3. Alt dette skal jeg strikke på kun 99 m Hvordan kan jeg det? MVH Elinor Poulsen
14.02.2026 - 09:22
![]() Karina Pichl wrote:
Karina Pichl wrote:
Gibt es vom Rückenteil auch ein Bild. Wenn ich es recht verstehe, wird der Rücken glatt rechts gestrickt, mit 1 Musterfolge am Anfang?
20.05.2025 - 11:05DROPS Design answered:
Liebe Frau Pichl, wir haben für Rückenteil kein Bild, das Lochmuster wird wie beim Vorderteil gestrickt, nun die ganze Breite mit Lochmuster (und nicht mit krausrechten Maschen in der Mitte wie beim Vorderteil - z.B. A.9 anstatt A.7) - folgen Sie nur die Diagramme wie beschrieben. Viel Spaß beim Stricken!
20.05.2025 - 13:20
![]() Guylaine Rondeau wrote:
Guylaine Rondeau wrote:
Bonjour, je désire vous partager une photo mais je ne sais pas comment Faire pour le lien et transmettre la photo. MERCI
04.05.2025 - 03:24DROPS Design answered:
Bonjour Mme Rondeau, vous pourrez partager vos photos avec nous comme indiqué ici, vous pouvez indiquer le lien de l'endroit où vous avez publié votre photo: Ravelry, Facebook, Instagram, etc.. Merci d'avance!
05.05.2025 - 07:41
![]() Guylaine Rondeau wrote:
Guylaine Rondeau wrote:
Bonjour, serait-il possible de voir une photo de ce modèle de dos, cat il y a beaucoup de détails dans la description du dos.. je suis une personne visuelle ce qui m aiderait a comprendre le descriptif du patron. Cordiale merci Merci
24.04.2025 - 02:06DROPS Design answered:
Bonjour Mme Rondeau, nous n'avons pas d'autres photos de ce modèle; le dos ressemble au devant, à la différence des côtes mousse qu'il y a au milieu du devant, on aura le point ajouré au milieu du dos. Suivez bien les diagrammes indiqué pour chaque partie, devants et dos. Bon tricot!
24.04.2025 - 08:55
![]() Guylaine Rondeau wrote:
Guylaine Rondeau wrote:
Bonjour, après le 1er 10cm on doit augmenter de 8m à la fin du rg envers. Ce qui donne 61m au totale. Au début de l autre rang endroit on doit continuer sur les 24 m suivantes...avantde faire le motif de 7a...ma question est qu il y a 23 mailles après les 4 mailles de la bordure. Pouvez-vous m expliquer que faire. Merci
09.04.2025 - 00:28DROPS Design answered:
Bonjour Mme Rondeau, vous tricotez désormais ainsi sur l'endroit, en commençant par les 8 nouvelles mailles (bordure manche): 4 m point mousse, A.5a, puis vous tricotez A.5b comme avant et terminez par A.5c, A.6 et A.7 exactement comme avant, vous avez juste plus de mailles au point ajouré en début de rang sur l'endroit, et les 4 premières des 8 nouvelles mailles se tricotent au point mousse (et les 4 m tricotées au point mousse avant se tricotent désormais au point ajouré). Bon tricot!
09.04.2025 - 08:43
![]() Guylaine Rondeau wrote:
Guylaine Rondeau wrote:
Au devant gauche on tricote: 4m point mousse,A5a(2m), A5b(4m), au dessus des 16m suivantes,A5c(3m),A6(5m), A7a(23m) Continuer ainsi...je ne comprends pas comment arriver à 53 m...ça veux dire quoi CONTINUER AINSI... Si vous pouvez m expliquer la suite ça serait très apprécié. Merci
07.04.2025 - 00:43DROPS Design answered:
Bonjour Mme Rondeau, lorsque l'ouvrage mesure 10 cm depuis que l'on tricote le devant gauche seul, on monte 8 mailles à la fin du rang suivant sur l'envers pour la bordure de manche, cf vidéo ou - leçon pour savoir comment monter ces mailles; continuer ainsi signifie continuez à tricoter les mailles comme indiqué auparavant. Bon tricot!
07.04.2025 - 09:35
![]() Anita Albech wrote:
Anita Albech wrote:
Mit spørgsmål går på hvad der menes med " 4 gange i bredden" : Strik mønster således: 4 masker retstrik, A.1 (= 10 masker), A.2 (= 18 masker) 4-5-6-7 gange i bredden, A.3 (= 9 masker), 4 masker retstrik.
30.01.2025 - 08:55DROPS Design answered:
Hej Anita. Det betyder att du stickar A.2 4 gånger efter varann, så du stickar alltså: 4 masker retstrik, A.1, A.2, A.2, A.2, A.2, A.3, 4 masker retstrik. Mvh DROPS Design
30.01.2025 - 14:13
![]() Marianne Fischer wrote:
Marianne Fischer wrote:
Dette er ikke gennem tænkt Aldrig har det været så umuligt at forstå en opskrift. Diagram på øverste del fronter splittet i så mange dele med forskellige pinde og gentagelser, det er en ommer. Jeg frygter ryggen da der ikke er visuelt billede. Spild af penge til garn desværre.
01.09.2024 - 12:46
![]() María wrote:
María wrote:
Hola, en la espalda, cuando los diagramas A5 abc, A6 y A8 abc se repiten en vertical hasta completar todo A9? O esos puntos se realizan en punto jersey. En el patrón no lo veo claro. Gracias
02.05.2024 - 20:57DROPS Design answered:
Hola María, sí, se mantiene el patrón, con A.5, A.6, A.8, hasta haber repetido A.9b 3 veces en vertical.
05.05.2024 - 20:31
![]() Liliy wrote:
Liliy wrote:
I see the garter stitch on both sides after separating the left from right on diagram and Photo but in the pattern it’s not mentioned.Plus I can’t imagine only one sided garter border.
09.07.2023 - 16:46DROPS Design answered:
Dear Lilly, these garter stitches are included in diagrams A.7.a (right front piece) and A.7b (left front piece). Happy knitting!
28.07.2023 - 09:22
|
||||||||||||||||||||||||||||
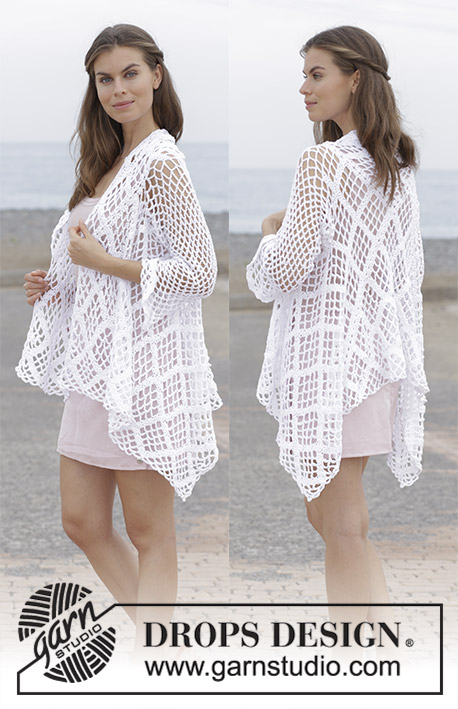
Portofino#portofinotunic |
||||||||||||||||||||||||||||
|
|
||||||||||||||||||||||||||||
Knitted tunic with lace pattern and vent in the sides. Size: S - XXXL Piece is knitted in DROPS Paris.
DROPS 187-16 |
||||||||||||||||||||||||||||
|
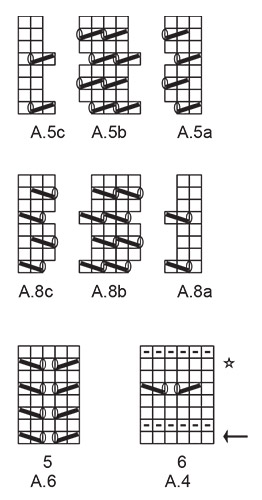
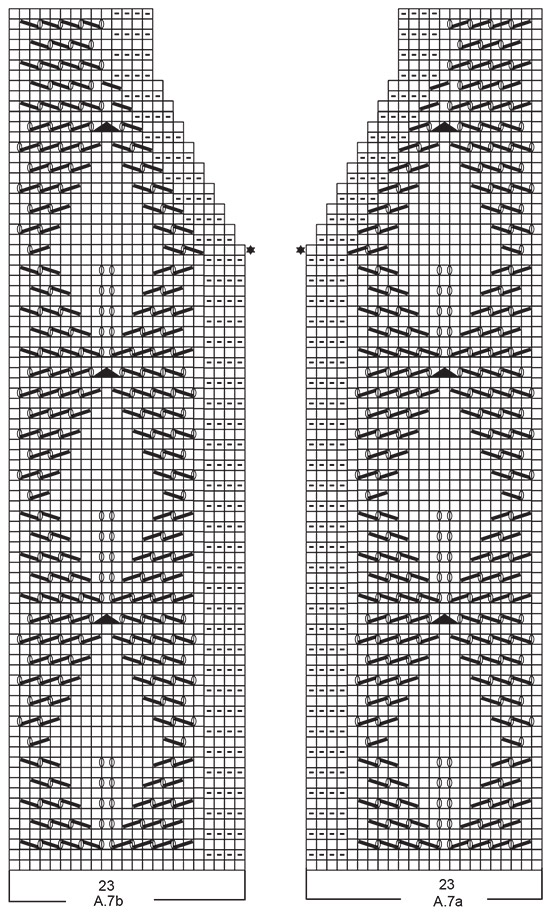
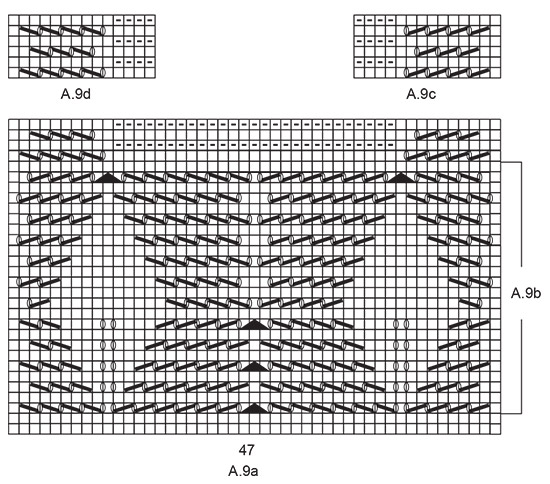
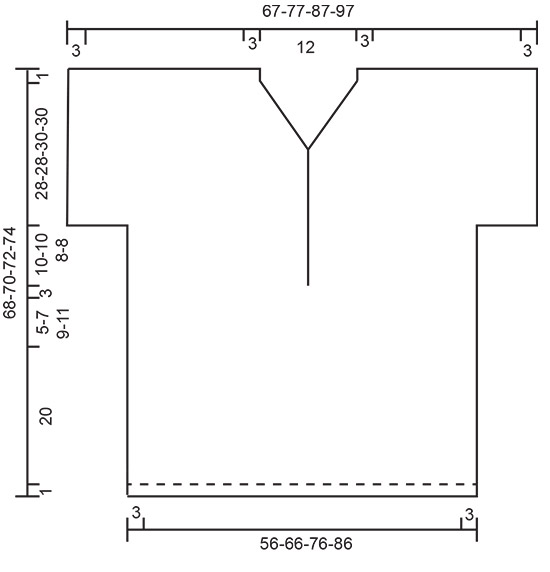
INFORMATION FOR PATTERN: GARTER STITCH (back and forth): 1 ridge = knit 2 rows. PATTERN: See diagrams A.1 to A.9. Diagrams show all rows in pattern seen from the right side. DECREASE TIP: Decrease 1 stitch by knitting 2 together. INCREASE TIP: Increase 1 stitch by making a yarn over. On next row work yarn overs twisted to avoid holes. KNITTING TIP: To make the band lay nicely where decrease for neck begins work a short row over the outermost 4 stitches in garter stitch towards mid front. When working A.7a work the short row from right side of piece as follows: Work all stitches on needle, turn and knit over the 4 stitches in band, turn, knit over the 4 stitches in band, turn and work back over all stitches. When working A.7b work the short row from right side of piece as follows: Knit over the 4 stitches in band, turn and knit over the 4 stitches in band, turn and work as before over all stitches. ---------------------------------------------------------- TUNIC: Piece is worked back and forth bottom up in parts and sewn together when finished. FRONT PIECE: Cast on 99-117-135-153 stitches on circular needle size 5 mm with Paris. Work 2 ridges in GARTER STITCH - see explanation above. Work pattern as follows: 4 stitches in garter stitch, A.1 (= 10 stitches), A.2 (= 18 stitches) 4-5-6-7 times in width, A.3 (= 9 stitches), 4 stitches in garter stitch. After first row in A.1 to A.3 there are 89-105-121-137 stitches on needle. REMEMBER THE KNITTING TENSION! When A.1 to A.3 have been worked, continue with stocking stitch and 4 stitches in garter stitch in each side until piece measures 26-28-30-32 cm. Now work pattern, AT THE SAME TIME on first row decrease 2-0-4-2 stitches evenly – read DECREASE TIP (but not over stitches in garter stitch) as follows: 4 stitches in garter stitch, A.4 until 5 stitches remain, work first stitch in A.4, 4 stitches in garter stitch = 87-105-117-135 stitches. On next to last row in A.4 increase 3-1-5-3 stitches evenly – read INCREASE TIP (but not over stitches in garter stitch) = 90-106-122-138 stitches. Work last row from wrong side as follows: Work the first 45-53-61-69 stitches before slipping them on a stitch holder for right front piece. Continue over the last 45-53-61-69 stitches (= left front piece). LEFT FRONT PIECE: = 45-53-61-69 stitches. Insert a marker thread here. NOW MEASURE PIECE FROM HERE! Work pattern from right side as follows: 4 stitches in garter stitch, A.5a (= 2 stitches), A.5b (= 4 stitches) over the next 8-16-24-32 stitches, A.5c (= 3 stitches), A.6 (= 5 stitches), A.7a (= 23 stitches). Continue pattern like this. When piece measures 10-10-8-8 cm, cast on 8 new stitches at the end of next row from wrong side = 53-61-69-77 stitches. Continue pattern from right side as follows: 4 stitches in garter stitch, A.5a, A.5b over the next 16-24-32-40 stitches, and continue A.5c, A.6 and A.7a as before. On row with star in A.7a work a short row so that band lays nicely - read KNITTING TIP! When entire A.7a has been worked vertically, there are 44-52-60-68 stitches for shoulder and piece measures approx. 38 cm in all sizes. Work 1 ridge over all stitches. Cast off - make sure that the cast-off edge is not too tight! Piece measures approx. 68-70-72-74 cm from shoulder and down. RIGHT FRONT PIECE: = 45-53-61-69 stitches. Insert a marker thread here. NOW MEASURE PIECE FROM HERE! Work pattern from right side as follows: A.7b (= 23 stitches), A.6 (= 5 stitches), A.8a (= 3 stitches), A.8b (= 4 stitches) over the next 8-16-24-32 stitches, A.8c (= 2 stitches), 4 stitches in garter stitch. Continue pattern like this. When piece measures 10-10-8-8 cm, cast on 8 new stitches at the end of next row from right side = 53-61-69-77 stitches. Work 1 row in pattern as before but knit over the new stitches cast on. Continue pattern from right side as follows: A.7b, A.6 (= 5 stitches), A.8a, A.8b over the next 16-24-32-40 stitches, A.8c, 4 stitches in garter stitch. On row with star in A.7b work a short row the same way as on left band but reversed, so that band lays nicely - remember KNITTING TIP! When entire A.7b has been worked vertically, there are 44-52-60-68 stitches for shoulder and piece measures approx. 38 cm in all sizes. Work 1 ridge over all stitches. Cast off - make sure that the cast-off edge is not too tight! Piece measures approx. 68-70-72-74 cm from shoulder and down. BACK PIECE: Cast on and work the same way as on front piece until A.4. Piece now measures 26-28-30-32 cm. Now work pattern, AT THE SAME TIME on first row decrease 2-0-4-2 stitches evenly (but not over stitches in garter stitch) as follows: 4 stitches in garter stitch, A.4 until 5 stitch remain, work first stitch in A.4, 4 stitches in garter stitch = 87-105-117-135 stitches. On next to last row in A.4 increase 4-2-6-4 stitches evenly = 91-107-123-139 stitches. When entire A.4 is done, insert a marker thread here. NOW MEASURE PIECE FROM HERE! Work pattern as follows: 4 stitches in garter stitch, A.5a (= 2 stitches), A.5b (= 4 stitches) over the next 8-16-24-32 stitches, A.5c (= 3 stitches), A.6 (= 5 stitches), A.9a (= 47 stitches), A.6 (= 5 stitches), A.8a (= 3 stitches), A.8b (= 4 stitches) over the next 8-16-24-32 stitches, A.8c (= 2 stitches), 4 stitches in garter stitch. When the first 2 rows in A.9a have been worked, repeat A.9b 3 times in total vertically, AT THE SAME TIME when piece measures 10-10-8-8 cm, cast on 8 new stitches at the end of the next 2 rows for sleeves = 107-123-139-155 stitches. Continue pattern as follows from right side: 4 stitches in garter stitch, A.5a (= 2 stitches), A.5b (= 4 stitches) over the next 16-24-32-40 stitches, A.5c (= 3 stitches), A.6 (= 5 stitches), A.9a (= 47 stitches), A.6 (= 5 stitches), A.8a (= 3 stitches), A.8b (= 4 stitches) over the next 16-24-32-40 stitches, A.8c (= 2 stitches), 4 stitches in garter stitch. When A.9b has been done 3 times in total vertically, work the last 4 rows in diagram A.9a. Work next row from right side as follows: Work pattern as before over the first 30-38-46-54 stitches, work A.9c (= 14 stitches), and slip these 44-52-60-68 stitches on a stitch holder (= right shoulder), cast off the next 19 stitches for neck, work A.9d (= 14 stitches), work the last 30-38-46-54 stitches as before. Now work back and forth over the last 44-52-60-68 stitches worked after decrease for neck (= left shoulder). Continue back and forth until A.9d has been worked vertically. Work 1 ridge over all the 44-52-60-68 stitches. Cast off - make sure that the cast-off edge is not too tight! Piece measures approx. 68-70-72-74 cm from shoulder and down. Slip the 44-52-60-68 stitches from stitch holder back on circular needle size 5 mm and continue pattern back and forth until A.9c has been worked. Work 1 ridge over all the 44-52-60-68 stitches. Cast off - make sure that the cast-off edge is not too tight. Piece measures approx. 68-70-72-74 cm from shoulder and down. ASSEMBLY: Sew shoulder seams with grafting/kitchener stitch - make sure the seam is not tight. Sew seam under sleeves and continue down the body until first row in A.4 to make a vent in the side from A.4 and down. Repeat in the other side. Sew band together mid front by sewing in outermost loop of one and one stitch upwards from first row in A.7a/A.7b and until approx. 7 ridges remain before neck decrease begins. TWINED STRING AND TASSELS: Cut 2 lengths of yarn of 65 cm. Twine the strands together until they resist, fold the string double so that it twines again. Make a knot at each end. Thread the string through each of the bands approx. 12 rows above the neck decrease and make a knot. Cut 15 lengths of yarn of 18 cm. Thread them through end on the twined string and distribute so that they are even. Place a strand around the tassel, tighten and make a knot. Repeat on the other end of string so that there is a tassel in each end of string. |
||||||||||||||||||||||||||||
Diagram explanations |
||||||||||||||||||||||||||||
|
||||||||||||||||||||||||||||
 |
||||||||||||||||||||||||||||
 |
||||||||||||||||||||||||||||
 |
||||||||||||||||||||||||||||
 |
||||||||||||||||||||||||||||
 |
||||||||||||||||||||||||||||
Have you finished this pattern?Tag your pictures with #dropspattern #portofinotunic or submit them to the #dropsfan gallery. Do you need help with this pattern?You'll find 28 tutorial videos, a Comments/Questions area and more by visiting the pattern on garnstudio.com. © 1982-2026 DROPS Design A/S. We reserve all rights. This document, including all its sub-sections, has copyrights. Read more about what you can do with our patterns at the bottom of each pattern on our site. |
||||||||||||||||||||||||||||


With over 40 years in knitting and crochet design, DROPS Design offers one of the most extensive collections of free patterns on the internet - translated to 17 languages. As of today we count 325 catalogues and 12298 patterns translated into English (UK/cm).
We work hard to bring you the best knitting and crochet have to offer, inspiration and advice as well as great quality yarns at incredible prices! Would you like to use our patterns for other than personal use? You can read what you are allowed to do in the Copyright text at the bottom of all our patterns. Happy crafting!
Post a comment to pattern DROPS 187-16
We would love to hear what you have to say about this pattern!
If you want to leave a question, please make sure you select the correct category in the form below, to speed up the answering process. Required fields are marked *.