
Popular categories
Looking for a yarn?


Comments / Questions (26)
![]() Cecile wrote:
Cecile wrote:
Bonjour, Si je veux tricoter un tel gilet sans motifs jacquard , uni donc, combien me faut il de pelotes de karisma pour la taille S ?
08.01.2026 - 13:36DROPS Design answered:
Bonjour Cécile, comme ce modèle a été tricoté avec jacquard, nous avons juste les quantités avec les 2 couleurs, vous pouvez additionner les quantités des deux couleurs, il vous en faudra peut-être un peu moins. Votre magasin pourra vous aider si besoin, même par mail ou téléphone. Bon tricot!
09.01.2026 - 08:10
![]() Xènia wrote:
Xènia wrote:
Hola buenas, mi duda esta en ¿como puedo leer los diagramas de los colores si quiero hacer la talla S? porque hay flechas con la talla pero no se si se leen desde abajo hasta la flecha con la talla (como si fuera el limite) o como. Gracias
31.07.2025 - 22:35DROPS Design answered:
Hola Xènia, en general los diagramas no tienen flechas y se trabajan de abajo arriba y de derecha a izquierda (por el lado derecho) o de izquierda a derecha (por el lado revés). La flecha en A.3 se usa para asegurarnos de terminar el diagrama en la misma fila en el cuerpo y las mangas. Es decir, trabajas de abajo arriba y cuando llegas a la fila con la flecha cierras los puntos indicados y dejas la labor en espera hasta que empieces a trabajar el canesú. Como sabes en qué fila del diagrama has terminado para el cuerpo y las mangas es más fácil continuar con el patrón en el canesú. Después ya no hace falta la flecha.
05.08.2025 - 13:23
![]() Hélène wrote:
Hélène wrote:
Goedemiddag, (voor maat S): ik begrijp niet zo goed waarom het aantal steken aan de voorkant meer is dan aan de achterkant (2x61 vs 113 steken), zeker als je rekening houdt met de 3 cm voorbies die er ook nog eens bij komt. Zou u daarvoor een verklaring hebben?
03.07.2025 - 19:19DROPS Design answered:
Hi Helene, there will be slightly more room for the bust part. Happy knitting!
20.09.2025 - 22:58
![]() Marion Porst wrote:
Marion Porst wrote:
Sind in den Diagramen nur die Hinreihen angezeigt, oder 1. Reihe hin und die 2. die Rückreihe? Oder wird die Rückreihe gestrickt wie das Muster erscheint?
17.11.2024 - 17:54DROPS Design answered:
Liebe Marion, das Diagramm zeigt alle Reihen des Musters, aus RS und WS. Viel Spaß beim Stricken!
17.11.2024 - 17:57
![]() Gaetane wrote:
Gaetane wrote:
Bonjour, dernière étape! Je ne saisi pas la méthode des boutonnières ? Comment procede t on ? Merci 🙏
28.02.2024 - 21:00DROPS Design answered:
Bonjour Gaetane, pour former 1 boutonnière dans les sections 2 mailles envers des côtes, on va tricoter 2 mailles ensemble à l'envers, et faire 1 jeté, au rang suivant, on tricote le jeté à l'endroit. Bon tricot!
29.02.2024 - 08:05
![]() Gaetane wrote:
Gaetane wrote:
Bonjour ! Suis rendu au col , après mon premier rang , l envers je tricote normal pour revenir à l endroit pour continuer avec l aiguille circulaire 3 ? Autrement dit je tricote le rang comme indiqué et à l envers je tricote comme elle se présente c est ça ? Les rangs entre les *** et répétez? Ai-je bien saisi ? Merci 🙏
26.02.2024 - 12:55DROPS Design answered:
Bonjour Gaetane, effectivement vous pouvez tricoter 1 rang envers sur l'envers avant de tricoter les côtes en les commençant sur l'endroit. Après le 1er rang des côtes, tricotez simplement en côtes 2 mailles endroit/2 mailles envers (= tricotez les mailles comme elles se présentent, on n'augmente qu'au 1er rang). Bon tricot!
26.02.2024 - 14:11
![]() Gaetane wrote:
Gaetane wrote:
Bonjour, suis rendu à l empiècement, si je comprends bien je tricote les mailles du début du devant jusqu’à l emmanchure, là je mets un fil marqueur et je tricote les mailles de la manche et au bout je tricote les mailles du dos etc alors la manche est en rond je saisi pas comment procéder pour empiécer manche avec le devant etc,, ? Merci 🙏
18.02.2024 - 16:35DROPS Design answered:
Bonjour Gaetane, c'est bien ainsi que l'on doit faire, dans cette vidéo, nous montrons comment mettre les manches entre le devant et le dos; les premiers rangs sont parfois un peu plus difficile, vous pouvez vous aider d'une autre aiguille circulaire ou bien utiliser la technique du magic loop, après quelques rangs ce sera plus simple de nouveau. Bon tricot!
19.02.2024 - 09:30
![]() Gaetane wrote:
Gaetane wrote:
Bonjour ! Encore moi ! Je comprends votre diagramme mais au moment qu on augmente on tricote ces mailles en noir ou blanc car ça suit pas du diagramme 😢comment je procède pour le suivi des motifs ? Merci 🙏
13.02.2024 - 00:56
![]() Gaetane wrote:
Gaetane wrote:
Bonjour ! Lorsqu on fait les augmentations des manches , on procède comment pour suivre le diagramme, la maille augmenter devient elle le diagramme A5 ou quoi ? Merci 🙏
12.02.2024 - 18:41DROPS Design answered:
Bonjour Gaetane, tricotez les augmentations en suivant A.5, vous pouvez progressivement les incorporer dans A.1 si vous le souhaitez ou comme dans A.5 tout simplement. Bon tricot!
13.02.2024 - 08:24
![]() Gaetane wrote:
Gaetane wrote:
Bonjour ! Suite à votre réponse concernant les augmentations des manches , ça veut dire qu au bout de 6 cm, je commence à tricoter les augmentations et le diagramme en rond sur 4 aiguilles? Et qu en est-il pour suivre le diagramme des mailles qu on augmente ? Merci 🙏
12.02.2024 - 17:14DROPS Design answered:
Bonjour Gaetane, pour les manches, tricotez d'abord 5 cm de côtes puis 1 tour avec les aiguilles 4 en diminuant comme indiqué, tricotez ensuite 1 tour en noir et commencez les diagrammes. En même temps, quand la manche mesure 6 cm, commencez à augmenter et incorporez les augmentations au motif. Bon tricot!
13.02.2024 - 08:20
|
|||||||
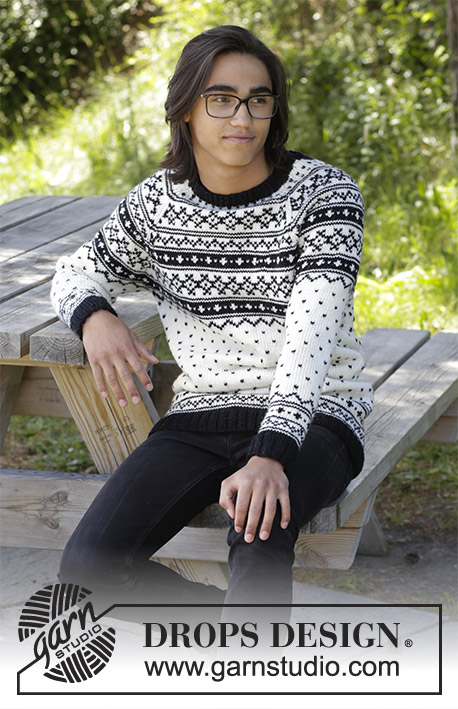
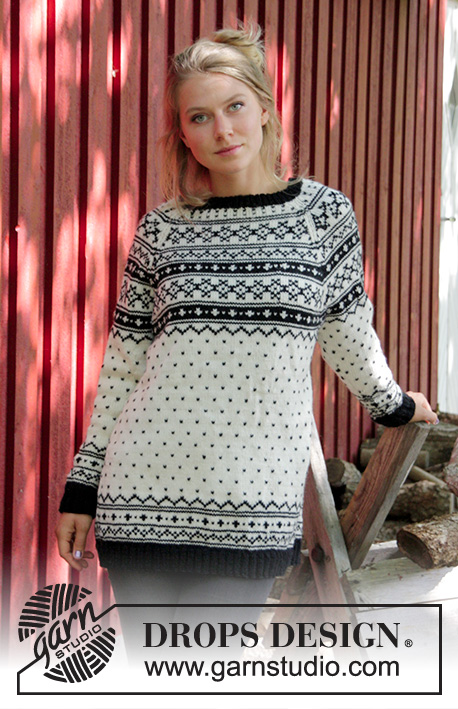
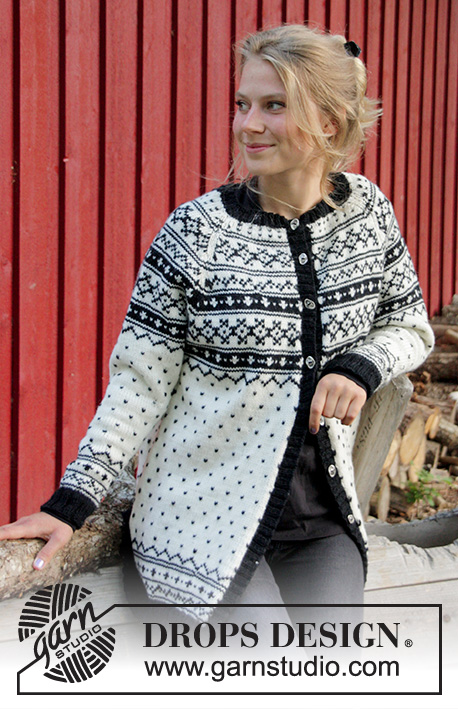
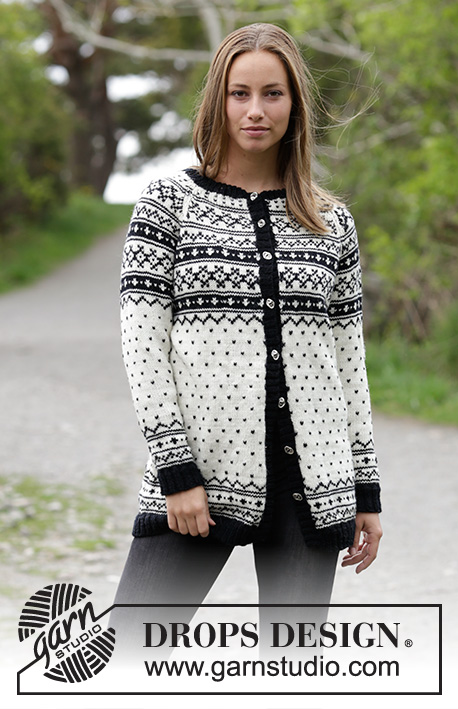
Telegram Jacket#telegramjacket |
|||||||
 |
 |
||||||
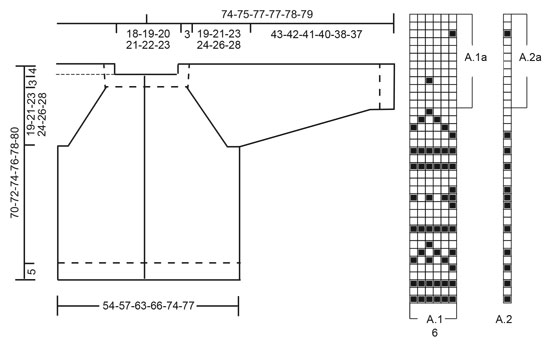
Knitted jacket with multi-coloured pattern and raglan. Size: S - XXXL Piece is knitted in DROPS Karisma.
DROPS 184-22 |
|||||||
|
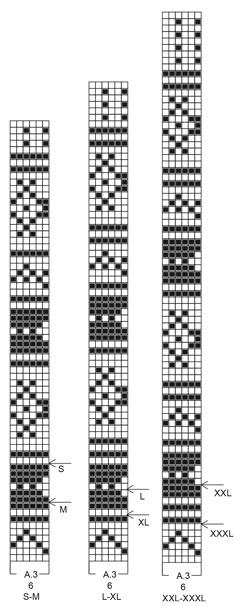
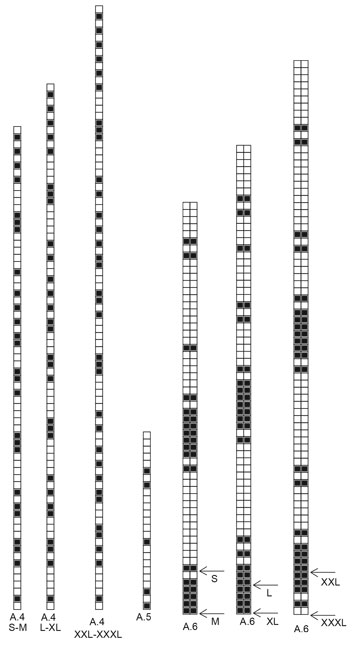
INFORMATION FOR PATTERN: GARTER STITCH (back and forth): 1 ridge = knit 2 rows. PATTERN: See diagrams A.1 to A.6. Work the entire pattern in stocking stitch. Choose diagram for your size. KNITTING TIP-1: To avoid the knitting tension to tighten when working pattern, it is important not to tighten the strands on back side of piece. Switch to a higher needle number when working pattern if the pattern is somewhat tight. KNITTING TIP-2 (applies to yoke on jacket): If knitting tension is incorrect in height and there are more rows vertically on 10 cm than stated in pattern the yoke will be too short and the armhole too small. This can be compensated by working 1 extra row in stocking stitch evenly on yoke. DECREASE TIP: To calculate how to decrease evenly, use the total number of stitches on row (e.g. 272 stitches) and divide stitches by number of decreases to be done (e.g. 44) = 6.1. In this example work approx. every 5th and 6th stitch together. INCREASE TIP: Work until 2 stitches remain before marker thread, make 1 yarn over (= 1 stitch increased), knit 4 (marker thread is in the middle of these stitches), make 1 yarn over (= 1 stitch increased). On next row work yarn over twisted It should not make a hole. RAGLAN: All decreases are done from the right side! Decrease for raglan on each side of every A.6 as follows: Decrease 1 stitch after A.6 as follows: Slip last stitch in A.6, knit 1, pass slipped stitch over (= 1 stitch decreased). Decrease 1 stitch before A.6 as follows: Work until 1 stitch remains before A.6, knit the next 2 stitches together (= 1 stitch decreased). I.e. decrease 2 stitches at every A.6 and 8 stitches in total on row. BUTTONHOLES (applies to right band): Decrease for buttonholes on right band. When band measures approx. 1.5 cm, decrease for 8-8-8-9-9-9 buttonholes evenly (decrease for buttonholes in purl sections seen from right side). 1 buttonhole = purl 2 together and make 1 yarn over – top buttonhole should be approx. 2 cm from the top, the other buttonholes should be approx. 7-8 cm apart. ---------------------------------------------------------- JACKET: Worked back and forth on circular needle from mid front. Sleeves are work in the round on double pointed needles, switch to a short circular needle when needed. Join the parts together and work yoke back and forth. Work band back and forth at the end. BODY: Cast on 276-288-320-332-372-388 stitches (including 1 edge stitch in each side of piece) on circular needle size 3 mm with black. Work as follows: Work 1 edge stitch in GARTER STITCH – see explanation above, work rib (= knit 2 / purl 2), until 3 stitches remain, finish with knit 2 and 1 edge stitch in garter stitch. When piece measures 5 cm, switch to circular needle size 4 mm and knit 1 row from right side while decreasing 39-45-53-47-57-55 stitches evenly - read DECREASE TIP = 237-243-267-285-315-333 stitches. Work 1 row as follows: Work 1 edge stitch in garter stitch, 60-60-66-72-78-84 stitches in stocking stitch (= front piece), insert 1 marker in next stitch, and work this stitch in stocking stitch, work 113-119-131-137-155-161 stitches in stocking stitch (= back piece), insert 1 marker in next stitch, and work this stitch in stocking stitch, work 60-60-66-72-78-84 stitches in stocking stitch until 1 stitch remains, finish with 1 edge stitch in garter stitch (= front piece). Markers shows sides of garment. Then work next row as follows: Work 1 edge stitch in garter stitch in base colour in pattern, A.1 (= 6 stitches) until 2 stitches remain (= 39-40-44-47-52-55 times in width), and finish with A.2 over next stitch and 1 edge stitch in garter stitch - read KNITTING TIP-1. REMEMBER THE KNITTING TENSION! When A.1 and A.2 have been worked 1 time vertically, repeat A.1a and A.2a vertically. When piece measures 39-41-40-42-41-43 cm, work A.3 over A.1 and A.4 over A.2. When you have worked up to arrow in A.3, work next row in A.3 as follows: Work the first 58-58-64-70-76-82 stitches as before, cast off 3 stitches before marker and 4 stitches after marker (= 7 stitches in total), work the next 107-113-125-131-149-155 stitches as before, cast off 3 stitches before marker and 4 stitches after marker (= 7 stitches), work the last 58-58-64-70-76-82 stitches as before. Piece measures approx. 44-44-44-45-45-45 cm. Put piece aside and work the sleeves. SLEEVES: Work in the round on double pointed needles, switch to a short circular needle when needed. Cast on 48-52-56-60-64-64 stitches on double pointed needles size 3 mm. Work rib (= knit 2/purl 2). When piece measures 5 cm, switch to double pointed needles size 4 mm and work 1 round in stocking stitch while decreasing 6-8-8-10-12-10 stitches evenly = 42-44-48-50-52-54 stitches. Insert 1 marker thread at beginning of round (= mid under sleeve). Work 1 round with black, then work next round as follows: Work 0-1-0-1-2-0 stitches A.5, work A.1 over the next 42-42-48-48-48-54 stitches (= 7-7-8-8-8-9 repetitions), finish with 0-1-0-1-2-0 stitches A.5. When A.1 has been worked 1 time vertically, repeat A.1a. When piece measures 6 cm, increase 1 stitch on each side of marker thread (= 2 stitches increased) - read INCREASE TIP! Increase like this every 3-2½-2-1½-1½-1½ cm 12-14-15-17-19-21 times in total = 66-72-78-84-90-96 stitches. Work stitches in A.5 and the increased stitches in the pattern. When piece measures 38-39-37-37-34-35 cm, work A.3 over A.1. When all stitches under sleeve have been increased, work A.3 11-12-13-14-15-16 times in total in width. When you have worked up to arrow in A.3, work next round as follows: Cast off 4 stitches, work the next 59-65-71-77-83-89 stitches as before, cast off the last 3 stitches. Sleeve measures approx. 43-42-41-40-38-37 cm. Knit another sleeve the same way. YOKE: Slip sleeves on to same circular needle as body where armholes were cast off = 341-359-395-425-467-497 stitches. Insert 1 marker thread between every transition between each sleeve and body before continuing. Work 1 edge stitch in garter stitch, work pattern as before until 2 stitches remain before marker thread between sleeve and body, A.6 over the next 2 stitches (= front piece), work pattern over the 59-65-71-77-83-89 stitches (= sleeve), A.6 over the next 2 stitches, work pattern over the next 103-109-121-127-145-151 stitches as before, A.6 over the next 2 stitches (= back piece), work pattern over the next 59-65-71-77-83-89 stitches (= sleeve), A.6 over the next 2 stitches, pattern as before until 1 stitch remains, finish with 1 edge stitch in garter stitch – read KNITTING TIP-2. Continue pattern like this and decrease for RAGLAN – see explanation above, every other row 26-29-31-33-36-39 times in total = 133-127-147-161-179-185 stitches. When A.3 has been worked 1 time vertically, switch to black. Work 1 row with black. Yoke measures approx. 19-21-23-24-26-28 cm. An elevation in the back of neck can be worked to get a better fit so that yoke is somewhat higher in the neck. This elevation can be skipped, to make the neck the same at the front and back. Work elevation in the back of neck or start to work the neck edge if you don’t want an elevation. ELEVATION IN BACK OF NECK: Skip this paragraph if you do not want an elevation. Insert 1 marker in the middle stitch on needle (= mid back). Knit 30-30-34-34-40-40 past marker, turn, tighten yarn and purl 60-60-68-68-80-80. Turn, tighten yarn and knit 54-54-61-61-72-72, turn, tighten yarn and purl 48-48-54-54-64-64. Turn, tighten yarn and knit 42-42-48-48-56-56, turn, tighten yarn and purl 36-36-42-42-48-48. Turn, tighten yarn and knit 30-30-35-35-40-40, turn, tighten yarn and purl 24-24-28-28-32-32, turn, tighten yarn and work the rest of row. NECK EDGE: On next row from right side decrease as follows: Knit 27-24-29-34-37-40 and decrease 3-0-4-6-9-10 stitches evenly, work the next 18 stitches together 2 by 2 (= 9 stitches decreased), knit 44-44-54-58-70-70 and decrease 5-0-8-10-18-18 stitches evenly, work the next 18 stitches together 2 by 2 (= 9 stitches decreased), knit the last 26-23-28-33-36-39 and decrease 3-1-5-7-10-11 stitches evenly = 104-108-112-120-124-128 stitches. Switch to circular needle size 3 mm. Work next row as follows: Knit 1, * Knit 2, purl 2, knit 1, make 1 yarn over (= 1 stitch increased), purl 2, knit 2, make 1 yarn over (= 1 stitch increased), purl 1 *, work from *-* until 3-7-11-19-3-7 stitches remain, work rib (= knit 2/purl 2) until 3 stitches remain, finish with knit 2 and 1 edge stitch in garter stitch = 124-128-132-140-148-152 stitches. Work yarn overs twisted in rib (i.e. knit 2/purl 2) on next row to avoid holes. When rib measures 3 cm, cast off knit over knit and purl over purl. LEFT BAND: Work band back and forth on circular needle size 3 mm with black. Pick up 174-210 stitches (number of stitches must be divisible by 4 + 2) on circular needle size 3 mm with black inside 1 edge stitch from right side. Knit 1 row from wrong side. Work rib (= purl 2/knit 2) until 2 stitches remain, finish with knit 2. Continue with knit over knit and purl over purl until rib measures 3 cm. Cast off stitches with knit over knit and purl over purl. RIGHT BAND: Work as left band but decrease for BUTTONHOLES - see explanation above. ASSEMBLY: Sew opening under each sleeve in front loop of outermost stiches. Sew on buttons on left band. |
|||||||
Diagram explanations |
|||||||
|
|||||||
 |
|||||||
 |
|||||||
 |
|||||||
Have you finished this pattern?Tag your pictures with #dropspattern #telegramjacket or submit them to the #dropsfan gallery. Do you need help with this pattern?You'll find 35 tutorial videos, a Comments/Questions area and more by visiting the pattern on garnstudio.com. © 1982-2026 DROPS Design A/S. We reserve all rights. This document, including all its sub-sections, has copyrights. Read more about what you can do with our patterns at the bottom of each pattern on our site. |
|||||||


With over 40 years in knitting and crochet design, DROPS Design offers one of the most extensive collections of free patterns on the internet - translated to 17 languages. As of today we count 325 catalogues and 12298 patterns translated into English (UK/cm).
We work hard to bring you the best knitting and crochet have to offer, inspiration and advice as well as great quality yarns at incredible prices! Would you like to use our patterns for other than personal use? You can read what you are allowed to do in the Copyright text at the bottom of all our patterns. Happy crafting!
Post a comment to pattern DROPS 184-22
We would love to hear what you have to say about this pattern!
If you want to leave a question, please make sure you select the correct category in the form below, to speed up the answering process. Required fields are marked *.