
Popular categories
Looking for a yarn?


Comments / Questions (15)
![]() M Eijpe wrote:
M Eijpe wrote:
Bij het telpatroon van model DROPS design: Patroon pu-021Garengroep B staat er 2x hetzelfde bij de uitleg van de kabel: = zet 3 steken op een kabelnaald en houd deze achter het werk, 3 recht, 3 recht van de kabelnaald = zet 3 steken op een kabelnaald en houd deze achter het werk, 3 recht, 3 recht van de kabelnaald. de 2e moet volgens mij \"VOOR\" de naald zijn.
22.07.2018 - 07:46
![]() Sandra Pinkerton wrote:
Sandra Pinkerton wrote:
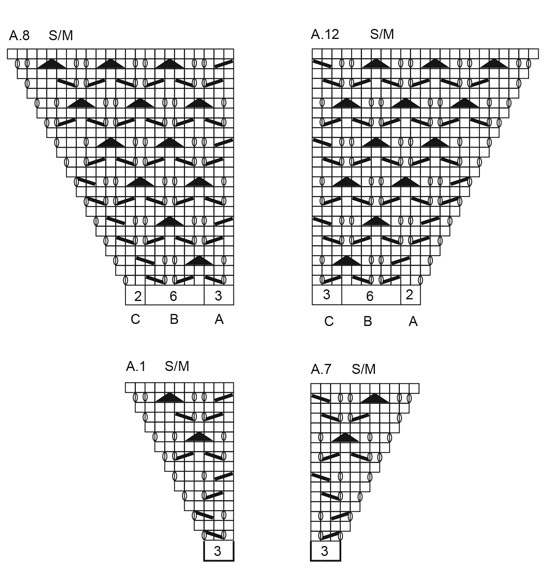
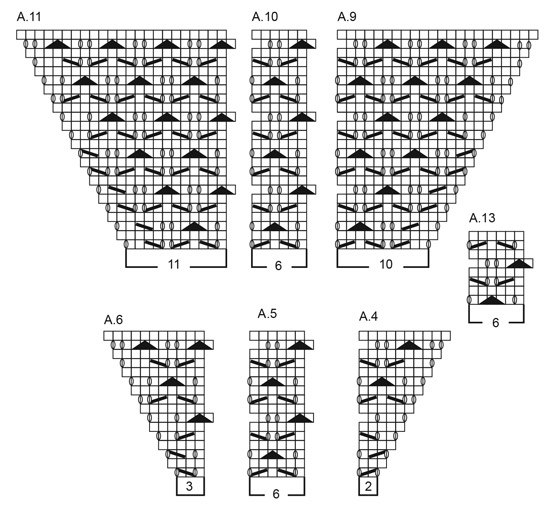
In chart 4, row seven has 2 increases but the next row only shows 1 additional stitch. In Row 15 there are 4 increases but only 1 double decrease. I am not sure what to follow the pattern and ignore the stitch count or adjust the pattern to match the stitch count. Thanks for your help.
10.06.2018 - 00:48DROPS Design answered:
Dear Mrs Pinkerton, the first row in A.4 (on row 7) is for the increase to the raglan, the 2nd YO will replace the last st in A.4 (= the one that you will dec in A.5 slipping 1 st as if to K, K2 tog, psso). Happy knitting!
11.06.2018 - 09:17
![]() Teresa Luís wrote:
Teresa Luís wrote:
O início do esquema A1, começa com uma laçada (esquerda) ou com uma malha em meia (direito)? Eu estava a ler os esquemas da esquerda para a direita, mas ao ver a sequência do esquema A8, parece-me que a leitura será da direita para a esquerda. Fico na dúvida se os esquemas devem ser lidos da esquerda para a direita, ou da direita para a esquerda. Obrigada pela vossa ajuda! Teresa
03.05.2018 - 11:09SILVIA wrote:
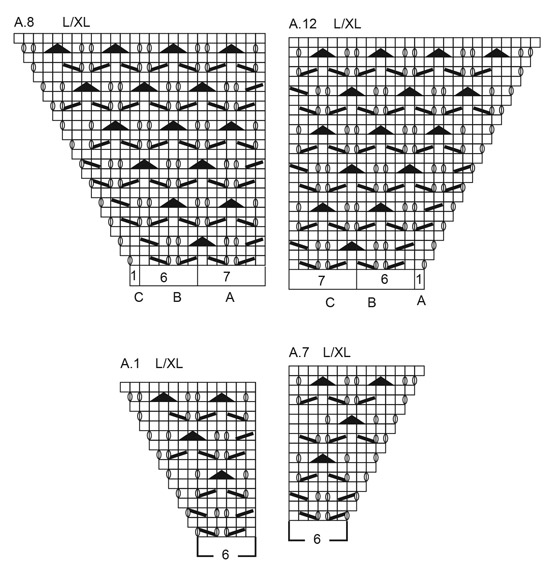
Hola, estoy tejiendo este modelo y me pasa que no entiendo cuando dice: " Cada vez que se completa A.8/A.12 1 vez en vertical trabajar 2 repeticiones más de A.8/A.12 B entre A.8/A.12 A y A.8/A.12 C. Cada vez que se completa A.9, A.10 y A.11 una vez en vertical, trabajar 4 repeticiones más de A.10 entre A.9-A.11. " tengo que repetir A8 dos veces más? Gracias!
24.02.2018 - 20:48DROPS Design answered:
Hola Silvia. Al trabajar repeticiones verticales aumentamos puntos en cada 2ª fila y por tanto, al finalizar hay más puntos, los suficientes para trabajar 1 repetición más del dibujo central, en este caso A.8/A.12 B. En el segundo caso también se hace lo mismo.
02.03.2018 - 13:41
![]() Gunnel Ekroth wrote:
Gunnel Ekroth wrote:
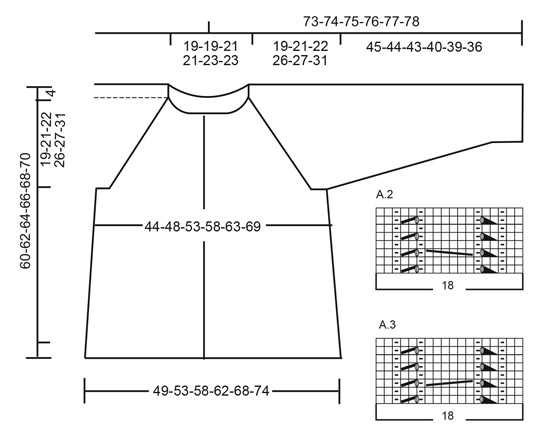
I mönstergrupp A2 och A3, 18 maskor, ska man på varv 1 sticka ihop 2 maskor 2 gånger = 16 maskor kvar. Men hur gör man på varv 3? Då ska man göra likadant enligt skissen men då går det ju inte att sticka ihop 2 maskor för då finns ju bara 1! I ökningstips får jag heller ingen klarhet och där nämns även markörer men var i mönstret nämns det markörer? Alltså hur gör jag för att det åter ska bli 18 maskor i A2 och A3? Tacksam för hjälp!
13.12.2017 - 16:26DROPS Design answered:
Hej, då du stickar diagram A.2 och A.3 ska du även göra omslagen enligt diagrammen, då hålls maskantalet konstant på 18 maskor. Markörerna i ökningstipset sätts i varje sida på fram- och bakstycket enligt beskrivningen.
13.12.2017 - 17:55
|
||||||||||||||||||||||||||||
Winter Grace Jacket#wintergracejacket |
||||||||||||||||||||||||||||
 |
 |
|||||||||||||||||||||||||||
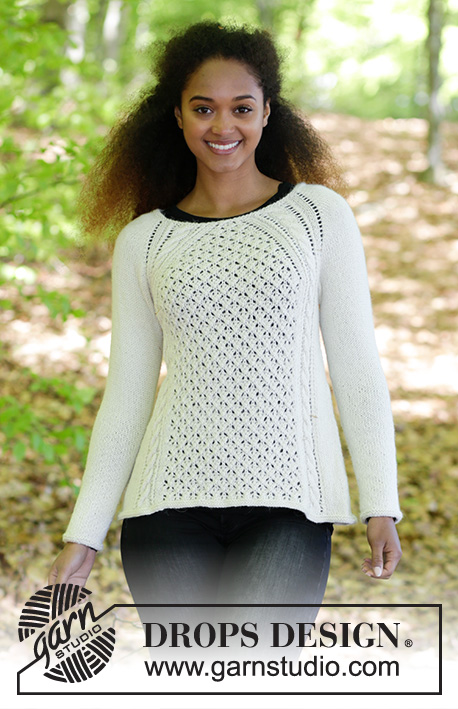
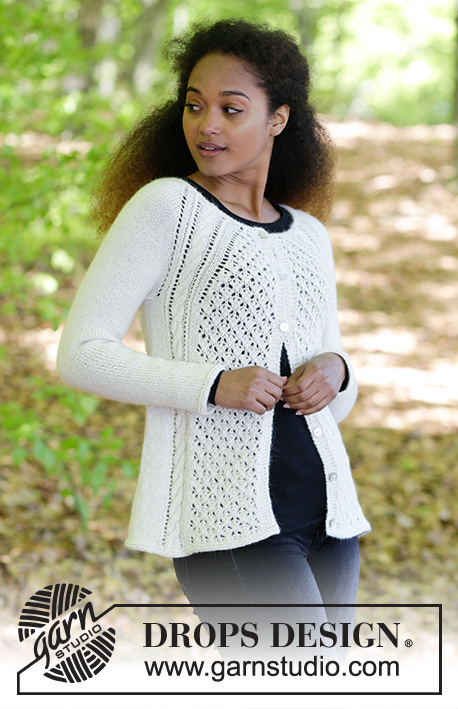
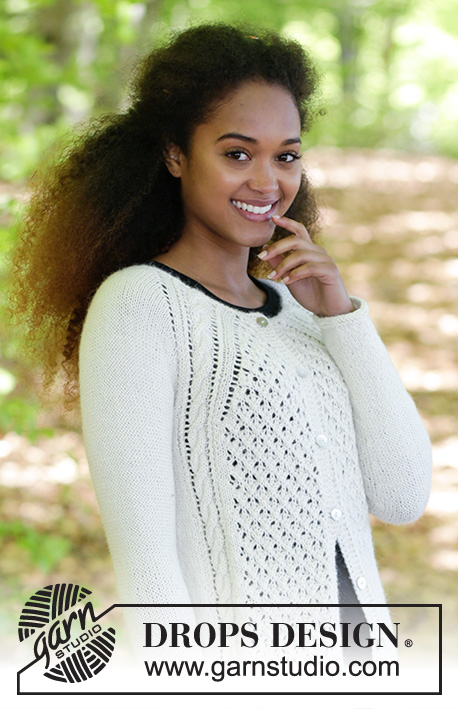
Jacket with cables, lace pattern and raglan, knitted top down. Size: S - XXXL Piece is knitted in DROPS Puna.
DROPS 183-10 |
||||||||||||||||||||||||||||
|
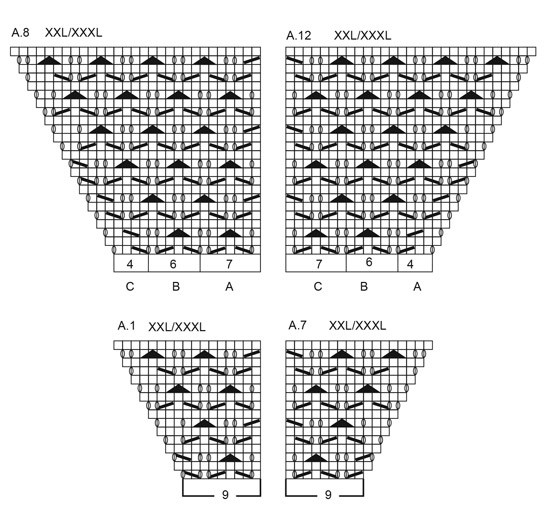
INFORMATION FOR PATTERN: GARTER STITCH (worked in the round): 1 ridge = 2 rounds. Knit 1 round and purl 1 round. GARTER STITCH (back and forth): 1 ridge = knit 2 rows. PATTERN: See diagrams A.1 to A.13. Diagrams show all rows in pattern seen from the right side. See diagram for your size in A.1, A.7, A.8 and A.12. DECREASE TIP: Decrease under sleeve as follows: Begin 3 stitches before marker thread, knit 2 together, knit 2 (marker thread is in the middle of these stitches), slip 1 stitch knitwise, knit 1, pass slipped stitch over stitch worked (= 2 stitches decreased). INCREASE TIP (applies to increase in the sides of body): Begin 1 stitch before marker, 1 yarn over, knit 2 (marker is in the middle of these 2 stitches), 1 yarn over (= 2 stitches increased). On next round work yarn overs twisted to avoid holes. BUTTONHOLES: Decrease first buttonhole after the 2 ridges in the neck, then decrease the next 6-6-6-6-7-7 approx. 8 cm apart. Decrease for buttonholes on right band as follows: Work until 3 stitches remain on needle (seen from right side), make 1 yarn over, knit 2 together and knit 1. On next row knit yarn over to make holes. ---------------------------------------------------------- JACKET: Work back and forth on circular needle from mid front, work top down. YOKE: Cast on 97-97-105-105-113-113 stitches on circular needle size 4 mm with Puna. Work 2 ridges in GARTER STITCH - see explanation above. On to last row in ridge increase 20-20-24-24-28-28 stitches evenly = 117-117-129-129-141-141 stitches. REMEMBER THE KNITTING TENSION! Work next row as follows from right side: 5 stitches in garter stitch (= band), A.1 (= 3-3-6-6-9-9 stitches), A.2 (= 18 stitches), 1 yarn over, 12 stitches in stocking stitch (= sleeve), 1 yarn over, A.3 (= 18 stitches), A.4 (= 2 stitches), A.5 0-0-1-1-2-2 times (= 0-0-6-6-12-12 stitches), A.6 (= 3 stitches), A.2, 1 yarn over, 12 stitches in stocking stitch (= sleeve), 1 yarn over, A.3, A.7 (= 3-3-6-6-9-9 stitches), 5 stitches in garter stitch (= band). Decrease for BUTTONHOLES - see explanation above. Continue this pattern and upwards, increase as shown in A.1, A.4, A.6 and A.7. On sleeves increase on each side of the 12 stitches in stocking stitch, increase every other row with 1 yarn over as explained above. On next row purl yarn over to make hole. Work the increased stitches in stocking stitch. When A.1 to A.7 has been worked 1 time vertically, there are 181-181-193-193-205-205 stitches on needle. Work next row as follows from right side: 5 stitches in garter stitch, A.8 A (= 3-3-7-7-7-7 stitches) A.8 B (= 6 stitches), A.8 C (= 2-2-1-1-4-4 stitches), A.2 as before, 28 stitches in garter stitch (= sleeve), A.3 as before, A.9 (= 10 stitches), A.10 0-0-1-1-2-2 times (= 0-0-6-6-12-12 stitches), A.11 (11 = stitches), A.2 as before, 28 stitches in stocking stitch (= sleeve), A.3 as before, A.12 A (= 2-2-1-1-4-4 stitches), A.12 B (= 6 stitches), A.12 C (= 3-3-7-7-7-7 stitches), 5 stitches in garter stitch. Continue this pattern upwards, and continue increases on sleeves. Every time A.8/A.12 is worked 1 time vertically work 2 repetitions more of A.8/A.12 B between A.8/A.12 A and A.8/A.12 C. Every time A.9, A.10 and A.11 have been worked 1 time vertically, work 4 repetitions more of A.10 between A.9 and A.11. Continue pattern until 25-29-30-35-37-43 increases have been done in total = 317-349-369-409-437-485 stitches. Work next row as follows from wrong side: Work first 51-55-59-64-69-75 stitches (= right front piece), slip the next 62-70-72-82-86-98 stitches on a stitch holder for sleeve, cast on 8-8-10-10-12-12 new stitches under sleeve, work the next 91-99-107-117-127-139 stitches (= back piece), slip the next 62-70-72-82-86-98 stitches on a stitch holder for sleeve, cast on 8-8-10-10-12-12 new stitches, work the last 51-55-59-64-69-75 stitches on round (= left front piece). Piece measures approx. 19-21-22-26-28-31 cm from cast-on edge. NOW MEASURE THE PIECE FROM HERE! BODY: = 209-225-245-265-289-313 stitches. Insert 1 marker thread in each side, in the middle of the new stitches. Continue in garter stitch, A.2 and A.3. Over stitches in A.8, A.9, A.10, A.11 and A.12 (= 55-63-71-81-91-103 stitches on back piece and 28-32-36-41-46-52 stitches on each front piece) work pattern according to A.13. Begin on the row in A.13 that makes the pattern fits on last pattern row in A.8 to A.12 - work the stitches that do not fit the pattern in the sides in stocking stitch. REMEMBER BUTTONHOLES! When piece measures 4 cm, increase 1 stitch on each side of marker threads (= 4 stitches increased). Increase every 6 cm 5 times in total = 229-245-265-285-309-333 stitches. When piece measures 36-35-37-35-36-34 cm, decrease 3 stitch over each cable in A.2 and A.3 = 217-233-253-273-297-321 stitches. Work 2 ridges over all stitches, then cast off. Jacket measures approx. 60-62-64-66-68-70 cm from shoulder. SLEEVE: Worked in the round on a short circular needle, switch to double pointed needles when needed. Slip stitches from sleeve on a short circular needle size 4 mm, pick up 1 stitch in each of the 8-8-10-10-12-12 stitches cast on under sleeve = 70-78-82-92-98-110 stitches. Insert 1 marker thread in the middle of the new stitches under sleeve – NOW MEASURE PIECE FROM HERE. Work in stocking stitch in the round. When piece measures 3 cm, decrease 1 stitch on each side of marker - READ DECREASE TIP. Decrease every 2½-2-2-1½-1½-1 cm 14-17-18-22-24-29 times in total. After all decreases are done, 42-44-46-48-50-52 stitches remain on round. When piece measures 44-43-42-39-38-35 cm (shorter measurements in the larger sizes because of longer yoke), work 2 ridges in GARTER STITCH - see explanation above. Then loosely cast off by knitting. Work the other sleeve the same way. ASSEMBLY: Sew the buttons on to the left band. |
||||||||||||||||||||||||||||
Diagram explanations |
||||||||||||||||||||||||||||
|
||||||||||||||||||||||||||||
 |
||||||||||||||||||||||||||||
 |
||||||||||||||||||||||||||||
 |
||||||||||||||||||||||||||||
 |
||||||||||||||||||||||||||||
 |
||||||||||||||||||||||||||||
Have you finished this pattern?Tag your pictures with #dropspattern #wintergracejacket or submit them to the #dropsfan gallery. Do you need help with this pattern?You'll find 30 tutorial videos, a Comments/Questions area and more by visiting the pattern on garnstudio.com. © 1982-2026 DROPS Design A/S. We reserve all rights. This document, including all its sub-sections, has copyrights. Read more about what you can do with our patterns at the bottom of each pattern on our site. |
||||||||||||||||||||||||||||


With over 40 years in knitting and crochet design, DROPS Design offers one of the most extensive collections of free patterns on the internet - translated to 17 languages. As of today we count 325 catalogues and 12298 patterns translated into English (UK/cm).
We work hard to bring you the best knitting and crochet have to offer, inspiration and advice as well as great quality yarns at incredible prices! Would you like to use our patterns for other than personal use? You can read what you are allowed to do in the Copyright text at the bottom of all our patterns. Happy crafting!
Post a comment to pattern DROPS 183-10
We would love to hear what you have to say about this pattern!
If you want to leave a question, please make sure you select the correct category in the form below, to speed up the answering process. Required fields are marked *.