
Popular categories
Looking for a yarn?


Comments / Questions (47)
![]() Pirjo Sarentola wrote:
Pirjo Sarentola wrote:
Hei. Ohjeen ymmärtämistä helpottaisi, jos olisi valokuva myös sivulta/kainalon alta
19.11.2025 - 11:12
![]() Christine wrote:
Christine wrote:
Bonjour. Je suis en train de faire le gilet et je ne comprends pas la diminution de 3 mailles au dessus des torsades. Merci pour vos explications.
08.11.2025 - 17:54DROPS Design answered:
Bonjour Christine, pour la même largeur, il faut plus de mailles pour les torsades que pour du jersey, lorsque l'on diminue les torsades après la division, on va devoir diminuer les mailles des torsades pour éviter d'altérer la largeur, ainsi, lorsque vos diminutions atteignent les torsades, comme vous ne pourrez plus les tricoter, diminuez 3 mailles (en tricotant ensemble 2 par 2 à l'endroit les 6 m de la torsade) dans chacune de ces torsades. Bon tricot!
10.11.2025 - 07:25
![]() Arlene Joffe wrote:
Arlene Joffe wrote:
Could you please tell me what the tension/guage is for this pattern. i have checked and checked but cannot find it in the pattern instructions. thank you
17.01.2024 - 16:04DROPS Design answered:
Hi Arlene, DROPS DOUBLE POINTED NEEDLES AND CIRCULAR NEEDLE (40 and 60 or 80 cm) SIZE 4.5 MM – or the size needed to get 20 stitches and 26 rows stocking stitch on 10 cm in width and 10 cm in height. DROPS DOUBLE POINTED NEEDLES AND CIRCULAR NEEDLE (60 or 80 cm) SIZE 4 MM for rib – or the size needed to get 21 stitches and 28 rows stocking stitch on 10 cm in width and 10 cm in height. Happy knitting!
17.01.2024 - 16:53
![]() Andrea wrote:
Andrea wrote:
Ich habe die Jacke soweit fertig. Allerdings drehen sich die beiden Blenden mit den je 5 kraus rechts gestrickten Maschen auf die Innenseiten der Jacke. Was kann ich tun?
28.12.2022 - 22:33DROPS Design answered:
Liebe Andrea, sorry für Spätantwort. Sie können die Jacke mit Stecknadeln auf einer geeigneten Unterlage spannen, anfeuchten (z.B. mit einer Sprühflasche für Blumen) und trocknen lassen, danach entfernen Sie die Stecknadeln, dann sollte sich der Rand nicht mehr rollen.
06.02.2023 - 15:46
![]() Elena D'Amato wrote:
Elena D'Amato wrote:
Buonasera, ancora un altro chiarimento. Quando si devono diminuire le tre maglie? C'è scritto "ALLO STESSO TEMPO " diminuire 3 maglie su ogni treccia....grazie
22.03.2022 - 21:01DROPS Design answered:
Buonasera Elena, deve lavorare le diminuzioni quando non c'è spazio per lavorare A.1. Buon lavoro!
24.03.2022 - 22:52
![]() Elena D'Amato wrote:
Elena D'Amato wrote:
Buonasera, non ho capito come si devono diminuire 3 maglie su ogni treccia. Grazie
22.03.2022 - 20:57DROPS Design answered:
Buonasera Elena, può utilizzare la tecnica che preferisce. Buon lavoro!
24.03.2022 - 22:52
![]() Manuela wrote:
Manuela wrote:
Hallo liebes Drops Team. Habe den ersten Ärmel beendet und am Ende der Raglanlinie hat sich ein Beule gebildet. Was kann ich Tun?
05.05.2021 - 20:56DROPS Design answered:
Liebe Manuela, per Ferndiagnose ist es etwas schwierig, einen Fehler zu erkennen. Diese Lektion zeigt, wie man einen Pullover von oben nach unten strickt und kann Ihnen helfen. Am besten zeigen Sie die Jacke in Ihrem Wollgeschäft - oder machen ein Foto von der Jacke und schicken das Ihrem Wollgeschäft, vielleicht kann man Ihnen dort mit Ihrem individuellen Stück weiterhelfen.
06.05.2021 - 07:52
![]() Hanne wrote:
Hanne wrote:
Denne oppskriften ville vært svært mye enklere å lese om det fantes noen illustrasjoner/diagrammer. Det er fryktelig vanskelig å tolke ren tekst og finne frem til rett sted i teksten! Jeg er ikke ferdig med å felle bort A1 (har fortsatt 12 masker igjen i A1) men arbeidet måler allerede 14,5 cm fra ermet, og jeg skal snart begynne å legge ut 4 masker hver 5. cm 🤔 Hvordan??
03.03.2021 - 20:15
![]() Alberta Hapuku wrote:
Alberta Hapuku wrote:
Hello again. So far good. Now I'm at the separation part of the cardigan. Work 54 sts. that includes the 5st band?.
16.02.2021 - 10:03DROPS Design answered:
Hi Alberta, Yes, this stitch count includes the band. Happy knitting!
17.02.2021 - 07:46
![]() Alberta Hapuku wrote:
Alberta Hapuku wrote:
Thank U for answering. It has been tried both ways. What I've done is cast on the bands and not included them into the actual pattern. After completing the ribbing with the decreases of 2 stitches bringing it down to 126 is accurate. From there it becomes complicated. . Right now i think I may have sought it out. I came out with with 160 stitches which includes the 2 bands of 5 stitches. So I'm going to work with that amount which should be OK. What do you think. Cheers Alberta
10.02.2021 - 10:32DROPS Design answered:
Dear Mrs Hapuku, work the 128 sts as follows: 5 sts in garter st, (K2, P2) x 29, K2, 5 sts in garter st (= 5 + 116+2+5=128 sts) - then work 1 ridge dec 2 sts = 126 sts. Work then these 126 sts follows: 5 sts garter st, K12, *1 YO, K1 * x 3, K1, * 1YO, K 1 *x 3, K20, *1YO, K1 * x 3, K1, * 1 YO, K1 * x3, K24, * 1 YO, K1 *x3, K1, * 1 YO, K1 *x3, K20, *1 YO, K1 *x3, K1, * 1 YO, K1 *x3, K 12, 5 sts garter stitch = 5+12+(6+1+6)+20+(6+1+6)+24+(6+1+6)+20+(6+1+6)+12+5= 150 sts. Hope this will help. Happy knitting!
10.02.2021 - 11:55
|
|||||||||||||||||||
Arendal Cardigan#arendalcardigan |
|||||||||||||||||||
 |
 |
||||||||||||||||||
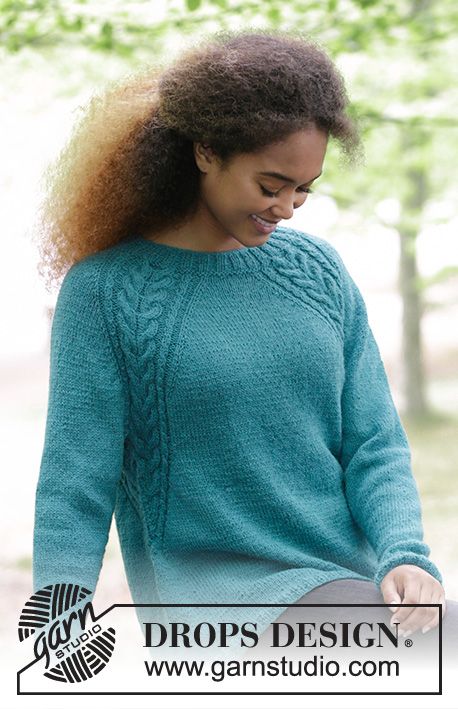
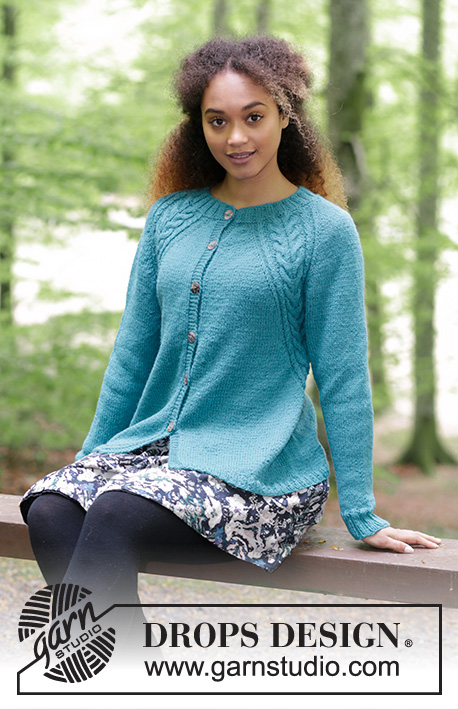
Knitted jacket with cables and raglan, worked top down. Sizes S - XXXL. The piece is worked in DROPS Puna.
DROPS 181-25 |
|||||||||||||||||||
|
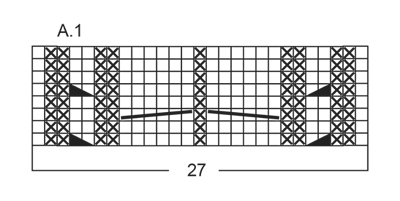
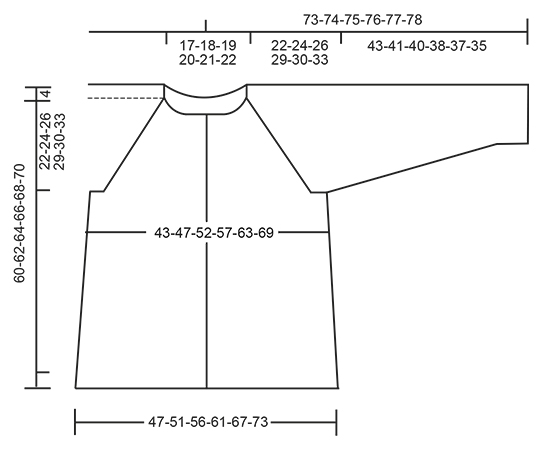
INFORMATION FOR THE PATTERN: RIDGE/GARTER STITCH (worked back and forth): 1 ridge = Knit 2 rows. PATTERN: See diagram A.1. The diagram shows all the rows in the pattern seen from the right side. RAGLAN: Increase to raglan on each side of A.1. Increase 1 stitch on each side of A.1 as follows (= 8 new stitches each time you increase). Work to A.1, 1 yarn over, work A.1, 1 yarn over. On the next round, purl the yarn overs twisted to prevent holes. INCREASE TIP (for the sides): Work until there are 2 stitches left before the marker thread in the side. Make 1 yarn over, knit 2 stitches (the marker thread sits between these) and make 1 yarn over. On the next round, purl the yarn overs twisted to prevent holes. DECREASE TIP (for sleeves): Decrease 1 stitch on each side of the marker thread as follows: Work until there are 3 stitches left before the marker thread, slip 1 stitch as if to knit, knit 1, pass the slipped stitch over, knit 2 stitches (the marker thread sits between these stitches), knit the next 2 stitches together. BUTTONHOLE: The first buttonhole is worked when the rib in the neck measures 3 cm, then work the 5-5-5-6-6-6 next buttonholes with approx. 8 cm between them. Decrease for buttonhole on the right band as follows: Work until there are 3 stitches left on the needle (seen from the right side), make 1 yarn over, knit 2 together and knit 1. On the next row, knit the yarn over, so that there is a hole. ---------------------------------------------------------- The jacket is worked back and forth with circular needle, from mid front and top down. JACKET: Cast on 120-128-132-136-144-144 stitches (including 5 band stitches in each side towards mid front) with circular needle size 4 mm and Puna. Purl 1 row from the wrong side, then work as follows – from the right side: 5 stitches garter stitch, * knit 2/ purl 2 *, repeat from *-* until there are 7 stitches left, knit 2 stitches and 5 stitches garter stitch. REMEMBER BUTTONHOLE! Continue with rib in this way for 4 cm. The last row is from the wrong side. Change to circular needle size 4.5 mm. Work 1 RIDGE – see description above, on the first row, decrease 2 stitches evenly on row = 118-126-130-134-142-142 stitches. Continue as follows – from the right side: Work 5 stitches garter stitch, knit 11-12-13-15-16-18, *1 yarn over, knit 1 *, repeat from *-* a total of 3 times, knit 1, * 1 yarn over, knit 1 *, repeat from *-* a total of 3 times (= these 7 stitches become 13 stitches), knit 18-20-20-18-20-16, *1 yarn over, knit 1 *, repeat from *-* a total of 3 times, knit 1, * 1 yarn over, knit 1 *, repeat from *-* a total of 3 times, knit 22-24-26-30-32-36, * 1 yarn over, knit 1 *, repeat from *-* a total of 3 times, knit 1, * 1 yarn over, knit 1 *, repeat from *-* a total of 3 times, knit 18-20-20-18-20-16, *1 yarn over, knit 1 *, repeat from *-* a total of 3 times, knit 1, * 1 yarn over, knit 1 *, repeat from *-* a total of 3 times, knit 11-12-13-15-16-18 and 5 stitches garter stitch = 142-150-154-158-166-166 stitches. Purl 1 row from the wrong side; the yarn overs are purled twisted to prevent holes and the bands are knitted. Continue as follows from the right side: Work 5 stitches garter stitch (= band stitches), 4-5-6-8-9-11 stitches stocking stitch (= left front piece), A.1 (= 27 stitches), 4-6-6-4-6-2 stitches stocking stitch (= sleeve), A.1, 8-10-12-16-18-22 stitches stocking stitch (= back piece), A1, 4-6-6-4-6-2 stitches stocking stitch (= sleeve), A.1, 4-5-6-8-9-11 stitches stocking stitch (= right front piece and finish with 5 stitches garter stitch (= band stitches). READ THE WHOLE OF THE NEXT SECTION BEFORE CONTINUING! Continue this pattern, at the same time increase on each side of A.1 to RAGLAN – see description above. Increase every 2nd row (= each row from the right side) 21-24-27-30-32-35 times. REMEMBER THE KNITTING TENSION! After all the increases, there are 310-342-370-398-422-446 stitches on the needle. Continue the pattern as before (without increases) until the piece measures 22-24-26-29-30-33 cm from the cast-on edge mid front. The next row is worked as follows from the wrong side: Work 50-54-58-63-68-73 stitches (= right front piece), place the next 60-68-74-78-80-82 stitches on 1 thread (= sleeve), cast on 8-8-10-10-12-14 new stitches on the needle (= under the sleeve), work 90-98-106-116-126-136 stitches (= back piece), place the next 60-68-74-78-80-82 stitches on 1 thread (= sleeve), cast on 8-8-10-10-12-14 new stitches on the needle (= under the sleeve) and work the remaining 50-54-58-63-68-73 stitches (= left front piece). BODY: = 206-222-242-262-286-310 stitches. THE PIECE IS NOW MEASURED FROM HERE! Insert a marker thread in each side, in the middle of the new stitches cast on. Continue back and forth with stocking stitch and 5 stitches garter stitch in each side of the piece. REMEMBER BUTTONHOLE. Continue A.1 over the 20-20-20-20-22-22 stitches in the pattern which remain on the front and back pieces, but on every 2nd row (= each row from the right side) make 1 yarn over on the outside of each A.1 (= towards mid front and mid back) and knit 2 stitches together on each side of the marker thread in the sides. The yarn overs are purled twisted on the next row to prevent holes. The number of stitches remains the same, but the stitches in A.1 will gradually decrease towards the sides of the jacket and there will be more and more stitches in stocking stitch. When there are not enough stitches in A.1 to work 6-stitch cable, work these stitches in stocking stitch, AT THE SAME TIME as you decrease 3 stitches evenly over the cable, do not decrease over the cable with 2 stitches (remember to make the increase on the outside of A.1 and decrease on each side of the marker threads). When all of A.1 has been decreased there are 182-198-218-238-262-286 stitches on the row. Continue with stocking stitch and garter stitch over the band stitches. There is 48-52-57-62-68-74 stitches on each front piece and 86-94-104-114-126-138 stitches on back piece. When the piece measures 15-15-15-15-15-15 cm increase 1 stitch on each side of the marker threads (= 4 stitches increased) – READ INCREASE TIP! Increase every 5 cm a total of 4 times = 198-214-234-254-278-302 stitches. When the piece measures 32-32-32-31-32-31 cm, purl 1 row from the wrong side where you increase 42-46-50-54-58-62 stitches evenly on row (the bands are continued in garter stitch, do not increase over these stitches) = 240-260-284-308-336-364 stitches. Change to circular needle size 4 mm. On the next row from the right side, work as follows: 5 stitches garter stitch, * knit 2, purl 2 *, repeat from *-* until there are 7 stitches left, knit 2 stitches and 5 stitches garter stitch. Work rib for 2 cm, cast off loosely, with knit over knit and purl over purl. The jacket measures approx. 60-62-64-66-68-70 cm from the shoulder. SLEEVE: The piece is worked in the round with circular needle/double pointed needles. Place the 60-68-74-78-80-82 stitches from the thread in the one side of the piece on a short circular needle size 4.5 mm. In addition, cast on 8-8-10-10-12-14 new stitches mid under the sleeve = 68-76-84-88-92-96 stitches on the needle. Insert a marker thread in the middle of these new stitches – The piece is now measured from here! Work stocking stitch in the round. When the piece measures 2-2-2-2-2-4 cm decrease 2 stitches mid under the sleeve – READ DECREASE TIP. Decrease every 3-2-1½-1½-1½-1 cm a total of 12-15-18-19-20-21 times = 44-46-48-50-52-54 stitches. When the sleeve measures 38-36-35-33-32-30 cm increase 4-6-8-6-8-10 stitches evenly on round = 48-52-56-56-60-64 stitches. Change to double pointed needles size 4 mm and work rib, knit 2/ purl 2 over all stitches. Cast off with knit over knit and purl over purl when the sleeve measures 43-41-40-38-37-35 cm. Work the other sleeve in the same way. ASSEMBLY: Sew the openings under the sleeves. Sew the buttons onto the left band. |
|||||||||||||||||||
Diagram explanations |
|||||||||||||||||||
|
|||||||||||||||||||
 |
|||||||||||||||||||
 |
|||||||||||||||||||
Have you finished this pattern?Tag your pictures with #dropspattern #arendalcardigan or submit them to the #dropsfan gallery. Do you need help with this pattern?You'll find 28 tutorial videos, a Comments/Questions area and more by visiting the pattern on garnstudio.com. © 1982-2026 DROPS Design A/S. We reserve all rights. This document, including all its sub-sections, has copyrights. Read more about what you can do with our patterns at the bottom of each pattern on our site. |
|||||||||||||||||||


With over 40 years in knitting and crochet design, DROPS Design offers one of the most extensive collections of free patterns on the internet - translated to 17 languages. As of today we count 324 catalogues and 12290 patterns translated into English (UK/cm).
We work hard to bring you the best knitting and crochet have to offer, inspiration and advice as well as great quality yarns at incredible prices! Would you like to use our patterns for other than personal use? You can read what you are allowed to do in the Copyright text at the bottom of all our patterns. Happy crafting!
Post a comment to pattern DROPS 181-25
We would love to hear what you have to say about this pattern!
If you want to leave a question, please make sure you select the correct category in the form below, to speed up the answering process. Required fields are marked *.