
Popular categories
Looking for a yarn?


Comments / Questions (74)
![]() Anna wrote:
Anna wrote:
Hei. jeg forstår ikke "legg de 3 stolpe-m på venstre bakstk under de 3 stolpe-m på høyre bakstk"
18.04.2018 - 19:44DROPS Design answered:
Hei Anna Dette skal du gjøre for at det skal gå an å kneppe igjen plagget når det er ferdig – siden knappestolpene bare går ned til midten av ryggen, må de to stolpene avsluttes på samme sted. Ellers vil du ikke få kneppet igjen. Altså: bærestykke er ferdig og bolen skal strikkes rundt på rundpinne, og da må stolpen med knappehull ligge over stolpen med knapper. Dette gjør du ved å legge dem over hverandre og strikke maskene fra den ene rett sammen med masken som ligger over fra den andre stolpen. God fornøyelse
25.04.2018 - 15:27
![]() Elżbieta wrote:
Elżbieta wrote:
Czy można zrobić tą sukienkę z włóczki Drops Safran nr 17 kolor biały - 100% bawełna?
08.04.2018 - 22:07DROPS Design answered:
Witaj Elu, możesz użyć DROPS Safran, ale ta włóczka jest cieńsza (Grupa A), więc trzebaby się pobawić i dopasować wzór. Najlepiej użyć linku do zamiennika włóczek (w każdym wzorze, pod materiałami). Pozdrawiamy
09.04.2018 - 10:23
![]() Olga Rusyniakova wrote:
Olga Rusyniakova wrote:
Ako mam pliesť vzor A.2
01.04.2018 - 23:13DROPS Design answered:
Dobrý den, Olgo, postupujte podle schématu A.2 zdola nahoru, od pravého dolního rohu. Zobrazeny jsou lícové i rubové řady a vzor je zakreslen tak, jak oka vypadají na lícové straně pleteniny. Hodně zdaru!
03.04.2018 - 22:32
![]() Bouquin Martine wrote:
Bouquin Martine wrote:
\\\\\\\\r\\\\\\\\nJe suis désolée je ne comprends pas .. plutôt expérimentée en tricot pourtant !! \\\\\\\\r\\\\\\\\nMerci pour votre aide précieuse Martine
16.03.2018 - 21:28DROPS Design answered:
Bonjour Mme Bouquin, si vous tricotez un échantillon sur 25 m (= A = 2 m, B = 12 m, C = 11 m), vous conserverez toujours le même nombre de mailles: au rang 1, on diminue un total de 8 m et on fait un total de 8 jetés sur ce même rang: le nombre de mailles reste bien le même, au rang suivant sur l'envers, décalez vos marqueurs pour conserver le bon nombre de mailles dans chaque motif à répéter et continuez ainsi. Au rang9, vous diminuez 8 m de nouveau sur les 3 diagrammes, compensés par un total de 8 jetés. Bon tricot!
19.03.2018 - 09:06
![]() Bouquin Martine wrote:
Bouquin Martine wrote:
Suite..je vous explique ce que je tricote : je commence par 2 m endroit, 1 jeté, je glisse une m.et tricote la suivante je passe la m. glissée par dessus et je refais un jeté , je tricote ensuite une m. je fais un jeté je tricote ensuite 2 m. ensembles et je refais un jeté et je tricote deux m. et ..ensuite deux m. ensemble ( triangle sur votre schéma) et ensuite je tricote une m. et bien déjà la je me retrobuve avec une m. de plus que votre schéma j obtiens 13 m. au lieu de 12
16.03.2018 - 21:27
![]() Bouquin Martine wrote:
Bouquin Martine wrote:
Brj merci pour cette réponse j ai bien compris le décalage des marqueurs cependant je fais mon test sur les 23 premières mailles et après avoir suivi le schéma je me retrouve avec des mailles de plus.. \\\\\\\\r\\\\\\\\n
16.03.2018 - 21:26
![]() Bouquin Martine wrote:
Bouquin Martine wrote:
Bjr Merci mais désolée je n’en comprends pascomment est ce que je peux avoir toujours deux mailles en A2a puisque le dessin me demande de tricoter les deux mailles ensembles ..il va donc de soi que je n ai plus deux mailles mais’ une seule maille d ou mon interrogation sur le nombre de mailles qui ne reste pas à l’dentique.Mais je pense que je ne comprends pas Si vous pouviez être un peu plus précise cela m aiderait Merci beaucoup !! Martine bouquin
14.03.2018 - 19:28DROPS Design answered:
Bonjour Mme Bouquin, tout à fait, A.2A doit bien avoir toujours 2 mailles, et au 1er rang on tricote 2 m ens à l'end, au rang suivant sur l'envers, déplacez vos marqueurs pour que C = 11 m, B = 12 m et A = 2 m ainsi, vous avez de nouveau 2 m dans A au rang 3 et ainsi de suite. En répétant le diagramme en largeur, vous conservez le bon nombre de mailles (nbe de jetés = nbe de diminutions), et chaque partie du diagramme doit bien conserver le nbe de mailles indiqué. Bon tricot!
15.03.2018 - 08:42
![]() Bouquin wrote:
Bouquin wrote:
Bonjour Je suis bloquée sur le schéma A2... sur les 24 mailles du Sheraton ( C=11- B=12- À=2) lorsque je tricote en suivant le schéma je me retrouve avec un manque de 5 mailles Je ne comprends pas pourquoi Pouvez vous revenir vers moi pour m expliquer car je ne comprends pas Merci pour votre aide Martine bouquin
07.03.2018 - 22:14DROPS Design answered:
Bonjour Mme Bouquin, quand vous tricotez A.2, utilisez des marqueurs pour bien repérer votre nombre de mailles, vous devez toujours avoir 2 m dans A.2A, 12 m dans A.2B et 11 m dans A.2C, vous pouvez déplacer les marqueurs aux rangs pairs pour qu'au rang impair suivant vous ayez le bon nombre de mailles dans chaque diagramme de nouveau. Bon tricot!
08.03.2018 - 09:37
![]() Lena wrote:
Lena wrote:
Bei der Mütze verstehe ich nicht wie man das Muster A2 ab Reihe 11 weiterstricken soll, da A2A immer ein Teil von A2B ist durch die Abnahme. Aber A2A wird nur einmal am Anfang der Reihe gestrickt und nicht vor jedem A2B. Wie beginnen in den Reihen 11, 13 und 15 der Teil A2B in den 4 Wiederholungen? Grüße
15.01.2018 - 00:43DROPS Design answered:
Liebe Lena, die letzte Masche in A/B wird zs mit der 1. M in ersten/nächsten B um beim letzten B mit der 1.M C gestrickt. Beachten Sie, daß es immer 2 M in A, 12 M in jedem B und 11 M in C gibt. Viel Spaß beim stricken!
15.01.2018 - 10:16
![]() Malgorzata wrote:
Malgorzata wrote:
Dziękuję serdecznie za odpowiedź. Teraz wszystko pasuje!!! Nie przeczytałam dokładnie wzoru. Pozdrawiam serdecznie.
20.09.2017 - 08:07
|
|||||||||||||||||||||||||
My Fairy#myfairychristeninggown |
|||||||||||||||||||||||||
 |
 |
||||||||||||||||||||||||
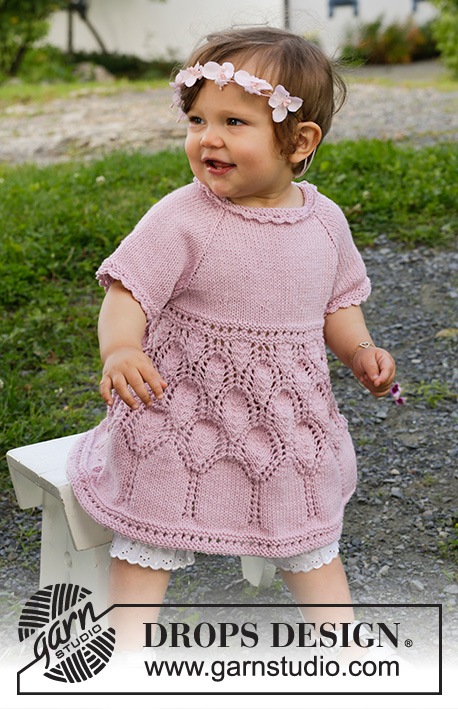
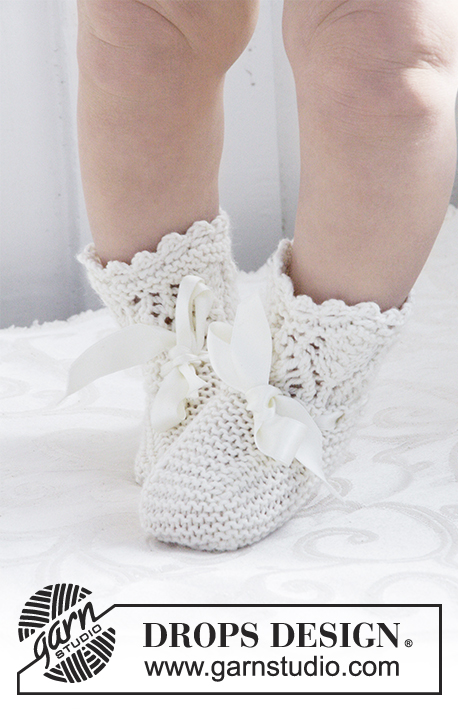
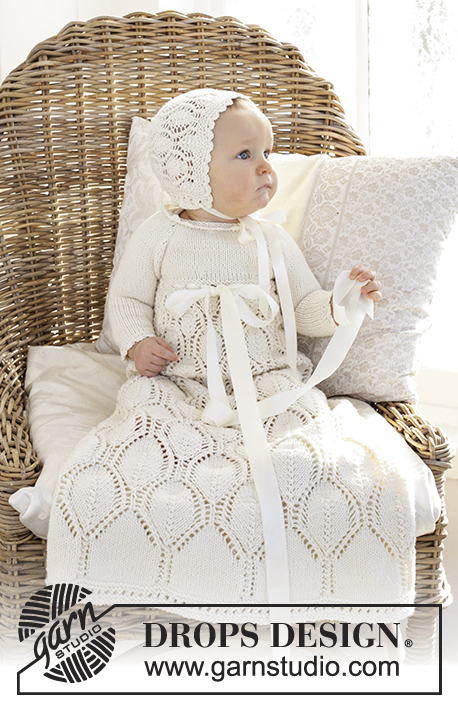
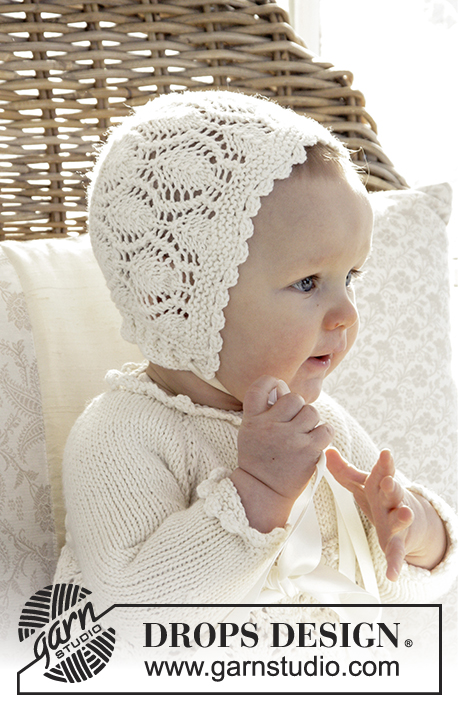
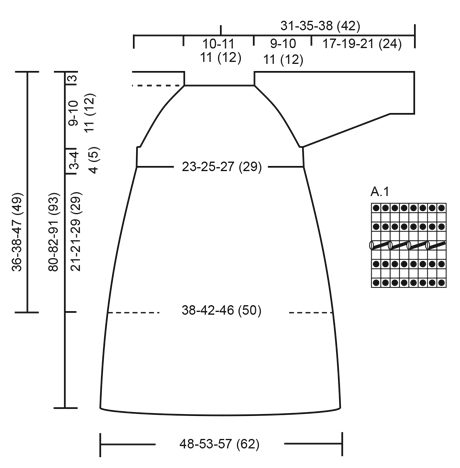
This set is made up of: Dress for Christening or special occasions worked top down with raglan and lace pattern in DROPS Cotton Merino. Knitted hat with lace pattern in DROPS Cotton Merino. Baby sizes 0 - 2 years.
DROPS Baby 29-1 |
|||||||||||||||||||||||||
|
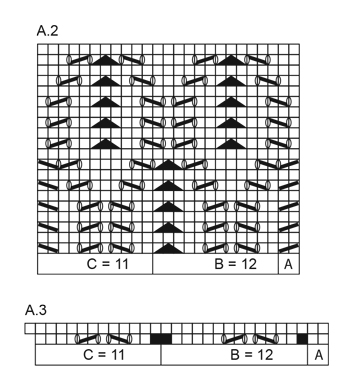
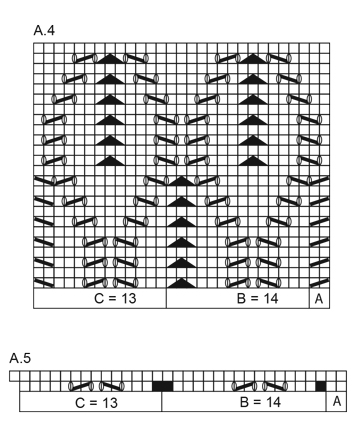
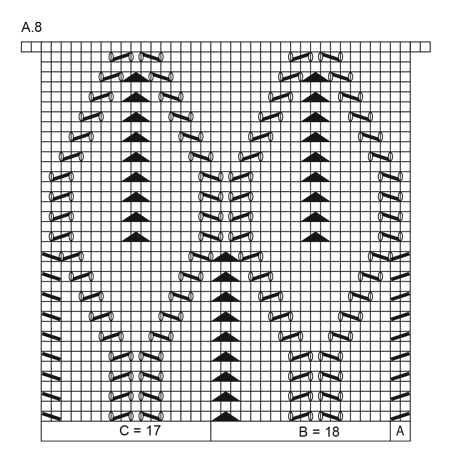
DRESS: RIDGE/GARTER STITCH (worked back and forth): 1 ridge = knit 2 rows. RIDGE/GARTER STITCH (worked in the round): 1 ridge = 2 rounds. Knit 1 round and purl 1 round. PATTERN: See diagrams A.1 to A.10. The diagrams show all the rows in the pattern from the right side. INCREASE TIP: To work out how to increase evenly along the row, count the total number of stitches on the needle (e.g. 96 stitches) and divide by the number of increases to be made (e.g. 25) = 3.84. In other words, in this example you increase after approx. every 4 stitches. Increase by making 1 yarn over. On the next round knit the yarn overs twisted to prevent holes. DECREASE TIP (for mid under sleeve): Decrease on each side of the marker thread mid under the sleeve as follows: Start 3 stitches before the marker thread, knit 2 together, knit 2 (the marker thread sits in the middle of these 2 stitches), slip 1 stitch as if to knit, knit 1, pass the slipped stitch over the knitted stitch (= 2 stitches decreased). RAGLAN: Increase to raglan on each side of the stitch with the marker thread. Increase as follows: Start just before the stitch with the marker thread, make 1 yarn over, knit 1 (= stitch with marker thread), 1 yarn over (= 2 stitches increased). On the next round, purl the yarn overs twisted to prevent holes. BUTTONHOLES: Decrease for the buttonholes on the right band at the back (when the garment is worn). 1 buttonhole = knit the second and third stitch from the edge together and make 1 yarn over. On the next row, knit the yarn overs so that there are holes. Decrease for the buttonholes when the piece measures: SIZE 0/6 MONTHS: 2, 5 and 8 cm. SIZE 6/12 MONTHS: 2, 5 and 8 cm. SIZE 12/18 MONTHS: 2, 6 and 10 cm. SIZE 2 YEARS: 2, 6 and 10 cm. ---------------------------------------------------------- DRESS: The piece is worked top down. It is worked back and forth from mid back until the band at the back is finished, then the piece is worked in the round to desired length (normal dress length or long dress) – see description in the text. YOKE: Cast on 50-54-54 (58) stitches with circular needle size 3 mm and Cotton Merino. Work 2 RIDGES – see description above. Knit 1 row from the right side where you increase 21 stitches evenly along the row (increase after approx. every 2nd stitch and do not increase over the outermost 3 stitches in each side) = 71-75-75 (79) stitches on the needle. Now insert 4 marker threads in the piece as follows (start mid back – NOTE: Do NOT work the stitches whilst inserting the marker threads): Skip the first 10-11-11 (12) stitches (= right back piece when the garment is worn), insert 1 marker thread in the next stitch, skip the next 12 stitches (= sleeve), insert 1 marker thread in the next stitch, skip the next 20-22-22 (24) stitches (= front piece), insert 1 marker thread in the next stitch, skip the next 12 stitches (= sleeve) and insert the last marker thread in the next stitch (there are now 13-14-14 (15) stitches on the row after the last marker thread (= left back piece). READ THE WHOLE OF THE NEXT SECTION BEFORE CONTINUING! Change to circular needle size 4 mm and work stocking stitch back and forth from mid back, but the 3 outermost stitches in each side are worked in garter stitch (= bands). REMEMBER THE KNITTING TENSION and remember BUTTONHOLE on the right band – see description above. AT THE SAME TIME on the first row from the right side, increase to RAGLAN on each side of the 4 marker threads – see description above (= 8 stitches increased). Increase in this way every 2nd row (i.e. every row from the right side) a total of 11-13-15 (16) times = 159-179-195 (207) stitches. After the final increase to raglan work the next row from the wrong side as follows: Work 25-28-30 (32) stitches as before (= left back piece), place the next 34-38-42 (44) stitches on 1 thread (= sleeve), cast on 6-6-8 (8) new stitches on the needle (= under the sleeve), work the next 44-50-54 (58) stitches as before (= front piece), place the next 34-38-42 (44) stitches on 1 thread (= sleeve), cast on 6-6-8 (8) new stitches on the needle (= under the sleeve) and work the remaining 22-25-27 (29) stitches as before (= right back piece). The yoke is now finished and the body and sleeves are worked separately. BODY: Insert 1 marker in the piece – THE PIECE IS NOW MEASURED FROM HERE! Start mid back, lay the 3 band stitches on the left back piece under the 3 band stitches on the right back piece (so that the band with the buttonholes is on top). Work in the round and knit 1 round over all stitches and AT THE SAME TIME knit the stitches from the two bands together 2 and 2 = 100-112-124 (132) stitches on the needle. Continue working stocking stitch in the round for 1-2-2 (3) cm – decrease AT THE SAME TIME 4-8-12 (12) stitches evenly along the first round = 96-104-112 (120) stitches. Change to circular needle size 3 mm and work pattern according to diagram A.1. When A.1 has been completed, change to circular needle size 4.5 mm. Knit 1 round where you increase 25-29-33 (37) stitches evenly – READ INCREASE TIP = 121-133-145 (157) stitches. Continue to work pattern in the round as follows: A.2A (= 2 stitches), A.2B (= 12 stitches) a total of 9-10-11 (12) times and A.2C (= 11 stitches). Continue the pattern in this way, but follow the description onwards for the desired length (dress of normal length or long dress). DRESS OF NORMAL LENGTH: When A.2 has been completed 1 time in height in all sizes, continue with pattern in the same way, but now work A.3 instead of A.2. When A.3 has been completed 1 time in height you have increased 2 stitches in each repeat of the lace pattern = 141-155-169 (183) stitches on the needle. Continue working pattern as before, but now work A.4 instead of A.3. When A.4 has been worked 1-1-2 (2) times in height (or to desired length) work A.5 instead of A.4. After A.5 there are 161-177-193 (209) stitches on the needle. Now work pattern according to diagram A.9 in the same way for approx. 5 cm, i.e. work A.9A (= 2 sts), A.9B (= 16 stitches) a total of 9-10-11 (12) times and A.9C (= 15 stitches). Work 4 rounds stocking stitch. Change to circular needle size 4 mm and work A.1 in the round over all the stitches before LOOSELY casting off (NOTE: On round 5 in A.1 knit the last stitch of the round). The dress measures approx. 36-38-47 (49) cm from the shoulder down. LONG DRESS: When A.2 has been completed 1 time in height in all sizes, continue with pattern in the same way, but now work A.3 instead of A.2. When A.3 has been completed 1 time in height you have increased 2 stitches in each repeat of the lace pattern = 141-155-169 (183) stitches. Continue working pattern as before, but now work A.4 instead of A.3. When A.4 has been worked 2-2-3 (3) times in height, work pattern in the same way, but now with A.5 instead of A.4. When A.5 has been completed 1 time in height you have increased 2 stitches in each repeat of the lace pattern = 161-177-193 (209) stitches. Continue working pattern as before, but with A.6 instead of A.5. When A.6 has been completed 2 times in height in all sizes (or to desired length), work A.7 instead of A.6. When A.7 has been completed 1 time in height you have increased 2 stitches in each repeat of the lace pattern = 181-199-217 (235) stitches. Work 1 repeat of A.8 in height. After A.8 there are 201-221-241 (261) stitches on the needle. Now work pattern according to diagram A.10 in the same way for approx. 5 cm, i.e. work A.10A (= 2 stitches), A.10B (= 20 stitches) a total of 9-10-11 (12) times and A.10C (= 19 stitches). Work 4 rounds stocking stitch. Change to circular needle size 4 mm and work A.1 in the round over all stitches before LOOSELY casting off (NOTE: On round 5 in A.1 knit the last stitch on the round). The dress measures approx. 80-82-91 (93) cm from the shoulder down. BOTH DRESSES: SLEEVE: Place the stitches from the thread on one side of the piece on double pointed needles size 4 mm. Knit 1 round and knit up in addition 1 stitch in each of the 6-6-8 (8) new stitches mid under the sleeve = 40-44-50 (52) stitches. Insert 1 marker thread in the middle of the new stitches (= the round begins mid under the sleeve) – THE PIECE IS NOW MEASURED FROM HERE! Work stocking stitch in the round. When the piece measures 2 cm in all sizes decrease 2 stitches mid under the sleeve – READ DECREASE TIP. Decrease in this way every 3-2½-2 (2) cm a total of 4-6-8 (8) times = 32-32-34 (36) stitches. Continue working until the sleeve measures 16-18-20 (23) cm. Change to double pointed needles size 3 mm and work 2 RIDGES – see description above, before loosely casting off with knit. Work the other sleeve in the same way. PICOT EDGE: Work a picot edge at the bottom of both sleeves with crochet hook size 3 mm as follows: 1 double crochet in the first stitch, * 3 chain stitches, 1 treble crochet in the first chain stitch worked, skip 2 stitches on the sleeve, 1 double crochet in the next stitch *, repeat from *-*, but finish the round with 1 slip stitch in the double crochet at the beginning of the round (instead of 1 double crochet in the next stitch). Work the same picot edge along the neckline in the transition between the garter stitch edge and the stocking stitch section on the yoke – NOTE: The edge is worked top down. ASSEMBLY: Fasten 3 buttons on the left band at the back. Thread the silk ribbon up and down through the row of holes on the yoke (start and finish mid front) and tie a bow mid front. ---------------------------------------------------------- HAT: RIDGE/GARTER STITCH (worked back and forth): 1 ridge = knit 2 rows. PATTERN: See diagrams A.1 and A.2. The diagrams show all the rows in the pattern from the right side. DECREASE TIP (for mid piece on the back of the hat): Decrease inside the outermost stitch in garter stitch in each side. All decreases are done from the right side! Decrease as follows after the first stitch in garter stitch: Slip 1 stitch as if to knit, knit 1, pass the slipped stitch over the knitted stitch. Decrease as follows before the last stitch in garter stitch: Start 2 stitches before the last stitch in garter stitch and knit 2 together. ---------------------------------------------------------- HAT: The piece is worked back and forth on circular needle. Cast on 70-78-82 (90) stitches (including 1 edge stitch in each side) with circular needle size 3 mm and Cotton Merino. Work 2 RIDGES – see description above. Knit 1 row from the right side where you decrease 7-3-7 (3) stitches evenly along the row = 63-75-75 (87) stitches. Knit 1 row from the wrong side. The next row is worked as follows from the right side: 1 edge stitch in garter stitch, A.2A (= 2 stitches), A.2B (= 12 stitches) a total of 4-5-5 (6) times, A.2C (= 11 stitches) and 1 edge stitch in garter stitch. Continue the pattern in this way. REMEMBER THE KNITTING TENSION! When the piece measures 12-13-14 (15) cm work 1 ridge over all stitches. Cut the strand. Now place the outermost 23-28-28 (33) stitches in each side on separate threads or extra needle = 17-19-19 (21) stitches left on the row (= mid piece at the back of the hat). Work garter stitch back and forth over the mid piece AT THE SAME TIME as the last stitch on each row (both from the right and wrong side) is knitted together with the first stitch on the thread/extra needle. Continue in this way. AT THE SAME TIME when the mid piece measures 4 cm in all sizes, decrease 1 stitch in each side of the mid piece – READ DECREASE TIP! Repeat the decrease when the piece measures 8-8-9 (9) cm = 13-15-15 (17) stitches left on the mid piece. Continue working until all the stitches from the threads/extra needle in each side have been worked together with the mid piece, then cast off the 13-15-15 (17) stitches on the mid piece. ASSEMBLY: Knit up from the right side approx. 66-72-76 (82) stitches along the bottom edge of the hat with circular needle size 3 mm and work pattern according to diagram A.1 with 1 edge stitch in garter stitch in each side (first row = from the wrong side). When A.1 has been completed, cast off in knit from the right side. PICOT EDGE: Work a picot edge at the front of the hat. Start from the right side at the bottom in the corner and work with hook size 3 mm as follows: 1 double crochet in the first stitch, * 3 chain stitches, 1 treble crochet in the first chain stitch worked, skip 2 stitches on the hat, 1 double crochet in the next stitch *, repeat from *-* along the whole of the front edge of the hat. Cut and fasten the strand. Thread the silk ribbon up and down through the row of holes at the bottom of the hat. |
|||||||||||||||||||||||||
Diagram explanations |
|||||||||||||||||||||||||
|
|||||||||||||||||||||||||
 |
|||||||||||||||||||||||||
 |
|||||||||||||||||||||||||
 |
|||||||||||||||||||||||||
 |
|||||||||||||||||||||||||
 |
|||||||||||||||||||||||||
Have you finished this pattern?Tag your pictures with #dropspattern #myfairychristeninggown or submit them to the #dropsfan gallery. Do you need help with this pattern?You'll find 35 tutorial videos, a Comments/Questions area and more by visiting the pattern on garnstudio.com. © 1982-2026 DROPS Design A/S. We reserve all rights. This document, including all its sub-sections, has copyrights. Read more about what you can do with our patterns at the bottom of each pattern on our site. |
|||||||||||||||||||||||||


With over 40 years in knitting and crochet design, DROPS Design offers one of the most extensive collections of free patterns on the internet - translated to 17 languages. As of today we count 325 catalogues and 12298 patterns translated into English (UK/cm).
We work hard to bring you the best knitting and crochet have to offer, inspiration and advice as well as great quality yarns at incredible prices! Would you like to use our patterns for other than personal use? You can read what you are allowed to do in the Copyright text at the bottom of all our patterns. Happy crafting!
Post a comment to pattern DROPS Baby 29-1
We would love to hear what you have to say about this pattern!
If you want to leave a question, please make sure you select the correct category in the form below, to speed up the answering process. Required fields are marked *.