
Popular categories
Looking for a yarn?


Comments / Questions (74)
![]() Renate wrote:
Renate wrote:
Ich stricke gerade das Taufkleidchen "My Fairy". Wenn in der Runde gestrickt wird und da steht: Hinreihe rechts und Rückreihe links. Stricke ich dann in der Runde beide Reihen rechts? Grüße von Renate
06.05.2026 - 18:32DROPS Design answered:
Liebe Renate, am Anfang Rumfpteil, wenn mann in der Runde strickt werden alle Maschen glatt rechts gestrickt so strickt man die Maschen rechts in jeder Runde; dann strikt man später das Lochmuster. Kann das helfen oder missverstehe ich Ihre Frage?
07.05.2026 - 08:36
![]() Katherine wrote:
Katherine wrote:
Hej detta mönstret stämmer inte. Innan jag börjar med A2 så har jag 133 maskor på stickan. När jag börjar sticka den första varvet så får jag kvar 4 maskor trots att jag har alla 133 maskor som jag ska ha. Sen antal gånger stämmer inte heller. Jag får A2.b 9 gånger när jag egentligen ska göra 10 gånger och sen om jag stickar A.2c så blir 4 maskor kvar. Så det är något som inte stämmer.
06.04.2026 - 07:30DROPS Design answered:
Hej Katherine. På första varvet stickar du såhär: 2+(120x10)+11= 133 maskor. Det hjälper ofta om man sätter markör mellan rapporterna för att se att maskantalet blir riktigt. Mvh DROPS Design
10.04.2026 - 09:14
![]() Hélène BUSSON wrote:
Hélène BUSSON wrote:
Merci beaucoup pour vos réponses détaillées à mes précédentes questions. Mon projet est pour un bébé d'un mois. Il va naître bientôt mais je dois commencer maintenant. Je me suis demandée ce que vous entendiez par "tour de tête" . Comment le vous mesurez-vous: à l'horizontale en passant sur la bosse frontale et la partie bombée à l'arrière du crâne ou verticalement en passant sous le menton ?
07.10.2025 - 23:09DROPS Design answered:
Bonjour Mme Busson, le tour de tête est pris à l'horizontale, en passant par le front et en faisant le tour de la tête. Bon tricot!
08.10.2025 - 07:43
![]() Lotje wrote:
Lotje wrote:
Heb de muts al zeker 10 keer uitgetrokken Nog nooit dit meegemaakt en al vele mensen gevraagd hoe dit patroon te lezen is Ik snap hier niks van d
03.10.2025 - 23:33
![]() Monique wrote:
Monique wrote:
Bei den Maschen markier wird die Masche mit gezählt, die man markiert? Ich komme beim anbringen der Maschen Markierer nicht auf die Maschen. Z. 71 wo liegt mein Fehler?
25.09.2025 - 13:25DROPS Design answered:
Hi, Monique, the stitches with the markers are counted, so the markers are placed like this for the smallest size: count 10 stitches, insert marker in 1 stitch, count 12 stitches, insert marker in 1 stitch, count 20 stitches, insert marker in 1 stitch, count 12 stitches, insert marker in 1 stitch, count 13 stitches (10+1+12+1+20+1+12+1+13=71 stitches). Happy knitting!
24.10.2025 - 10:04
![]() Hélène BUSSON wrote:
Hélène BUSSON wrote:
Bonjour, pour le bonnet, je rencontre deux problèmes et j'aimerais vraiment réussir. 1. Pour la partie A2C du diagramme , on crée une maille de plus que les 11 de départ (4 jetés pour 3 tricotées ensemble). 2. Ensuite au rang 3, pour la partie A2A du diagramme, je n'ai plus qu'1 maille, les deux mailles ayant été tricotées ensemble au rang 1. J'ai l'impression que les motifs ne se superposeront pas. Par avance ,merci pour votre aide détaillée
26.07.2025 - 19:39DROPS Design answered:
Bonjour Mme Busson, en fait, les motifs vont être décalés: A doit se tricoter sur 2 mailles, mais on diminue 1 m, au 1er rang, A sera ainsi: 2 m ens à l'end, 1 m end (=2 m), B doit se tricoter toujours sur 12 m (décalez vos marqueurs entre chaque motif) et C doit se tricoter sur les 11 dernières mailles. Placez bien des marqueurs entre chaque motif et décalez-les quand/si besoin pour bien conserver le bon nombre de mailles pour chaque motif = sur A,B,C vous avez au total 8 diminutions (1 dans A, 4 dans B et 3 dans C) et bien 8 jetés (4 dans B et 4 dans C). Bon tricot!
28.07.2025 - 07:40
![]() Sylvia Price wrote:
Sylvia Price wrote:
I’ve never used a chart before but I’m trying to. Can you explain. On the A2 chart If you’re following B column which 12 sts what happens when the 12th column is linked to the first column of C I don’t understand.
02.05.2025 - 11:11DROPS Design answered:
Dear Mrs Price, the number of sts should always be the same in the diagram, so for example on 9th row (from bottom) the 2 sts A.2 are: 1 dec + YO; on 11th row , you will work the last stitch of A together with the first stitch first repeat B (= still 2 sts in A), then work the last stitch first B with the first stitch next repeat B and so no then with the first stitch C. Make sure you always get the correct number of sts in each part, use help from marker if needed. Happy knitting!
02.05.2025 - 13:32
![]() Hélène BUSSON wrote:
Hélène BUSSON wrote:
Bonjour, j'ai deux questions sur le bonnet : - échantillon: à quel diagramme correspond le "point ajouré" mentionné: A1 ou A2 ? - diminutions au rang 5 : faut-il utiliser le calculateur proposé - qui place la première diminution après 8 mailles et la dernière juste à la fin du rang- ou plutôt faire la première diminution sur les mailles 5-6 , puis *(8 mailles, tricoter les 2 suivantes ensemble)* 6 fois, et tricoter les 4 dernières? Par avance, merci pour votre réponse
22.04.2025 - 23:13DROPS Design answered:
Bonjour Mme Busson, vous devez avoir le même nombre de mailles quelque soit le diagramme, autrement dit pour A.1 et A.2; lorsque vous devez diminuer à intervalles réguliers (ex après les 2 côtes mousse au début du bonnet), vous pouvez effectivement utiliser le calculateur. Bon tricot!
23.04.2025 - 07:58
![]() Henriette wrote:
Henriette wrote:
Hei igjen. Jeg forstår ikke hvordan jeg skal strikke pinne 11. Får ikke mønsteret til å gå opp. Skal man fremdeles strikke A2b 4 ggr og så A2c? Hvor slutter og begynner man? A2b slutter jo midt i en inntagning. Og skal den ene rettmasken i hver ende av diagrammet strikkes på hver rapport? Jeg har vanligvis ingen problemer med å lese diagrammer, men dette var vrient. Strikker lua 0 - 6.
27.01.2025 - 23:58DROPS Design answered:
Hei Henriette. Husk 1 kantmaske i rille og A.2A, før du strikker A.2B 4 ganger og avslutter med A.2C. Du strikker 1 kantmake i rille + A.2A (1 rett-1 kast 2 rett sammen, men da med 1. maske av A.2B) og når du gjentar A.2B så strikkes siste maske av 1.rapport av A.2B sammen med 1. maske av 2.rapport av A.2B osv). Når du strikker siste rapport og siste maske av A.2B, strikkes den sammen med 1. maske av A.2C. A.2A strikkes kun 1 gang = det startes med en rettmaske etter kantmasken og A.2C strikkes også bare 1 gang = siste maske strikkes rett og så strikkes kantmasken. mvh DROPS Design
03.02.2025 - 10:03
![]() Henriette wrote:
Henriette wrote:
Hei! Strikker lue i str 0 - 6. Stemmer det at man vil få en maske "for mye" på slutten av pinnen på den andre pinnen med mønster? Der det skal være to rett før to sammen, har jeg 3 rett. Maskeantall stemmer.
27.01.2025 - 09:35DROPS Design answered:
Hei Henriette. Du skal ha det samme maskeantallet. Husk 1 kantmaske i hver side. I str 0/6 mnd starter du med 70 masker, så felles det til 63 masker før man starter med diagrammene. Da strikkes det slik: 1 maske i rille + A.2a + A.2b + A.2b + A.2b + A.2b + A.2c + 1 maske i rille (= 63 masker). mvh DROPS Design
27.01.2025 - 14:12
|
|||||||||||||||||||||||||
My Fairy#myfairychristeninggown |
|||||||||||||||||||||||||
 |
 |
||||||||||||||||||||||||
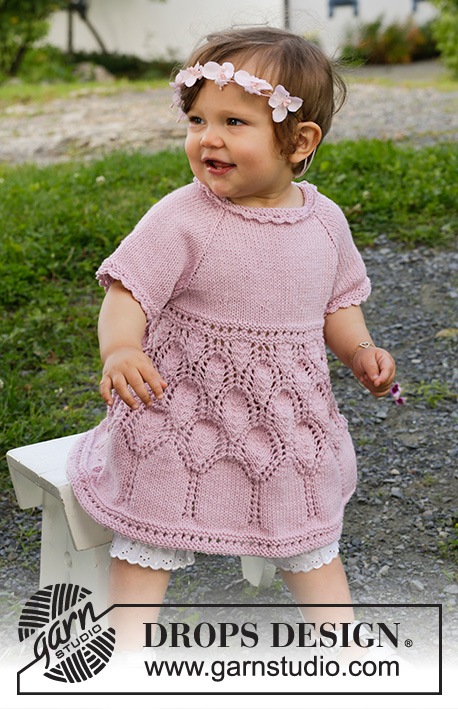
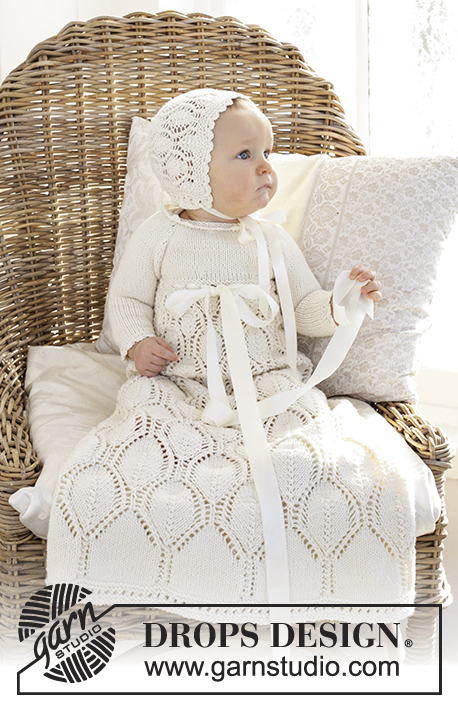
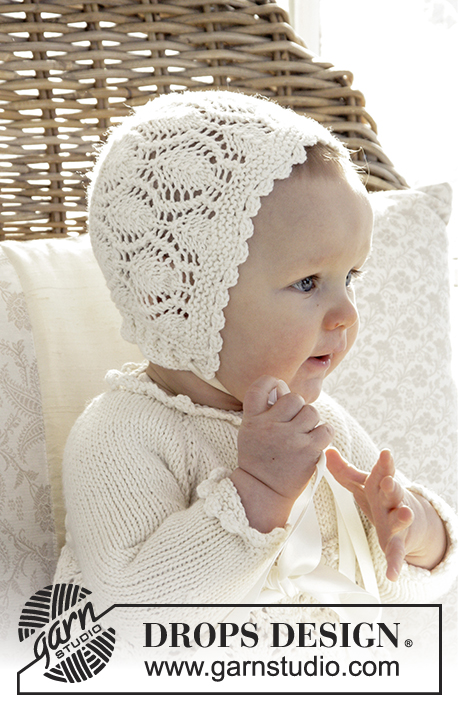
This set is made up of: Dress for Christening or special occasions worked top down with raglan and lace pattern in DROPS Cotton Merino. Knitted hat with lace pattern in DROPS Cotton Merino. Baby sizes 0 - 2 years.
DROPS Baby 29-1 |
|||||||||||||||||||||||||
|
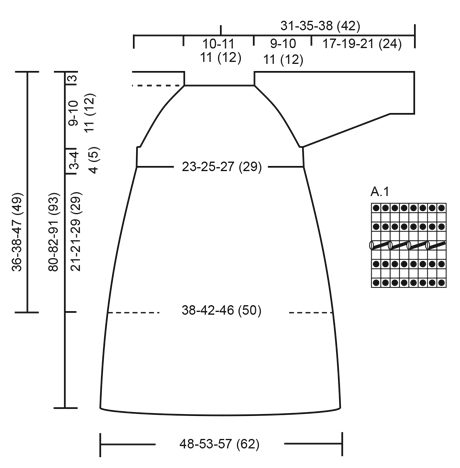
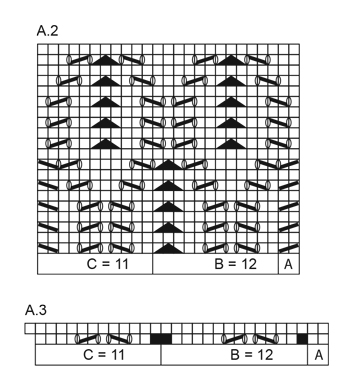
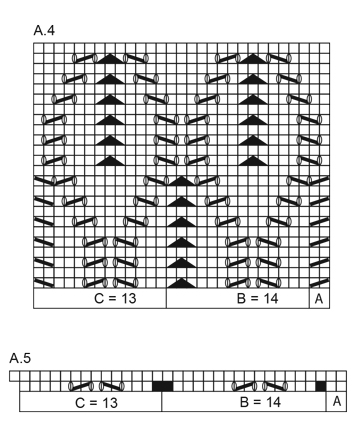
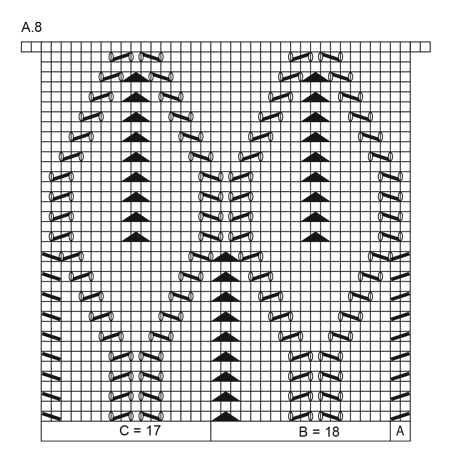
DRESS: RIDGE/GARTER STITCH (worked back and forth): 1 ridge = knit 2 rows. RIDGE/GARTER STITCH (worked in the round): 1 ridge = 2 rounds. Knit 1 round and purl 1 round. PATTERN: See diagrams A.1 to A.10. The diagrams show all the rows in the pattern from the right side. INCREASE TIP: To work out how to increase evenly along the row, count the total number of stitches on the needle (e.g. 96 stitches) and divide by the number of increases to be made (e.g. 25) = 3.84. In other words, in this example you increase after approx. every 4 stitches. Increase by making 1 yarn over. On the next round knit the yarn overs twisted to prevent holes. DECREASE TIP (for mid under sleeve): Decrease on each side of the marker thread mid under the sleeve as follows: Start 3 stitches before the marker thread, knit 2 together, knit 2 (the marker thread sits in the middle of these 2 stitches), slip 1 stitch as if to knit, knit 1, pass the slipped stitch over the knitted stitch (= 2 stitches decreased). RAGLAN: Increase to raglan on each side of the stitch with the marker thread. Increase as follows: Start just before the stitch with the marker thread, make 1 yarn over, knit 1 (= stitch with marker thread), 1 yarn over (= 2 stitches increased). On the next round, purl the yarn overs twisted to prevent holes. BUTTONHOLES: Decrease for the buttonholes on the right band at the back (when the garment is worn). 1 buttonhole = knit the second and third stitch from the edge together and make 1 yarn over. On the next row, knit the yarn overs so that there are holes. Decrease for the buttonholes when the piece measures: SIZE 0/6 MONTHS: 2, 5 and 8 cm. SIZE 6/12 MONTHS: 2, 5 and 8 cm. SIZE 12/18 MONTHS: 2, 6 and 10 cm. SIZE 2 YEARS: 2, 6 and 10 cm. ---------------------------------------------------------- DRESS: The piece is worked top down. It is worked back and forth from mid back until the band at the back is finished, then the piece is worked in the round to desired length (normal dress length or long dress) – see description in the text. YOKE: Cast on 50-54-54 (58) stitches with circular needle size 3 mm and Cotton Merino. Work 2 RIDGES – see description above. Knit 1 row from the right side where you increase 21 stitches evenly along the row (increase after approx. every 2nd stitch and do not increase over the outermost 3 stitches in each side) = 71-75-75 (79) stitches on the needle. Now insert 4 marker threads in the piece as follows (start mid back – NOTE: Do NOT work the stitches whilst inserting the marker threads): Skip the first 10-11-11 (12) stitches (= right back piece when the garment is worn), insert 1 marker thread in the next stitch, skip the next 12 stitches (= sleeve), insert 1 marker thread in the next stitch, skip the next 20-22-22 (24) stitches (= front piece), insert 1 marker thread in the next stitch, skip the next 12 stitches (= sleeve) and insert the last marker thread in the next stitch (there are now 13-14-14 (15) stitches on the row after the last marker thread (= left back piece). READ THE WHOLE OF THE NEXT SECTION BEFORE CONTINUING! Change to circular needle size 4 mm and work stocking stitch back and forth from mid back, but the 3 outermost stitches in each side are worked in garter stitch (= bands). REMEMBER THE KNITTING TENSION and remember BUTTONHOLE on the right band – see description above. AT THE SAME TIME on the first row from the right side, increase to RAGLAN on each side of the 4 marker threads – see description above (= 8 stitches increased). Increase in this way every 2nd row (i.e. every row from the right side) a total of 11-13-15 (16) times = 159-179-195 (207) stitches. After the final increase to raglan work the next row from the wrong side as follows: Work 25-28-30 (32) stitches as before (= left back piece), place the next 34-38-42 (44) stitches on 1 thread (= sleeve), cast on 6-6-8 (8) new stitches on the needle (= under the sleeve), work the next 44-50-54 (58) stitches as before (= front piece), place the next 34-38-42 (44) stitches on 1 thread (= sleeve), cast on 6-6-8 (8) new stitches on the needle (= under the sleeve) and work the remaining 22-25-27 (29) stitches as before (= right back piece). The yoke is now finished and the body and sleeves are worked separately. BODY: Insert 1 marker in the piece – THE PIECE IS NOW MEASURED FROM HERE! Start mid back, lay the 3 band stitches on the left back piece under the 3 band stitches on the right back piece (so that the band with the buttonholes is on top). Work in the round and knit 1 round over all stitches and AT THE SAME TIME knit the stitches from the two bands together 2 and 2 = 100-112-124 (132) stitches on the needle. Continue working stocking stitch in the round for 1-2-2 (3) cm – decrease AT THE SAME TIME 4-8-12 (12) stitches evenly along the first round = 96-104-112 (120) stitches. Change to circular needle size 3 mm and work pattern according to diagram A.1. When A.1 has been completed, change to circular needle size 4.5 mm. Knit 1 round where you increase 25-29-33 (37) stitches evenly – READ INCREASE TIP = 121-133-145 (157) stitches. Continue to work pattern in the round as follows: A.2A (= 2 stitches), A.2B (= 12 stitches) a total of 9-10-11 (12) times and A.2C (= 11 stitches). Continue the pattern in this way, but follow the description onwards for the desired length (dress of normal length or long dress). DRESS OF NORMAL LENGTH: When A.2 has been completed 1 time in height in all sizes, continue with pattern in the same way, but now work A.3 instead of A.2. When A.3 has been completed 1 time in height you have increased 2 stitches in each repeat of the lace pattern = 141-155-169 (183) stitches on the needle. Continue working pattern as before, but now work A.4 instead of A.3. When A.4 has been worked 1-1-2 (2) times in height (or to desired length) work A.5 instead of A.4. After A.5 there are 161-177-193 (209) stitches on the needle. Now work pattern according to diagram A.9 in the same way for approx. 5 cm, i.e. work A.9A (= 2 sts), A.9B (= 16 stitches) a total of 9-10-11 (12) times and A.9C (= 15 stitches). Work 4 rounds stocking stitch. Change to circular needle size 4 mm and work A.1 in the round over all the stitches before LOOSELY casting off (NOTE: On round 5 in A.1 knit the last stitch of the round). The dress measures approx. 36-38-47 (49) cm from the shoulder down. LONG DRESS: When A.2 has been completed 1 time in height in all sizes, continue with pattern in the same way, but now work A.3 instead of A.2. When A.3 has been completed 1 time in height you have increased 2 stitches in each repeat of the lace pattern = 141-155-169 (183) stitches. Continue working pattern as before, but now work A.4 instead of A.3. When A.4 has been worked 2-2-3 (3) times in height, work pattern in the same way, but now with A.5 instead of A.4. When A.5 has been completed 1 time in height you have increased 2 stitches in each repeat of the lace pattern = 161-177-193 (209) stitches. Continue working pattern as before, but with A.6 instead of A.5. When A.6 has been completed 2 times in height in all sizes (or to desired length), work A.7 instead of A.6. When A.7 has been completed 1 time in height you have increased 2 stitches in each repeat of the lace pattern = 181-199-217 (235) stitches. Work 1 repeat of A.8 in height. After A.8 there are 201-221-241 (261) stitches on the needle. Now work pattern according to diagram A.10 in the same way for approx. 5 cm, i.e. work A.10A (= 2 stitches), A.10B (= 20 stitches) a total of 9-10-11 (12) times and A.10C (= 19 stitches). Work 4 rounds stocking stitch. Change to circular needle size 4 mm and work A.1 in the round over all stitches before LOOSELY casting off (NOTE: On round 5 in A.1 knit the last stitch on the round). The dress measures approx. 80-82-91 (93) cm from the shoulder down. BOTH DRESSES: SLEEVE: Place the stitches from the thread on one side of the piece on double pointed needles size 4 mm. Knit 1 round and knit up in addition 1 stitch in each of the 6-6-8 (8) new stitches mid under the sleeve = 40-44-50 (52) stitches. Insert 1 marker thread in the middle of the new stitches (= the round begins mid under the sleeve) – THE PIECE IS NOW MEASURED FROM HERE! Work stocking stitch in the round. When the piece measures 2 cm in all sizes decrease 2 stitches mid under the sleeve – READ DECREASE TIP. Decrease in this way every 3-2½-2 (2) cm a total of 4-6-8 (8) times = 32-32-34 (36) stitches. Continue working until the sleeve measures 16-18-20 (23) cm. Change to double pointed needles size 3 mm and work 2 RIDGES – see description above, before loosely casting off with knit. Work the other sleeve in the same way. PICOT EDGE: Work a picot edge at the bottom of both sleeves with crochet hook size 3 mm as follows: 1 double crochet in the first stitch, * 3 chain stitches, 1 treble crochet in the first chain stitch worked, skip 2 stitches on the sleeve, 1 double crochet in the next stitch *, repeat from *-*, but finish the round with 1 slip stitch in the double crochet at the beginning of the round (instead of 1 double crochet in the next stitch). Work the same picot edge along the neckline in the transition between the garter stitch edge and the stocking stitch section on the yoke – NOTE: The edge is worked top down. ASSEMBLY: Fasten 3 buttons on the left band at the back. Thread the silk ribbon up and down through the row of holes on the yoke (start and finish mid front) and tie a bow mid front. ---------------------------------------------------------- HAT: RIDGE/GARTER STITCH (worked back and forth): 1 ridge = knit 2 rows. PATTERN: See diagrams A.1 and A.2. The diagrams show all the rows in the pattern from the right side. DECREASE TIP (for mid piece on the back of the hat): Decrease inside the outermost stitch in garter stitch in each side. All decreases are done from the right side! Decrease as follows after the first stitch in garter stitch: Slip 1 stitch as if to knit, knit 1, pass the slipped stitch over the knitted stitch. Decrease as follows before the last stitch in garter stitch: Start 2 stitches before the last stitch in garter stitch and knit 2 together. ---------------------------------------------------------- HAT: The piece is worked back and forth on circular needle. Cast on 70-78-82 (90) stitches (including 1 edge stitch in each side) with circular needle size 3 mm and Cotton Merino. Work 2 RIDGES – see description above. Knit 1 row from the right side where you decrease 7-3-7 (3) stitches evenly along the row = 63-75-75 (87) stitches. Knit 1 row from the wrong side. The next row is worked as follows from the right side: 1 edge stitch in garter stitch, A.2A (= 2 stitches), A.2B (= 12 stitches) a total of 4-5-5 (6) times, A.2C (= 11 stitches) and 1 edge stitch in garter stitch. Continue the pattern in this way. REMEMBER THE KNITTING TENSION! When the piece measures 12-13-14 (15) cm work 1 ridge over all stitches. Cut the strand. Now place the outermost 23-28-28 (33) stitches in each side on separate threads or extra needle = 17-19-19 (21) stitches left on the row (= mid piece at the back of the hat). Work garter stitch back and forth over the mid piece AT THE SAME TIME as the last stitch on each row (both from the right and wrong side) is knitted together with the first stitch on the thread/extra needle. Continue in this way. AT THE SAME TIME when the mid piece measures 4 cm in all sizes, decrease 1 stitch in each side of the mid piece – READ DECREASE TIP! Repeat the decrease when the piece measures 8-8-9 (9) cm = 13-15-15 (17) stitches left on the mid piece. Continue working until all the stitches from the threads/extra needle in each side have been worked together with the mid piece, then cast off the 13-15-15 (17) stitches on the mid piece. ASSEMBLY: Knit up from the right side approx. 66-72-76 (82) stitches along the bottom edge of the hat with circular needle size 3 mm and work pattern according to diagram A.1 with 1 edge stitch in garter stitch in each side (first row = from the wrong side). When A.1 has been completed, cast off in knit from the right side. PICOT EDGE: Work a picot edge at the front of the hat. Start from the right side at the bottom in the corner and work with hook size 3 mm as follows: 1 double crochet in the first stitch, * 3 chain stitches, 1 treble crochet in the first chain stitch worked, skip 2 stitches on the hat, 1 double crochet in the next stitch *, repeat from *-* along the whole of the front edge of the hat. Cut and fasten the strand. Thread the silk ribbon up and down through the row of holes at the bottom of the hat. |
|||||||||||||||||||||||||
Diagram explanations |
|||||||||||||||||||||||||
|
|||||||||||||||||||||||||
 |
|||||||||||||||||||||||||
 |
|||||||||||||||||||||||||
 |
|||||||||||||||||||||||||
 |
|||||||||||||||||||||||||
 |
|||||||||||||||||||||||||
Have you finished this pattern?Tag your pictures with #dropspattern #myfairychristeninggown or submit them to the #dropsfan gallery. Do you need help with this pattern?You'll find 35 tutorial videos, a Comments/Questions area and more by visiting the pattern on garnstudio.com. © 1982-2026 DROPS Design A/S. We reserve all rights. This document, including all its sub-sections, has copyrights. Read more about what you can do with our patterns at the bottom of each pattern on our site. |
|||||||||||||||||||||||||


With over 40 years in knitting and crochet design, DROPS Design offers one of the most extensive collections of free patterns on the internet - translated to 17 languages. As of today we count 325 catalogues and 12298 patterns translated into English (UK/cm).
We work hard to bring you the best knitting and crochet have to offer, inspiration and advice as well as great quality yarns at incredible prices! Would you like to use our patterns for other than personal use? You can read what you are allowed to do in the Copyright text at the bottom of all our patterns. Happy crafting!
Post a comment to pattern DROPS Baby 29-1
We would love to hear what you have to say about this pattern!
If you want to leave a question, please make sure you select the correct category in the form below, to speed up the answering process. Required fields are marked *.