
Popular categories
Looking for a yarn?


Comments / Questions (26)
![]() Lise P wrote:
Lise P wrote:
Re-bonjour. J’ai fait et refait des échantillons à plusieurs reprises, en suivant la vidéo en tricotant comme mentionné avec Le décalage indiqué et A-2 et A-3 ne donnent toujours pas le même effet. Est-ce que quelqu’un peut m’aider ? Je ne voudrais pas devoir abandonner ce projet. Merci!
25.06.2021 - 15:12DROPS Design answered:
Bonjour Lise, contactez votre magasin en lui montrant ce que vous avez fait (même en photo), ce sera bien plus simple. Vous pouvez également demander de l'aide à d'autres tricoteuses dans notre 25.06.2021 - 16:22
![]() Lise P wrote:
Lise P wrote:
Je crois que Sur l’endroit et sur l’envers les quatre dernières mailles se tricotent à l’endroit Il y a quelque chose que je n’arrive pas à saisir... Dommage que vous n’ayez pas fait la vidéo pour les trois diagrammes 🙂
16.06.2021 - 16:39DROPS Design answered:
Bonjour Lise P, rappelez-vous que les diagrammes se lisent de droite à gauche sur l'endroit et de gauche à droite sur l'envers, vous ne faites pas la même chose en même temps sur A.2 et A.3, vous avez 1 rang de décalage. Les 4 premières mailles de A.2 et les 4 dernières mailles de A.3 sont des mailles point mousse (= à l'endroit tous les rangs). Bon tricot!
17.06.2021 - 08:16
![]() Lise P wrote:
Lise P wrote:
Concernant la dentelle, j’ai regardé la vidéo plusieurs fois. Ça fonctionne bien pour les diagrammes montrés, soit A3 et A5 mais lorsqu’on fait le A2, ça ne donne pas exactement le même effet que A3. C’est comme si le jeté qu’on laisse tomber au 3e rang de A2 se retrouve sur l’avant du tricot et non à l’arrière comme sur A3
15.06.2021 - 19:34DROPS Design answered:
Bonjour Lise, A.2 se tricote en début de rang sur l'endroit/fin de rang sur l'envers et A.3 se tricote en fin de rang sur l'endroit et en début de rang sur l'envers, ainsi, le rang avec le double jeté se fait au 2ème rang = sur l'envers dans A.2 et au 3ème rang = sur l'endroit dans A.3. Pour que le motif soit bien symétrique, ils ont un rang d'écart. En espérant que ceci puisse vous aider. Bon tricot!
16.06.2021 - 07:15
![]() Lotta Johansson wrote:
Lotta Johansson wrote:
När jag stickar A4 och ska sticka 3 e raden uppifrån börjar jag på avigsidan?
17.04.2021 - 16:13DROPS Design answered:
Hej Lotta, den skal strikkes fra avigsidan :)
28.04.2021 - 13:52
![]() Christa Dewilde wrote:
Christa Dewilde wrote:
Hallo, ik zou graag dit patroon breien maar zou graag de hals wat dieper willen. Het is ook de eerste keer dat ik van boven naar beneden zal breien. Dankjewel voor de hulp
23.04.2020 - 18:29
![]() Isabelle wrote:
Isabelle wrote:
Bonjour je voudrais savoir si se modèle peux se faire au crochet merci
24.05.2019 - 08:25DROPS Design answered:
Bonjour Isabelle, ce modèle existe uniquement en version tricot, vous trouverez ici tous nos modèles de hauts au crochet. Bon crochet!
24.05.2019 - 08:33
![]() Anastasia wrote:
Anastasia wrote:
Hallo, ich bin an der Stelle, an der man das Muster A.4 1* in der Höhe stricken soll. An den Seiten wird A.2/A.3 gestrickt. Diese haben eine Höhe von 4 Reihen aber A.4 hat eine Höhe von 6 Reihen. Wenn ich mit A4 fertig bin fange ich mit A.5 an. Dann fehlen aber 2 Reihen von A.2/A.3 für den schönen Rand. Ist das richtig? Schöne Grüße Anastasia
05.02.2018 - 15:03DROPS Design answered:
Liebe Anastasia, wenn A.2 in der Höhe gestrickt wird, von der 1. Reihe wiederholen. Und nach A.4 stricken Sie A.5 über die Maschen von A.4 (A.2 weiter stricken und in der Höhe widerholen). Viel Spaß beim stricken!
05.02.2018 - 16:52
![]() Nagore wrote:
Nagore wrote:
Este patron que se teje en circular no entiendo porque en el diagrama A1 se diferencia si esta en el derecho o revés del patrón. O es solo ounto derecho y puntos revés?
28.01.2018 - 21:23DROPS Design answered:
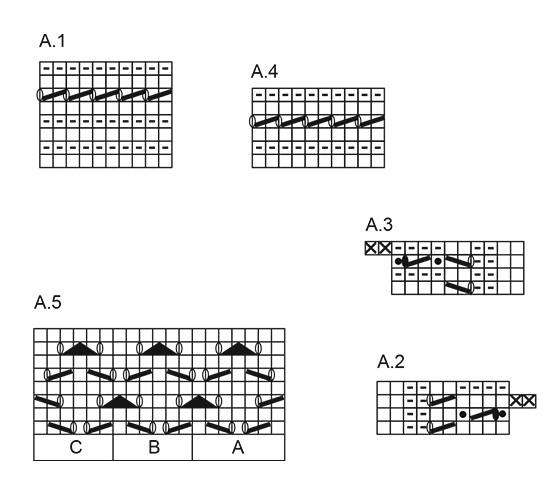
Hola Nagore. Las abreviaturas son iguales para todos los diagramas. A.1 se teje en redondo. A partir del diagrama A.2 se trabajan de ida y vuelta. A.1 se lee de la siguiente manera: fila 1: derecho; fila 2: revés; fila 3: derecho; fila 4: revés; fila 5: derecho; fila 6: 2 puntos juntos de derecho, 1 hebra; fila 7: derecho; fila 8: revés.
31.01.2018 - 20:22Genevieve Foo wrote:
Thanks very much for the video help. I've also written down the instructions on paper to keep myself in check as I always lost mid way into the pattern.
07.09.2017 - 10:05Genevieve Foo wrote:
Hi. I've just began to knit the back. Started 1st row which is the wrong side. However, I'm lost as to how to decrease on the 2nd row which is the right side. Any videos on how to do the decrease? If not, can advise the steps? Thanks.
05.09.2017 - 02:12DROPS Design answered:
Dear Mrs Foo, you will decrease before A.3 with K2 tog: knit the last st in st st and first st in A.3 tog. And you will dec after A.2 with slip 1,k1, psso: Slip the last st in A.2, K first st in st st, psso. See DECREASE TIP-2 and videos showing how to decrease at the bottom of the pattern page. Happy knitting!
05.09.2017 - 08:32
|
||||||||||||||||||||||||||||
Amandine#amandinetop |
||||||||||||||||||||||||||||
|
|
||||||||||||||||||||||||||||
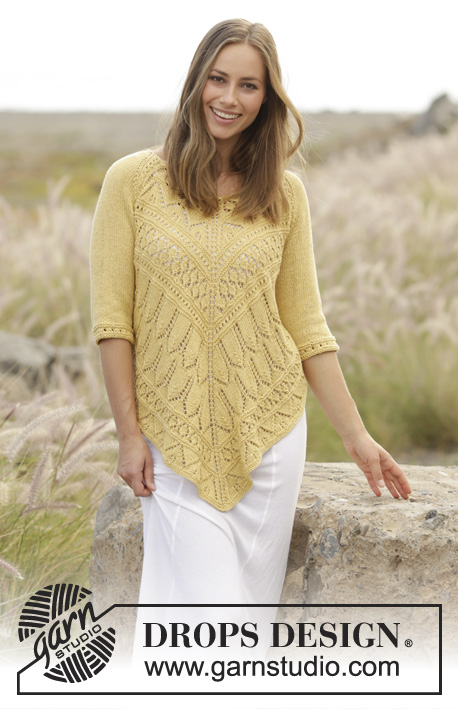
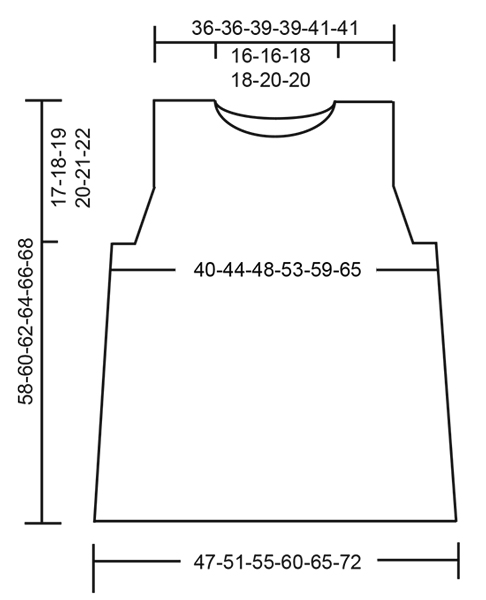
Knitted top with lace pattern and lace edge, worked bottom up in DROPS Cotton Merino. Size: S - XXXL
DROPS 176-12 |
||||||||||||||||||||||||||||
|
GARTER STITCH (worked in the round): 1 ridge = 2 rounds. Knit 1 round and purl 1 round. PATTERN: See diagrams A.1 to A.5. Diagrams show all rows/rounds in pattern seen from the right side. DECREASE TIP-1: Begin 3 stitches before marker, slip 1 stitch knitwise, knit 1, pass slipped stitch over stitch worked, knit 2 (marker is in the middle of these stitches), knit 2 together. DECREASE TIP-2: Decrease inside A.2/A.3 in each side. All decreases are done from the right side. Decrease as follows before A.3: Begin 1 stitch before A.3: Knit last stitch in stocking stitch and first stitch in A.3 together. Decrease as follows after A.2: Slip last stitch in A.2 knitwise, knit next stitch, pass slipped stitch over stitch worked. ---------------------------------------------------------- TOP: Worked in the round on circular needle up to armhole, then work front and back piece back and forth separately. Cast on 198-214-230-250-274-302 stitches on circular needle size 4 mm with Cotton Merino. Work pattern A.1. When A.1 has been worked 1 time vertically, continue in stocking stitch. Insert 1 marker in each side; 1 at the beginning of round and 1 after 99-107-115-125-137-151 stitches (= sides). When piece measures 6 cm, decrease 1 stitch on each side of markers in the side (= 4 stitches decreased) - READ DECREASE TIP-1! Decrease every 5-5-5½-5½-6-6 cm 7 times in total = 170-186-202-222-246-274 stitches. When piece measures 40-41-42-43-44-45 cm, work ridges in GARTER STITCH - see explanation above, over 12-16-16-24-28-40 stitches in each side (= 6-8-8-12-14-20 stitches on each side of each marker), continue the remaining stitches in stocking stitch. When 2 ridges have been worked in the side, work next round as follows: Cast off the first 2-4-4-8-10-16 stitches, knit 81-85-93-95-103-105 stitches, cast off the next 4-8-8-16-20-32 stitches, knit 81-85-93-95-103-105 stitches and cast off the last 2-4-4-8-10-16 stitches. Now finish front and back piece back and forth separately. BACK PIECE: = 81-85-93-95-103-105 stitches. Continue as follows, purl first row from wrong side: A.3, begin on 2nd row in pattern (from the left side in diagram) (= 10 stitches), work in stocking stitch until 10 stitches remain and finish with A.2, begin on 2nd row in pattern (from the left side in diagram) (= 10 stitches). On next row from right side decrease 1 stitch in each side, decrease inside A.2 and A.3 - SEE DECREASE TIP-2. Decrease on every other row (every row from right side) 3-5-6-7-8-9 times in total = 75-75-81-81-87-87 stitches. When piece measures 44-46-47-49-50-52 cm (decreases are now done), continue as follows from right side: A.2, A.4 until 11 stitches remain, finish with 1 stitch in stocking stitch and A.3. When A.4 has been worked 1 time vertically, continue as follows from right side: A.2, A.5 A (= 7 stitches), A.5 B over the next 42-42-48-48-54-54 stitches, A.5 C (= 6 stitches), finish with A.3. Continue this pattern until piece measures 56-58-60-62-64-66 cm, cast off the middle 31-31-35-35-39-39 stitches. Finish each shoulder separately. On next row decrease 1 stitch from the neck = 21-21-22-22-23-23 stitches remain on each shoulder. NOTE: Work stitches that do not fit the pattern towards the neck in stocking stitch when decreasing. Cast off when piece measures 58-60-62-64-66-68 cm. FRONT PIECE: = 81-85-93-95-103-105 stitches. Work as back piece until piece measures 52-54-56-57-59-61 cm = 75-75-81-81-87-87 stitches. Now slip the middle 25-25-29-29-33-33 stitches on a stitch holder and finish each shoulder separately. Continue to cast off for neck at beginning of every row from neck as follows: Cast off 2 stitches 1 time and 1 stitch 2 times = 21-21-22-22-23-23 stitches remain for shoulder - NOTE: Work stitches that do not fit the pattern towards the neck in stocking stitch when decreasing. Continue pattern as before. Cast off when piece measures 58-60-62-64-66-68 cm. Repeat on the other shoulder. ASSEMBLY: Sew the shoulder seem, sew edge to edge in outermost stitch to avoid a thick seem. NECK EDGE: Pick up approx. 80 to 100 stitches around the neck (including stitches on stitch holder) on a short circular needle size 4 mm. Work 2 ridges in GARTER STITCH, then cast off by knitting. |
||||||||||||||||||||||||||||
Diagram explanations |
||||||||||||||||||||||||||||
|
||||||||||||||||||||||||||||
 |
||||||||||||||||||||||||||||
 |
||||||||||||||||||||||||||||
Have you finished this pattern?Tag your pictures with #dropspattern #amandinetop or submit them to the #dropsfan gallery. Do you need help with this pattern?You'll find 30 tutorial videos, a Comments/Questions area and more by visiting the pattern on garnstudio.com. © 1982-2026 DROPS Design A/S. We reserve all rights. This document, including all its sub-sections, has copyrights. Read more about what you can do with our patterns at the bottom of each pattern on our site. |
||||||||||||||||||||||||||||


With over 40 years in knitting and crochet design, DROPS Design offers one of the most extensive collections of free patterns on the internet - translated to 17 languages. As of today we count 324 catalogues and 12290 patterns translated into English (UK/cm).
We work hard to bring you the best knitting and crochet have to offer, inspiration and advice as well as great quality yarns at incredible prices! Would you like to use our patterns for other than personal use? You can read what you are allowed to do in the Copyright text at the bottom of all our patterns. Happy crafting!
Post a comment to pattern DROPS 176-12
We would love to hear what you have to say about this pattern!
If you want to leave a question, please make sure you select the correct category in the form below, to speed up the answering process. Required fields are marked *.