
Popular categories
Looking for a yarn?


Comments / Questions (24)
![]() Sissi wrote:
Sissi wrote:
Merci pour votre réponse. Mais je n'ai pas bien compris "cette partie sera ensuite assemblée le long du dos (la maille à monter côté encolure et pour la couture le long des diminutions du dos)" dans votre explication. Est ce que la couture de l'épaule se retrouve dans le dos ? Quelle est cette maille à monter côté encolure ?
18.05.2021 - 08:48DROPS Design answered:
Bonjour Sissi, chaque épaule va se terminer en forme triangle, et vous assemblerez ensuite le côté du triangle (jusqu'à la pointe) contre les mailles diminuées pour le raglan en haut du dos. Cette maille à monter côté encolure est pour la couture, c'est la maille lisière. Bon tricot!
18.05.2021 - 11:32
![]() Sissi wrote:
Sissi wrote:
Pouvez vous expliquer ce que veut dire pour le devant : . À 56-58-60 ..... Continuer l'épaule pour le dos. Monter 1 m côté encolure = 25-23-20 m. Diminuer 1 m côté encolure tous les 2 rangs jusqu'à ce que toutes les mailles aient été diminuées. Merci
14.05.2021 - 10:21DROPS Design answered:
Bonjour Sissi, le marqueur sert pour repérer le haut de l'épaule, vous continuez à tricoter les mailles maintenant pour la partie épaule du dos en diminuant 1 maille tous les 2 rangs jusqu'à ce que toutes les mailles soient diminuées et cette partie sera ensuite assemblée le long du dos (la maille à monter côté encolure et pour la couture le long des diminutions du dos). Bon tricot!
17.05.2021 - 08:24
![]() AS wrote:
AS wrote:
Est-ce possible pour vous de me donner les explications avec les abbréviations à faire de chaque mailles au début du rang et à la fin de rang ? Diminuer 1 m comme indiqué ci dessus en tricotant 2 m ens à l'envers. EN MÊME TEMPS, augmenter avec 1 jeté (faire la première augmentation à 1 m lis du bord, puis augmenter 1 m de plus à chaque fois qu'il y a un rang ajouré le long du raglan de l'emmanchure.
08.03.2020 - 18:53DROPS Design answered:
Bonjour AS, vous diminuez à 3 m des bords de chaque côté et vous augmentez à 1 m des bord en même temps: donc vous aurez pour la 1ère série: 1 m, 1 augm, 2 m, 1 diminution en début de rang et en fin de rang: 1 dim, 2 m, 1 augm, 1 m. Vous aurez ensuite 2 m, 1 augm, 2 m, 1 dim... 1 dim, 2 m, 1 augm, 2 m et ainsi de suite, vous allez augmenter et diminuer de part et d'autre des 2 mailles soulignées ci-dessus. ce sont des mailles de raglan et les nouvelles mailles sont celles des manches. Bon tricot!
09.03.2020 - 12:06
![]() Anna wrote:
Anna wrote:
Je suis rendue BLOQUÉE de l'incompréhension de ce qui signifie ci-dessous: Diminuer ensuite tous les 2 rangs 5-9-13 fois 1 m de chaque côté pour les emmanchures à 3 m des bords -voir diminutions ci dessus = 88-92-96 m.
02.03.2020 - 17:07DROPS Design answered:
Bonjour Anna. Cela signifie que tu dois revenir plus tot dans le modele et voir la section (ci-dessus) suivant: Diminutions : toutes les diminutions se font sur l'endroit. Diminuer 1 m à 3 m des bords tricotées ainsi : 1 m lis au point mousse, 2 m jersey... Bon travail!
03.03.2020 - 07:41
![]() Paola wrote:
Paola wrote:
Salve Vorrei realizzare questo modello con Karisma , ma a maniche lunghe. Per le maniche posso raccordarmi al raglan? E nel caso come posso calcolare il numero di maglie da cui partire prima di iniziare il raglan delle maniche? Grazie
27.02.2020 - 10:55DROPS Design answered:
Buongiorno Paola, per un aiuto così personalizzato può rivolgersi al suo rivenditore DROPS di fiducia. Buon lavoro!
28.02.2020 - 09:21
![]() Lianne wrote:
Lianne wrote:
Hallo, ik heb een vraagje over het volgende stukje: Brei door in patroon tot een hoogte van 35-36-37 cm. Kant 4 st af aan weerskanten = 98-110-122 st resteren, en kant vervolgens 5-9-13 x 1 st aan weerskanten naast de 3 kantst in elke 2e nld - zie breitips-1 = 88-92-96 st. in het Nederlandse patroon staat kant eerst 4 aan beide kanten af en daarna nog 5x1st, in het engelse patroon staat, decrease (dus minderen ipv afkanten), Ik neem aan dat het inderdaad minderen is?
13.09.2019 - 16:06DROPS Design answered:
Dag Lianne,
Ja hoor, daar wordt hetzelfde mee bedoeld in dit geval. Decrease betekent minderen en soms wordt dat woord ook gebruikt voor afkanten
13.09.2019 - 20:05Hekmat wrote:
What about tip1,would you please explain it .and if my measurements are below XL too much and above L by 4cm to each part (fornt and back) alone what should I do? Thanks for your answers
14.12.2018 - 14:13DROPS Design answered:
Dear Mrs Hekmat, when you only decrease work as follow: 1 edge st, K2, P2 tog (= 1 st dec), continue as before and finish row with P2 tog (= 1 st dec), K2, 1 edge st. We are unfortunately not able to adjust every pattern to each individual measurements, for any further assistance please contact the store where you bought the y arn - even per mail or telephone- they will assisst you adjusting the armholes if required. Happy knitting!
14.12.2018 - 14:55Hekmat wrote:
I do not understand the kitting tip 1and2 specially tip 2 ,would you please make video tutorial for them for this pattern.
13.12.2018 - 23:49DROPS Design answered:
Dear Mrs Hekmat, When you have to inc and dec at the same time work as follows: 1 edge st, YO (= increase 1 st), K2, P2 tog, and finish row with P2 tog, K2, YO (= inc 1 st), 1 edge st. Continue increasing like this with a YO before the (K2, P2 tog (dec for raglan)) at the beg of row and with a YO after (P2 tog, K2) at the end of row. Work the increase sts in stocking st. Happy knitting!
14.12.2018 - 08:38
![]() Anna wrote:
Anna wrote:
Que veut dire ? M2, M1...
15.11.2018 - 20:07DROPS Design answered:
Bonjour Anna, M1, M2 ect. sont les diagrammes des points fantaisies. Ils sont en bas de page. Comment lire les diagrammes des points fantaisie dans les explications vous troverez ICI. Bon travail!
15.11.2018 - 20:34Maria wrote:
Hello! Are the diagramm descriptions for the right site? For example at the 5th sign ( 5sts in stockinette st), in the wrong side should I purl 5? Thank you !
04.04.2016 - 19:33DROPS Design answered:
Dear Maria, the diagrams are showing all rows from RS, starting from the bottom corner on the right side towards the left from RS and from the left towards the right from WS. so that sts with 4th symbol will be worked K from RS and P from WS (= 5 sts in stocking st). Happy knitting!
05.04.2016 - 09:12
|
||||||||||||||||||||||
That Girl |
||||||||||||||||||||||
 |
 |
|||||||||||||||||||||
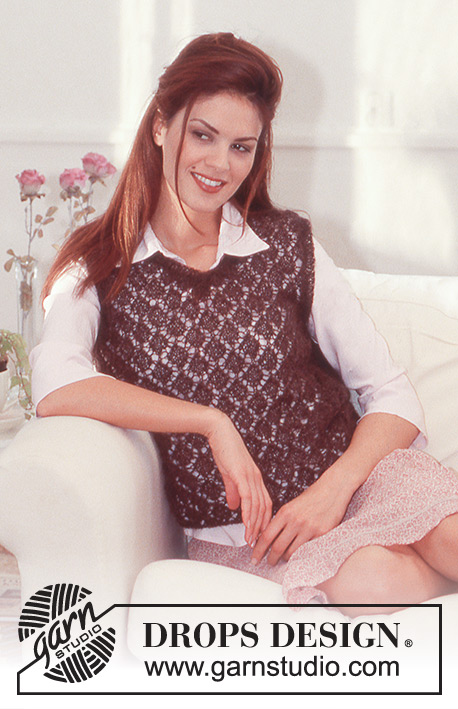
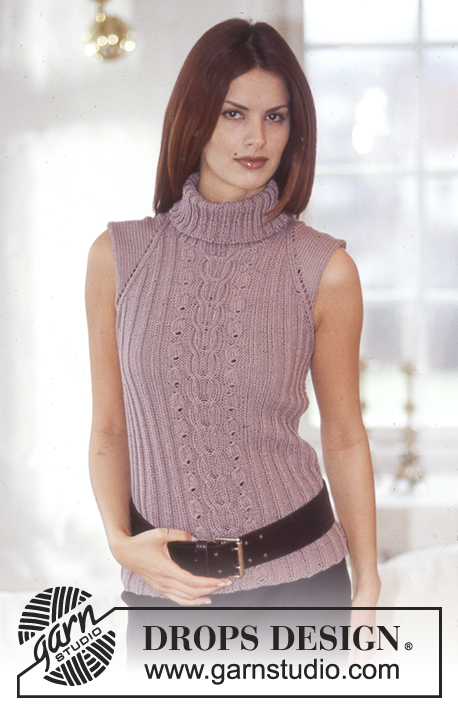
DROPS Top in Muskat.
DROPS 73-15 |
||||||||||||||||||||||
|
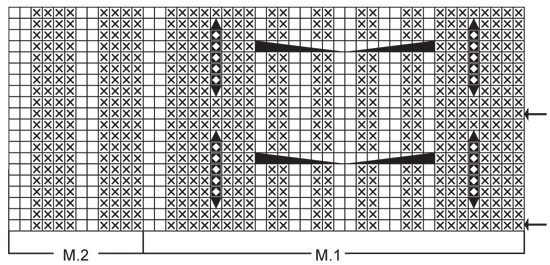
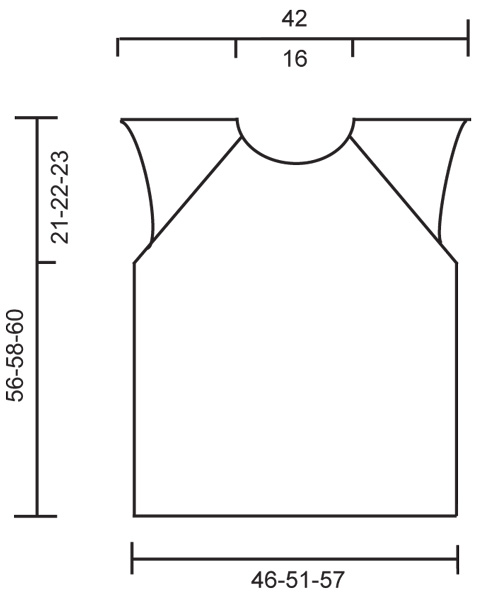
Gauge: 21 sts x 28 rows = 10 x 10 cm in stockinette st. Garter st, when knitting flat: Knit all sts, all rows. Pattern: See chart. The pattern is seen from the right side. Knitting tips-1: All decs are made on right side rows. Dec 1 st inside 3 edge sts, knit as follows from edge: 1 st in garter st and 2 sts in stockinette st. After 3 edge sts: P 2 tog Before 3 edge sts: P 2 tog, twisting sts Knitting tips-2: read this entire section before knitting: You will be increasing sts for the shoulder at the same time as decreasing for the armhole. All incs and decs occur on the same rows (right side rows). Dec 1 st as explained in knitting tips-1 by P 2 tog. At the same time inc 1 st with yo - make the first inc inside of 1 edge st, then inc inside 1 st more each time so that there will be a line of holes along «raglan» armhole. Note: Knit the edge st and then the first 2 increased sts (3 sts at side edge) in garter st throughout – these sts will fold under at the edge – knit the remaining increased sts in stockinette st. ------------------------------------------------------------ Front: Cast on 106-118-130 sts. Establish pattern on first row as follows: P 1, Pattern 2 over 36-42-48 sts, Pattern 1 (= 34 sts), Pattern 2 over 34-40-46 sts, P 1. Continue in pattern as established until the piece measures 35-36-37 cm. Bind off 4 sts at each side = 98-110-122 sts remain, then dec 1 st at each side for armhole inside 3 edge sts every other row 5-9-13 times - see knitting tips-1 = 88-92-96 sts. Now dec and inc 1 st every other row 24-22-19 times according to knitting tips-2. At the same time when the piece measures approx. 48-50-52 cm - adjust to end after one of the arrows on the chart - put the center 20 sts on a st holder for the neck. Then bind off at each neck edge every other row: 3 sts 1 time, 2 sts 2 times and 1 st 2 times. After all neck shaping and incs/decs for sleeve are complete, 25-27-29 sts remain on each shoulder. Continue in stockinette st with the 3 outermost sts of shoulder in garter st. When the piece measures 56-58-60 cm put a marker at the side = top of shoulder – and bind off 1-5-10 sts at neck edge = 24-22-19 sts remain. Continue on shoulder sts for back. Cast on 1 new st at the neck edge = 25-23-20 sts. Then dec 1 st at the neck edge every other row until all sts are decreased. Back: Cast on 94-106-118 sts. Establish pattern on first row as follows (right side row): P 1, K 2, Pattern 2 over 90-102-114 sts, P 1. Continue with pattern as established until the piece measures 35-36-37 cm. Dec 1 st for armhole at each side every other row 29-31-32 times - see knitting tips-1. At the same time when the piece measures 54-56-58 cm bind off the center 30 sts for the neck. Then bind off 2 sts at each neck edge on the next row = 1-5-10 sts remain on each shoulder. Bind off, the piece measures approx. 56-58-60 cm. Assembly: Sew shoulder seams. Sew shoulder piece from front to back using 1 edge st as seam allowance - see that the sleeves start on the same place on back as on front. Sew side seams using 1 edge st as seam allowance. Note: The P 4 at each side of front is the side –the seams are offset to the back. Collar: Pick up approx. 92-100 sts (divisible by 4, incl. sts on st holder) around the neck on double-pointed needles and knit rib (K 2, P 2) - see that sts follow those on front. Bind off in pattern when the collar measures 18 cm. |
||||||||||||||||||||||
Diagram explanations |
||||||||||||||||||||||
|
||||||||||||||||||||||
 |
||||||||||||||||||||||
 |
||||||||||||||||||||||
Have you finished this pattern?Tag your pictures with #dropspattern or submit them to the #dropsfan gallery. Do you need help with this pattern?You'll find 18 tutorial videos, a Comments/Questions area and more by visiting the pattern on garnstudio.com. © 1982-2026 DROPS Design A/S. We reserve all rights. This document, including all its sub-sections, has copyrights. Read more about what you can do with our patterns at the bottom of each pattern on our site. |
||||||||||||||||||||||


With over 40 years in knitting and crochet design, DROPS Design offers one of the most extensive collections of free patterns on the internet - translated to 17 languages. As of today we count 324 catalogues and 12290 patterns translated into English (UK/cm).
We work hard to bring you the best knitting and crochet have to offer, inspiration and advice as well as great quality yarns at incredible prices! Would you like to use our patterns for other than personal use? You can read what you are allowed to do in the Copyright text at the bottom of all our patterns. Happy crafting!
Post a comment to pattern DROPS 73-15
We would love to hear what you have to say about this pattern!
If you want to leave a question, please make sure you select the correct category in the form below, to speed up the answering process. Required fields are marked *.