
Popular categories
Looking for a yarn?


|
|||||||
DROPS 73-16 |
|||||||
|
|
|||||||
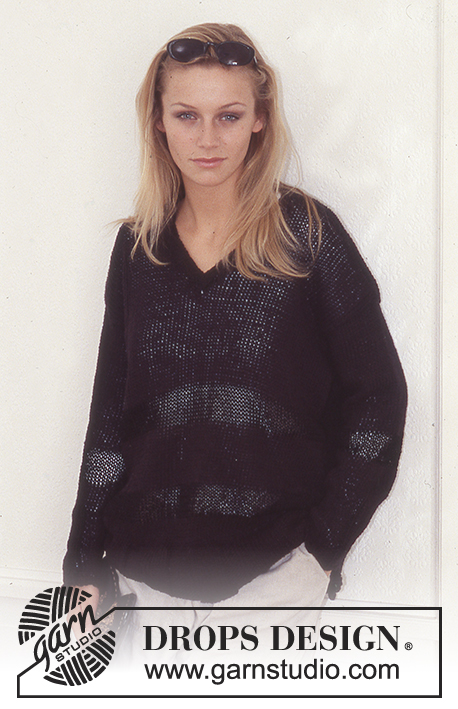
Knitted Pullover in DROPS Bomull-Lin and Cotton Viscose. Summerhat in DROPS Paris
DROPS 73-16 |
|||||||
|
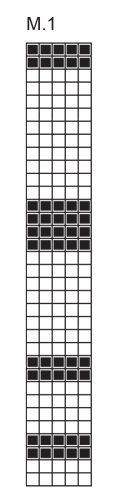
PULLOVER: Gauge: 12 sts x 18 rows with Bomull-Lin in garter st = 10 x 10 cm. Garter st, when knitting flat: Knit all sts, all rows. Stripe Pattern: See chart. 1 row of chart = 2 rows garter st. The pattern repeats to finished measurements. Knitting tips for decreasing (for neck shaping): Dec 1 st inside of 4 edge sts knit as follows from edge: 3 sts garter st, 1 st stockinette st: After 4 edge sts: K 2 tog. Before 4 edge sts: Slip 1 as if to knit, K 1, psso. Measuring tips: Because of the pattern, the garment pulls in when held up or worn – the measurements on the diagram are shown as held up or worn. -------------------------------------------------------------------- Front: Cast on 58-64-70-74-80 sts with Bomull-Lin and knit garter st following Pattern 1, but keep 4 sts at each side knit as follows from edge: 3 sts in garter st and 1 st in stockinette st. When the piece measures 24 cm - see Measuring tips - end split and inc 1 st at each side for seam allowance = 60-66-72-76-82 sts. Now knit garter st over all sts. Knit entire next section before knitting: Armhole: When the piece measures 53-55-57-60-62 cm bind off for armhole at each side every other row: 3 sts 1 time, 2 sts 0-1-2-2-3 times and 1 st 2-2-2-4-4 times. Neck: At the same time when the piece measures 54-56-59-63-66 cm bind off the 2 center sts for V-neck and knit each piece separately. Put sts on left side on a st holder. Right side: Dec 1 st at neck edge every 4 rows 6-6-7-7-8 times - see knitting tips = 18-19-19-19-19 sts remain on shoulder. Bind off when the piece measures 73-76-79-83-86 cm. Left side: Put sts from st holder back on needles - begin the 1st row from center front (wrong side row) - start by picking up 1 st in the 1st bound off st and knit together with 1st st on needle (this is the lower edge of V-neck). Continue the same as right side and bind off when the piece measures 73-76-79-83-86 cm. ---------------------------------------------------------------------- Back: Cast on and knit the same as the front. Bind off for armhole as on front until the piece measures 71-74-77-81-84 cm - see Measuring tips, (adjust to end after wrong side row). Now bind off the center 12-12-14-14-16 sts for the neck. Then dec 1 st at each neck edge on the next row - see knitting tips = 18-19-19-19-19 sts remain on each shoulder. Bind off when the piece measures 73-76-79-83-86 cm. Sleeve: Cast on 30-32-32-34-34 sts with Bomull-Lin and knit garter st following Pattern 1. When the piece measures 12 cm inc 1 st at each side every 4-4-3.5-3-2.5 cm a total of 9-9-10-10-11 times = 48-50-52-54-56 sts. When sleeve measures 49-48-46-44-43 cm bind off for sleeve cap at each side every other row: 3 sts 2-3-3-3-4 times, then bind off 2 sts at each side until the piece measures 53 cm and then bind off 3 sts at each side until the piece measures 55 cm. Bind off the remaining sts. Assembly: Sew shoulder seams. Sew in sleeves. Sew sleeve and side seams using edge sts as a seam allowance, leaving open side slit at each side. HAT Sunny Daze Size: S/M - L Materials: Drops Paris from Garnstudio 150 g colour no 59, light old pink DROPS crochet hook size 3.5 mm – or the size needed to obtain correct crochet tension. Crochet tension: 20 tr in width crochet with hook size 3.5 mm and Paris = 10 cm Crochet tips: Substitute the first tr on each round with 3 ch . Finish each round with 1 sl st in first tr (3rd ch). Hat: Crochet 4 ch using hook size 3.5 mm in Paris and make a ring with a sl st in the first ch. 1st round: – Read Crochet tips! Crochet 5 tr in ring 2nd round: Crochet 2 tr in each tr = 10 tr. 3rd round: Crochet 2 tr in each tr = 20 tr. 4th round: *2 tr in the first tr, 1 tr in the next tr* repeat from *-* = 30 tr. 5th round: *2 tr in the first tr, 1 tr in the next tr, 1 tr in the next tr*, repeat from *-* = 40 tr. 6th-10th (6th – 11th) round: Inc. a total of 10 times on each round, inc. in line with previous inc. i.e there will be 1 more tr ine between each inc. for each round. Inc. as done earlier as follows: crochet 2 tr in 1 tr = 90 tr (For size L do 6 rounds with inc. = 100 tr) 11th (12th) round: Crochet 1 tr in each tr = 90 (100) tr 12th (13th) round: 1 tr in the first tr *2 ch, skip over 1 tr, 1 tr in the next tr*, repeat from *-* and finish with 2 ch, skip over 1 tr and 1 sl st at beg. of round = 45 (50) tr 13th – 18th (14th-19th) round: 1 tr in the first tr, *2 ch, skip over 2 ch, 1 tr in the next tr*, repeat from *-* and finish with 2 ch and 1 sl st at beg. of round = 45 (50) tr. 19th (20) round: *1 tr in each tr, 1 tr in each ch-loop*, repeat from *-* = 90 (100) tr 20th (21th) round: *1 tr in each tr = 90 (100) tr 21th (22nd) round: Crochet 1 round with tr at the same time inc. in every 5th tr as follows: crochet 2 tr in 1 tr. = 108 (120) tr 22nd- 23rd (23rd-24th) round: Crochet 1 tr in each tr = 108 (120) tr 24th(25th) round: Crochet 1 round at the same time inc. 10 (12) tr evenly distributed. Inc. as follows: crochet 2 tr in 1 tr = 118 (132) tr 25th – 26th (26th-27Th) round: Crochet 1 tr in each tr = 118 (132) tr 27th. (28th) round: Crochet 1 round with tr at the same time inc. 12 (13) tr evenly distributed. Inc. as follows: crochet 2 tr 1 tr = 130 (145) tr. Cut and sew the thread. |
|||||||
Diagram explanations |
|||||||
|
|||||||

|
|||||||
|
|||||||
|
Have you made this or any other of our designs? Tag your pictures in social media with #dropsdesign so we can see them! Do you need help with this pattern?You'll find tutorial videos, a Comments/Questions area and more by visiting the pattern on garnstudio.com. © 1982-2024 DROPS Design A/S. We reserve all rights. This document, including all its sub-sections, has copyrights. Read more about what you can do with our patterns at the bottom of each pattern on our site. |
|||||||


With over 40 years in knitting and crochet design, DROPS Design offers one of the most extensive collections of free patterns on the internet - translated to 17 languages. As of today we count 304 catalogues and 11422 patterns - 11422 of which are translated into English (UK/cm).
We work hard to bring you the best knitting and crochet have to offer, inspiration and advice as well as great quality yarns at incredible prices! Would you like to use our patterns for other than personal use? You can read what you are allowed to do in the Copyright text at the bottom of all our patterns. Happy crafting!
Comments / Questions (4)
Hallo, ich bin gerade am Häkeln dieses Hutes, verstehe aber das Lochmuster nicht. Wie sieht die 14. Rd aus, wo ich schon Lm-Bögen habe? Auf dem Bild sieht es so aus als ob die Lm-Bögen im Lochmuster verschoben würden, aber wie das gemacht wird, ist für mich nicht klar. Vielen Dank für die Hilfe im Voraus!
02.07.2021 - 22:22DROPS Design answered:
Liebe Bernadett, die Löcher sind hier mit Stäbchen und Luftmaschen gehäkelt, dh wie erklärt für R 13 bis 19. Gerne können Sie die Stäbchen unter den vorrigen 2 Luftmaschen anstatt in das Stäbchen häkeln, Viel Spaß beim häkeln!
05.07.2021 - 07:27Moeten de stokjes van toer 14 bij het hoedje in de stokjes van toer 13 of in de lossenbogen van toer 13, (of nog weer anders, aangezien je na het stokje 1 steek overslaat en je dan eigenlijk in de 2e losse vd lossenboog terecht komt) ? ik hoor graag, dank u!
25.05.2019 - 20:12DROPS Design answered:
Dag Gabriëlle,
Deze moeten inderdaad in de stokjesbogen (om de lossen die tussen de stokjes zitten)
26.05.2019 - 09:33Los cm para empezar la sisa de las mangas es menor cuando la talla del Jersey es mayor. ¿ es correcto?
25.03.2019 - 22:46DROPS Design answered:
Hola Alexandra. Si te refieres a la copa de la manga si, es correcto.
13.04.2019 - 20:55Har försökt att sticka nr 9 men det blir ojämnt inte alls som på bilden har gått över till nr 7. Själva strukturen på tröjan blir då bättre men varför får jag inte snygga kanter i sprunden och där jag byter till randningen blir inte heller snyggt. Har gjort randning efter videon och försökte även med kedjekant men det blir också håligt och fult. Vad gör jag för fel?
05.08.2017 - 08:07DROPS Design answered:
Kom ihåg att kontrollera stickfastheten så att den stämmer, då borde det se ut som på bilden. Vid sprunden är det viktigt att det inte stickas för löst. Du ska även alltid byta till ny färg från rätsidan av arbetet.
09.08.2017 - 13:50