
Popular categories
Looking for a yarn?


Comments / Questions (112)
![]() DROPS Design Deutschland wrote:
DROPS Design Deutschland wrote:
Liebe Lisa, Entschuldigung, ich habe in der Schnelle den Namen Ihrer "Nachbarin" erwischt.
03.12.2012 - 09:45
![]() Lisa wrote:
Lisa wrote:
Habe auch ein Problem mit dem Kragen: Welcher Teil wird an welcher Seite angenäht? Ich verstehe nicht ganz, was mit "äußeren Maschen" gemeint ist, nähe ich die kürzere Seite oder die längere an?
02.12.2012 - 20:48DROPS Design answered:
Hallo Lilly, der Kragen wird ja zunächst unten aus dem Halsausschnitt herausgestrickt und dann in Krausrippen fortgeführt. Wenn Sie das gestickt haben, sehen Sie ganz deutlich, welcher Teil an den hinteren Halsausschnitt angenäht werden muss (der kürzere Teil), sonst wäre der Kragen verdreht.
03.12.2012 - 09:43
![]() Katja Müller wrote:
Katja Müller wrote:
Vielen Dank für den Tip, ich habe es jetzt hinbekommen! Liebe Grüsse Katja
30.11.2012 - 17:36
![]() Katja Müller wrote:
Katja Müller wrote:
Hallo! Ich habe eine Frage zum Erstellen des Kragens: Ich habe nach 22 cm Muster stricken mit den Krausrippen und den verkürzten Reihen angefangen, doch ich weiss nicht was gemeint ist wovon ich die 10 cm messen soll, die der Kragen erreichen soll. Es steht da : von der Markierung an der kurzen Seite gemessen! Ich kann damit nichts anfangen, ich verstehe das nicht! Wenn ich die verkürzten Reihen stricken soll, muss ich immer wiederholt nur über die ersten 20 Maschen stricken? Katja
29.11.2012 - 11:22DROPS Design answered:
Hallo Katja Sie messen ab der Stelle, an der Sie mit den Krausrippen angefangen haben. Durch die verkürzten Reihen haben Sie ja eine lange und eine kurze Seite. Sie messen an der kurzen Seite. Für die verkürzten R siehe Anleitung: * 2 R. über alle M. stricken, 2 R. nur über die äussersten 20 M. stricken *, von *-* wiederholen.
29.11.2012 - 13:53
![]() Mélanie wrote:
Mélanie wrote:
Hi! I am having some trouble with this pattern.. I am now doing the front part, and have to do the decreases on one side.. But when doing the decreases, the pattern doesn't work anymore. (ex. If I start with k,p,k,p and do the same thing on the other side it doesn't work) Do you know how I have to do it ? I am starting off with 35 st. Thanks
22.11.2012 - 17:10DROPS Design answered:
Dear Melanie, it is important that you keep track with the double moss stitch (see pattern).You have to K over K and P over P in 2 nd and 4th row. In 3rd row you K over P and P over K (=double miss stitch). I hope this helps, if not – please ask again. Happy knitting!
23.11.2012 - 11:00
![]() Geetanjali wrote:
Geetanjali wrote:
I am stuck on the collar and cannot understand the video either. Please explain how to put a marker on the end of the row and how to do only 20 stitches towards midfront. Thank you!
18.11.2012 - 21:31DROPS Design answered:
Dear Geetanjali, the collar is worked in 2 pieces, you first pick up sts from st holder mid front and work as indicated in pattern, then with short rows. After this side has been worked, pick up sts for left side behind right side you have worked, the video will help you there showing where you have to pick up your sts. Work then as the first side of collar but reversed. Happy knitting!
19.11.2012 - 09:24
![]() Laurence wrote:
Laurence wrote:
Je ne suis pas une grande experte en tricot, j'ai fini le pull mais je bloque pour faire le pull. Je ne comprend pas quand vous dites "relever les mailles en attente au milieu devant", "tricoter les rangs raccourcis"... Pouvez vous me donner d'autres explications? Merci d'avance.
18.02.2012 - 17:59DROPS Design answered:
Bonjour Laurence. Les mailles à reprendre sont les 26-28-30-32-34-36 m sur l'arrêt de mailles avant de tricoter le devant. Les vidéos suivantes de notre vidéothèque devraient pouvoir vous aider : pour relever les mailles du col "Col châle pour pull - bordures devants", et "Rangs raccourcis" (plusieurs vidéos disponibles). Bon tricot !
20.02.2012 - 09:02
![]() Luana wrote:
Luana wrote:
Ciao! scusa il disturbo, ma è il mio1 maglione e ho qualche difficoltà. x il collo: è possibile lavorarlo coi ferri dritti o coi 4 ferri? - colletto dx:ferri accorciati, vuol dire che lavoro solo le 20 maglie più esterne e le altre 10 rimanenti le passo sul ferro senza lavorarle? - colletto sx: dice di riprendere le maglie sul ferro ausiliario, ma non le ho già riprese x il colletto dx? quali devo prendere? Grazie per la pazienza!
28.12.2011 - 10:50
![]() Luana wrote:
Luana wrote:
Ciao Heidi, ti scrivo da qui perchè ho provato 2 volte a registrarmi al vostro forum ma invano. Non mi fa accedere, riesci ad aiutarmi x questo? del modello invece volevo sapere se devo cambiare il numero di maglie dato che ho usato un filato di gruppo B, uno di quelli indicati. grazie x tutto il lavoro che fai e fate... so che avrò bisogno di altre 2 dritte mentre lavoreerò, x questo ti sarei grata se mi aiuti nell'accesso al forum
03.12.2011 - 15:14
![]() Luana wrote:
Luana wrote:
Buongiorno a tutti, vi ringrazio per i modelli che pubblicate, sono meravigliosi e utilissimi! A proposito di questo maglioncino da uomo, vorrei sapere se è possibile realizzarlo con i due ferri e quali sarebbero le misure. aspetto una vostra risposta con impazienza. Grazie
07.11.2011 - 20:57
|
|
Limestone#limestonesweater |
|
 |
 |
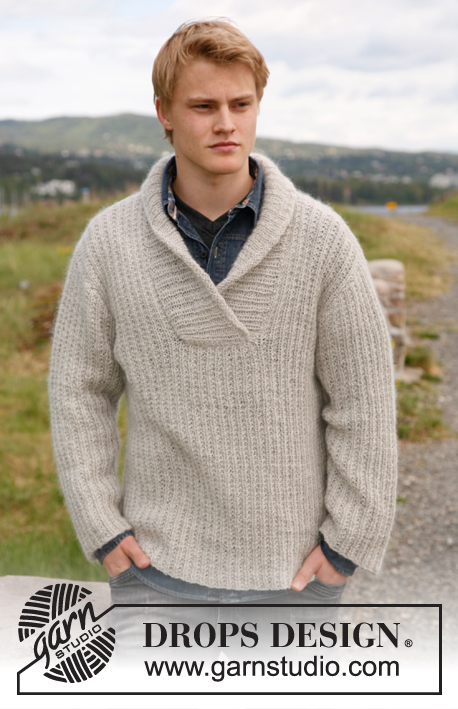
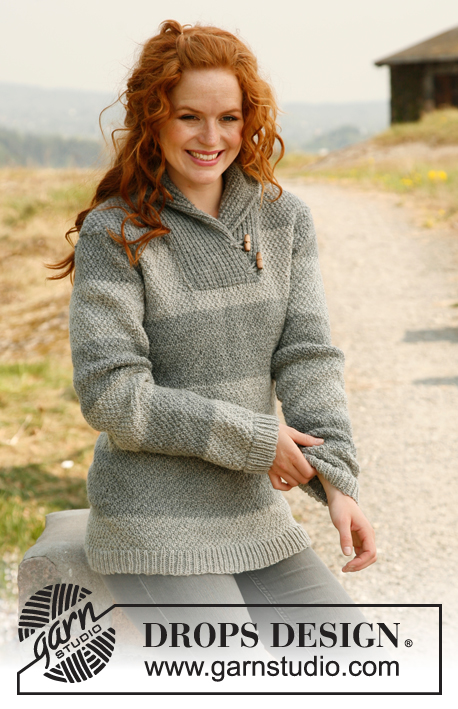
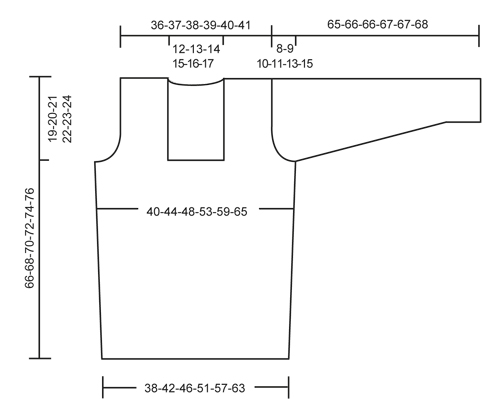
Men's knitted jumper with shawl collar, stripes and moss stitch in DROPS Karisma or DROPS Merino Extra Fine. Size S-XXXL.
DROPS 135-1 |
|
|
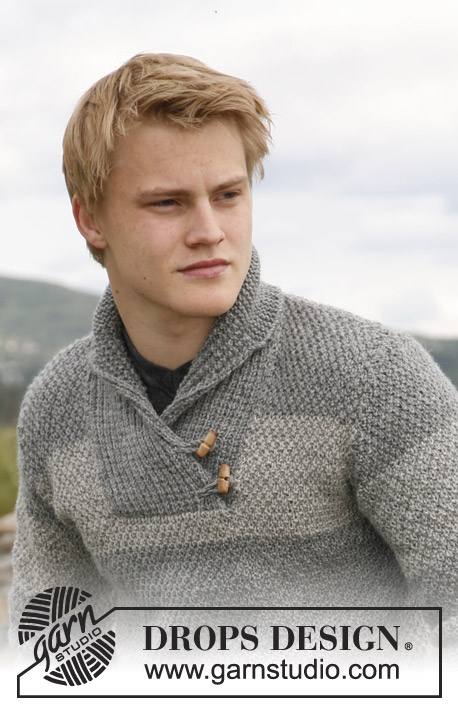
DOUBLE MOSS ST: 1st round: * K 1, P 1 *, repeat from *-*. 2nd round: K over K and P over P. 3rd round: * P 1, K 1 *, repeat from *-*. 4th round: P over P and K over K. Repeat rounds 1-4. STRIPES: Work medium grey and light grey alternately every 11-11-11½-12-12-12½ cm. NOTE: Measure first stripe from cast on edge. Work medium grey in the last stripe on the body and sleeve until finished measurements. INCREASE TIP: Inc 1 st by making 1 YO, on next round work YO twisted (i.e. work in back loop of st instead front) to avoid holes. PATTERN 1: Row 1 (= from RS): K all sts. Row 2 (= from WS): * K 1, P 1 *, repeat from *-*. Repeat 1st and 2nd row. GARTER ST (back and forth on needle): K all rows. -------------------------------------------------------- BODY: Worked in the round on circular needle. Cast on 213-234-255-288-318-351 sts on circular needle size 3.5 mm with light grey. Work rib as follows: * K 1, P 2 *, repeat from *-*. When piece measures 4 cm, K 1 round while AT THE SAME TIME dec 53-58-63-72-78-87 sts evenly (dec by K tog approx. every 3rd and 4th st) = 160-176-192-216-240-264 sts. Then switch to circular needle size 4 mm and continue in the round with DOUBLE MOSS ST and STRIPES - See explanation above. REMEMBER THE KNITTING TENSION! When piece measures 15-15-16-16-17-17 cm, insert 2 markers in the piece; 1 at beg of round and 1 after 80-88-96-108-120-132 sts (marks the sides). On next round, inc 1 st on each side of every marker - Read INCREASE TIP above = 4 new sts on round. NOTE: Work the new sts in double moss st. Repeat inc one more time when piece measures 30-30-32-32-34-34 cm = 168-184-200-224-248-272 sts. When piece measures 47-48-49-50-51-52 cm, divide the piece at the markers and finish each part separately. BACK PIECE: = 84-92-100-112-124-136 sts (1st row = RS). Continue with stripes and double moss st - while AT THE SAME TIME casting off for armholes in each side on every other row as follows: Cast off 3 sts 1 time, 2 sts 0-1-2-4-6-8 times and 1 st 1-2-3-4-5-6 times = 76-78-80-82-84-86 sts. When piece measures 64-66-68-70-72-74 cm, cast off the middle 24-26-28-30-32-34 sts for neck and finish each shoulder separately. Then dec 1 st on next row from neck (dec by working the outermost 2 sts towards the neck tog) = 25 sts remain on shoulder in all sizes. Loosely cast off all sts when piece measures 66-68-70-72-74-76 cm. FRONT PIECE: = 84-92-100-112-124-136 sts. Continue with stripes and double moss st. Start cast offs for armholes as on back piece on 1st row (= RS) - AT THE SAME TIME slip the middle 26-28-30-32-34-36 sts on a stitch holder for neck at the front, now finish each part separately. Cast off for armholes in each side as on back piece. When all cast offs are done, 25 sts remain on each shoulder. Continue in double moss st and with stripes. When piece measures 66-68-70-72-74-76 cm, loosely cast off all sts. SLEEVE: Worked in the round on double pointed needles. Cast on 63-66-69-72-75-78 sts on double pointed needles size 3.5 mm with light grey. Work rib as follows: * K 1, P 2 *, repeat from *-*. When piece measures 4 cm, K 1 round while AT THE SAME TIME dec 15-16-17-18-19-20 sts evenly (dec by K tog approx. every 3rd and 4th st) = 48-50-52-54-56-58 sts. Switch to double pointed needles size 4 mm and insert a marker at beg of round. Continue in the round with DOUBLE MOSS ST and STRIPES. When piece measures 8-8-7-7-7-6 cm, inc 1 st on each side of marker = 2 new sts. Repeat inc every 5-4½-3½-3-2½-2½ cm a total of 10-11-13-15-17-18 times = 68-72-78-84-90-94 sts. When piece measures 57-57-56-56-54-53 cm (shorter measurements in the larger sizes because of longer sleeve cap and broader shoulder width) cast off 3 sts on each side of marker (= 6 sts mid under sleeve). Then work back and forth on circular needle. Continue to cast off for sleeve cap in each side on every other row as follows: Cast off 2 sts 2-2-3-3-5-5 times, and then 1 st 3-4-4-5-5-6 times. Then cast off 2 sts in each side until piece measures 64-65-65-66-66-67 cm, then cast off 3 sts 1 time in each side. Loosely cast off all sts. Piece measures approx. 65-66-66-67-67-68 cm. ASSEMBLY: Sew the shoulder seams tog. Sew in the sleeves. RIGHT COLLAR: Worked back and forth on circular needle size 4 mm with medium grey as follows: Knit up sts from stitch holder mid front (leave the stitch holder) = 26-28-30-32-34-36 sts, P 1 row from WS. Then work PATTERN 1 from RS - See explanation above. When collar measures 19-20-21-22-23-24 cm (last row = 2nd row in PATTERN 1 = WS), insert a marker at the end of row seen from RS. Continue in GARTER ST - See explanation above - until finished measurements - At the same time work short rows as follows: * Work 2 rows over all sts, work 2 rows over the outermost 20 sts towards mid front *, repeat from *-* until piece measures 8-9-9-10-10-11 cm from marker (in the shorter side). Cast off. LEFT COLLAR: Knit up the sts from stitch holder from RS behind right collar = left collar is underneath right collar. Work the same way as on right collar but reversed (work short rows over the outermost 20 sts towards mid front). ASSEMBLY: Sew right collar to right front piece and left collar to left front piece in outermost sts. Sew collar tog mid back and sew the neck on back piece. STRAP: Make 1 strap as follows: Twine 2 threads of 40 cm medium grey and fold them double. Make another strap the same way. Fasten the straps approx. 4 and 11 cm up from bottom edge on right collar (approx. 1 cm from edge mid front). Pull the threads through the collar and fasten the ends on the back. Sew button on left collar approx. 2 and 4 cm in from seam for left front piece. |
|
 |
|
Have you finished this pattern?Tag your pictures with #dropspattern #limestonesweater or submit them to the #dropsfan gallery. Do you need help with this pattern?You'll find 17 tutorial videos, a Comments/Questions area and more by visiting the pattern on garnstudio.com. © 1982-2026 DROPS Design A/S. We reserve all rights. This document, including all its sub-sections, has copyrights. Read more about what you can do with our patterns at the bottom of each pattern on our site. |
|


With over 40 years in knitting and crochet design, DROPS Design offers one of the most extensive collections of free patterns on the internet - translated to 17 languages. As of today we count 324 catalogues and 12290 patterns translated into English (UK/cm).
We work hard to bring you the best knitting and crochet have to offer, inspiration and advice as well as great quality yarns at incredible prices! Would you like to use our patterns for other than personal use? You can read what you are allowed to do in the Copyright text at the bottom of all our patterns. Happy crafting!
Post a comment to pattern DROPS 135-1
We would love to hear what you have to say about this pattern!
If you want to leave a question, please make sure you select the correct category in the form below, to speed up the answering process. Required fields are marked *.