
Popular categories
Looking for a yarn?


Comments / Questions (184)
![]() Maria Vittoria wrote:
Maria Vittoria wrote:
Non capisco assolutamente nulla del cappellino. Come prosegue il disegno dopo le diminuzioni?
09.05.2025 - 20:12DROPS Design answered:
Buonasera Maria Vittoria, dopo aver lavorato M.2 deve lavorare 1 giro a maglia rasata in cui lavorare le maglie insieme 2 a 2 e poi rifinirlo come indicato. Buon lavoro!
09.05.2025 - 23:10
![]() Maria Vittoria wrote:
Maria Vittoria wrote:
Non capisco assolutamente nulla del cappellino. Come prosegue il disegno dopo le diminuzioni?
09.05.2025 - 19:55DROPS Design answered:
Buonasera Maria Vittoria, dopo aver lavorato M.2 deve lavorare 1 giro a maglia rasata in cui lavorare le maglie insieme 2 a 2 e poi rifinirlo come indicato. Buon lavoro!
09.05.2025 - 23:11
![]() Abby wrote:
Abby wrote:
Hi, I'm confuse on the armhole bind off. "Bind off for armhole at side on beg of every row from side: 1 st 2-2-2-2 times = 24-29-33-36 sts (continue with 4 sts in garter sts towards armhole)." Where to bind off, is it before the garter st towards the armhole or bind off on the garter st on the armhole? Pls help.. new knitter here. Thank you so much.
04.05.2025 - 04:20DROPS Design answered:
Dear Abby, after casting off for the armhole before starting the front pieces you decrease for the armhole on the sides of the piece, so at the start of rows from the armhole (not from the neck). You need to decrease the first stitch after the 4 stitches in garter stitch of the armhole. Happy knitting!
04.05.2025 - 20:12
![]() Astrid Ertl wrote:
Astrid Ertl wrote:
Hallo! Wird die Mütze in Runden gestrickt oder in Reihen und dann zusammengenäht? Liebe Grüße Astrid
30.04.2025 - 09:15DROPS Design answered:
Liebe Frau Ertl, die Mütze wird in Runden gestrickt. Viel Spaß beim Stricken!
30.04.2025 - 13:05
![]() Cheryl Bonner wrote:
Cheryl Bonner wrote:
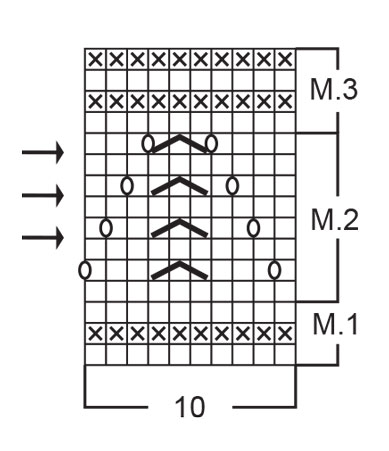
Beach Baby 10--7 pattern in the diagram M-2 the arrow are just for decreasing for the hat do that also mean to dec in the dress
18.03.2025 - 04:49DROPS Design answered:
Dear Mrs Bonner, the arrows in the diagram M.2 only apply to the hat, do not decrease when working dress. Happy knititng!
18.03.2025 - 10:20
![]() Susan wrote:
Susan wrote:
What size buttons do I need?
16.03.2025 - 21:40DROPS Design answered:
Dear Susan, for this pattern you will need 15mm buttons. Happy knitting!
16.03.2025 - 22:35
![]() Gaby wrote:
Gaby wrote:
Wie breit ist das Kleid unten in cm 6-9 Monate Danke schön
11.03.2025 - 11:56DROPS Design answered:
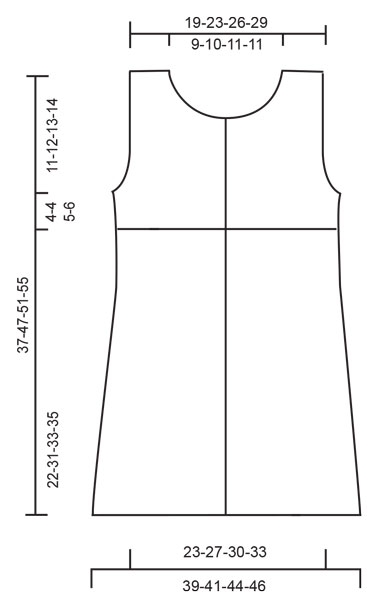
Liebe Gaby, unter bei der Maßskizze finden Sie alle Maßen, so in die 1. Größe 39 cm x 2 = 78 cm Umfang - hier lesen Sie mehr über Maßskizze. Viel Spaß beim Stricken!
12.03.2025 - 09:01
![]() Monique wrote:
Monique wrote:
Bestaat er een vestje met hetzelfde patroon als de jurk?
01.03.2025 - 14:22
![]() Beaucire wrote:
Beaucire wrote:
Je le trouve super joli et je suis entrain de le faire, et je me régale.
25.02.2025 - 16:33
![]() Mirian Bons wrote:
Mirian Bons wrote:
Ik moet 189 steken opzetten voor het kleinste patroon. 4 kst elk en 10 st voor patroon..waar blijft die ene steek dan? Patroontje is pen rechts en links of alleen rechts en dan retour averecjts breien?
25.02.2025 - 10:14DROPS Design answered:
Dag Mirian,
Als je 4 ribbelsteken aan beide kanten breit, houd je 181 steken over om de telpatronen te breien. Je herhaalt de telpatronen 18 keer en de laatste steek brei je in de eerste steek van het telpatroon. Op deze manier wordt het werk symmetrisch.
26.02.2025 - 20:57
|
||||||||||||||||
Beach Baby#beachbabydress |
||||||||||||||||
 |
 |
|||||||||||||||
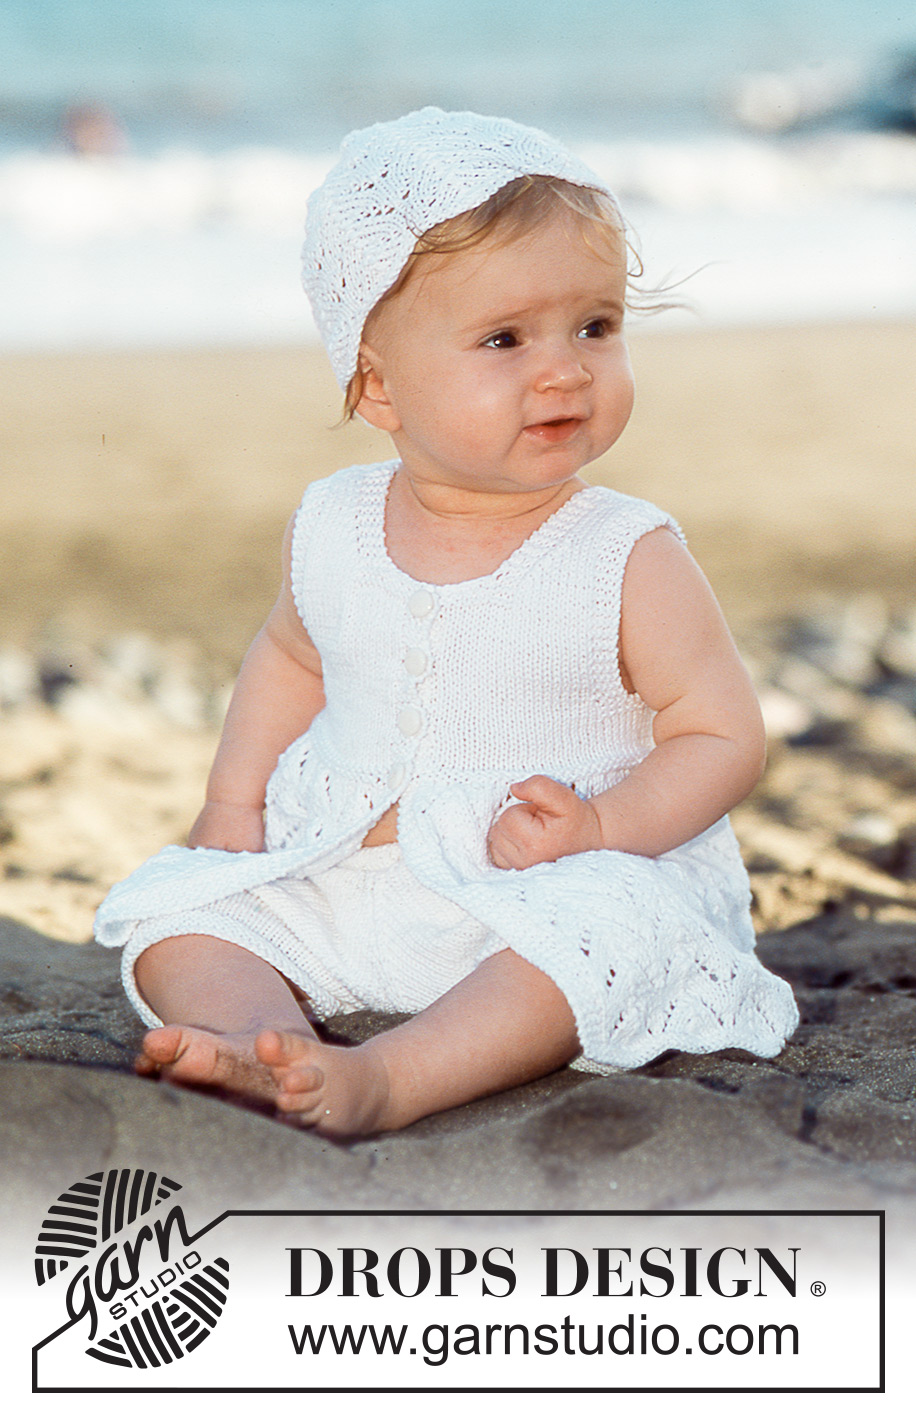
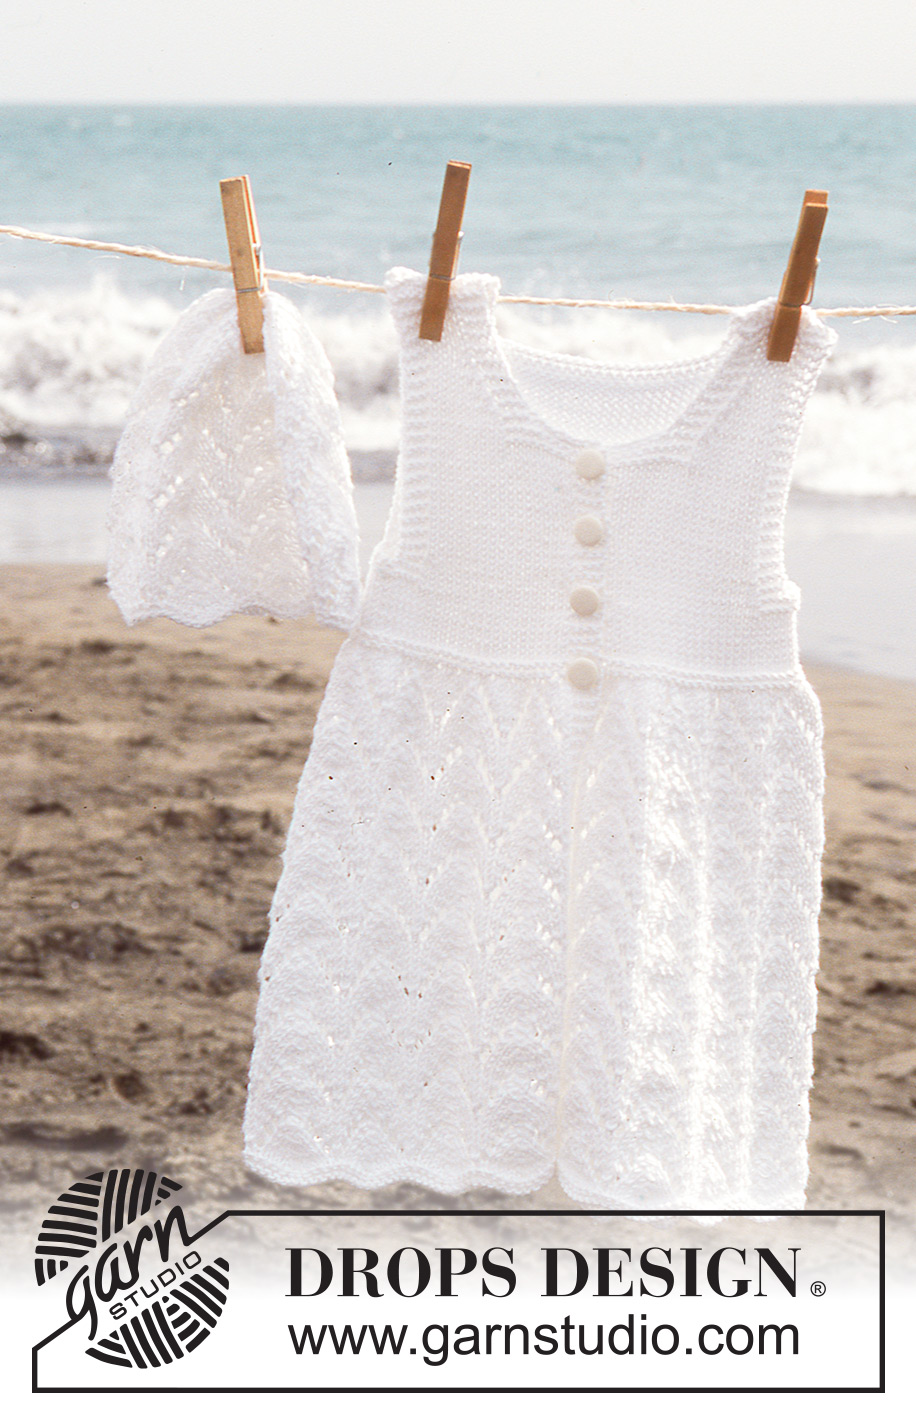
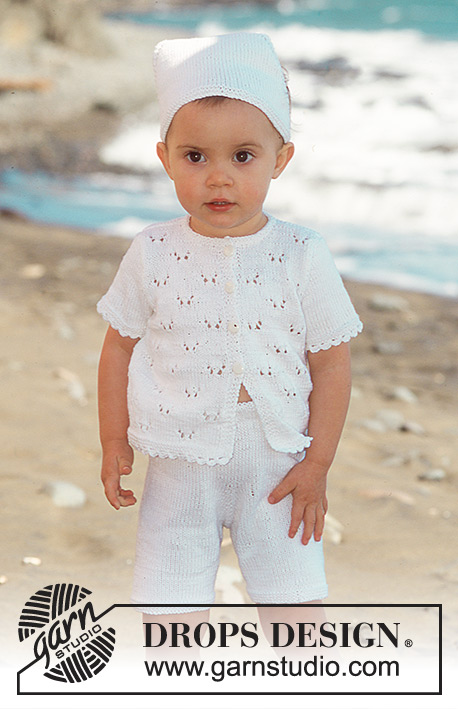
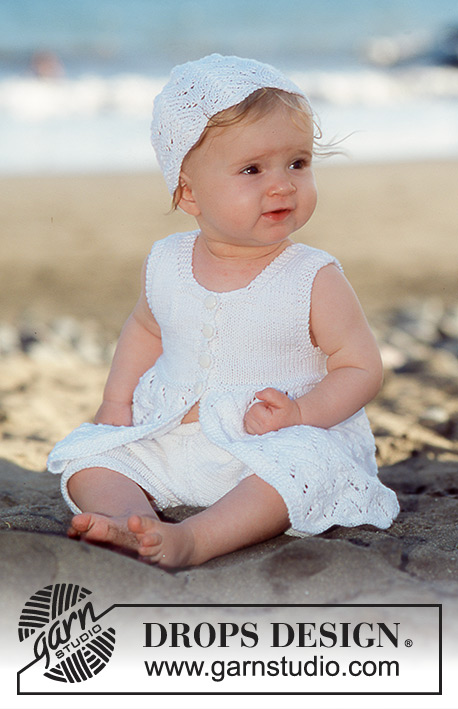
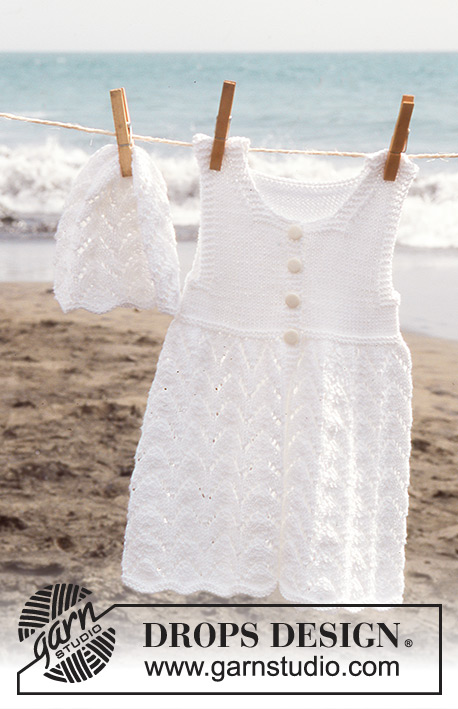
Short sleeved dress and hat in Safran
DROPS Baby 10-7 |
||||||||||||||||
|
Knitting tension: 24 sts x 32 rows on needles size 3 mm in stocking st = 10 x 10 cm. Garter sts (back and forth): Knit all rows Pattern: See diagrams M.1-M.3. The diagram shows the pattern from the right side. Buttonhole: Make buttonholes on right front band on the yoke from RS as follows: cast off 3rd st from edge and make a yo over cast off st on the return row. Make buttonholes as follows: Size 6/9 months: 22, 25, 28 and 31 cm Size 12/18 months: 31, 34.5, 38 and 41 cm Size 2 years: 33, 37, 40.5 and 44 cm Size 3/4 years: 36, 39.5, 44 and 48 cm Decreasing tips (apply to armhole and neck): All dec are done from the RS. Dec as follows before 4 garter sts: K2 tog Dec as follows after 4 garter sts: slip 1 st as if to knit, K1, psso DRESS: The dress is knitted back and forth on circular needle from mid front. Cast on 189-199-209-219 sts (incl 4 edge sts each side = mid front, knitted in garter sts throughout) on needle size 3 mm. Knit M.1 and continue in M.2. When piece measures 22-31-33-35 cm knit M.3, at the same time dec 79-69-65-61 sts evenly on the first row (do not dec over edge sts each side) = 110-130-144-158 sts. After M.3 finish the piece in socking sts – edge sts in garter sts and remember buttonholes on right front band, see above. When piece measures 25-34-37-40 cm insert 2 marking threads, 28-33-37-40 sts in from each side = 54-64-70-78 sts between marking threads = back piece. Continue with 4 rows in garter st over 6 sts each side of both marking threads (the remaining sts in stocking sts) = 12 garter sts each side. On next row cast off the middle 4 of these 12 sts for armhole and complete each piece separately. Left front piece: = 26-31-35-38 sts. Continue in stocking sts with 4 sts in garter sts towards mid front and towards armhole. Cast off for armhole at side on every other row: 1 st 2-2-2-2 times = 24-29-33-36 sts (continue with 4 sts in garter sts towards armhole). When piece measures 31-41-44-48 cm knit 4 rows in garter sts over 12-13-14-15 sts mid front (remaining sts in stocking sts). On next row cast off 8-9-10-11 sts mid front for neck, continue with 4 sts in garter sts towards mid front and dec to shape the neckline on every other row: 1 st 4 times = 12-16-19-21 sts left on shoulder. Cast off when piece measures 37-47-51-55 cm. Right front piece: Like left front piece, but mirrored. Remember buttonholes on front band. Back piece: = 50-60-66-74 sts. Cast off for armhole each side as described for front piece = 46-56-62-70 sts. When piece measures 35-45-49-53 cm knit 4 rows garter sts over the middle 30-32-32-36 sts (remaining sts in stocking sts). On next row cast off the middle 22-24-24-28 sts for neck = 12-16-19-21 sts left on each shoulder. Continue with 4 sts in garter sts each side until piece measures 37-47-51-55 cm and cast off. Assembly: Sew shoulder seams and sew on buttons. HAT: Size: 6/12 months – 2/4 years To fit head circumference: 42-46 cm Cast on 90-100 sts on small circular needle size 3 mm. Knit 4 rows garter sts and continue in M.2. Knit 5-6 vertical repeats of M.2 and now insert a marking thread in the first st in each horizontal repeat = 9-10 marking threads. Knit 1 more vertical repeat of M.2 and dec on the rows marked with an arrow in the diagram. Dec as follows: slip the st before the st with MT as if to knit, knit tog st with MT and the next st, psso. Repeat this dec in all horizontal repeats by the 3 arrows in diagram, i.e. a total dec of 54-60 sts = 36-40 sts left on needle. After the last round of M.2 knit 1 round in stocking sts, at the same time knitting all sts tog 2 by 2 = 18-20 sts left. Cut the thread and pull through remaining sts. Sew tight. |
||||||||||||||||
Diagram explanations |
||||||||||||||||
|
||||||||||||||||
 |
||||||||||||||||
 |
||||||||||||||||
Have you finished this pattern?Tag your pictures with #dropspattern #beachbabydress or submit them to the #dropsfan gallery. Do you need help with this pattern?You'll find 22 tutorial videos, a Comments/Questions area and more by visiting the pattern on garnstudio.com. © 1982-2026 DROPS Design A/S. We reserve all rights. This document, including all its sub-sections, has copyrights. Read more about what you can do with our patterns at the bottom of each pattern on our site. |
||||||||||||||||


With over 40 years in knitting and crochet design, DROPS Design offers one of the most extensive collections of free patterns on the internet - translated to 17 languages. As of today we count 324 catalogues and 12290 patterns translated into English (UK/cm).
We work hard to bring you the best knitting and crochet have to offer, inspiration and advice as well as great quality yarns at incredible prices! Would you like to use our patterns for other than personal use? You can read what you are allowed to do in the Copyright text at the bottom of all our patterns. Happy crafting!
Post a comment to pattern DROPS Baby 10-7
We would love to hear what you have to say about this pattern!
If you want to leave a question, please make sure you select the correct category in the form below, to speed up the answering process. Required fields are marked *.