
Popular categories
Looking for a yarn?


Comments / Questions (184)
![]() Rina Rau wrote:
Rina Rau wrote:
Hallo, ich stricke z.Zt. das Mützchen und die Wolle reicht nicht zum Fertigstellen, obwohl ich lt. Anleitung 150 gr. Safran für Gr. 62/68 bestellt hatte. Das fertiggestellte Kleidchen entspricht auch der Maßtabelle. Da ich das Gleiche noch einmal in einer anderen Farbe stricken möchte, frage ich mich, was ich falsch gemacht habe?
13.04.2015 - 11:33DROPS Design answered:
Wenn alles den Maßen entspricht und Sie die Maschenprobe eingehalten haben, sollte die Wolle eigentlich reichen, aber da Sie nun eine andere Erfahrung gemacht haben, würde ich einfach empfehlen, für das nächste Mal ein Knäuel mehr zu bestellen. Durch das Lochmuster können sich eventuell Messungenauigkeiten ergeben, je nachdem, ob das Muster beim Messen etwas gedehnt wird oder nicht. Ich denke nicht, dass Sie einen anderen Fehler gemacht haben.
17.04.2015 - 11:29
![]() Ingrid Koch wrote:
Ingrid Koch wrote:
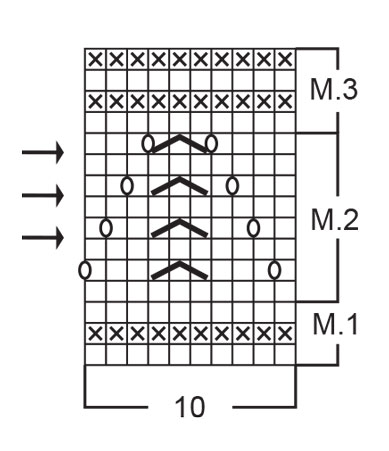
Drops Baby 10-7 wieviel Maschen ist ein Rapport bei der Mütze und wo beginnt der Rapport? Muß 10 Markierungsfäden setzen um Maschen abzunehmen und weiß nicht wo? Bitte um Ihre Hilfe und bedanke mich im Voraus! Mit freundlichen Grüßen Frau Koch
13.04.2015 - 08:23DROPS Design answered:
M.2 besteht aus 10 M (= alle 10 M des Diagramms). Den Beginn sehen Sie im Diagramm - die ersten 3 R sind M.1, dann kommt M.2, M.2 beginnt mit einer Rd re, dann kommt eine Loch-Rd, wieder eine Rd re, Loch-Rd usw. M.2 besteht aus 8 Rd. M.2 passt 10x in die Rd hinein. Wenn Sie dann immer die erste M von jedem M.2 markieren, haben Sie 10 Markierer. Die Abnahmen (an jedem Markierer nehmen Sie 2 M ab) machen Sie in den 3 Rd, die im Diagramm mit einem Pfeil markiert sind. Sie nehmen also pro Abnahme-Rd 20 M ab, 3 x 20 M = 60 M abgenommen.
13.04.2015 - 09:27MOUTHAR Sanaa wrote:
Bonjour; j'ai tricoté se modèle 3 fois c'est très réussi et superbe je voulais juste noté une petite faut sur les nombre de mailles du dos après les diminutions des emmanchures pour la petite taille ( 6/9 mois) c'est 46 pas 45 merci beaucoup
27.02.2015 - 01:21DROPS Design answered:
Bonjour Mme Mouthar et merci, le nbe de mailles a été corrigé. Bon tricot!
27.02.2015 - 09:26
![]() Eva wrote:
Eva wrote:
Jag får inte fram mönster M1, M2 och M3 under diagram.
04.02.2015 - 13:00
![]() Inka wrote:
Inka wrote:
Hallo, meine Frage ist: das M1 Muster beginnt mit einer Reihe recht Maschen, dann eine Reihe linke und wieder rechte Maschen, aber auf dem Foto mit dem fertigen Kleid sieht es aus, als ob die erste Reihe linke Maschen sind, dann eine Reihe rechts und dann wieder links. Wie ist es denn nun richtig?
28.01.2015 - 11:26DROPS Design answered:
Wenn Sie die 1. R als Hin-R re stricken, erscheint der Maschenanschlag wie eine li gestrickte R, dann müsste sich das Muster wie auf dem Foto ergeben. Der M-Anschlag ist also quasi die 1. Rück-R.
28.01.2015 - 12:00
![]() Kirsten Borgstrøm wrote:
Kirsten Borgstrøm wrote:
Hej Jeg er ved at strikke en af dine børnekjoler, men da jeg skal begynde med mønster 2 er jeg ikke klar over hvad der menes med kast. kunne jeg få dig til ar forklarer mig hvad jeg skal gører Hilsen Kirsten
29.10.2014 - 09:20DROPS Design answered:
Hej Kirsten, 1 kast er norsk og betyder 1 omslag på dansk. God fornøjelse!
29.10.2014 - 15:31
![]() Carole Barabé wrote:
Carole Barabé wrote:
Bonjour! Je suis à tricoter ce modèle 12/18mois. Lorsque je suis a faire le M3, je n'ai pas obtenue les cotes comme sur la photo soit le point mousse je croix. Cela m'a donné un point jersey sur les 3 rangs du M3. Ou ai-je fait l'erreur. Pourtant j'ai bien suivit le patron. Merci à l'avance
13.06.2014 - 05:13DROPS Design answered:
Bonjour Mme Barabé, le diagramme montre le motif vu sur l'endroit, ainsi 1 case vide = 1 m end sur l'end à tricoter à l'env sur l'envers, et 1 case avec une "x" se tricote à l'env sur l'end et à l'end sur l'envers.Ex M1= R1 sur l'end: tout à l'end, R2 sur l'env= tout à l'end. Bon tricot!
13.06.2014 - 08:46
![]() Marleen wrote:
Marleen wrote:
Ik heb dit setje twee jaar geleden gebreid voor mijn nichtje. Het was een hit tijdens de vakantie in Zuid-Frankrijk! Geweldig patroon!
07.06.2014 - 21:05
![]() Anna wrote:
Anna wrote:
The first stich of the pattern is needed for symmetry.
26.05.2014 - 08:37
![]() Ivette Casiano wrote:
Ivette Casiano wrote:
I'm making the smallest size and don't understand how an odd number of stitches (189) can create a pattern of an even number of stitches(10) when the pattern is vertically even, not slanted.In M2, after I finish the eighth row, I should begin from the first row of M2 again until the desired measurement, correct?
26.05.2014 - 04:53DROPS Design answered:
Dear Mrs Casiano, you work 4 sts in garter st (front edge), repeat 18 times diagram M1, work 1st st in M1 (to make the pattern symetric on both sides), and finish with 4 sts in garter st (front edge). Happy knitting!
26.05.2014 - 09:53
|
||||||||||||||||
Beach Baby#beachbabydress |
||||||||||||||||
 |
 |
|||||||||||||||
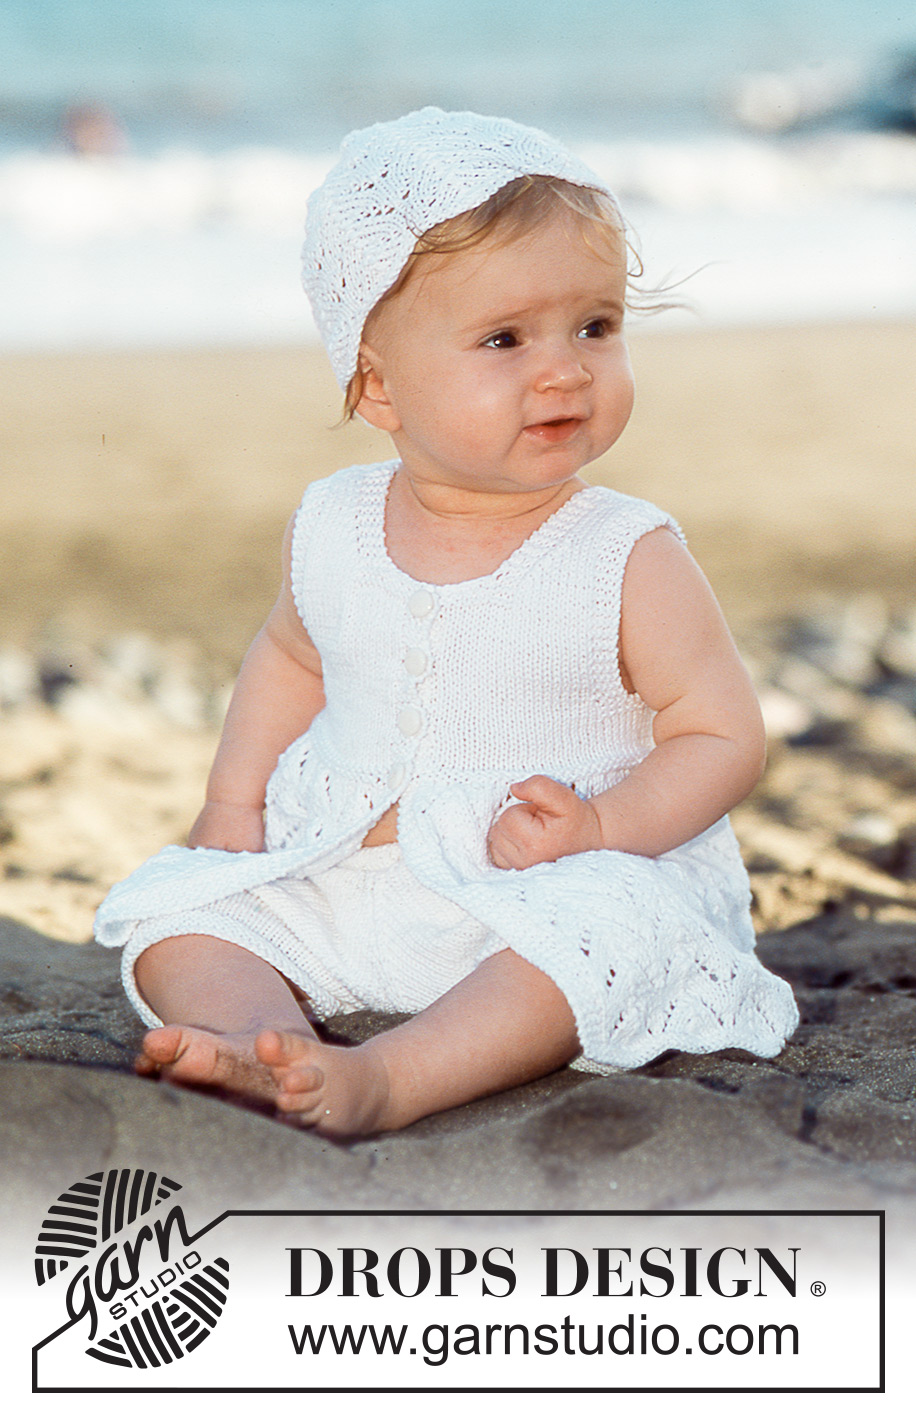
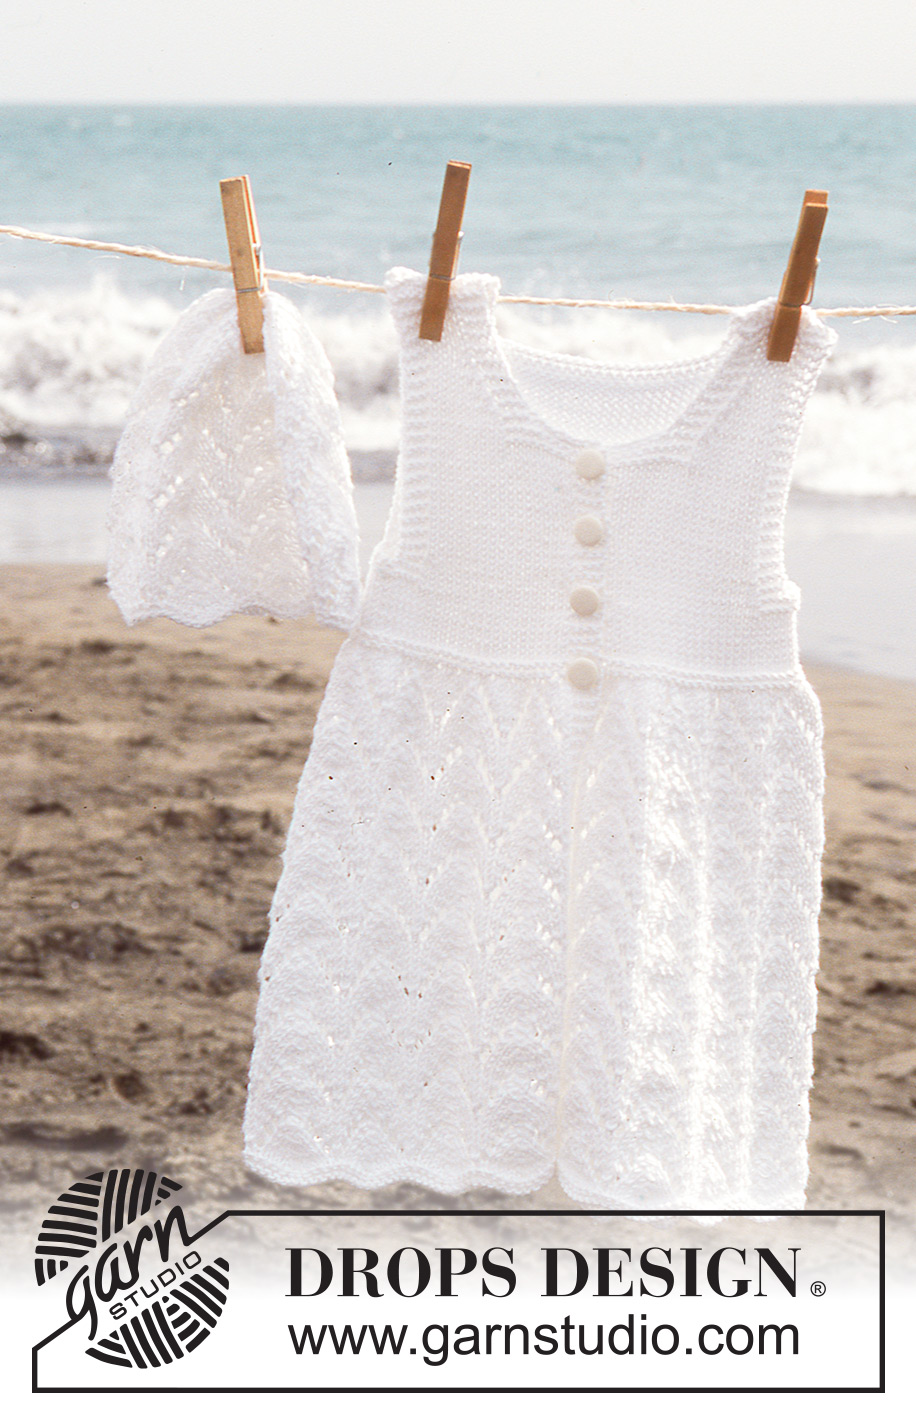
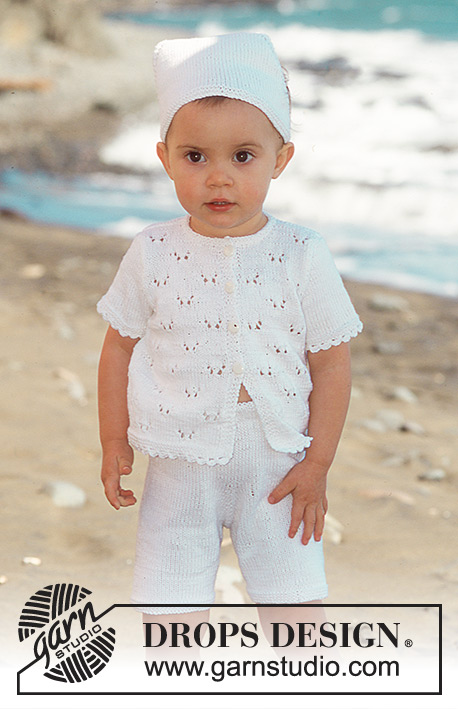
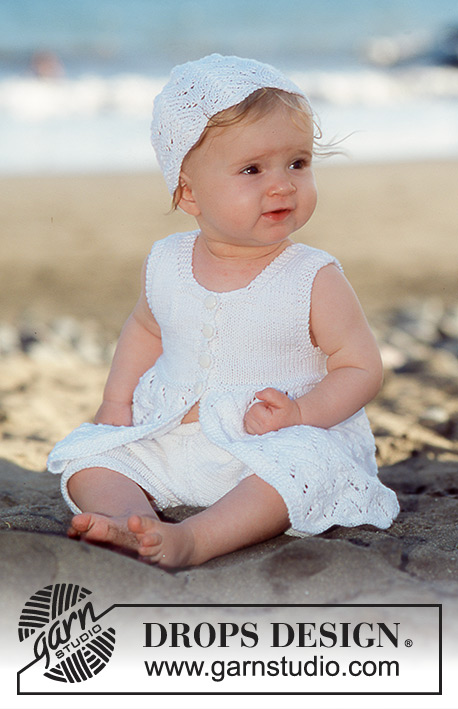
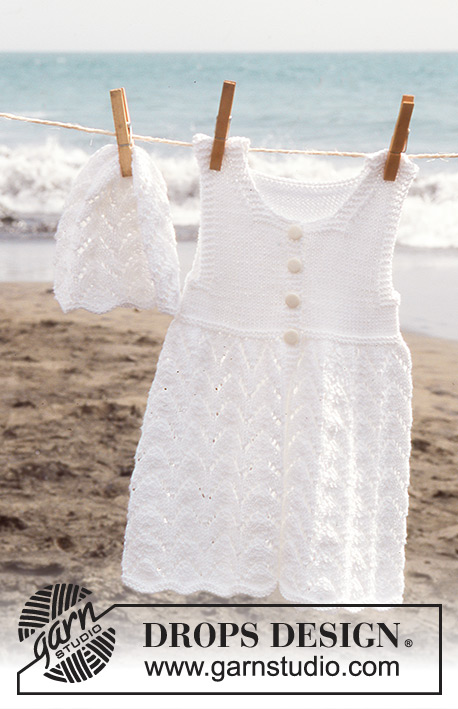
Short sleeved dress and hat in Safran
DROPS Baby 10-7 |
||||||||||||||||
|
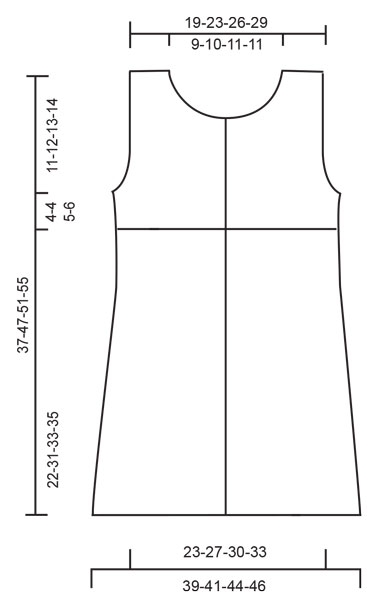
Knitting tension: 24 sts x 32 rows on needles size 3 mm in stocking st = 10 x 10 cm. Garter sts (back and forth): Knit all rows Pattern: See diagrams M.1-M.3. The diagram shows the pattern from the right side. Buttonhole: Make buttonholes on right front band on the yoke from RS as follows: cast off 3rd st from edge and make a yo over cast off st on the return row. Make buttonholes as follows: Size 6/9 months: 22, 25, 28 and 31 cm Size 12/18 months: 31, 34.5, 38 and 41 cm Size 2 years: 33, 37, 40.5 and 44 cm Size 3/4 years: 36, 39.5, 44 and 48 cm Decreasing tips (apply to armhole and neck): All dec are done from the RS. Dec as follows before 4 garter sts: K2 tog Dec as follows after 4 garter sts: slip 1 st as if to knit, K1, psso DRESS: The dress is knitted back and forth on circular needle from mid front. Cast on 189-199-209-219 sts (incl 4 edge sts each side = mid front, knitted in garter sts throughout) on needle size 3 mm. Knit M.1 and continue in M.2. When piece measures 22-31-33-35 cm knit M.3, at the same time dec 79-69-65-61 sts evenly on the first row (do not dec over edge sts each side) = 110-130-144-158 sts. After M.3 finish the piece in socking sts – edge sts in garter sts and remember buttonholes on right front band, see above. When piece measures 25-34-37-40 cm insert 2 marking threads, 28-33-37-40 sts in from each side = 54-64-70-78 sts between marking threads = back piece. Continue with 4 rows in garter st over 6 sts each side of both marking threads (the remaining sts in stocking sts) = 12 garter sts each side. On next row cast off the middle 4 of these 12 sts for armhole and complete each piece separately. Left front piece: = 26-31-35-38 sts. Continue in stocking sts with 4 sts in garter sts towards mid front and towards armhole. Cast off for armhole at side on every other row: 1 st 2-2-2-2 times = 24-29-33-36 sts (continue with 4 sts in garter sts towards armhole). When piece measures 31-41-44-48 cm knit 4 rows in garter sts over 12-13-14-15 sts mid front (remaining sts in stocking sts). On next row cast off 8-9-10-11 sts mid front for neck, continue with 4 sts in garter sts towards mid front and dec to shape the neckline on every other row: 1 st 4 times = 12-16-19-21 sts left on shoulder. Cast off when piece measures 37-47-51-55 cm. Right front piece: Like left front piece, but mirrored. Remember buttonholes on front band. Back piece: = 50-60-66-74 sts. Cast off for armhole each side as described for front piece = 46-56-62-70 sts. When piece measures 35-45-49-53 cm knit 4 rows garter sts over the middle 30-32-32-36 sts (remaining sts in stocking sts). On next row cast off the middle 22-24-24-28 sts for neck = 12-16-19-21 sts left on each shoulder. Continue with 4 sts in garter sts each side until piece measures 37-47-51-55 cm and cast off. Assembly: Sew shoulder seams and sew on buttons. HAT: Size: 6/12 months – 2/4 years To fit head circumference: 42-46 cm Cast on 90-100 sts on small circular needle size 3 mm. Knit 4 rows garter sts and continue in M.2. Knit 5-6 vertical repeats of M.2 and now insert a marking thread in the first st in each horizontal repeat = 9-10 marking threads. Knit 1 more vertical repeat of M.2 and dec on the rows marked with an arrow in the diagram. Dec as follows: slip the st before the st with MT as if to knit, knit tog st with MT and the next st, psso. Repeat this dec in all horizontal repeats by the 3 arrows in diagram, i.e. a total dec of 54-60 sts = 36-40 sts left on needle. After the last round of M.2 knit 1 round in stocking sts, at the same time knitting all sts tog 2 by 2 = 18-20 sts left. Cut the thread and pull through remaining sts. Sew tight. |
||||||||||||||||
Diagram explanations |
||||||||||||||||
|
||||||||||||||||
 |
||||||||||||||||
 |
||||||||||||||||
Have you finished this pattern?Tag your pictures with #dropspattern #beachbabydress or submit them to the #dropsfan gallery. Do you need help with this pattern?You'll find 22 tutorial videos, a Comments/Questions area and more by visiting the pattern on garnstudio.com. © 1982-2026 DROPS Design A/S. We reserve all rights. This document, including all its sub-sections, has copyrights. Read more about what you can do with our patterns at the bottom of each pattern on our site. |
||||||||||||||||


With over 40 years in knitting and crochet design, DROPS Design offers one of the most extensive collections of free patterns on the internet - translated to 17 languages. As of today we count 324 catalogues and 12290 patterns translated into English (UK/cm).
We work hard to bring you the best knitting and crochet have to offer, inspiration and advice as well as great quality yarns at incredible prices! Would you like to use our patterns for other than personal use? You can read what you are allowed to do in the Copyright text at the bottom of all our patterns. Happy crafting!
Post a comment to pattern DROPS Baby 10-7
We would love to hear what you have to say about this pattern!
If you want to leave a question, please make sure you select the correct category in the form below, to speed up the answering process. Required fields are marked *.