
Popular categories
Looking for a yarn?


Comments / Questions (30)
![]() Marcia wrote:
Marcia wrote:
I love the picot edge on the front bands but I can’t see how it's done. Could you please explain?
15.03.2025 - 22:18DROPS Design answered:
Dear Marcia, the picot edge is explained in the: Crochet border, after Assembly and before the button cover." Crochet a border around the jacket opening on crochet hook size 3 mm with Karisma as follows: 1 dc,* 4 ch, 1 tr in first ch, skip approx 2 cm, 1 dc *, repeat from *-*. ". Happy crochetting!
16.03.2025 - 22:48
![]() Carmen-Gabriela wrote:
Carmen-Gabriela wrote:
Viele ältere Modelle sind sooo schön:) - Ich bin gerade bei Zopf-/Aranmuster (Merino) "Klassiker neu aufgelegt" - Man sollte anhand Fotos aus den 80ern/90ern nicht beim Stöbern für ein neues Traummodell zurückschrecken.
07.10.2020 - 18:25Lorraine B wrote:
I am also from Australia. In answer to Maureen's question I have found using 3.75 for the waist band and 3.25 for the sleeves gives the best result. (Cuffs need to be a little firmer than the waistband.) Hope this helps.
03.08.2018 - 02:22Maureen Humphreys wrote:
This pattern calls for 3.5mm needles, however in Australia we have 3.25 or 3.75mm (not 3.5). Which should I use for the bands
28.05.2013 - 10:26DROPS Design answered:
Hi Maureen. I would knit a sample to see which needle gives you the correct tension for this pattern: 21 sts x 28 rows stocking sts = 10 x 10 cm. Good luck.
29.05.2013 - 12:31
![]() Anne Gröhn wrote:
Anne Gröhn wrote:
Hei! Kun kaikki kavennukset hihan pyöriöstä on tehty, niin ohjeen mukaan "päätä vielä kummastakin reunasta 2s kunnen työn pituus on ...cm." Siis 2 silmukkaa joka toinen kerrosko? Mulla loppuutällä tavalla silmukat ennen kuin saan hihan pyöriön sopivan mittaiseksi. Etu- ja takakappaleen mitan täsmäävät ohjeen kanssa. Vai pitääkö päättää kerralla ne 2 silmukkaa ja jatkaa suoraa neuletta kunnes päästään siihen "päätä lopuksi 1 x 3 s ja kavennetaan tasavälein 10 s M1/M2:n kohdalla."
23.05.2013 - 13:37DROPS Design answered:
Hei! Jos neuletiheytesi on sama kuin ohjeessa, silmukoiden pitäisi riittää. Päätät kummastakin reunasta joka 2. krs 2 s. Kun aloitat kavennukset, työssä on 80-86-90-96-102-108 s, joten työssä pitäisi olla riittävästi silmukoita. Viimeiset 3 s päätetään, kun hihanpyöriön korkeus on 7-8-9-10-12-14 cm.
27.05.2013 - 13:11
![]() Rosalia Tubolino wrote:
Rosalia Tubolino wrote:
Salve non capisco bene il diagramma di questo modello..DROPS 107-11.. nella spiegazione dice passare 3 m sul ferro ausiliario davanti il lavoro, 3 m dir, 1 rov dal ferro ausiliario. e le altre magli in sospeso come vanno lavorate? s stessa cosa per le altre spiegazioni.. scusate sono un pò inesperta ma ho l'impresione che manchi qualche maglia
02.11.2012 - 18:57DROPS Design answered:
Ha ragione!! C'era un errore ed ora abbiamo corretto tutto! Spero tutto sia chiaro ora. Grazie
03.11.2012 - 01:19
![]() Dey wrote:
Dey wrote:
Bonjour, au moment de commencer cette veste, il me manque une explication : pouvez-vous m'indiquer si les boutons cachent des pressions ou si l'on doit prévoir des boutonnières, je ne le voit pas dans les explications. Merci Martine
03.04.2012 - 21:29DROPS Design answered:
Bonjour Dey, les housses de boutons recouvrent les boutons en bois clair n°503 indiqués dans les fournitures. Il n'y a pas de boutonnières, on utilise les arceaux de la bordure au crochet pour fermer la veste (dernière phrase éditée, merci). Bon tricot !
04.04.2012 - 09:19
![]() Drops Design France wrote:
Drops Design France wrote:
Bonjour Viviane, le diagramme est juste ainsi, on a volontairement un seul rang end sur l'end sur 2 m à ce niveau du motif. bon tricot !
11.01.2012 - 10:46
![]() Viviane Sarry wrote:
Viviane Sarry wrote:
Je pense qu'il manque 2 mailles endroit sur l'endroit, en bas à l'intérieur du losange du dessin (10ème rang du diagramme)
10.01.2012 - 14:20
![]() Jan wrote:
Jan wrote:
I love your designs! This one is beautiful!
29.01.2008 - 00:28
|
|||||||||||||||||||
DROPS 107-11 |
|||||||||||||||||||
|
|
|||||||||||||||||||
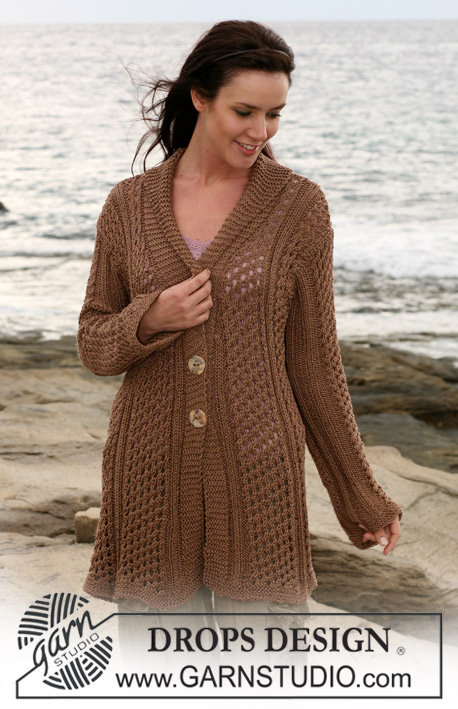
DROPS jacket with cable pattern in ”Karisma”. Sizes: S - XXXL
DROPS 107-11 |
|||||||||||||||||||
|
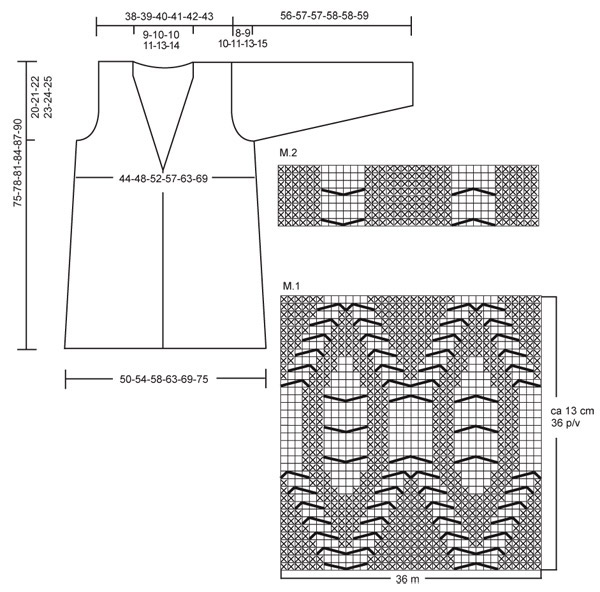
Garter st (back and forth on needle): K all rows. Pattern: See diagram M.1 and M.2. Diagrams are seen from RS. Decreasing tips (for front piece): Dec inside 10 garter sts. Make all dec from RS! Dec as follows after 10 sts: Slip 1 st as if to knit, K1, psso. Dec as follows before 10 sts: K2 tog Back piece: Worked back and forth on circular needle. Cast on 193-207-221-235-249-263 sts (includes 1 edge st each side) on circular needle size 3.5 mm with Karisma. P1 row from WS, and continue as follows from RS: 1 edge st, * K2, P5 * repeat from *-* and finish with K2 and 1 edge st. When piece measures 4 cm and 8 cm reduce 1 sts in all p parts = 139-149-159-169-179-189 sts (dec by P2 tog at beg of P section). Change to circular needle size 4 mm when piece measures 12 cm and work 4 rows garter st – see explanation above. At the same time on 1st row dec 32-34-35-35-32-30 sts evenly = 107-115-124-134-147-159 sts. Now complete piece in reverse stocking st. Remember knitting tension! When piece measures 15 cm dec 1 st each side on every 7-7-8-8-8-9 cm a total of 6 times = 95-103-112-122-135-147 sts. When piece measures 55-57-59-61-63-65 cm cast off for armhole each side on every other row: 4 sts 0-0-0-1-1-1 times, 3 sts 1-1-1-1-2-2 times, 2 sts 2-3-4-4-4-6 times and 1 st 1-2-3-3-5-6 times = 79-81-84-86-89-91 sts. When piece measures 73-76-79-82-85-88 cm cast off the middle 17-19-20-22-25-27 sts for neck and dec 1 st on next row to shape the neckline = 30-30-31-31-31-31 sts left on each shoulder. Cast off when piece measures 75-78-81-84-87-90 cm. Right front piece: Cast on 116-123-130-137-144-151 sts (includes 1 edge st at side and 10 front band sts towards mid front) on circular needle size 3.5 mm with Karisma. P1 row from WS and continue as follows from RS: 10 garter sts (front band), *K2, P5* repeat from *-* and finish with 1 edge st. When piece measures 4 cm and 8 cm reduce 1 sts in all p parts = 86-91-96-101-106-111 sts. Change to circular needle size 4 mm when piece measures 12 cm and work 4 rows garter st. At the same time dec 11-12-13-13-11-10 sts evenly on first row = 75-79-83-88-95-101 sts. Knit 2 rows reverse stocking st with front bands in garter st as before. Continue as follows from RS: 10 garter sts, P13-14-15-16-18-19, M.1 (= 36 sts), P15-18-21-25-30-35, 1 edge st. When piece measures 15 cm dec at side as described for back piece = 69-73-77-82-89-95 sts. NB! When you cannot fit in a full repeat of M.1 – see finished measurements – complete piece in M.2. At the same time when piece measures 47-49-51-53-55-57 cm dec to shape the neckline – read Decreasing tips: 1 st on every 2.5-2-2-2-2-2 cm a total of 11-12-12-13-15-16 times. At the same time when piece measures 55-57-59-61-63-65 cm cast off for armhole as described for back piece. When all dec are completed there are 50-50-51-51-51-51 sts left on shoulder. Continue until piece measures 74-77-80-83-86-89 cm and now dec 10 sts evenly on M.1/M.2 = 40-40-41-41-41-41 sts. When piece measures 75-78-81-84-87-90 cm cast off 30-30-31-31-31-31 sts for shoulder = 10 front band sts left on row. Continue on front band sts as follows: *Work 1 row on all sts, turn and work return row, work 1 row on the outermost 5 sts towards mid front and work return row*, repeat from *-* until front band measures 4.5-5-5-5.5-6.5-7 cm (on the shorter side) from shoulder. Cast off loosely. Left front piece: Like right piece, but reversed. Sleeve: Worked back and forth on needle. Cast on 100-100-107-107-114-114 sts (includes 1 edge st each side) on needle size 3.5 mm. Purl 1 row from WS, and continue as follows from RS: 1 edge st, * K2, P5 * repeat from *-* and finish with 1 edge st. When piece measures 5 and 10 cm dec 1 sts in all p parts = 72-72-77-77-82-82 sts. Change to needle size 4 mm when piece measures 16 cm and work 4 rows garter st. At the same time on 1st row dec 12-8-11-9-12-10 sts evenly = 60-64-66-68-70-72 sts. Work 2 rows reverse stocking st. Continue as follows from RS: 1 edge st, P11-13-14-15-16-17, M.1, P11-13-14-15-16-17, 1 edge st. At the same time inc 1 st each side on every 3-2.5-2.5-2-1.5-1 cm a total of 10-11-12-14-16-18 times = 80-86-90-96-102-108 sts. Purl inc sts from RS. Note! When you cannot fit in a full vertical repeat of M.1 – see finished measurements - complete piece in M.2. When piece measures 48-48-47-47-45-44 cm (less for the larger sizes because of larger sleeve cap) cast off to shape sleeve cap each side on every other row: 3 sts 1 time, 2 sts 4-4-4-4-5-5 times and 1 st 1-3-4-5-6-9 times, then cast off 2 sts each side until piece measures 55-56-56-57-57-58 cm. Cast off 3 sts 1 time each side, at the same time dec 10 sts evenly on M.1/M.2. Cast off remaining sts, piece now measures approx 56-57-57-58-58-59 cm. Assembly: Sew shoulder seams. Set in sleeves. Sew sleeves and side seams within 1 edge st. Sew front band tog mid back and sew to neckline on back piece. Crochet border: Crochet a order round the jacket opening on crochet hook size 3 mm with Karisma as follows: 1 dc,* 4 ch, 1 tr in first ch, skip approx 2 cm, 1 dc *, repeat from *-*. Button cover: Crochet 4 button covers on crochet hook size 3 mm with Karisma as follows: Crochet 2 ch, then crochet 16 tr in the first ch, finish with 1 sl st at top of first tr (= round 1). Round 2: Crochet 1 dc in each tr and finish with 1 sl st in first dc on round (= 16 dc). Round 3: 3 ch and then 1 tr in every other dc. Finish with 1 sl st in 3rd ch = 8 tr. Slip buttons into cover, sew around edge and tie tog. Sew in buttons on left front piece. Size S: 12, 22, 31 and 40 cm from bottom edge. Size M: 12, 22, 32 and 41 cm from bottom edge. Size L: 12, 22, 32 and 42 cm from bottom edge. Size XL: 12, 23, 33 and 43 cm from bottom edge. Size XXL: 12, 23, 34 and 44 cm from bottom edge. Size XXXL: 12, 23, 34 and 45 cm from bottom edge. Use the holes in the crochet border as button holes. |
|||||||||||||||||||
Diagram explanations |
|||||||||||||||||||
|
|||||||||||||||||||
 |
|||||||||||||||||||
Have you finished this pattern?Tag your pictures with #dropspattern or submit them to the #dropsfan gallery. Do you need help with this pattern?You'll find 23 tutorial videos, a Comments/Questions area and more by visiting the pattern on garnstudio.com. © 1982-2026 DROPS Design A/S. We reserve all rights. This document, including all its sub-sections, has copyrights. Read more about what you can do with our patterns at the bottom of each pattern on our site. |
|||||||||||||||||||


With over 40 years in knitting and crochet design, DROPS Design offers one of the most extensive collections of free patterns on the internet - translated to 17 languages. As of today we count 324 catalogues and 12290 patterns translated into English (UK/cm).
We work hard to bring you the best knitting and crochet have to offer, inspiration and advice as well as great quality yarns at incredible prices! Would you like to use our patterns for other than personal use? You can read what you are allowed to do in the Copyright text at the bottom of all our patterns. Happy crafting!
Post a comment to pattern DROPS 107-11
We would love to hear what you have to say about this pattern!
If you want to leave a question, please make sure you select the correct category in the form below, to speed up the answering process. Required fields are marked *.