Charred No. 536
OrderClicking the ORDER button will redirect you to Wool Warehouse Direct Ltd website
Clicking the ORDER button will redirect you to Wool Warehouse Direct Ltd website
DROPS 96-11
Change language:
English (UK/cm)
-------------------------------------------------------
Alternative Yarn – See how to change yarns here
Yarn Groups A to F – Use the same pattern and change the yarn here
Yarn usage using an alternative yarn – Use our yarn converter here
-------------------------------------------------------
Each of our patterns has specific tutorial videos to help you.
These step-by-step tutorials might also help you:
Why is the knitting/crochet tension so important?
Knitting tension is what determines the final measurements of your work, and is usually measured per 10 x 10 cm. It is provided like so: number of stitches in width x number of rows in height - eg: 19 stitches x 26 rows = 10 x 10 cm.
The knitting tension is very individual; some people knit/crochet loosely while others work tightly. You adjust the knitting tension with the needle size, which is why the suggested needle size is only meant as a guide! You need to adjust this (up or down) to ensure that YOUR knitting tension matches the knitting tension provided in the pattern. If you work with a different knitting tension than provided you will have a different yarn consumption, and your work will have different measurements than what the pattern suggests.
The knitting tension also determines which yarns can replace each other. As long as you achieve the same knitting tension you can replace one yarn with another.
See DROPS lesson: How to measure your tension/gauge
See DROPS video: How to make a gauge tension swatch
How do I know how many balls of yarn I need?
The required amount of yarn is provided in grams, eg: 450 g. To calculate how many balls you’ll need you first need to know how many grams are in 1 ball (25g, 50g or 100g). This information is available if you click on the individual yarn quality on our pages. Divide the amount required with the amount of each ball. For example, if each ball is 50g (the most common amount), the calculation will be as follows: 450 / 50 = 9 balls.
Can I use a different yarn than what the pattern suggests?
The important thing when changing from one yarn to another is that the knitting/crochet tension remains the same. This is so that the measurements of the finished piece will be the same as on the sketch provided. It is easier to achieve the same knitting tension using yarns from the same yarn group. It is also possible to work with multiple strands of a thinner yarn to achieve the knitting tension of a thicker one. Please try our yarn converter. We recommend you to always work a test swatch.
Please NOTE: when changing yarn the garment might have a different look and feel to the garment in the photo, due to individual properties and qualities of each yarn.
See DROPS lesson: Can I use a different yarn than the one mentioned in the pattern?
What are the yarn groups?
All our yarns are categorised into yarn groups (from A to F) according to thickness and knitting tension – group A contains the thinnest yarns and group F the thickest. This makes it easier for you to find alternative yarns to our patterns, should you wish to switch yarn. All yarns within the same group have a similar knitting tension and can easily replace each other. However, different yarn qualities have different structures and properties which will give the finished work a unique look and feel.
How do I use the yarn calculator?
At the top of all our patterns you’ll find a link to our yarn calculator, which is a helpful tool should you wish to use a different yarn than suggested. By filling in the yarn quality you wish to replace, the amount (in your size) and number of strands, the calculator will present good alternative yarns with the same knitting tension. Additionally it will tell you how much you’ll require in the new qualities and whether you’ll need to work with multiple strands. Most skeins are 50g (some are 25g or 100g).
If the pattern is worked with multiple colours, every colour will have to be calculated separately. Similarly, if the pattern is worked with several strands of different yarns (for example 1 strand Alpaca and 1 strand Kid-Silk) you will have to find alternatives for each, individually.
Why do you show discontinued yarns in the patterns?
Since different yarns have different qualities and textures we have chosen to keep the original yarn in our patterns. However, you can easily find options among our available qualities by using our yarn calculator, or simply pick a yarn from the same yarn group.
It is possible that some retailers still have discontinued yarns in stock, or that someone has a few skeins at home that they would like to find patterns for.
The yarn calculator will provide both alternative yarn as well as required amount in the new quality.
What size should I knit?
If you think it's hard to decide what size to make, it can be a good idea to measure a garment you own already and like the size of. Then you can pick the size by comparing those measures with the ones available in the pattern's size chart.
You'll find the size chart at the bottom of the pattern.
See DROPS lesson: How to read size chart
Why do I get the wrong knitting tension with the suggested needle size?
The needle size provided in the pattern serves only as a guide, the important thing is to follow the knitting tension. And since knitting tension is very individual, you will have to adjust the needle size to ensure that YOUR tension is the same as in the pattern – maybe you’ll have to adjust 1, or even 2 needle sizes, up or down to achieve the correct tension. For this, we recommend that you work test swatches.
Should you work with a different knitting tension than the one provided, the measurements of the finished garment might deviate from the measurement sketch.
See DROPS lesson: How to measure your tension/gauge
See DROPS video: How to make a tension/gauge swatch
Why is the pattern worked top-down?
Working a garment top-down provides more flexibility and room for personal adjustment. For example it is easier to try the garment on while working, as well as making adjustments to length of yoke and shoulder caps.
The instructions are carefully explaining every step, in the correct order. Diagrams are adjusted to the knitting direction and are worked as usual.
How do I work according to a knitting diagram?
The diagram depicts all rows/rounds, and every stitch seen from the right side. It is read from bottom to top, from right to left. 1 square = 1 stitch.
When working back and forth, every other row is worked from the right side and every other row is worked from the wrong side. When working from the wrong side, the diagram will have to be worked reversed: from left to right, knit stitches are purled, purl stitches are knit etc.
When working in the round every round is worked from the right side and the diagram are worked from right to left on all rounds.
See DROPS lesson: How to read knitting diagrams
How do I work according to a crochet diagram?
The diagram depicts all rows/rounds, and every stitch seen from the right side. It is worked from bottom to top, from right to left.
When working back and forth every other row is worked from the right side: from right to left and every other row is worked from the wrong side: from left to right.
When working in the round, every row in the diagram are worked from the right side, from right to left.
When working a circular diagram you start in the middle and work your way outwards, counter clockwise, row by row.
The rows usually start with a given number of chain stitches (equivalent to the height of the following stitch), this will either be depicted in the diagram or explained in the pattern.
See DROPS lesson: How to read crochet diagrams
How do I work several diagrams simultaneously on the same row/round?
Instructions for working several diagrams after each other on the same row/round, will often be written like so: “work A.1, A.2, A.3 a total of 0-0-2-3-4 times". This means you work A.1 once, then A.2 is worked once, and A.3 is repeated (in width) the number of times provided for your size – in this case like so: S = 0 times, M = 0 times, L=2 times, XL= 3 times and XXL = 4 times.
The diagrams are worked as usual: begin with the first row in A.1, then work the first row in A.2 etc.
See DROPS lesson: How to read knitting diagrams
See DROPS lesson: How to read crochet diagrams
Why are the sleeves shorter in larger sizes?
The total width of the garment (from wrist-to-wrist) will be larger in the larger sizes, despite the actual sleeves being shorter. The larger sizes have longer sleeve caps and wider shoulders, so there will be a good fit in all sizes.
Where on the garment is the length measured?
The measurement sketch/schematic drawing provides information regarding the full length of the garment. If it’s a jumper or a jacket the length is measured from the highest point on the shoulder closest to the neckline, and straight down to the bottom of the garment. It is NOT measured from the tip of shoulder. Similarly, the length of yoke is measured from the highest point on the shoulder and down to where yoke is split into body and sleeves.
On a jacket measures are never taken along bands, unless specifically stated. Always measure inside band stitches when measuring the length.
See DROPS lesson: How to read a schematic drawing
What is a repeat?
Diagrams are often repeated on the round or in height. 1 repeat is the diagram the way it appears in the pattern. If it says to work 5 repeats of A.1 in the round, then you work A.1 a total of 5 times after/next to each other in the round. If it says to work 2 repeats of A.1 vertically/in height you work the entire diagram once, then begin again at the start and work the entire diagram one more time.
Why does the piece start with more chain stitches than it’s worked with?
Chain stitches are slightly narrower than other stitches and to avoid working the cast-on edge too tight, we simply chain more stitches to begin with. The stitch count will be adjusted on the following row to fit the pattern and measurement sketch.
Why increase before the rib edge when the piece is worked top-down?
The rib edge is more elastic and will contract slightly compared to, for example, stocking stitch. By increasing before the rib edge, you avoid a visible difference in width between the rib edge and the rest of the body.
Why increase in the cast-off edge?
It’s very easy to cast off too tightly, and by making yarn overs while casting off (and simultaneously casting these off) you avoid a too tight cast off edge.
See DROPS video: How to bind off with yarn overs (yo)
How do I increase/decrease on every 3rd and 4th row/round alternately?
To achieve an even increase (or decrease) you can increase on, for example: every 3rd and 4th row alternately, like so: work 2 rows and increase on the 3rd row, work 3 rows and increase on the 4th. Repeat this until the increase is complete.
See DROPS lesson: Increase or decrease 1 st on every 3rd and 4th row alternately
How can I work a jacket in the round instead of back and forth?
Should you prefer to work in the round instead of back and forth, you may of course adjust the pattern. You’ll need to add steeks mid-front (usually 5 stitches), and follow the instructions. When you would normally turn and work from the wrong side, simply work across the steek and continue in the round. At the end you’ll cut the piece open, pick up stitches to work bands, and cover the cut edges.
See DROPS video: How to knit steeks and cut open
Can I work a jumper back and forth instead of in the round?
Should you prefer to work back and forth instead of in the round, you may of course adjust the pattern so you work the pieces separately and then assemble them at the end. Divide the stitches for the body in 2, add 1 edge stitch in each side (for sewing) and work the front and back pieces separately.
See DROPS lesson: Can I adapt a pattern for circular needles into straight needles?
Why is the pattern slightly different than what I see in the photo?
Pattern repeats can vary slightly in the different sizes, in order to get the correct proportions. If you’re not working the exact same size as the garment in the photo, yours might deviate slightly. This has been carefully developed and adjusted so that the complete impression of the garment is the same in all sizes.
Make sure to follow instructions and diagrams for your size!
How do I make a women’s size garment into a men’s size one?
If you have found a pattern you like which is available in women’s size it’s not very difficult to convert it to men’s size. The biggest difference will be the length of sleeves and body. Start working on the women size that you think would fit across the chest. The additional length will be worked right before you cast off for the armhole/sleeve cap. If the pattern is worked top-down you can add the length right after the armhole or before the first decrease on sleeve.
Regarding additional yarn amount, this will depend on how much length you add, but it is better with a skein too many than too few.
How do I prevent a hairy garment from shedding?
All yarns will have excess fibres (from production) that might come off as lint or shedding. Brushed yarns (ie hairier yarns) have more of these loose, excess fibres, causing more shedding.
Shedding also depends on what is worn under or over the garment, and whether this pulls at the yarn fibres. It’s therefore not possible to guarantee that there will be no shedding
Below are some tips on how to get the best result when working with hairier yarns:
1. When the garment is finished (before you wash it) shake it vigorously so the looser hairs come off. NOTE: do NOT use a lint roller, brush or any method that pulls at the yarn.
2. Place the garment in a plastic bag and put it in your freezer - the temperature will cause the fibres to become less attached to each other, and excess fibres will come off easier.
3. Leave in the freezer for a few hours before taking it out and shaking it again.
4. Wash the garment according to the instructions on the yarn label.
Why does my garment pill?
Pilling is a natural process that happens to even the most exclusive of fibers. It's a natural sign of wear and tear that is hard to avoid, and that is most visible in high friction areas of your garment like a sweater's arms and cuffs.
You can make your garment look as new by removing the pilling, using a fabric comb or a pill/lint remover.
wrote:
Enig med innskriver under.Det gjennombrutte feltet er sikkert fint, men det ser vi ikke så godt. Selve fasongen virker tung og "slamsete"
07.06.2006 - 18:46
Ann-Kristin wrote:
denne har sikkert et vakkert mønsterfelt midt foran som "løfter" modellen litt, slik den fremstår nå virker den "bumsete" og litt "sliten og tung"
07.06.2006 - 15:07
Carmen wrote:
Hallo, ein tolles Modell, sieht recht ausgefallen aus. Viele Grüße Carmen
05.06.2006 - 16:31Birgit Kahra wrote:
Mycket användbar jacka av härligt garn garn.
04.06.2006 - 10:21Agneta Schultz wrote:
Detta är en så vacker modell som kan användas vid många olika tillfällen.
03.06.2006 - 20:44
Bettina wrote:
Måske er det blot min skærm, men jeg har svært veda t se mønsteret/modellen...det kan ofte være svært i sort, måske skulle I overveje at undlade at strikke modeller op i den farve?
03.06.2006 - 00:19Sidsel wrote:
Syns denne var litt ekstra spesiell,noe litt "nytt"
02.06.2006 - 17:41
Anitha Lannervik wrote:
Verkar vara ett härligt mönster
02.06.2006 - 17:18
DROPS 96-11 |
|
|
|
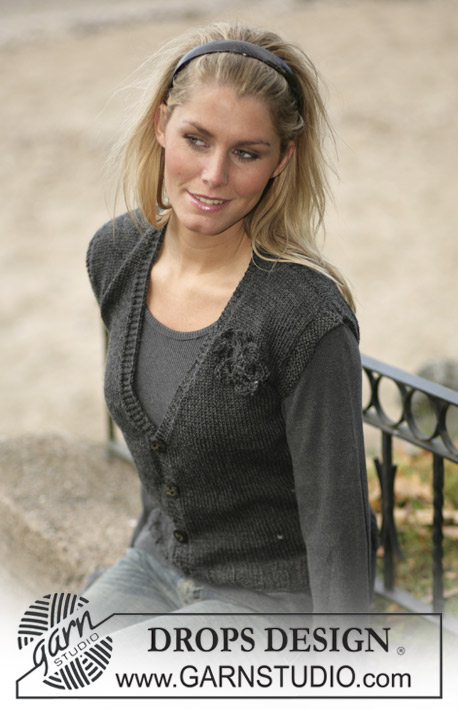
DROPS Jacket in Silke-Tweed and Alpaca with crochet borders
DROPS 96-11 |
|
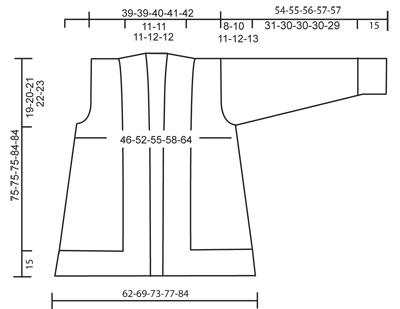
Knitting Tension: 16 stitches x 20 rows on needle size 5.5 mm with 1 thread of each yarn quality in stocking sts = 10 x 10 cm Garter sts: knit all rows Rib: *K3, P3*, repeat from *-* Crochet diamonds: 1 diamond = approx 20 x 20 cm. Back piece: Cast on 101-113-119-125-137 st (incl 1 edge st each side, knitted in garter sts throughout) on needle size 5.5 mm with 1 thread of each yarn quality (= double thread) and knit Rib as follows: 1 edge st, *K3, P3*, repeat from *-* and finish with K3 and 1 edge st. When piece measures 8 cm dec all P3 (seen from the RS) to P2 = 85-95-100-105-115 sts. Knit Rib *K3, P2* until piece measures 15 cm and continue in stocking sts. When piece measures 21 cm dec 1 st each side on every 6-6-6.5-6.5-7 cm a total of 5 times = 75-85-90-95-105 sts. When piece measures 56-55-54-62-61 cm dec for armhole each side on every other row: 3 sts 1 time, 2 sts 1-3-3-4-6 times and 1 st 1-2-4-4-4 times = 63-63-64-65-67 sts. When piece measures 69-72-75-78-81 cm cast off the middle 15-15-16-17-17 sts for neck and dec 1 st towards the neckline on next row = 23-23-23-23-24 sts left on each shoulder. Cast off when piece measures 75-75-75-84-84 cm. Right front: Cast on 39-45-51-51-57 sts (incl 1 edge st at side) on needle size 5.5 mm with 1 thread of each yarn quality (= double thread) and knit Rib as follows from mid front: 2 sts in garter sts, *K3, P3*, repeat from *-* and finish with 1 edge st at side. When piece measures 8 cm dec all P3 (seen from the RS) to P2 = 33-38-43-43-48 sts. Knit Rib *K3, P2* until piece measures 15 cm and continue in stocking sts. At the same time, on 1st row after the Rib adjust number of sts to 34-39-41-43-48. When piece measures 21 cm dec at side as described for back piece = 29-34-36-38-43 sts. When piece measures 56-55-54-62-61 cm dec for armhole as described for back piece = 23-23-23-23-24 sts left on shoulder. Cast off when piece measures 75-75-75-84-84 cm. Left front: Cast on and knit as right front, but mirrored. Sleeves: Cast on 50-50-56-56-56 sts (incl 1 edge st at side) on needle size 5.5 mm with 1 thread of each yarn quality (= double thread) and knit Rib with 1 edge st each side. When piece measures 8 cm dec all P3 (seen from the RS) to P2 = 42-42-47-47-47 sts. Knit Rib *K3, P2* until piece measures 15 cm and continue in stocking sts. At the same time after the Rib, inc 1 st each side on every 5-3.5-4-3-2 cm a total of 7-9-8-10-13 times = 56-60-63-67-73 sts. When sleeve measures 46-45-45-45-44 cm dec for sleeve cap each side on every other row: 3 sts 1 time, 2 sts 2-2-3-3-3 times, 1 st 1-3-3-3-4 times and 2 sts each side until sleeve measures 53-54-55-56-56 cm. Now dec 3 sts 1 time each side and cast off remaining sts on next row, sleeve measures approx 54-55-56-57-57 cm. Assembly: Sew shoulder seams. Sew in sleeves and sew sleeve and side seams inside 1 edge st. Crochet diamonds round front and back pieces: Crochet 8-8-8-9-9 diamonds with 1 thread Silke-Tweed and 1 thread Alpaca as follows: Crochet info: Replace 1st dc on round with 2 ch, replace 1st tr on round with 3 ch. Finish each round with 1 sl st in 1st st from beg of round. Crochet 6 ch with hook size 5 and form a ring with a sl st. Read Crochet info! 1st round: 16 tr in ring 2nd round: 1 dc in first tr, *3 ch, skip 1 tr, 1 dc in next tr*, repeat from *-* = 8 ch-loops 3rd round: *1 tr in each dc, 3 tr in each ch-loop*, repeat from *-* = 32 tr 4th round: * 1 dc in first tr, 3 ch, skip 1 tr, 1 dc in next tr*, repeat from *-* = 16 ch-loops 5th round: *1 tr in each dc, 2 tr in each ch-loop*, repeat from *-* = 48 tr 6th round: *1 dc in first tr, 7 ch, skip 2 tr, 1 dc in next tr*, repeat from *-* = 16 ch-loops 7th round: crochet sl st to the middle of first ch-loop, *7 ch, 1 dc in next ch-loop, 7 ch, 1 dc in next ch-loop, 7 ch, 1 dc in next ch-loop, 10 ch (= corner), 1 dc in next ch-loop*, repeat from *-* all the way round – the circle has now become a square. 8th round: crochet sl st to the middle of the first ch-loop, *7 ch, 1 dc in the same ch-loop (= corner), 7 ch, 1 dc in next ch-loop*, repeat from *-* all the way round. Cut the thread. Crochet the diamonds tog 2 by 2 to create a long piece: Put 2 diamonds on top of each other and crochet as follows: 1 dc in the corner ch-loop through both diamonds, *5 ch, 1 dc in next ch-loop through both diamonds*, repeat from *-* until the 2 diamonds are crochet tog. Crochet the remaining diamonds tog in the same way. Now crochet a border along each long side: *4 tr in ch-loop, 1 tr in dc*, repeat from *-*. Sew the diamonds to the jacket, along the front piece, along the nape of the back neck and along the other front piece. Sew 3 buttons on left front piece inside the crochet border (see photo) as follows: Size S: 25, 33 and 41 cm Size M: 27, 35 and 43 cm Size L: 29, 37 and 45 cm Size XL: 31, 39 and 47 cm Size XXL: 33, 41 and 49 cm. Sew on 1 button on the inside of right front piece inside the crochet border approx 33-35-37-39-41 cm from the bottom edge. Use an opening in the crochet border as buttonholes. Crochet border: Crochet along the bottom edge on back and front pieces and the sleeves using crochet hook size 5 with 1 thread of each yarn quality as follows: 1 dc in first st, *4 ch, skip approx 2.5 cm, 1 dc in next st*, repeat from *-*. |
|
![]() |
|
Have you finished this pattern?Tag your pictures with #dropspattern or submit them to the #dropsfan gallery. Do you need help with this pattern?You'll find 23 tutorial videos, a Comments/Questions area and more by visiting the pattern on garnstudio.com. © 1982-2025 DROPS Design A/S. We reserve all rights. This document, including all its sub-sections, has copyrights. Read more about what you can do with our patterns at the bottom of each pattern on our site. |
With over 40 years in knitting and crochet design, DROPS Design offers one of the most extensive collections of free patterns on the internet - translated to 17 languages. As of today we count 314 catalogues and 11820 patterns translated into English (UK/cm).
We work hard to bring you the best knitting and crochet have to offer, inspiration and advice as well as great quality yarns at incredible prices! Would you like to use our patterns for other than personal use? You can read what you are allowed to do in the Copyright text at the bottom of all our patterns. Happy crafting!
Post a comment to pattern DROPS 96-11
We would love to hear what you have to say about this pattern!
If you want to leave a question, please make sure you select the correct category in the form below, to speed up the answering process. Required fields are marked *.