
Popular categories
Looking for a yarn?


Comments / Questions (5)
![]() Elke wrote:
Elke wrote:
Ich habe den Rumpfteil fertig und soll nun die Ärmel stricken. In der Anleitung steht „Ärmeltipp lesen“. Es ist aber kein Ärmeltipp vorhanden. Was ist der Tipp?
06.05.2026 - 20:35DROPS Design answered:
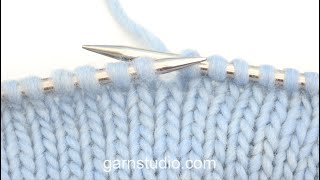
Liebe Elke, danke für den Hinweis. Wenn Maschen aus dem unteren Rand des Armausschnitts aufgefasst werden, kann im Übergang zwischen dem Rumpfteil und dem Ärmel ein kleines Loch entstehen. Dies lässt sich ggf. vermeiden, indem der Querfaden zwischen den Maschen aufgefasst und mit der ersten Masche im Übergang zwischen dem Rumpfteil und dem Ärmel verschränkt zusammengestrickt wird. Viel Spaß beim Stricken!
07.05.2026 - 09:04
![]() Rosalie wrote:
Rosalie wrote:
Ik brei nu achterpand met meerderen en strepen, maar ik begrijp het niet. Ik brei eerst 5 naalden naturel, dan herhaal ik van 1 naald licht noga en 5 naalden naturel en het blijkt draad naturel in rechts en andere draad licht noga in Links Moet ik ze knippen en dan brei ik een nieuwe draad? Ik zie de uitleg van strepen niet duidelijk.
07.03.2026 - 08:49DROPS Design answered:
Dag Rosalie,
De strepen brei je steeds 1 naald in nougat/taupe en 5 naalden in Naturel. Bij heen en weer breien betekent dat inderdaad dat je de draad af moet knippen en een nieuwe draad aan moet hechten.
10.03.2026 - 20:16
![]() Rosalie wrote:
Rosalie wrote:
Hoeveel steken aan het eind van de naald van achterpand brei ik voor meerder 1 van links en rechts?
06.03.2026 - 15:49DROPS Design answered:
Dag Rosalie,
Waar ben je precies en welke maat ben je aan het maken? Helaas begrijp ik de vraag niet goed. Wat bedoel je met 'voor meerder 1 van links en rechts'?
07.03.2026 - 10:57
![]() Helena wrote:
Helena wrote:
Jak se pletou pruhy v nekruhových řadách? Počet řad je lichý.
26.02.2026 - 20:10DROPS Design answered:
Dobrý den, Heleno. Při pletení v řadách přízi při střídání barvy buď pokaždé ustřihnete a nebo můžete plést s 2 klubky stejné barvy zároveň (tj. 1 klubko pro každou stranu řady, abyste nemusela přízi stříhat). Při pozdějším pletení trupu a rukávů v kruhových řadách pak tento náročnější postup odpadne. Hodně zdaru!
31.03.2026 - 00:32
![]() Elodie wrote:
Elodie wrote:
J'aurais besoin d'aide pour le sweat
15.02.2026 - 21:40DROPS Design answered:
Bonjour Élodie, vous pouvez volontiers poser votre question ici en indiquant quelle partie vous ne comprenez pas, quelle taille vous tricotez, etc... Pensez à consulter l'onglet "Vidéos" en haut de page, vous y trouverez des vidéos montrant comment réaliser chaque partie de ce type d'empiècement. Bon tricot!
17.02.2026 - 14:49
|
|
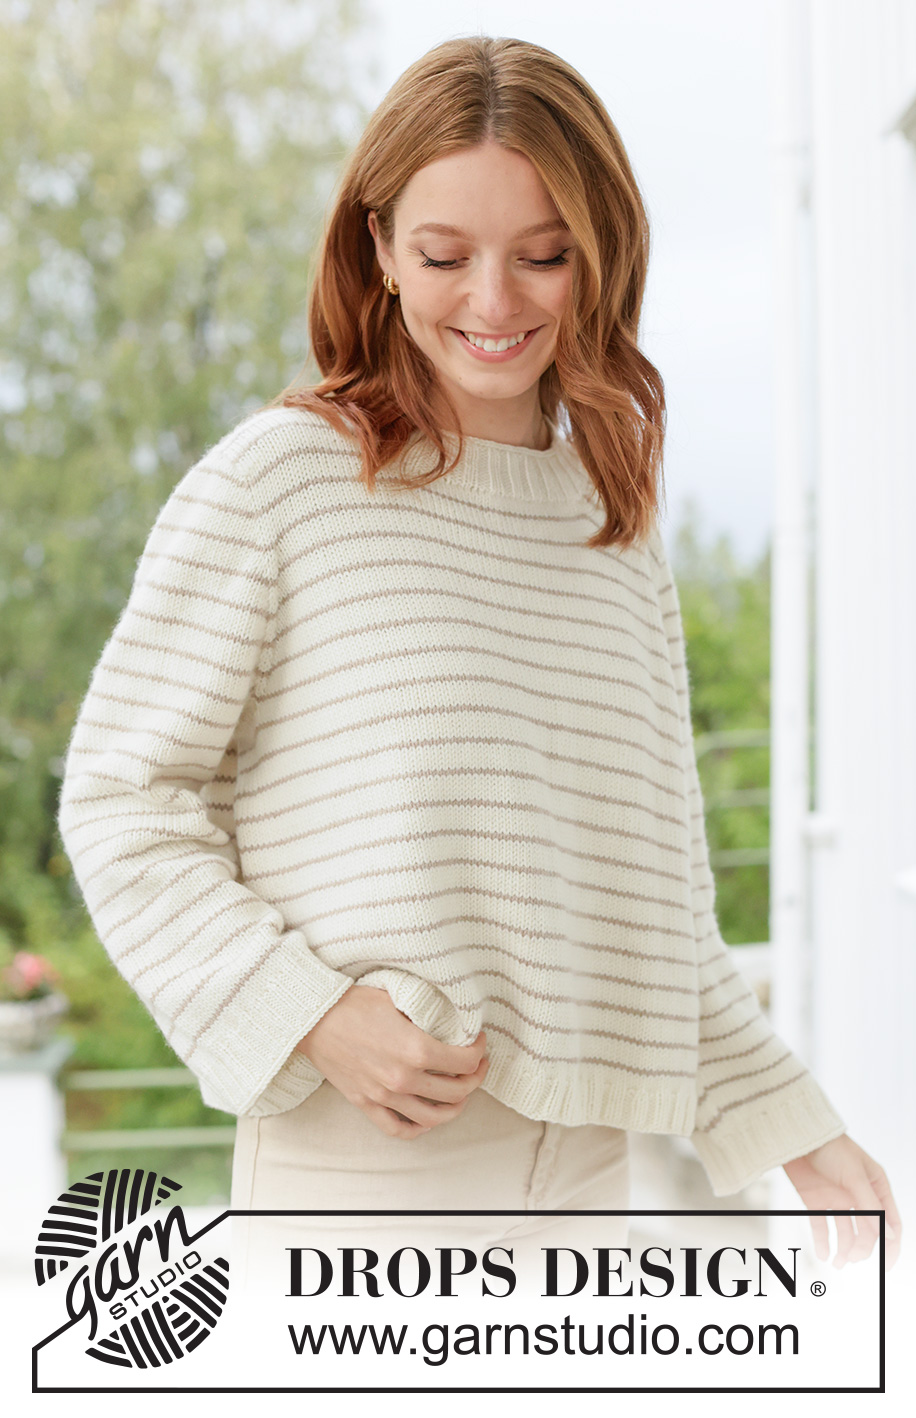
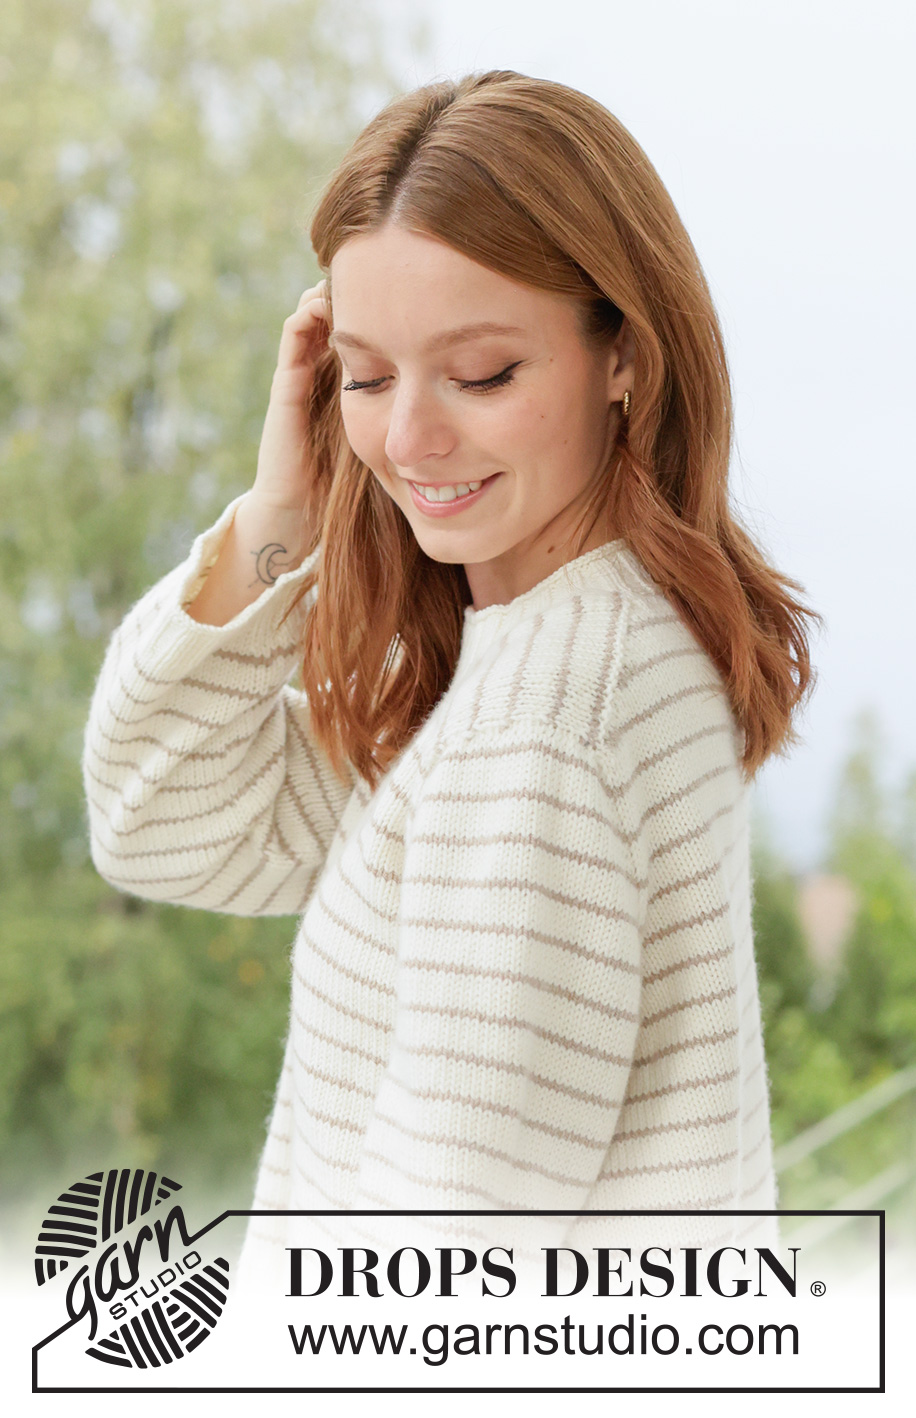
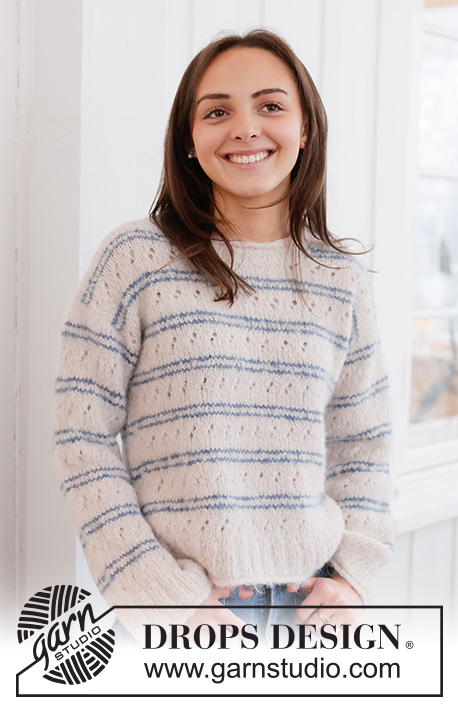
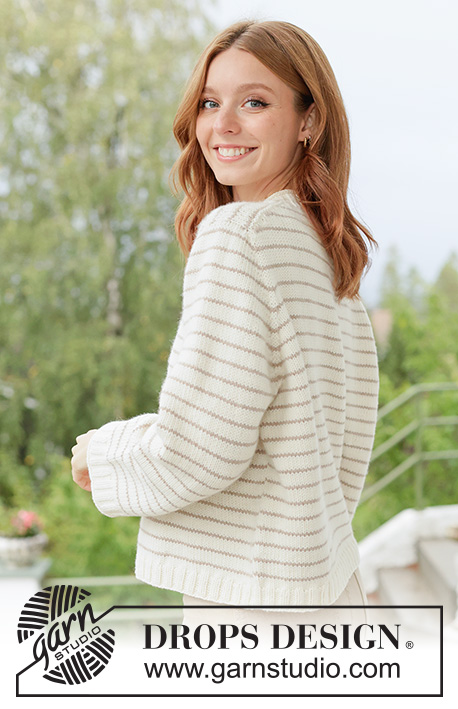
Caramel Stripes Sweater#caramelstripessweater |
|
 |
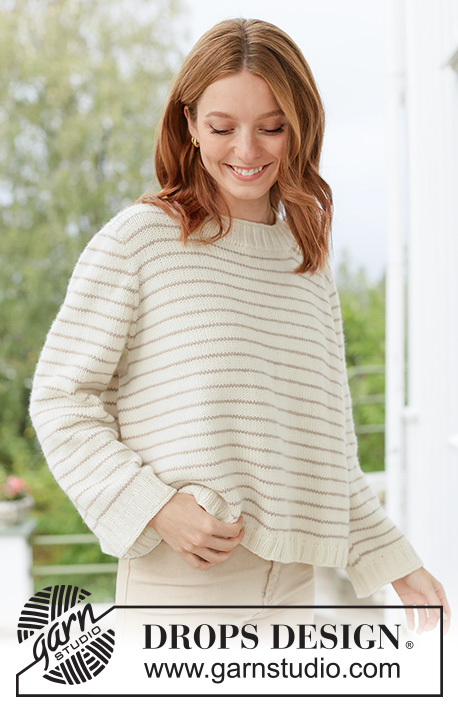 |
Knitted jumper in DROPS Daisy or DROPS Merino Extra Fine. Piece is knitted top down with European yoke and stripes. Size XS – XXXL.
DROPS 268-28 |
|
|
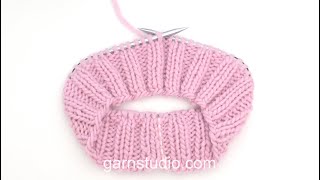
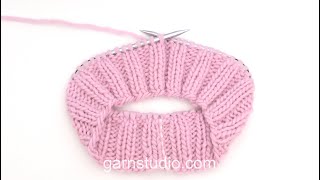
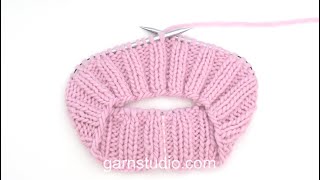
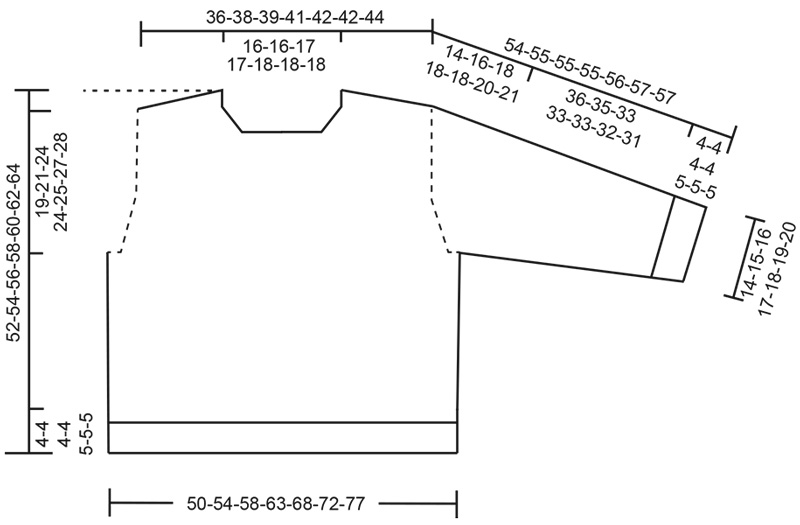
---------------------------------------------------------- EXPLANATION FOR THE PATTERN: ---------------------------------------------------------- STRIPES: 1 repetition with stripes measures approx. 2.3 cm. Stripes begin on different places on back piece and front piece; it is important so that the stripes fit on yoke. Begin stripes as follows on back piece: Work 1-3-5-1-5-5-1 rows in colour Off White, then work stripes as follows: * 1 row/round in colour Light Nougat/Light Taupe, 5 rows/rounds in colour Off White *, work from *-* onwards. Begin stripes as follows on front pieces: Work 1-1-5-5-5-5-5 rows in colour Off White, then work stripes as follows: * 1 row/round in colour Light Nougat/Light Taupe, 5 rows/rounds in colour Off White *, work from *-* onwards. STRIPE TIP (applies to stripes when working in the round): When working yoke in the round, the beginning of round should be before marker between back piece and right sleeve (i.e. round begins where 3rd marker was placed at beginning of yoke). To get a nicer transition at the beginning and end of round when working stripes, work as follows: Switch to new colour and work 1 round. Work first stitch on 2nd round as follows: Slip first stitch from previous round on to needle, knit this stitch together with first stitch on left needle. INCREASE TIP-1: INCREASE 1 STITCH TOWARDS THE LEFT: Use left needle to pick up yarn between 2 stitches from row/round below, pick up yarn from the front and knit stitch in stitch loop behind the needle. INCREASE 1 STITCH TOWARDS THE RIGHT: Use left needle to pick up yarn between 2 stitches from row/round below, pick up yarn from the back and knit stitch in stitch loop in front of needle. SLEEVE TIP: When picking up stitches mid under sleeve, there will be a small hole in the transition between stitches on body and sleeves. The holes can be closed by picking up the strand between two stitches - work this strand twisted together with the first stitch between body and sleeve to close the hole. DECREASE TIP: Decrease 1 stitch on each side of marker thread as follows: Work until 3 stitches remain before marker thread, knit 2 together, knit 2 (marker thread is between these 2 stitches), slip 1 stitch knitwise, knit 1, pass slipped stitch over stitch worked (= 2 stitches decreased). INCREASE TIP-2: When increasing stitches evenly in transition for rib, it is important to increase where stitches are going to be purled, the stitches in stocking stitch will then continue nicely over into rib. ---------------------------------------------------------- START THE PIECE HERE: ---------------------------------------------------------- JUMPER - SHORT OVERVIEW OF THE PIECE: In this pattern needles of different length have been used, begin with fitting length for number of stitches and switch as needed. Garment is worked as point 1 - 5. 1. BACK PIECE: Cast on stitches in the back of neck and work back piece back and forth downwards while at the same time increasing in each side of piece until number of stitches for shoulder width is reached. Back piece has a slight diagonal shoulder. 2. FRONT PIECE: Worked in 2 parts (= each side of neck). Begin by picking up stitches along one shoulder on back piece, work front piece downwards while increasing towards the neck. Repeat on the other shoulder. 3. YOKE: On next row work all stitches on same circular needle - work as follows: Work one front piece, pick up stitches for sleeve along the side on front piece, work stitches on back piece, pick up stitches for sleeve along the side on the other front piece and work stitches on other front piece = work yoke back and forth over all stitches back from mid front. 4. INCREASES FOR NECK, BODY AND SLEEVES: When working the yoke, first increase for only neck and sleeves, and then increase for both body and sleeves. At the same time after last increase for neck slip front pieces together mid front, then continue piece in the round on needle. 5. BODY AND SLEEVES: When all stitches have been increased and yoke is knitted to given measurements, divide the piece for body and sleeves. Work body downwards in the round on needle while putting the sleeves aside. Then work sleeves downwards in the round on needle. Finish by picking up stitches around the neck and work a neck edge in the round. BACK PIECE: Work piece back and forth on circular needle. Cast on 34-34-36-36-38-38-38 stitches on circular needle size 4.5 mm with colour Off White in DROPS Daisy or DROPS Merino Extra Fine. Read STRIPES in explanation above and work as follows: ROW 1 (= wrong side): Purl and cast on 2 new stitches at the end of row. ROW 2 (= right side): Knit and cast on 2 new stitches at the end of row. AFTER 2ND ROW: Work 1st and 2nd ROW until 10-11-11-12-12-12-13 increases have been done in each side (= 20-22-22-24-24-24-26 rows have been worked), after last increase there are = 74-78-80-84-86-86-90 stitches on needle. In size XS, S, XL, XXL and XXXL last row was in colour Light Nougat/Light Taupe and in size M and L 4 rows in colour Off White have been worked at the end of piece. Cut the yarn, slip stitches on a thread or a stitch holder. Remember to follow the knitting tension RIGHT SHOULDER: Find right shoulder on back piece as follows: Place back piece flat with right side up, place back piece so that stitches on thread/stitch holder is towards you, right side of piece = right shoulder. Now pick up stitches along right diagonal shoulder on back piece - begin from right side at the armhole and pick up stitches in towards the neck, use colour Off White. Make sure to pick up neatly inside the increased stitches to get a nice pick-up edge = 20-22-22-24-24-24-26 stitches for shoulder. Insert 1 marker in piece in towards the neck. All length measurements are done from this marker, measured in stitch direction. ROW 1 (= wrong side): Purl 2 stitches, knit until 2 stitches remain, purl 2. 1 ridge in garter stitch is now visible from right side with 2 stitches in stocking stitch in each side. Now work in stocking stitch and STRIPES - remember to begin with the correct colour. Work until piece measures approx. 8-8-8-8-10-10-10 cm – to make the stripes fit when slipping the yoke together next row should be 1st-1st-3rd-3rd-3rd-3rd-3rd row in colour Off White. Now increase stitches towards the neck (at the same time continue stripes as before) as follows: ROW 1 (= right side): Knit until 3 stitches remain, increase 1 stitch towards the right, knit 3 – read INCREASE TIP-1. ROW 2 (= wrong side): Purl without increasing. Work 1st and 2nd ROW 3-3-4-4-5-5-5 times in total (= 6-6-8-8-10-10-10 rows have been worked) = 23-25-26-28-29-29-31 stitches. In size XS, S, XL, XXL and XXXL last row was worked in colour Light Nougat/Light Taupe and in size M and L 4 rows in colour Off White have been worked. Slip stitches on a thread or stitch holder, now work left front piece along the left shoulder as explained below. LEFT SHOULDER: Pick up stitches along left diagonal shoulder on back piece - begin from right side at the neck and pick up stitches out towards the armhole, use colour Off White. Make sure to pick up neatly inside the increased stitches to get a nice pick-up edge = 20-22-22-24-24-24-26 stitches for shoulder. Insert 1 marker in piece in towards the neck. All length measurements are done from this marker, measured in stitch direction. ROW 1 (= wrong side): Purl 2 stitches, knit until 2 stitches remain, purl 2. 1 ridge in garter stitch is now visible from right side with 2 stitches in stocking stitch in each side. Now work in stocking stitch and STRIPES - remember to begin with the correct colour. Work until piece measures approx. 8-8-8-8-10-10-10 cm - to make the stripes fit when slipping the yoke together next row should be 1st-1st-3rd-3rd-3rd-3rd-3rd row in colour Off White. Now increase stitches towards the neck (at the same time continue stripes as before) as follows: ROW 1 (= right side): Remember INCREASE TIP-1 and knit 3, increase 1 stitch towards the left, knit the rest of row. ROW 2 (= wrong side): Purl without increasing. Work 1st and 2nd ROW 3-3-4-4-5-5-5 times in total (= 6-6-8-8-10-10-10 rows have been worked) = 23-25-26-28-29-29-31 stitches. In size XS, S, XL, XXL and XXXL last row was worked in colour Light Nougat/Light Taupe and in size M and L 4 rows in colour Off White have been worked. Then slip front pieces and back piece together and pick up stitches for sleeves while at the same time continuing increases for neck and stripes, work as explained below. YOKE: ROW 1 (= right side): Begin from right side with stitches from left front piece: Knit 3, increase 1 stitch towards the left, knit until 2 stitches remain on front piece, slip 1 stitch, knit 1, pass slipped stitch over (= 1 stitch decreased), insert 1 marker here, pick up 20-20-22-22-28-28-28 stitches along the side on left front piece (= stitches for sleeve - pick up stitches inside outermost stitch), insert 1 marker, slip stitches from back piece back on needle, knit the first 2 stitches together (= 1 stitch decreased), knit until 2 stitches remain on back piece, slip 1 stitch, knit 1, pass slipped stitch over (= 1 stitch decreased), insert 1 marker, pick up 20-20-22-22-28-28-28 stitches along the side on right front piece (= stitches for sleeve - pick up stitches inside outermost stitch), insert 1 marker, work stitches from right front piece back on needle, knit the first 2 stitches together (= 1 stitch decreased), knit until 3 stitches remains, increase 1 stitch towards the right, knit the last 3 stitches = 158-166-174-182-198-198-206 stitches. ROW 2 (= wrong side): Purl all stitches. ROW 3 (= right side): Knit 3, increase 1 stitch towards the left, knit until first marker, move marker on to right needle, increase 1 stitch towards the left, knit until next marker, increase 1 stitch towards the right, move marker on to right needle, knit until next marker, move marker on to right needle, increase 1 stitch towards the left, knit until next marker, increase 1 stitch towards the right, move marker on to right needle, knit until 3 stitches remain on needle, increase 1 stitch towards the right, knit 3 = 164-172-180-188-204-204-212 stitches. Increases for neck are now done. Cast on 24 new stitches at the end of row for neck = 188-196-204-212-228-228-236 stitches. 3-3-1-1-3-3-3 rows in colour Off White have been worked. Piece measures approx. 12-12-13-13-15-15-15 cm from marker. 2 cm of the neck depth will be over back piece. Then work piece in the round, read KNITTING TIP - to make the stripes continue nicely cut the yarn and displace the round so that it begins before 3rd marker (= right shoulder at the back) and work as follows: ROUND 1: Knit all stitches without increase. ROUND 2: Knit all stitches and increase 1 stitch in each side of each sleeve as before – remember INCREASE TIP-1, number of stitches on each sleeve increase, number of stitches on front piece and back piece stays the same. Work 1st and 2nd ROUND 7-9-8-7-3-2-1 times (= 14-18-16-14-6-4-2 rounds have been worked, 8-10-9-8-4-3-2 increases have been done on sleeves = 36-40-40-38-36-34-32 stitches on each sleeve and 72-76-78-82-84-84-88 stitches on front piece/back piece) = 216-232-236-240-240-236-240 stitches. Then increase on both sleeves and body - increase for body inside the 2 stitches in each side of front piece/back piece - work as follows: ROUND 1: Knit without increasing. Remember STRIPES TIP, beginning of round should be before marker between back piece and right sleeve. ROUND 2: Move marker on to right needle, increase 1 stitch towards the left, knit until next marker, increase 1 stitch towards the right, move marker on to right needle, knit 2, increase 1 stitch towards the left, knit 68-72-74-78-80-80-84 , increase 1 stitch towards the right, knit 2, move marker on to right needle, increase 1 stitch towards the left, knit until next marker, increase 1 stitch towards the right, move marker on to right needle, knit 2, increase 1 stitch towards the left, knit 68-72-74-78-80-80-84, increase 1 stitch towards the right, knit 2 (= 8 stitches increased, i.e. increase 1 stitch on each side of 2 stitches in every transition between body and sleeves). Work 1st and 2nd ROUND 10-11-14-16-20-23-25 times (= 20-22-28-32-40-46-50 rounds worked). 18-21-23-24-24-26-27 increases have been done in total on sleeves and 10-11-14-16-20-23-25 increases on body = 56-62-68-70-76-80-82 stitches on each sleeve and 92-98-106-114-124-130-138 stitches on front piece/back piece) = 296-320-348-368-380-420-440 stitches. Sleeve measures approx. 14-16-18-18-18-20-21 cm - when the jumper is folded double at the shoulder, piece 19-21-24-24-25-27-28 cm from the edge on shoulder and down along the armhole. If the garment is shorter than this, continue until correct measurements without increases. Now divide yoke for body and sleeves. DIVIDING FOR BODY AND SLEEVES: AT THE SAME TIME as next round is worked divide yoke for body and sleeves as follows: Slip the first 56-62-68-70-76-80-82 stitches on a thread for sleeve, cast on 8-10-10-12-12-14-16 new stitches on needle (= in the side mid under sleeve), knit the next 92-98-106-114-124-130-138 stitches (= front piece), slip the next 56-62-68-70-76-80-82 stitches on a thread for sleeve, cast on 8-10-10-12-12-14-16 new stitches on needle (= in the side mid under sleeve), knit the last 92-98-106-114-124-130-138 stitches (= back piece). Finish body and sleeves separately. BODY: = 200-216-232-252-272-288-308 stitches. Work in stocking stitch (continue stripes as before) in the round until piece measures 46-48-50-52-53-55-57 cm from cast-on edge mid back – adjust so that there are at least 3 rounds in colour Off White before rib, work rib in colour Off White. Switch to circular needles size 3.5 mm - read INCREASE TIP-2 in explanation above and work rib (= knit 2/purl 2) while AT THE SAME TIME increasing 52-56-60-64-72-76-80 stitches evenly on 1st round = 252-272-292-316-344-364-388 stitches. When rib measures 4-4-4-4-5-5-5 cm, cast off all stitches somewhat loosely with knit over knit and purl over purl. Jumper measures approx. 50-52-54-56-58-60-62 cm from mid back and 52-54-56-58-60-62-64 cm from the shoulder. SLEEVES: Slip 56-62-68-70-76-80-82 sleeve stitches from one thread on to circular needle size 4.5 mm and pick in addition up 1 stitch in each of the 8-10-10-12-12-14-16 stitches cast on under sleeve - read SLEEVE TIP = 64-72-78-82-88-94-98 stitches. Insert 1 marker in the middle of the new stitches under sleeve and round begins here. Work in the round in stocking stitch and stripes as before. When 1 round has been worked after division, decrease mid under sleeve – read DECREASE TIP and decrease as follows: Decrease 2 stitches 2-2-3-3-3-3-3 times on every other round, then decrease 2 stitches 2-4-4-4-5-6-6 times every 5-6-4-4-7-3-3 cm = 56-60-64-68-72-76-80 stitches on needle. Work until sleeve measures 36-35-33-33-33-32-31 cm from division – adjust so that there are at least 3 rounds in colour Off White before rib, work rib in colour Off White. Switch to double pointed needles size 3.5 mm and work rib (= knit 2/purl 2) while AT THE SAME TIME increasing 12-12-16-16-16-20-20 stitches evenly on 1st round - remember INCREASE TIP = 68-72-80-84-88-96-100 stitches. When rib measures 4-4-4-4-5-5-5 cm, cast off all stitches somewhat loosely with knit over knit and purl over purl. Sleeve measures approx. 54-55-55-55-56-57-57 cm from shoulder. NECK EDGE: Use circular needle size 3.5 mm and colour Off White. Begin from right side at one shoulder line and pick up approx. 100 to 114 stitches around the neck inside 1 stitch (number of stitches must be divisible by 4). Knit 1 round. Work rib in the round (= knit 2/purl 2) for 4-4-4-4-5-5-5 cm. Knit 1 round and loosely cast off by knitting. |
|
 |
|
Have you finished this pattern?Tag your pictures with #dropspattern #caramelstripessweater or submit them to the #dropsfan gallery. Do you need help with this pattern?You'll find 45 tutorial videos, a Comments/Questions area and more by visiting the pattern on garnstudio.com. © 1982-2026 DROPS Design A/S. We reserve all rights. This document, including all its sub-sections, has copyrights. Read more about what you can do with our patterns at the bottom of each pattern on our site. |
|


With over 40 years in knitting and crochet design, DROPS Design offers one of the most extensive collections of free patterns on the internet - translated to 17 languages. As of today we count 325 catalogues and 12291 patterns translated into English (UK/cm).
We work hard to bring you the best knitting and crochet have to offer, inspiration and advice as well as great quality yarns at incredible prices! Would you like to use our patterns for other than personal use? You can read what you are allowed to do in the Copyright text at the bottom of all our patterns. Happy crafting!
Post a comment to pattern DROPS 268-28
We would love to hear what you have to say about this pattern!
If you want to leave a question, please make sure you select the correct category in the form below, to speed up the answering process. Required fields are marked *.