
Popular categories
Looking for a yarn?


Comments / Questions (22)
![]() Hanna wrote:
Hanna wrote:
Why did we have to make this pattern so confusing? Purled first row, wrong side. Great. Except now the left and right front pieces are on the opposite sides of the patterns. Starting with the right front and ending with the left front. While this is entirely adjustable, the verbiage used is overly complex and just confuses people. Its a beautiful cardigan if only I could understand the pattern enough to knit it.
05.02.2026 - 00:42
![]() Sylvie Bérard wrote:
Sylvie Bérard wrote:
Bonjour, pour l’empiecement je ne comprend pas ou placer mes marqueurs pour le small : pouvez vous être aussi clairs que dans vos autres patrons ? Est- ce que les deux bords ont le même nombre de mailles ? Il semble que non. Veuillez m’ expliquer SVP
28.01.2026 - 18:33DROPS Design answered:
Bonjour Mme Bérard, en taille S, mettez vos marqueurs ainsi: 3 m (devant gauche), 1er marqueur, 18 m (manche), 2ème marqueur, 28 m (dos), 3ème marqueur, 18 m (manche), 4ème marqueur, 3 m (devant droit) = 70 m. Notez que vous aurez 2 m pour le raglan, ces 2 mailles sont 1 de chaque côté de chaque marqueur, soit par ex. 2 m (devant gauche), 2 m raglan avec 1 marqueur entre elles, 16 m (manche), 2 m raglan avec 1 marqueur entre elles, 26 m (dos), 2 m raglan avec 1 marqueur entre elles, 18 m (manche), 2 m raglan avec 1 marqueur entre elles, 2 m (devant droit). Bon tricot!
29.01.2026 - 08:58
![]() Monicq K wrote:
Monicq K wrote:
Hej! Ska man använda 1 tråd Flora? I beskrivningen står det att man ska det. Men i garnåtgången ska man använda en tråd Kid-silk också.
13.01.2026 - 08:37DROPS Design answered:
Hej Monica. Du ska sticka med 1 tråd DROPS Flora och en tråd DROPS Kidsilk (=2 trådar). Mvh DROPS Design
13.01.2026 - 13:39
![]() Christine Audet wrote:
Christine Audet wrote:
Pour la grandeur \'\'Moyen\'\' les quantités des mailles sont inexactes. Après avoir fait mes augmentations pour les \'\'raglans\'\' je n\'obtiens pas 45 mailles pour les devants, mais 44 mailles (3 mailles + 28 mailles (augm. devant)+ 13 mailles (augm. V)). Pour les manches je n\'obtiens pas 52 mailles, mais 54 mailles (18 mailles + 36 mailles). Pour le dos, je n\'obtiens pas 86 mailles, mais 84 mailles (28 mailles + 56 mailles).
01.10.2025 - 15:27
![]() April wrote:
April wrote:
Hi! For v-neck increases, is it inside the edge stitches? for example: for the left front piece, slip stitch knit-wise, yarn over, knit 1? Or after working the edge stitches? Thank you.
06.09.2025 - 17:12DROPS Design answered:
Hi April, for the left front piece: Slip 1 stitch knit-wise, knit 1 (2 EDGE STITCHES), make 1 yarn over. Right front piece: Work until there are 2 stitches left on the row, make 1 yarn over, knit 2 (2 EDGE STITCHES). Happy knitting!
21.09.2025 - 21:50
![]() Heike wrote:
Heike wrote:
Liebes Droste Team, erst einmal Dankeschön für die tolle Anleitung. Eine Frage hätte ich allerdings: bei den Hinweisen zur Anleitung steht bei den V Ausschnitt Zunahmen für das rechte Vorderteil: „… in der nächsten Reihe, in das hintere Maschenglied des Umschlags einstechen…“. Müsste nicht in das vordere Maschenglied eingestochen werden? So ist es nämlich bei den Raglan Zunamen erklärt. Liebe Grüße und danke schön!
15.08.2025 - 09:21DROPS Design answered:
Liebe Heike, stimmt, danke für den Hinweis, eine Korrektur erfolgt. Viel Spaß beim Stricken!
15.08.2025 - 12:25
![]() Jasmin wrote:
Jasmin wrote:
Werden bei den Raglan- und V-Ausschnitt-Zunahmen immer nur die Hin-Reihen gezählt (also in jeder 2. Reihe = jede 2. Hinreihe) oder mit den Rückreihen (also in jeder 2. Reihe = jede Hinreihe)? Dankeschön!!
20.07.2025 - 20:52DROPS Design answered:
Liebe Jasmin, die Raglan Zunahmen werden in den Hinreihen gestrickt, zuerst in jeder Hinreihe dann in jeder 2. Hinreihe bei den Ärmeln (aber immer noch in jeder Hinreihe beim Vorder-/Rückenteil); und die V-Ausschnitt Zunahmen werden zuerst in jeder 2. Hinreihe (= in jeder 4. Reihe) dann in jeder Hinreihe (= in jeder 2. Reihe) und endlich wieder in jeder 2. Hinreihe (= in jeder 4. Reihe). Viel Spaß beim Stricken!
24.07.2025 - 16:00
![]() May Larsson wrote:
May Larsson wrote:
Hej! Jag undrar om man ska sticka en maska mellan ökningarna till raglan? Som det beskrivs görs det två omtag efter varandra och det ser konstigt ut. Tacksam för svar! MVH May Larsson
07.05.2025 - 08:55DROPS Design answered:
Hei May. I oppskriften er det forklart at man har 2 masker mellom raglansøkningene. Slik står det: Öka till raglan på var sida om 2 raglanmaskor vid varje märktråd. Under OK settes det 4 merketråder. Masken før og etter merketråden = raglanlinjen (som består av 2 masker). Usikker på hvor du leser at det görs två omtag efter varandra. mvh DROPS Design
12.05.2025 - 09:59
![]() Gerry wrote:
Gerry wrote:
Hoe haak ik de rand? 1 steek haken, 2,5 cm overslaan? Dan krijg ik toch een geribbelde rand?
15.04.2025 - 07:53DROPS Design answered:
Dag Gerry,
Je haakt de rand volgens het telpatroon onderaan. Dit patroon herhaal je steeds. De totale breedte van 1 herhaling is ongeveer 5 cm. Nadat je het groepje van stokjes hebt gehaakt (met 1 losse in het midden en op het eind weer een losse, dan steek je de haaknaald ongeveer 2,5 cm verderop (ten opzicht van waar je het stokjesgroepje in hebt gehaakt) weer in het werk om een vaste te haken.
15.04.2025 - 19:19
![]() Katja wrote:
Katja wrote:
Hi liebes Team, wie bekomme ich den Abschluss beim Abketten des Rumpfteils schön hin? Bei mir rollt sich der immer auf?
09.04.2025 - 21:10DROPS Design answered:
Liebe Katja, Sie können die Jacke mit Stecknadeln auf einer geeigneten Unterlage spannen, anfeuchten (z.B. mit einer Sprühflasche für Blumen) und trocknen lassen, danach entfernen Sie die Stecknadeln, dann sollte sich der Rand nicht mehr rollen. Oder beim Abketten, können Sie diese beide Methode benutzen, siehe dieses Video und dieses Video. Viel Spaß beim Stricken!
10.04.2025 - 09:57
|
||||||||||||||||
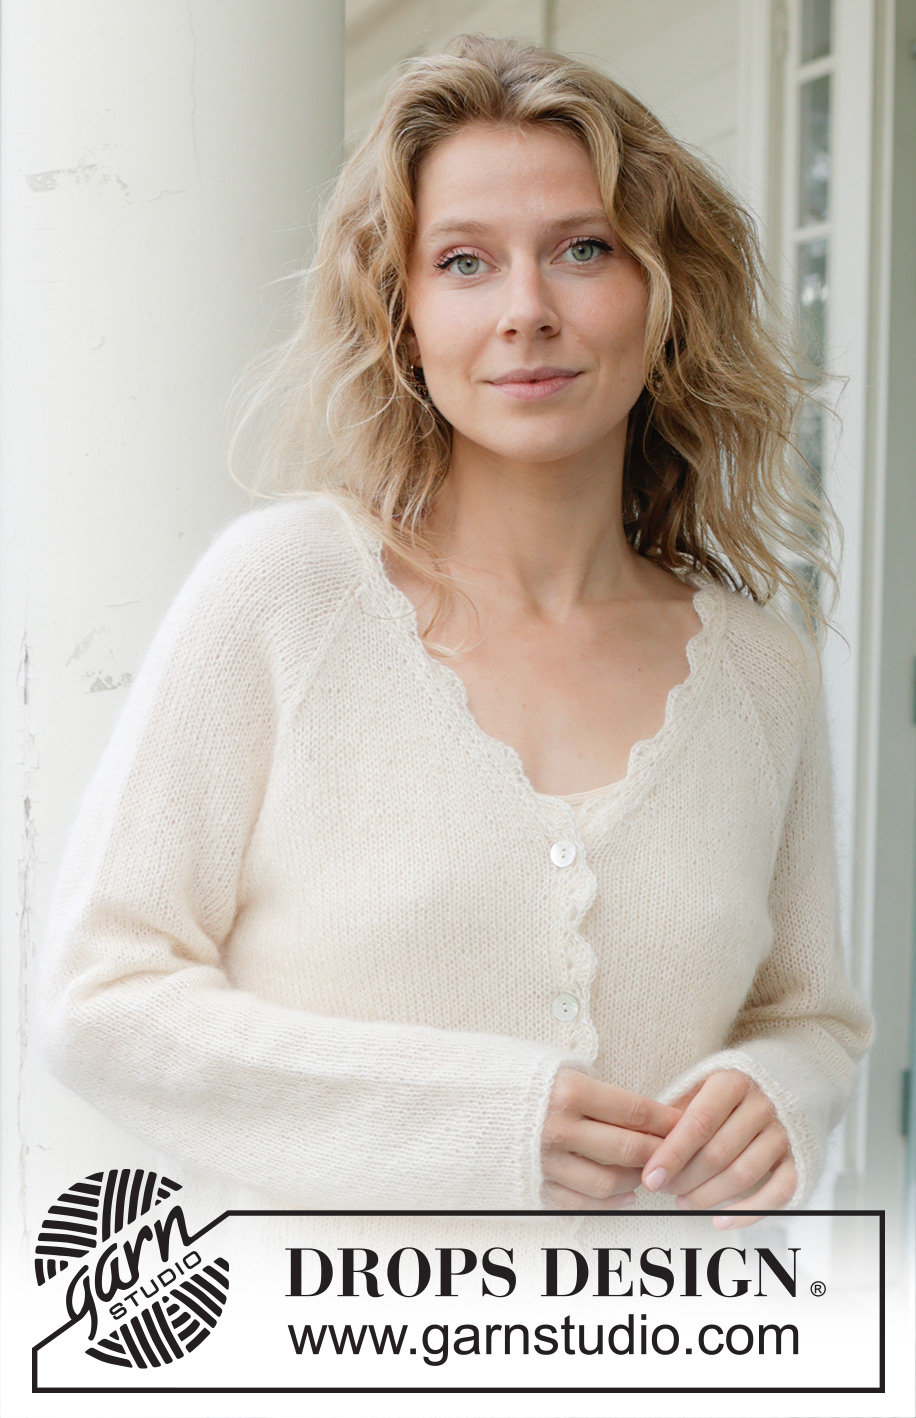
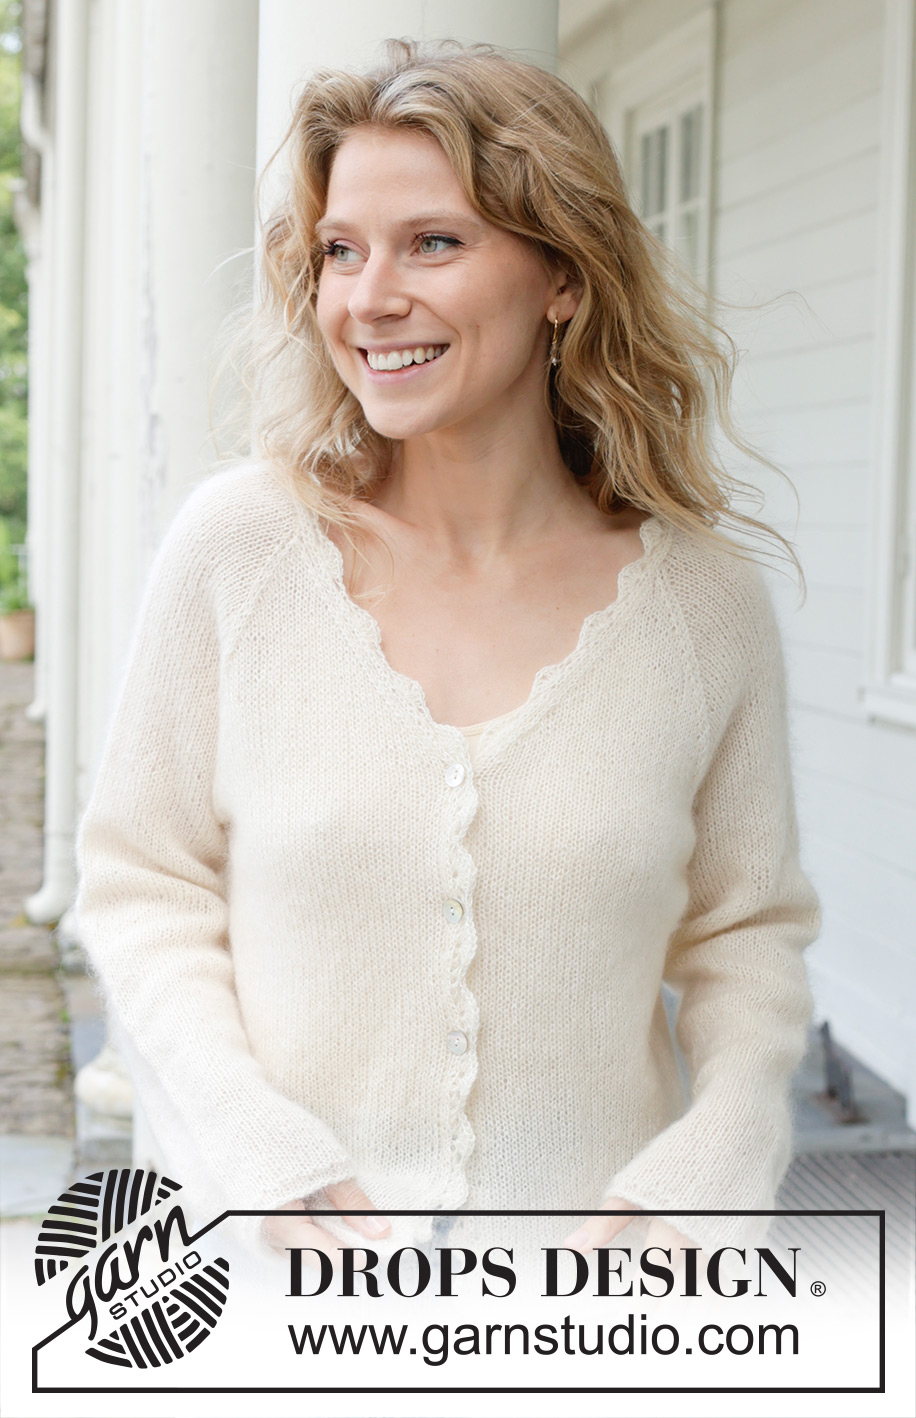
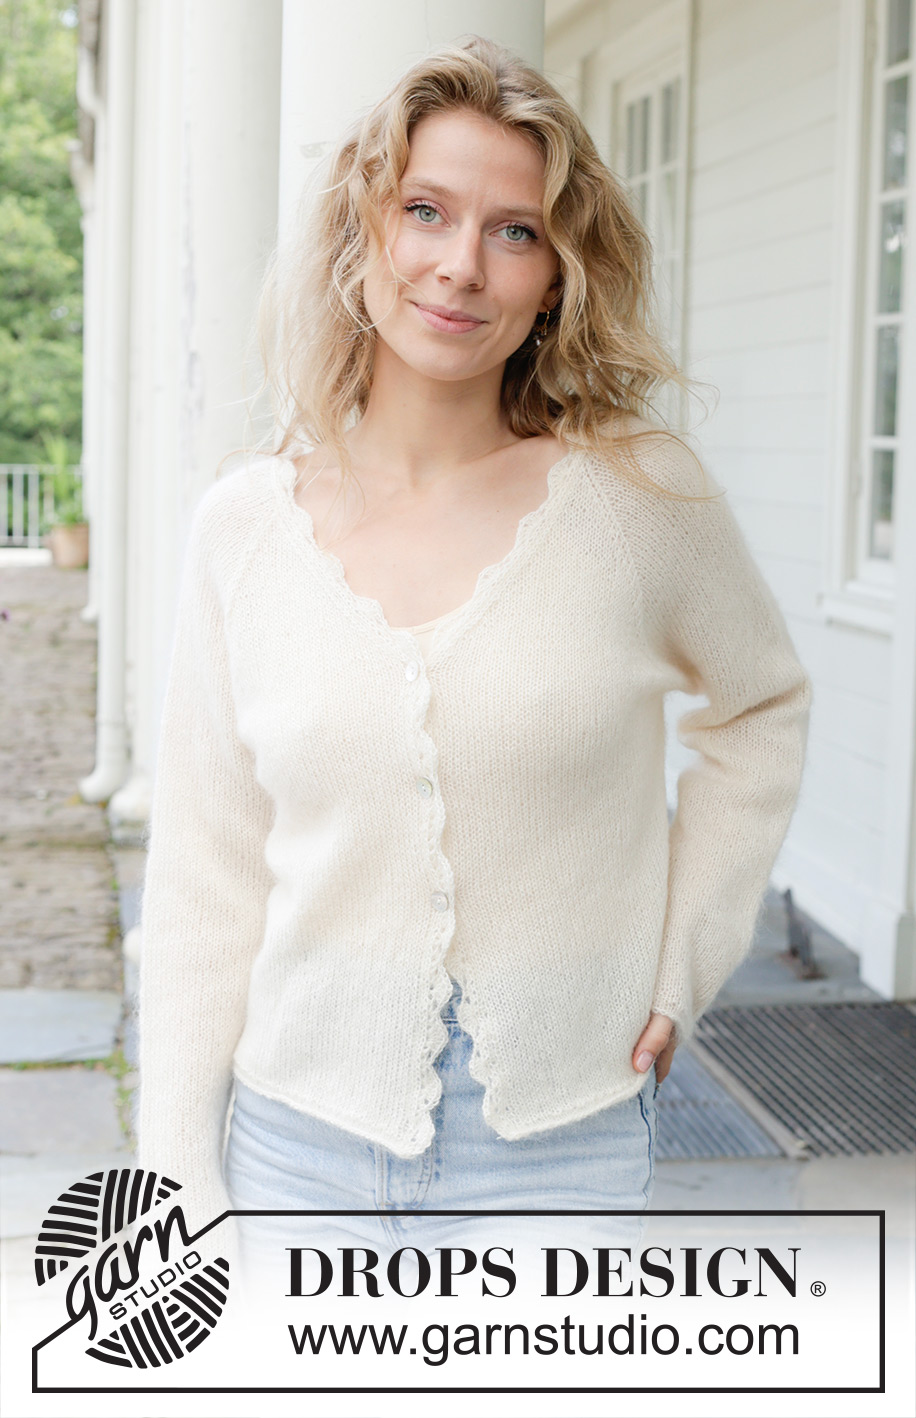
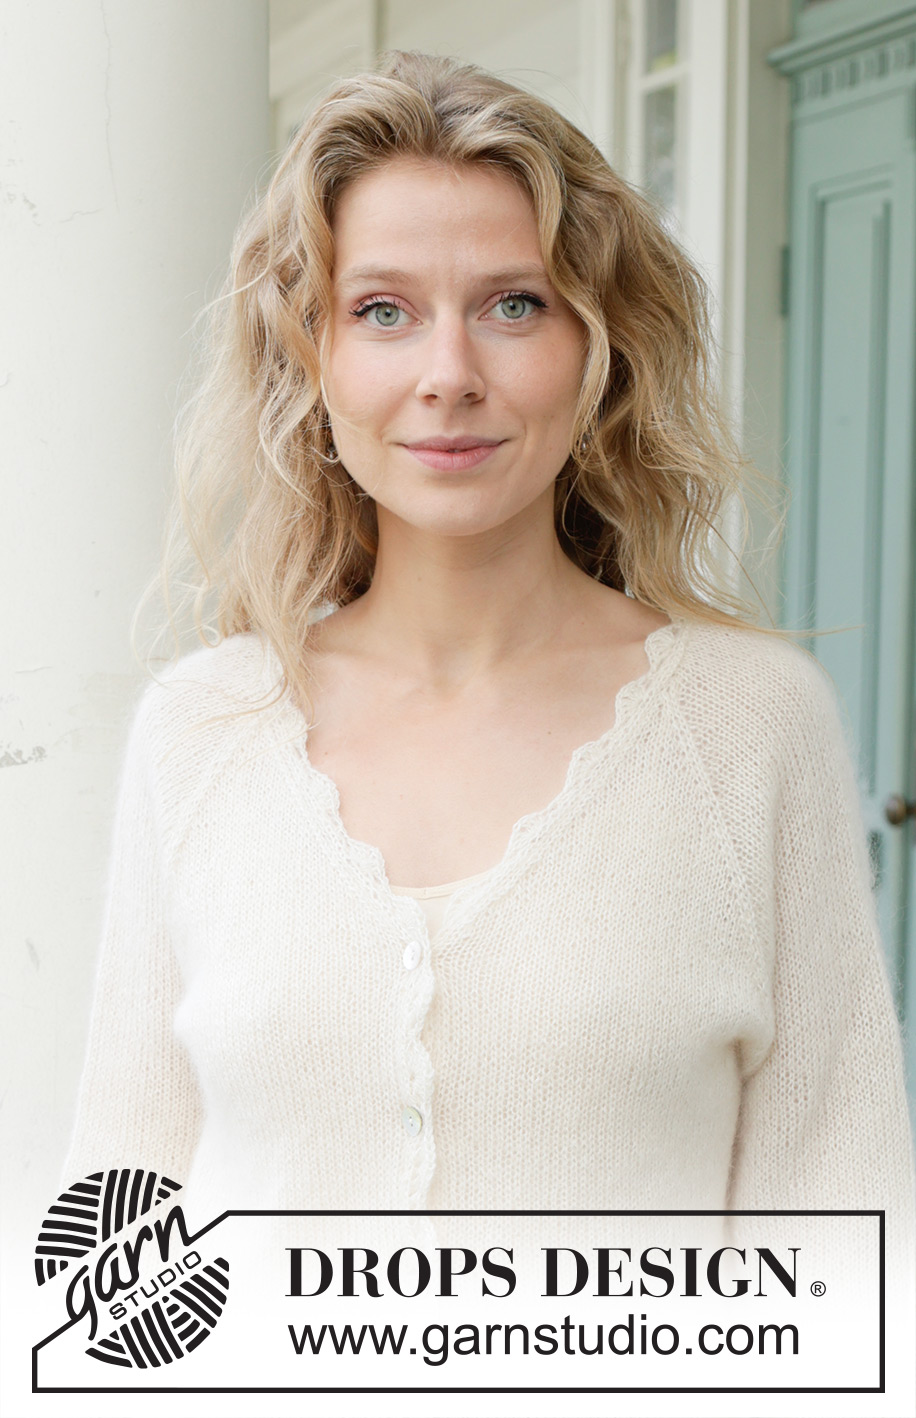
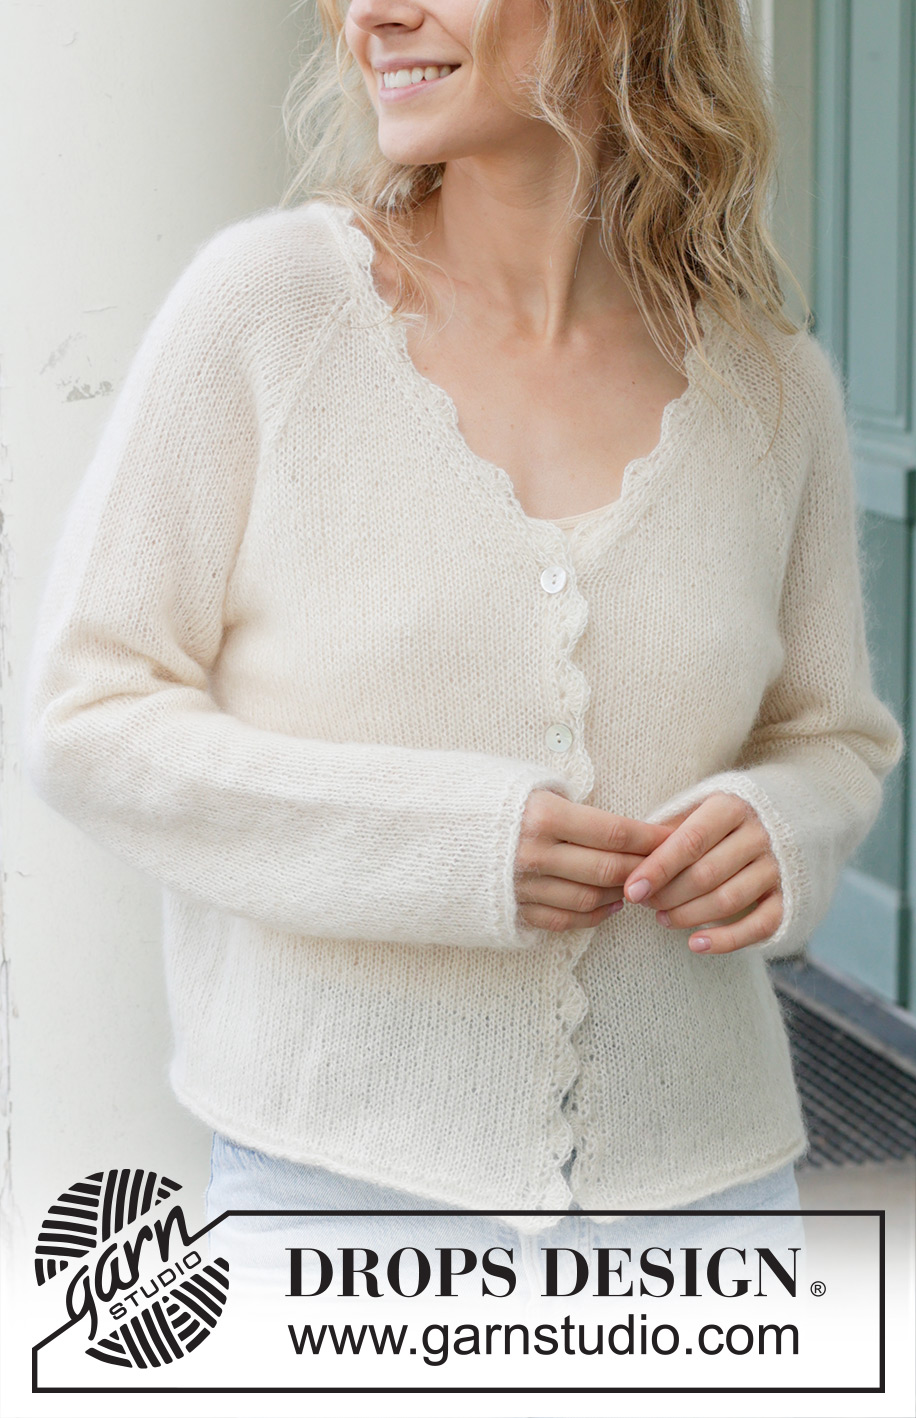
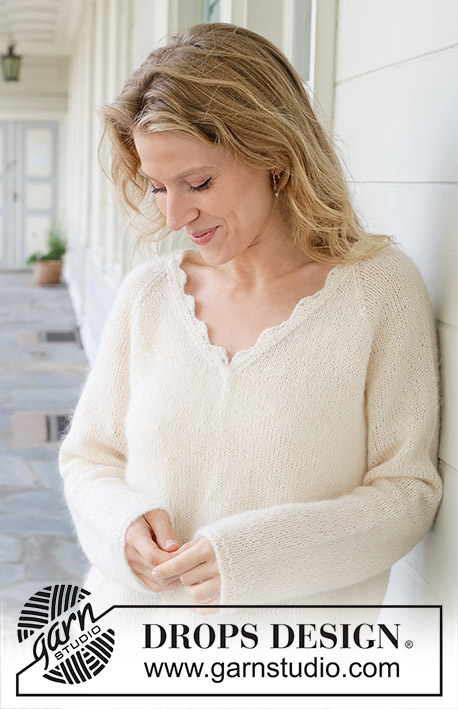
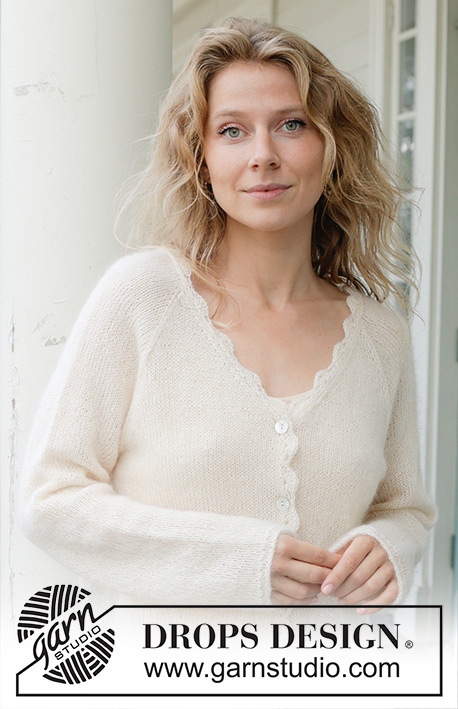
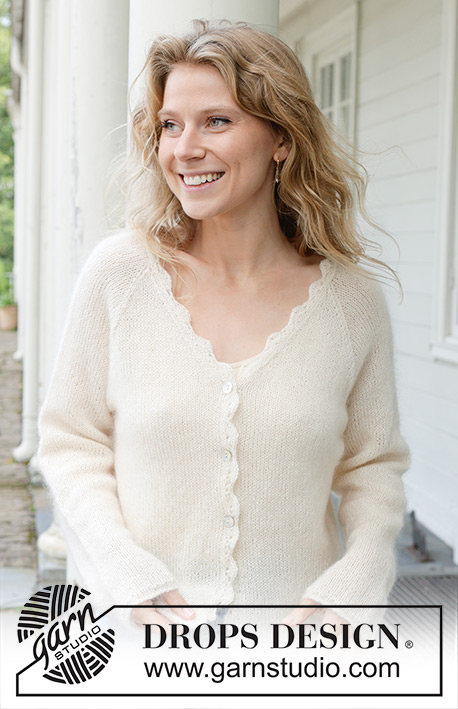
Sweet Harmony Cardigan#sweetharmonycardigan |
||||||||||||||||
 |
 |
|||||||||||||||
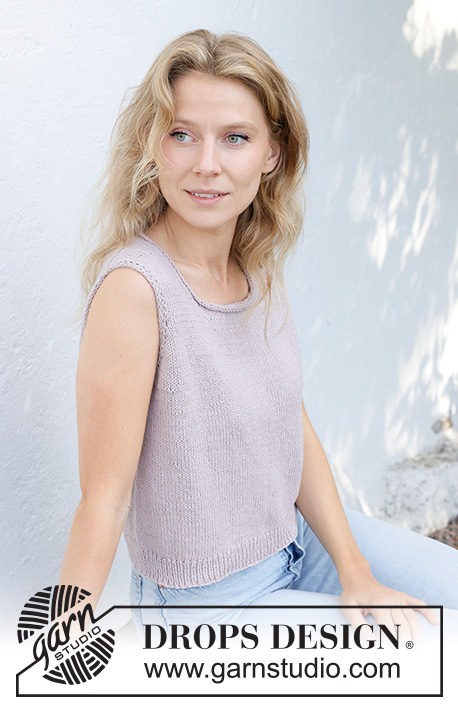
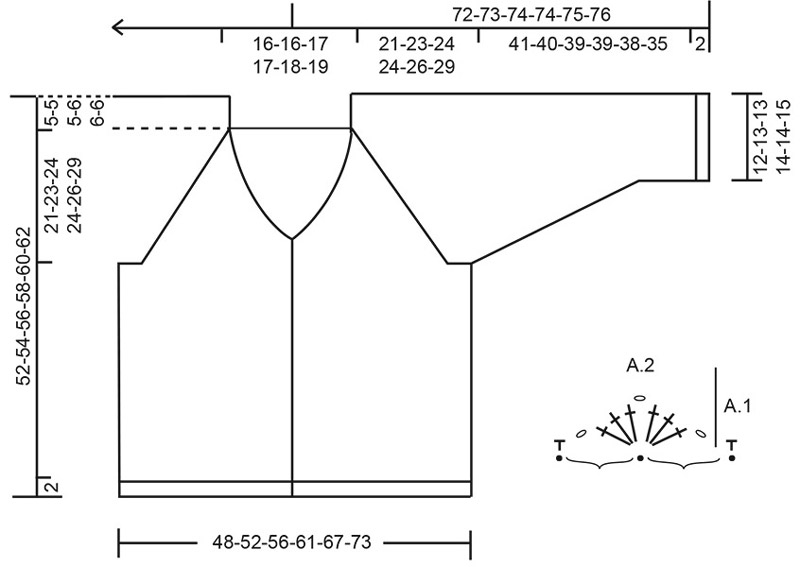
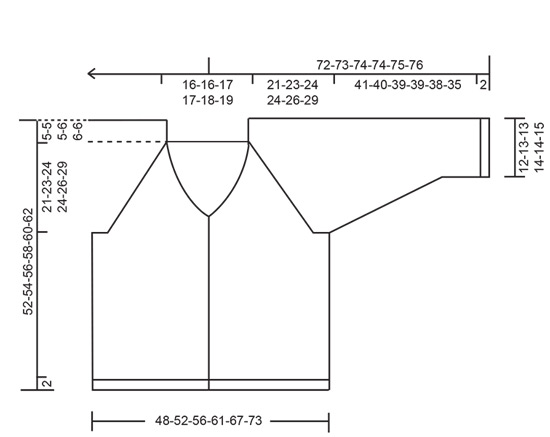
Knitted jacket in 1 strand DROPS Flora or DROPS Alpaca and 1 strand DROPS Kid-Silk. The piece is worked top down, with stocking stitch, raglan, V-neck, rolled edges and crocheted edges. Sizes S - XXXL.
DROPS 257-2 |
||||||||||||||||
|
------------------------------------------------------- EXPLANATIONS FOR THE PATTERN: ------------------------------------------------------- 2 EDGE STITCHES: FROM RIGHT SIDE, BEGINNING OF ROW: Slip 1 stitch knit-wise, knit 1. FROM RIGHT SIDE, END OF ROW: Work until there are 2 stitches left on row, knit 2. FROM WRONG SIDE, BEGINNING OF ROW: Slip 1 stitch purl-wise, purl 1. FROM WRONG SIDE, END OF ROW: Work until there are 2 stitches left on row, purl 2. RAGLAN: All increases are worked from the right side! Increase 1 stitch as described below: INCREASE 1 STITCH TOWARDS THE RIGHT BEFORE MARKER: Make 1 yarn over by taking the strand from the back, over the right needle to the front. On the next row, purl the front loop of the yarn over, then work the new stitch in stocking stitch. INCREASE 1 STITCH TOWARDS THE LEFT AFTER MARKER: Make 1 yarn over by taking the strand in front of the needle, then back. On the next row, purl the back loop of the yarn over, then work the new stitch in stocking stitch. V-NECK: All increases are worked from the right side. Increase 1 stitch as described below: LEFT FRONT PIECE: Work 2 edge stitches as before, make 1 yarn over by taking the strand in front of the needle, then back. On the next row, purl the back loop of the yarn over, then work the new stitch in stocking stitch. RIGHT FRONT PIECE: Work until there are 2 stitches left on the row, make 1 yarn over by taking the strand from the back, over the right needle to the front, work the 2 edge stitches. On the next row, purl the front loop of the yarn over, then work the new stitch in stocking stitch. BUTTONHOLES: Work the buttonholes from the right side, when there are 5 stitches left on the row. ROW 1 (right side): Make 1 yarn over, knit 2 together, knit 3. ROW 2 (wrong side): Work the band as before, purl the yarn over to leave a hole. The first buttonhole is worked on the first row after the V-neck is finished. Then work the other 2 buttonholes with 8-8-8½-8½-9-9 cm between each one. DECREASE TIP: Decrease 1 stitch on each side of the marker-thread as follows: Work until there are 3 stitches left before the marker-thread, knit 2 together, knit 2 (marker-thread sits between these 2 stitches), slip 1 stitch knit-wise, knit 1 and pass the slipped stitch over the knitted stitch (2 stitches decreased). KNITTING TIP: When knitting up stitches under the sleeve, small holes can be left in the transitions between body and sleeve. These holes can be closed by picking up the strand between 2 stitches and working it twisted together with the next stitch. PATTERN: See diagrams A.1 and A.2 (crocheted edge). ------------------------------------------------------- START THE PIECE HERE: ------------------------------------------------------- JACKET – SHORT OVERVIEW OF THE PIECE. The pattern uses both long and short needles; start with the length which fits the number of stitches and change when necessary. The yoke is worked back and forth with circular needle, from mid front and top down. When the yoke is finished, it is divided for body and sleeves and the body continued back and forth, while the sleeves wait. The sleeves are worked in the round, top down. A crocheted edge is worked along each front piece and round the neckline. NECKLINE: Cast on 70-70-72-80-82-84 stitches with circular needle size 4.5, 1 strand DROPS Flora or 1 strand DROPS Alpaca and 1 strand DROPS Kid-Silk (2 strands). Purl 1 row from the wrong side. Insert 1 marker inside 2 edge stitches on one side; the piece is measured from here. YOKE: Insert 4 marker-threads, without working the stitches, each marker-thread inserted between 2 stitches (these 2 stitches are called raglan-stitches and are worked in stocking stitch): Count 3 stitches (= left front piece), insert marker-thread 1 before the next stitch, count 18-18-18-22-22-22 stitches (= sleeve), insert marker-thread 2 before the next stitch, count 28-28-30-30-32-34 stitches (= back piece), insert marker-thread 3 before the next stitch, count 18-18-18-22-22-22 stitches (= sleeve), insert marker-thread 4 before the next stitch, there are 3 stitches left after the last marker-thread (= right front piece). You now work stocking stitch back and forth with 2 EDGE STITCHES on each side, increasing for RAGLAN and V-NECK at the same time – read all descriptions above. Read both paragraphs below before continuing. Remember to maintain the knitting tension. RAGLAN: Increase for raglan on each side of the 2 raglan-stitches by each marker-thread (= 8 increased stitches) every 2nd row, 9-8-15-21-23-21 times. Then increase for raglan every 2nd row on the front and back pieces but only every 4th row on the sleeves (alternately 4 and 8 increased stitches). Repeat these increases a total of 16-20-14-8-8-14 times on the front and back pieces (8-10-7-4-4-7 times on the sleeves). You have increased a total of 25-28-29-29-31-35 times on the front and back pieces and 17-18-22-25-27-28 times on the sleeves. V-NECK: After you have increased 2 times for raglan, begin to increase for the V-neck. Increase from the right side on both front pieces, inside the 2 edge stitches (1 stitch increased each side), every 4th row 1-2-2-2-2-2 times, then every 2nd row 10-9-10-10-11-12 times and finally every 4th row 2-2-2-2-2-2 times. A total of 13-13-14-14-15-16 increases for the V-neck on each side. After all the increases for raglan and V-neck, there are 264-280-304-324-344-368 stitches. Remember the BUTTONHOLES – read description above. Continue working without further increases, until the yoke measures 21-23-24-24-26-29 cm, measured straight down from the marker (not along the V-neck). Now divide for the body and sleeves. DIVIDE FOR BODY AND SLEEVES: Work 42-45-48-51-55-60 stitches as before (= front piece), place the next 50-52-58-62-64-66 stitches on 1 thread for the sleeve, cast on 6-8-8-12-14-16 stitches (under sleeve), work 80-86-92-98-106-116 stitches (= back piece), place the next 50-52-58-62-64-66 stitches on 1 thread for the sleeve, cast on 6-8-8-12-14-16 stitches (under sleeve), work the last 42-45-48-51-55-60 stitches as before (= front piece). The body and sleeves are finished separately. BODY: = 176-192-204-224-244-268 stitches. Continue the edge stitches and stocking stitch until the piece measures 45-47-49-50-52-54 cm from the marker, increasing 1 stitch on the last row = 177-193-205-225-245-269 stitches. Change to circular needle size 3.5 mm and work as follows from the right side: 2 edge stitches as before, rib (knit 1, purl 1) until there are 3 stitches left, knit 1 and 2 edge stitches as before. Then work 4 rows of stocking stitch (starting with purl from the wrong side), with 2 edge stitches on each side. Change to circular needle size 4.5 mm. Cast off a little loosely with purl from the wrong side. The jacket measures approx. 47-49-51-52-54-56 cm from the marker and 52-54-56-58-60-62 cm from the top of the shoulder. SLEEVES: Place the 50-52-58-62-64-66 sleeve-stitches from one thread on circular needle size 4.5 mm and knit up 1 stitch in each of the 6-8-8-12-14-16 stitches cast on under the sleeve – read SLEEVE TIP = 56-60-66-74-78-82 stitches. Insert a marker-thread in the middle of the 6-8-8-12-14-16 stitches under the sleeve. Start at the marker-thread and work stocking stitch in the round. When the sleeve measures 3-3-3-2-2-2 cm, decrease 2 stitches under the sleeve – read DECREASE TIP. Decrease like this every 6-5-3½-2½-2½-2 cm a total of 6-7-9-12-13-14 times = 44-46-48-50-52-54 stitches. Continue working until the sleeve measures 41-40-39-39-38-35 cm from the division. Change to double pointed needles size 3.5 mm. Work 1 round of rib (knit 1, purl 1). Then knit 4 rounds. Change to double pointed needles size 4.5 mm and cast off a little loosely with knit. The sleeve measures approx. 43-42-41-41-40-37 cm. CROCHETED EDGE: Use crochet hook size 3.5 mm and 1 strand of each quality (2 strands). Start from the right side at the bottom of the right front piece. Work diagram A.1 in the first stitch, then diagram A.2 up the front piece, along the neckline and down the left front piece. Make sure A.2 finishes with a double crochet in the last stitch at the bottom of the left front piece. Cut and fasten the strand. ASSEMBLY: Sew the buttons onto the left front piece. |
||||||||||||||||
Diagram explanations |
||||||||||||||||
|
||||||||||||||||
 |
||||||||||||||||
 |
||||||||||||||||
Have you finished this pattern?Tag your pictures with #dropspattern #sweetharmonycardigan or submit them to the #dropsfan gallery. Do you need help with this pattern?You'll find 32 tutorial videos, a Comments/Questions area and more by visiting the pattern on garnstudio.com. © 1982-2026 DROPS Design A/S. We reserve all rights. This document, including all its sub-sections, has copyrights. Read more about what you can do with our patterns at the bottom of each pattern on our site. |
||||||||||||||||


With over 40 years in knitting and crochet design, DROPS Design offers one of the most extensive collections of free patterns on the internet - translated to 17 languages. As of today we count 325 catalogues and 12298 patterns translated into English (UK/cm).
We work hard to bring you the best knitting and crochet have to offer, inspiration and advice as well as great quality yarns at incredible prices! Would you like to use our patterns for other than personal use? You can read what you are allowed to do in the Copyright text at the bottom of all our patterns. Happy crafting!
Post a comment to pattern DROPS 257-2
We would love to hear what you have to say about this pattern!
If you want to leave a question, please make sure you select the correct category in the form below, to speed up the answering process. Required fields are marked *.