
Popular categories
Looking for a yarn?


Comments / Questions (11)
![]() Beverley Lawton wrote:
Beverley Lawton wrote:
How do I see on the crochet flowers to the knitted blanket without it showing through?
07.11.2024 - 11:43DROPS Design answered:
Dear Mrs Lawton, you can maybe sew them with the colour of the blanket so that the sewing yarn will not be visible from wrong side of blanket, and sew the flowers using the back loops of stitches on flowers so that the colour is not visible from right side of flowers. Happy assembly!
07.11.2024 - 13:04
![]() Cockelien Kool wrote:
Cockelien Kool wrote:
Het werk gaat aan de randen erg krullen. Dit kont door de tricotsteek. Kan je hier iets aan doen? Of is het verholpen als de rand er langs haakt. Ik hoor het graag. Dank alvast
26.09.2024 - 21:10DROPS Design answered:
Dag Cockelien,
Als de rand rondom gehaakt is zal dit krullen wegvallen. Daarnaast kun je het werk ook blocken, als het klaar is.
29.09.2024 - 20:37
![]() Cockelien Kool wrote:
Cockelien Kool wrote:
Het is toch een gebreid dekentje. Omdat er staat haak met nld...??
22.09.2024 - 14:51DROPS Design answered:
Dag Cockelien<
Ja, het is inderdaad een gebreid dekentje. Er staat steeds haken, maar dat is een vertaalfout geweest en zal binnenkort worden aangepast.
25.09.2024 - 08:31
![]() Pascale Chevalier wrote:
Pascale Chevalier wrote:
Je ne comprends pas les explications pour la fabrication des fleurs. merci pour votre aide
15.05.2024 - 16:27DROPS Design answered:
Bonjour Mme Chevalier, suivez attentivement le diagramme, où chaque symbole représente une maille ou un groupe de mailles, retrouvez plus d'infos sur les diagrammes ici. Bon crochet!
16.05.2024 - 07:50
![]() Hendrika Janssen wrote:
Hendrika Janssen wrote:
Er staat gehaakt in tricotsteek? Is toch een gebreid dekentje?
24.04.2024 - 18:19
![]() Anne wrote:
Anne wrote:
Hej! Mit strik er vokset meget efter vask. Er det muligt at skrumpe strikketøjet - enten ved højere temperaturer i vask eller tørretumbling?
24.03.2024 - 16:53DROPS Design answered:
Hej Anne, har du set vaskeanvisningen til DROPS Baby Merino, Gå ind på kvaliteten og klik på vaskeanvisning. Man kan tørretumble forsigtigt med 5 minutter ad gangen. Men følg vaskeanvisningen først :)
03.04.2024 - 15:32
![]() Anna wrote:
Anna wrote:
Jag får inte diagrammet till virkade blomman att stämma med diagrammet. Jag får det bara till 2 varv. Ni skriver : 1 kryss =1 fm. Men det är 2 kryss. Förstår inte i vilket var man gör 2 fm. Min blomma liknar inte den på bilden. Den gula delen syns knappt på blomman . Kan ni förklara hela diagrammet i text?
23.01.2024 - 12:24DROPS Design answered:
Hej Anna, jo, det er 3 varv: første varv består 1 lm, 5 fm om luftmaskringen, varv 2: 3lm, 1fm 6 ggr men du avslutar med 1 smygm, varv 3 virkas i luftmaskbågen, se forklaring i diagramteksten :)
02.02.2024 - 13:42
![]() Anna wrote:
Anna wrote:
Jag får inte diagrammet till virkade blomman att stämma med diagrammet. Jag får det bara till 2 varv. Ni skriver : 1 kryss =1 fm. Men det är 2 kryss. Förstår inte i vilket var man gör 2 fm. Min blomma liknar inte den på bilden. Den gula delen syns knappt på blomman . Kan ni förklara hela diagrammet i text?
20.01.2024 - 12:21DROPS Design answered:
Hei Anna. De 2 fastmaskene over hverandre hekles i hver sin omgang (1. omgang og i 2. omgang). Dette diagrammet har Starten + 3 omganger. Du hekler starten (4 lm til en ring) + 2 omg med gult. 1. omg = 1. lm + 5 fm om ringen, avslutt med 1 kjm i 1. lm. 2. omg = 1 lm + *3 lm + 1 fm i fm fra forrige omg*, gjenta *-* 4 ganger til, deretter hekles det 3 lm og avsluttes med 1 kjm i 1. lm og bytt farge. 3. omg = 1 lm, hekle deretter 1 fm, 1 halvst, 1 st, 1 lm, 1 st, 1 halvst og 1 fm i hver lm-bue fra forrige omg = 6 blomsterblad, avslutt med 1 kjm i 1. lm på omg. mvh DROPS Design
29.01.2024 - 11:04
![]() Carina wrote:
Carina wrote:
Eftersom filten stickas i slätstickning så kommer ju kanterna rulla upp sig. Finns det något tips så att det inte blir så ?
14.10.2023 - 19:54DROPS Design answered:
Hej Carina, hvis kanten ruller sig efter at du har hæklet kanten, så kan du presse den forsigtigt med en handduk melllan tyget och strykjärnet :)
18.10.2023 - 07:33
![]() Anna-Lotta Dahlberg wrote:
Anna-Lotta Dahlberg wrote:
Kanterna på filten rullar ihop sig. Måste jag spänna upp arbetet (om ja, hur då) eller blir det platt när jag virkat kanten runt om? Tacksam för snabbt svar! Stort tack på förhand!
21.09.2023 - 11:25DROPS Design answered:
Hej Anna-Lotta, ja du kan vaske det (følg vaskeanvisningen på farvekortet!!!) Og lægge det til tørre i de rigtige mål (må ikke hænge). Man kan stryge forsigtigt med en handduk imellem :)
26.09.2023 - 15:21
|
|||||||||||||||||||
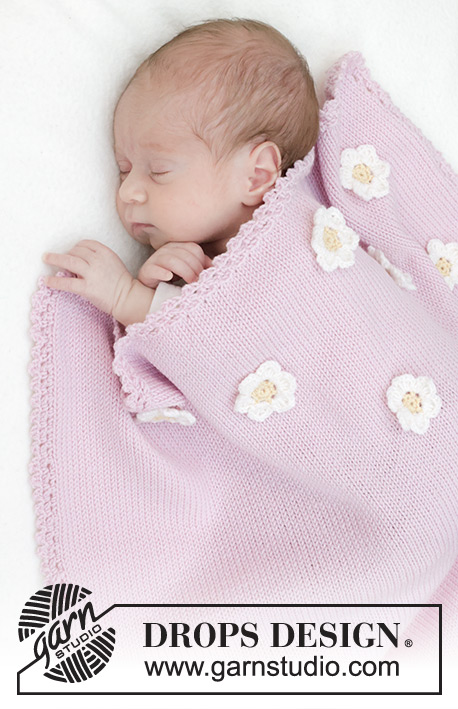
Little Daisy Blanket#littledaisyblanket |
|||||||||||||||||||
 |
 |
||||||||||||||||||
Knitted baby blanket in DROPS BabyMerino. The piece is worked in stocking stitch with crocheted edge and flowers.
DROPS Baby 46-1 |
|||||||||||||||||||
|
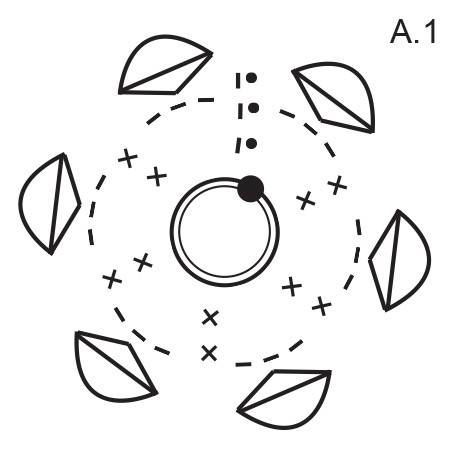
------------------------------------------------------- EXPLANATIONS FOR THE PATTERN: ------------------------------------------------------- RIDGE/GARTER STITCH (worked back and forth): Knit all rows. 1 ridge = knit 2 rows. PATTERN: See diagram A.1. ------------------------------------------------------- START THE PIECE HERE: ------------------------------------------------------- BLANKET – SHORT OVERVIEW OF THE PIECE: The piece is worked back and forth with circular needle. An edge is crocheted around the blanket, then flowers are crocheted and sewn on to finish. BLANKET: Cast on 108-120-156 stitches with circular needle size 3.5 mm and colour powder pink DROPS Baby Merino. Work stocking stitch back and forth with 1 edge stitch in GARTER STITCH on each side – read description above. REMEMBER THE KNITTING TENSION! Work until the piece measures 65-70-80 cm. Cast off. CROCHET EDGE: Use crochet hook size 3 mm and colour powder pink, work the first round inside the 1 edge stitch along the long sides and inside the cast-on/cast-off edge on the short sides, as follows:. ROUND 1: Start in one corner and fasten the strand with 1 slip stitch. Work 1 double crochet, * 3 chain stitches (chain-space), skip 1 cm and work 1 double crochet *, work from *-*, adjusting so you work 1 double crochet in the middle of each corner. Finish the round with 1 slip stitch in the first double crochet. ROUND 2: Work slip stitches to the middle of the first chain-space. The round starts here! Work 1 double crochet, * 3 chain stitches, 1 treble crochet in the 3rd chain stitch from the hook, 1 double crochet around the next chain-space *, work from *-* to the end of the round, finish with 3 chain stitches, 1 treble crochet in the 3rd chain stitch from the hook and 1 slip stitch in the first double crochet on the round. Cut and fasten the strand. CROCHETED FLOWERS: Work 4 chain stitches with colour yellow and form them into a ring with 1 slip stitch in the first chain stitch. Work diagram A.1; the first 2 rounds in the diagram are worked with colour yellow, the last round with colour white. Cut and fasten the strands. Work 11 flowers. ASSEMBLY: Sew the flowers to the blanket, in your chosen pattern. |
|||||||||||||||||||
Diagram explanations |
|||||||||||||||||||
|
|||||||||||||||||||
 |
|||||||||||||||||||
Have you finished this pattern?Tag your pictures with #dropspattern #littledaisyblanket or submit them to the #dropsfan gallery. Do you need help with this pattern?You'll find 23 tutorial videos, a Comments/Questions area and more by visiting the pattern on garnstudio.com. © 1982-2026 DROPS Design A/S. We reserve all rights. This document, including all its sub-sections, has copyrights. Read more about what you can do with our patterns at the bottom of each pattern on our site. |
|||||||||||||||||||


With over 40 years in knitting and crochet design, DROPS Design offers one of the most extensive collections of free patterns on the internet - translated to 17 languages. As of today we count 324 catalogues and 12290 patterns translated into English (UK/cm).
We work hard to bring you the best knitting and crochet have to offer, inspiration and advice as well as great quality yarns at incredible prices! Would you like to use our patterns for other than personal use? You can read what you are allowed to do in the Copyright text at the bottom of all our patterns. Happy crafting!
Post a comment to pattern DROPS Baby 46-1
We would love to hear what you have to say about this pattern!
If you want to leave a question, please make sure you select the correct category in the form below, to speed up the answering process. Required fields are marked *.