
Popular categories
Looking for a yarn?


Comments / Questions (13)
![]() Isabelle wrote:
Isabelle wrote:
Bonjour La description indique: "AUGMENTATIONS-2 (manches): Tricoter jusqu'à ce qu'il reste 2 mailles avant le fil marqueur, faire 1 jeté, tricoter 4 mailles jersey (le fil marqueur est au milieu de ces 4 mailles), faire 1 jeté." Donc 2 jetés. Effectivement il est indiqué différemment sur le diagramme... Il n'y a pas de mention non plus dans les descriptif de "tout les 4 rgs" Isabelle
17.02.2025 - 10:20DROPS Design answered:
Bonjour Isabelle, vous parliez des emmanchures, on n'utilise pas cette augmentation pour les emmanchures, elle sert juste pour les manches où on y fait référence. Pour les emmanchures dos, on va augmenter comme indiqué en tricotant A.1 et A.2 à 4 mailles des bords et en augmentant donc ainsi tous les 4 rangs. Ou bien je n'ai pas compris quelle partie vous réalisez, donc désolée d'avance et n'hésitez pas à me donner plus de détail, merci d'avance. Bon tricot!
17.02.2025 - 14:35
![]() Isabelle wrote:
Isabelle wrote:
Bonjour, Deux questions: Lors de l'augmentation pour les emmanchures, il est indiqué de faire 2 jeté (A2) est ce normal? Je n'arrive pas à 21 cm lorsque je débute le dos ou les devants. Faut-il augmenter pour les emmanchures tout les 2 rgs ou tout les 4rgs? Merci, Isabelle
15.02.2025 - 16:09DROPS Design answered:
Bonjour Isabelle, il n'y a pas de jeté à faire dans A.1 ni dans A.2 (cf légende), on doit augmenter 1 maille dans A.1 et 1 maille dans A.2 tous les 4 rangs comme indiqué dans le diagramme. Vous avez 8 cm avant les augmentations + (9 fois 4 rangs= 36 rangs = env. 11 cm) +3 rangs (env 1 cm) + les nouvelles mailles à monter (1 x 2 m + 1 x 5 m de chaque côté soit 4 rangs = environ 1 cm) soit 8+11+1+1= 21 cm environ. Bon tricot!
17.02.2025 - 08:06
![]() Neysa Azzahra wrote:
Neysa Azzahra wrote:
Hi, when casting on new stitches at both sides of the piece in the back piece, did I do it when I work on the knitting rows only? Or do I have to cast on when I'm doing the purl rows too? Thanks.
20.01.2023 - 04:31DROPS Design answered:
Dear Mrs Azzahra, when working the right shoulder, back piece you cast on the new stitches at the end of the rows from wrong side (for neck, only one one side) and when working the left shoulder, back piece you will cast on the new stitches at the end of the rows from right side only (for neck, only on one side). Happy knitting!
20.01.2023 - 08:36
![]() Clemens wrote:
Clemens wrote:
Hallo gibt es dieses Drop desinge auch in Koreanischer Sprache?
06.11.2022 - 12:58DROPS Design answered:
Liebe Frau Clemens, leider noch nicht - es sind doch viele anderen Sprachen erhältlich: klicken Sie auf dem drop-down Menu unter dem Foto. Viel Spaß beim stricken!
07.11.2022 - 09:10
![]() Neysa Ahmadina Azzahra wrote:
Neysa Ahmadina Azzahra wrote:
On the diagram there is an instruction that says: "pick up yarn from the front before next stitch (yarn between outermost stitch on right and left needle) and put it on left needle, knit 1 into back loop so that the stitch will lean towards the left" Is that the same as 'make 1' or M1 in knitting? Thanks.
15.07.2022 - 03:05DROPS Design answered:
Hi Neysa, Yes it is the same as Make 1 left (M1l). Happy knitting!
15.07.2022 - 06:51
![]() Neysa Azzahra wrote:
Neysa Azzahra wrote:
I have a question about the back piece. Lets say I am making this in size M. I want to make sure, is the increase for the armhole start 9 cms after the very first cast on of the shoulders (the 1 cast on), or after the last cast on I made (the 2 cast ons)? I hope my question make sense. Thank you so much!
13.07.2022 - 16:41DROPS Design answered:
Hi Neysa Azzahra, you measure from cast-on edge (on shoulder), I mean from the beggining of your work. Happy knitting!
14.07.2022 - 08:38
![]() Ingrid Ehret wrote:
Ingrid Ehret wrote:
Danbke für die schnelle antwort. DAs heißt der Umschlag wird auf der linken seite verschränkt gestrickt, damit kein Loch entsteht. Habe ich das richtig verstanden. Ich warte immer noch auf eine nerue Anleitung die noch nicht erschienen ist, nämlich auch ein westchen aus safran mit Lochmuster.d Wann wird dies erscheinen
23.05.2022 - 16:56DROPS Design answered:
Liebe Frau Ehret, es wird hier keinen Umschlag gestrickt (doch 1 Zunahme), nun genau wie bei dem 4. und 5. Zeichen gestrickt. Wenn dieses Modell bei der Abstimmung gewählt wurde, dann wird es bald veröffentlicht. Viel Spaß beim stricken!
24.05.2022 - 08:36
![]() Ingrid Ehret wrote:
Ingrid Ehret wrote:
Liebes Drops team, wollte die Jacke stricken, habe jedoch festgestellt, dass im Diagramm andere Zeichen zum bearbeiten angegeben, als in der Zeichnung des Strickmusters. Bitte um Kontrolle und baldige Nachricht, da ich mich mitten im stricken befinde. Vielen Dank im voraus.
23.05.2022 - 13:33DROPS Design answered:
Liebe Frau Ehret, danke für den Hinweis, also 4. und 5. Zeichen lesen Sie wie mit dem Umschlag wie bei A.1 und A.2, es wird so bald wie möglich korrigiert. Viel Spaß beim stricken!
23.05.2022 - 16:27
![]() Rocio Garcia Castro wrote:
Rocio Garcia Castro wrote:
Me encanta este patrón y antes de hacerlo lo he leído entero. En la explicación del hombro derecho en el segundo párrafo indica "cuando la pieza mida 21 cm...". Esto es correcto? En el hombro izquierdo indica cuando la pieza mida 2 cm.
14.05.2022 - 20:45DROPS Design answered:
Hola Rocío, puedes ver la respuesta debajo.
15.05.2022 - 23:32
![]() Rocío wrote:
Rocío wrote:
Me encanta este patrón y antes de hacerlo lo he leído entero. En la explicación del hombro derecho en el segundo párrafo indica "cuando la pieza mida 21 cm...". Esto es correcto? En el hombro izquierdo indica cuando la pieza mida 2 cm.
13.05.2022 - 08:27DROPS Design answered:
Hola Rocío, se trata de una errata, es cuando la labor mida 2 cm. Trataremos de corregirla lo antes posible.
15.05.2022 - 23:02
|
|||||||||||||||||||||||||
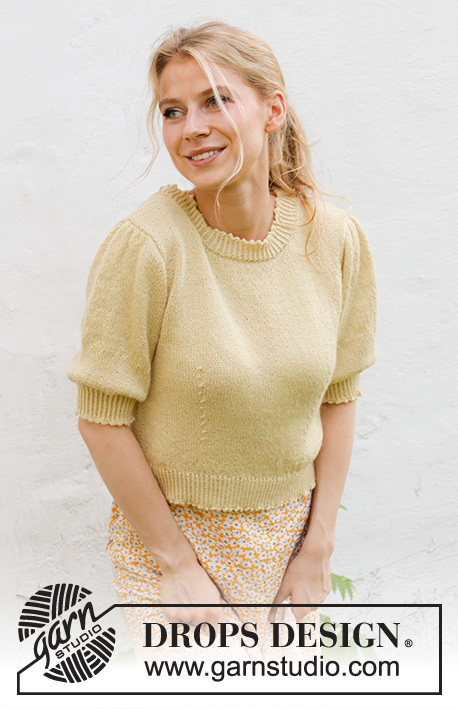
Chamomile Tea Cardi#chamomileteacardi |
|||||||||||||||||||||||||
 |
 |
||||||||||||||||||||||||
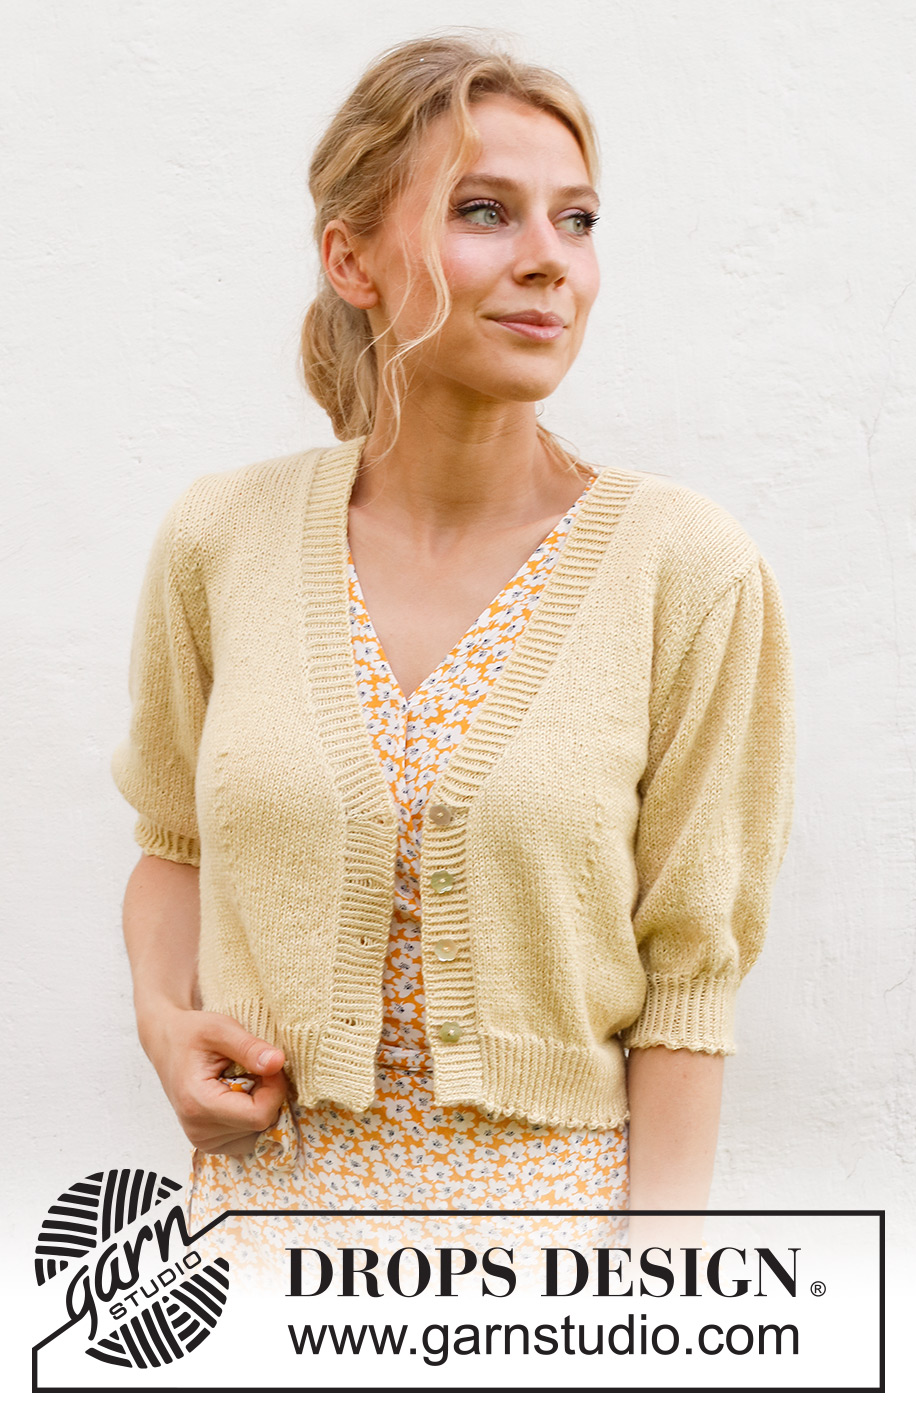
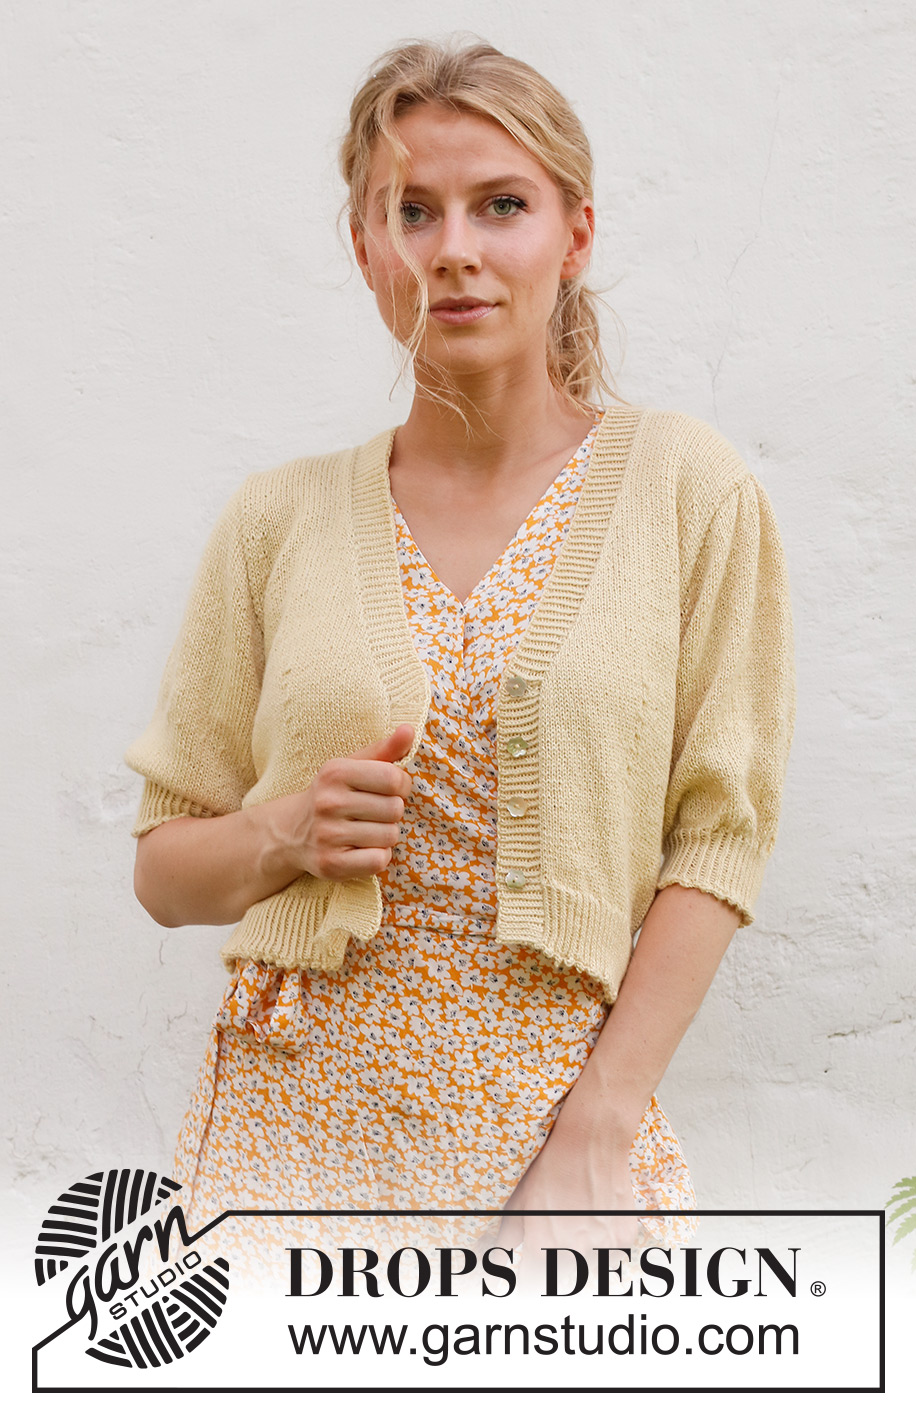
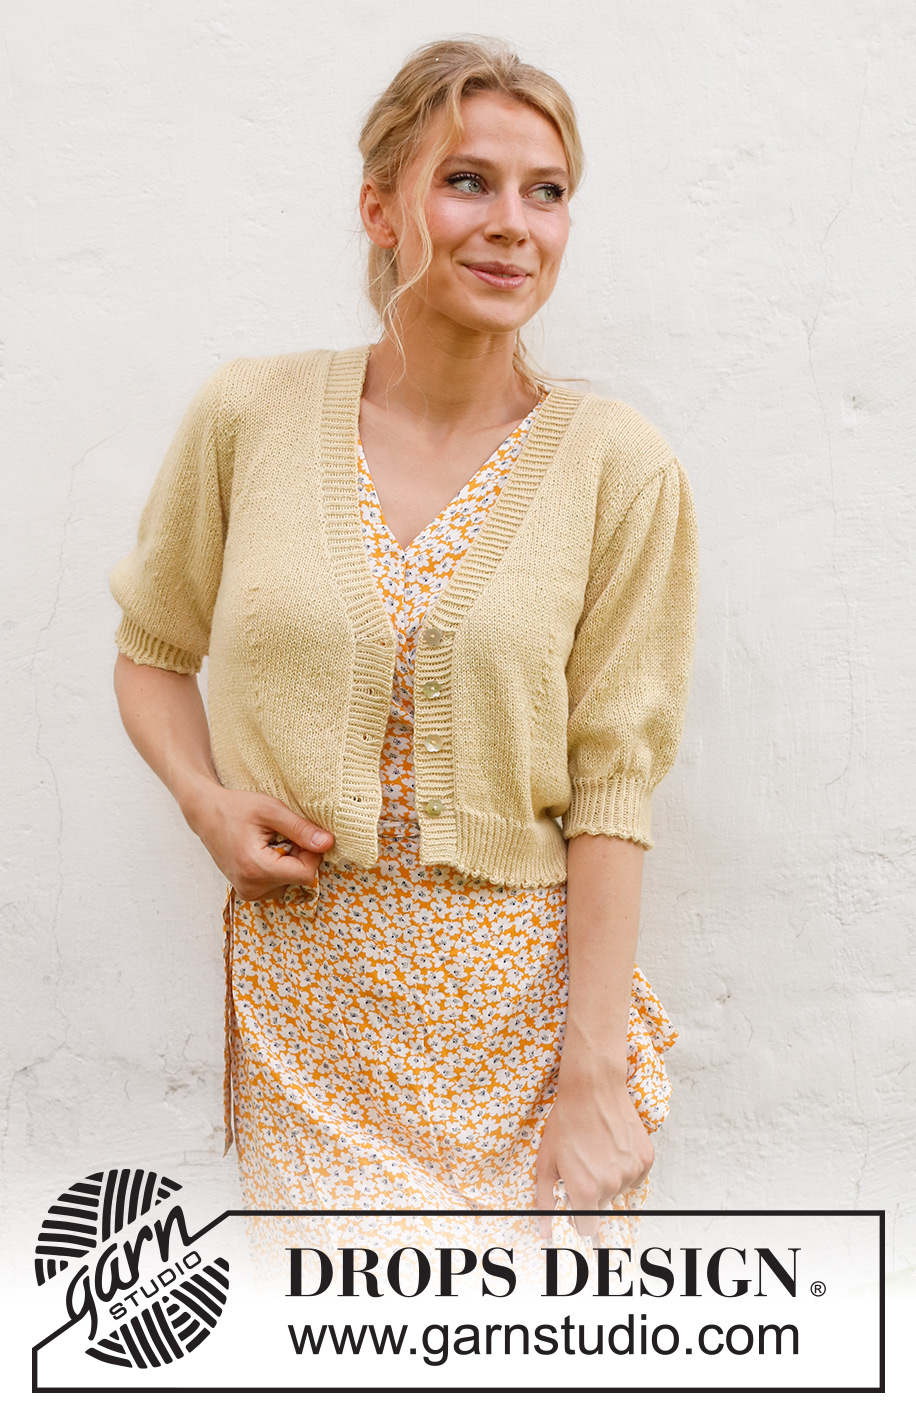
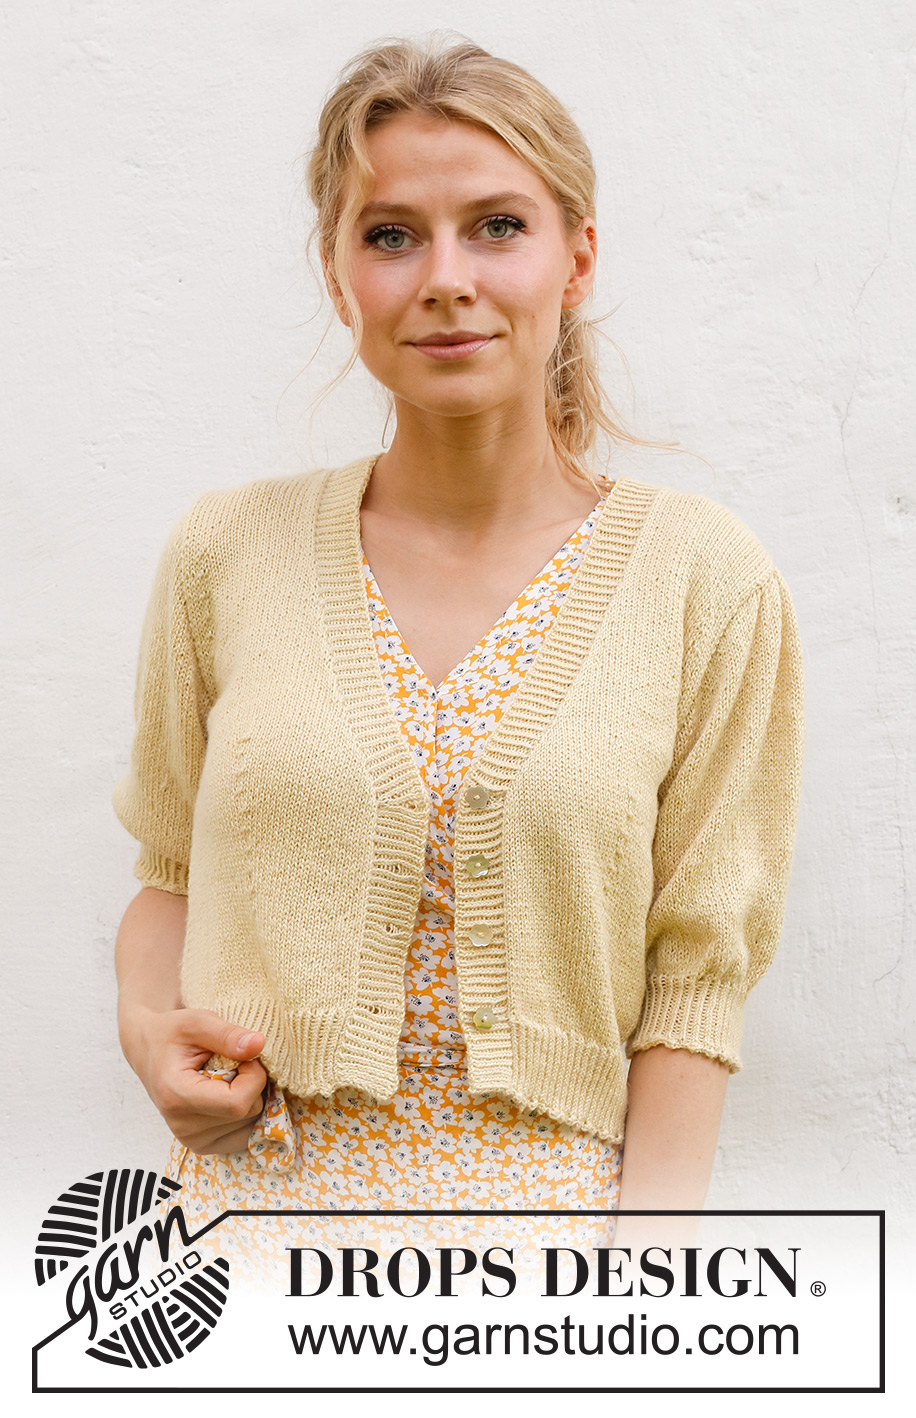
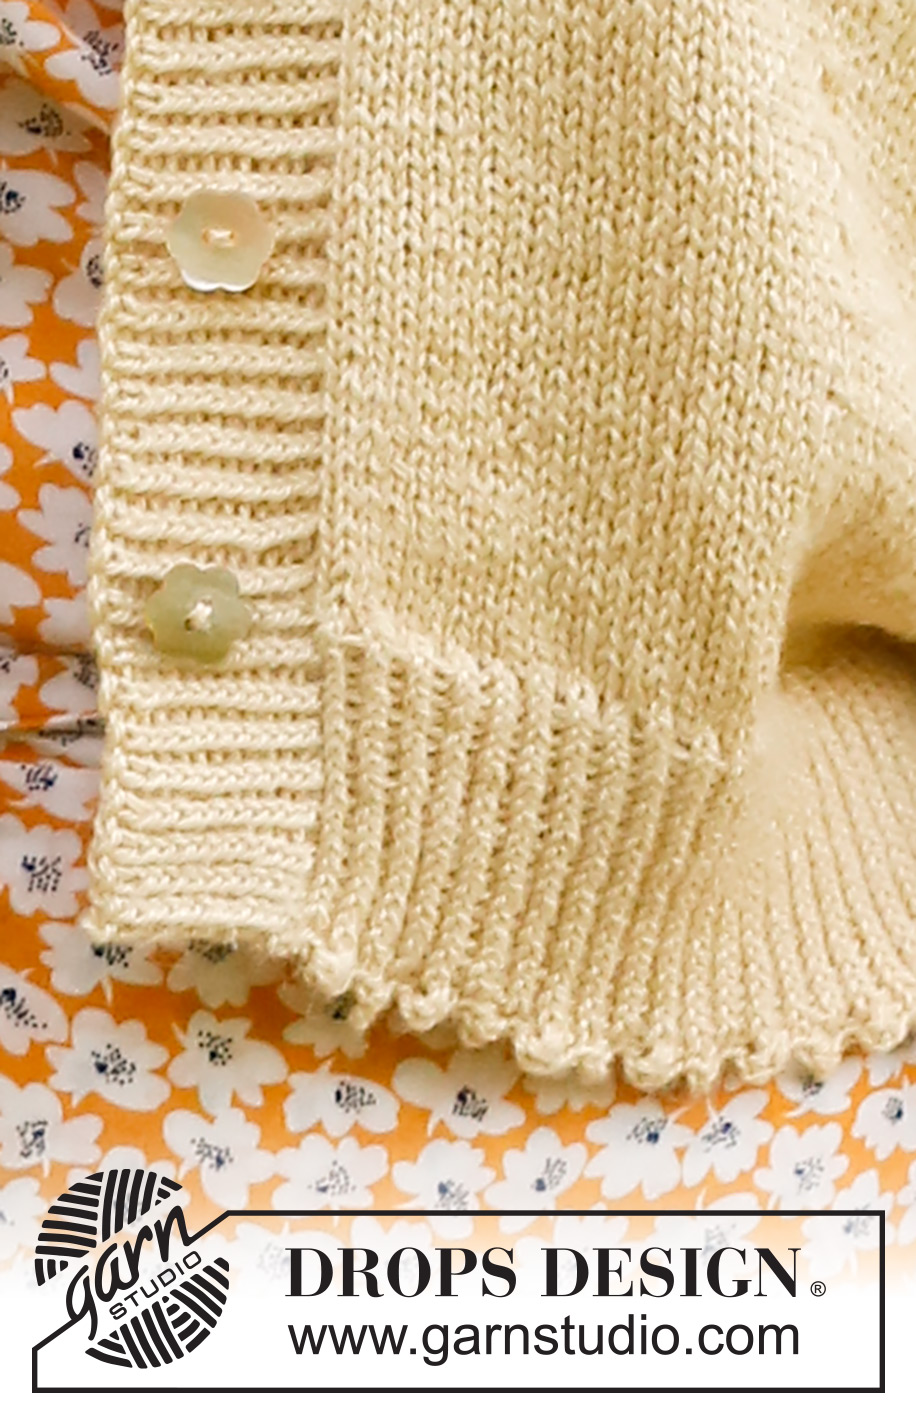
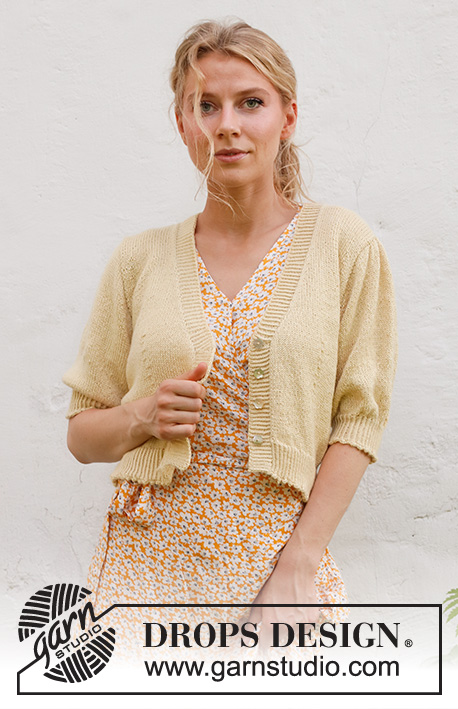
Knitted jacket in DROPS BabyAlpaca Silk. Piece is knitted top down in stocking stitch with V-neck, short puffed sleeves and picot edges. Size: S - XXXL
DROPS 231-21 |
|||||||||||||||||||||||||
|
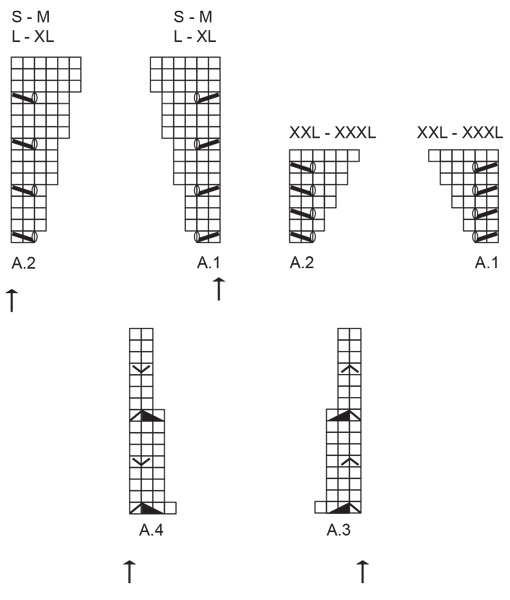
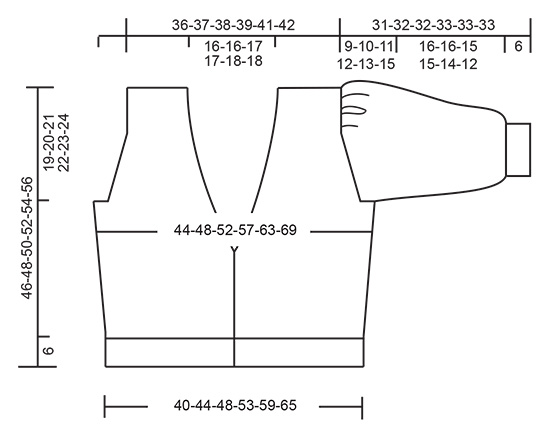
---------------------------------------------------------- EXPLANATION FOR THE PATTERN: ---------------------------------------------------------- GARTER STITCH (back and forth): Knit all rows. 1 ridge vertically = knit 2 rows. PATTERN: See diagrams A.1 to A.4. Choose diagram for your size (applies to A.1 and A.2). Diagrams show all rows in pattern seen from the right side. INCREASE TIP-1 (applies to V-neck): Increase 1 stitch inside 1 edge stitch in garter stitch by making 1 yarn over. On next row work yarn over twisted to avoid holes Then work the new stitches in stocking stitch. INCREASE TIP-2 (applies to sleeves): Work until 2 stitches remain before marker thread, make 1 yarn over, work 4 stitches in stocking stitch (marker thread is in the middle of these 4 stitches), make 1 yarn over. On next round knit yarns over twisted to avoid holes. Then work the new stitches in stocking stitch. CAST-OFF EDGE WITH PICOT: Knit 1 twisted, * insert right needle between the first 2 stitches on left needle (i.e. between stitches on needle, not through stitches), make 1 yarn over on right needle, pull yarn over forward between the stitches and slip yarn over on to left needle *, work from *-* 2 times in total (= 2 new stitches on left needle), knit and cast off at the same time off 5 stitches (= 1st stitch on right needle + 2 yarn overs+ 2 stitches). Continue to work from *-* and cast off 5 stitches the same way along the entire cast-off edge until there are no stitches left to make a new picot. Cast off the remaining stitches, cut the yarn and pull yarn through the remaining stitch. ---------------------------------------------------------- START THE PIECE HERE: ---------------------------------------------------------- JACKET - SHORT OVERVIEW OF THE PIECE: Work back piece and front pieces back and forth on circular needle, top down, separately until armholes are done. Work body back and forth on circular needle from mid front. Sleeve cap is worked back and forth on circular needle, top down. Work the rest of the sleeve in the round on double pointed needles/a short circular needle. Sew the piece together as explained in pattern. Finish by working the bands. BACK PIECE: Begin with right shoulder at the back. Then work left shoulder at the back before slipping stitches together and the back piece is worked. RIGHT SHOULDER BACK (when garment is worn): Cast on 24-25-26-27-27-28 stitches on circular needle size 3 mm with DROPS BabyAlpaca Silk. Purl 1 row from wrong side. Then work in stocking stitch with 1 edge stitch in GARTER STITCH in each side - read explanation above. REMEMBER THE KNITTING TENSION! When piece measures 2 cm, cast on new stitches at the end of every row from wrong side (towards the neck) as follows: Cast on 1 stitch 2 times, 2 stitches 1 time = 28-29-30-31-31-32 stitches. At the end of next row from wrong side cast on 30-30-32-32-36-36 new stitches (mid at the back of neck) = 58-59-62-63-67-68 stitches. Cut the yarn, put piece aside and work the left shoulder at the back. LEFT SHOULDER BACK (when garment is worn): Cast on 24-25-26-27-27-28 stitches on circular needle size 3 mm with DROPS BabyAlpaca Silk. Purl 1 row from wrong side. Then work in stocking stitch with 1 edge stitch in garter stitch in each side. When piece measures 2 cm, cast on new stitches at the end of every row from right side (towards the neck) as follows: Cast on 1 stitch 2 times, 2 stitches 1 time = 28-29-30-31-31-32 stitches. Work from wrong side after last increase. Now slip left and right shoulder together for back piece as explained below. BACK PIECE: Begin from right side, knit over stitches from left shoulder at the back, and knit over stitches from right shoulder at the back = 86-88-92-94-98-100 stitches. Work in stocking stitch back and forth with 1 edge stitch in garter stitch in each side. When piece measures 11-9-8-8-12-10 cm from cast-on edge on shoulder, increase for armhole in each side as explained under. Insert 1 marker inside the 4 outermost stitches in each side. Move markers upwards when working - markers should always be inside the 4 outermost stitches in each side. Work as follows: 1 edge stitch in garter stitch, 3 stitches in stocking stitch, A.1, work in stocking stitch until 2 stitches remain before marker, work A.2, 3 stitches in stocking stitch, 1 edge stitch in garter stitch. Continue back and forth like this, and increase the same way as shown in diagrams until 5-8-9-9-14-17 increases have been done in total in each side = 96-104-110-112-126-134 stitches. After last increase work 3-3-3-3-1-1 rows in stocking stitch without increases. Then work in stocking stitch AT THE SAME TIME as casting on new stitches at the end of every row in each side as follows: Cast on 2 stitches 1-1-1-3-3-4 times and then 3-4-5-6-7-8 stitches 1 time = 106-116-124-136-152-166 stitches. Piece measures approx. 19-20-21-22-23-24 cm from cast-on edge on shoulder. Cut the yarn, put piece aside, and work the front pieces as explained under. RIGHT FRONT PIECE (when garment is worn): Cast on 24-25-26-27-27-28 stitches on circular needle size 3 mm with DROPS BabyAlpaca Silk. Purl 1 row from wrong side. Then work in stocking stitch with 1 edge stitch in garter stitch in each side. OVERVIEW OF NEXT SECTION: Now increase for V-neck and armholes. This happens at the same time. Read therefore sections V-NECK and ARMHOLES before continuing! V-NECK: When piece measures 8-10-10-11-10-11 cm from cast-on edge, increase 1 stitch at the end of row towards mid front - read INCREASE TIP-1. Increase like this on every 4th row (every other row from right side) 9-9-9-9-10-10 times in total, then every other row (every row from right side) 11-11-12-12-13-13 times in total. ARMHOLE: AT THE SAME TIME when piece measures 11-9-8-8-12-10 cm from cast-on edge, increase for armhole in the side the same way as on back piece. I.e. insert 1 marker inside the first 4 stitches on needle from right side. Move markers upwards when working. Work as follows: 1 edge stitch in garter stitch, 3 stitches in stocking stitch, A.1, work the rest of row as before. Continue back and forth like this, and increase the same way until 5-8-9-9-14-17 increases have been done in total in the side towards the armhole. After last increase work 3-3-3-3-1-1 rows in stocking stitch without increases. Then work in stocking stitch AT THE SAME as casting on new stitches at the end of every row from wrong side as follows: Cast on 2 stitches 1-1-1-3-3-4 times and then 3-4-5-6-7-8 stitches 1 time. Piece measures approx. 19-20-21-22-23-24 cm from cast-on edge. Cut the yarn, put piece aside (increases for V-neck are not done), and work left front piece as explained below. LEFT FRONT PIECE (when garment is worn): Cast on 24-25-26-27-27-28 stitches on circular needle size 3 mm with DROPS BabyAlpaca Silk. Purl 1 row from wrong side. Then work in stocking stitch with 1 edge stitch in garter stitch in each side. OVERVIEW OF NEXT SECTION: Now increase for V-neck and armholes. This happens at the same time. Read therefore sections V-NECK and ARMHOLES before continuing! V-NECK: When piece measures 8-10-10-11-10-11 cm from cast-on edge on shoulder, increase 1 stitch at the beginning of row towards mid front - read INCREASE TIP-1. Increase like this on every 4th row (every other row from right side) 9-9-9-9-10-10 times in total, then every other row (every row from right side) 11-11-12-12-13-13 times in total. ARMHOLE: AT THE SAME TIME when piece measures 11-9-8-8-12-10 cm from cast-on edge on shoulder, increase for armhole in the side the same way as on back piece. I.e. insert 1 marker inside the last 4 stitches on needle from right side. Move markers upwards when working. Work as follows: 1 edge stitch in garter stitch, stocking stitch until 2 stitches remain before marker, work A.2, 3 stitches in stocking stitch, 1 edge stitch in garter stitch. Continue back and forth like this, and increase the same way until 5-8-9-9-14-17 increases have been done in total in the side towards the armhole. After last increase work 3-3-3-3-1-1 rows in stocking stitch without increases. Then work in stocking stitch AT THE SAME as casting on new stitches at the end of every row from right side as follows: Cast on 2 stitches 1-1-1-3-3-4 times and then 3-4-5-6-7-8 stitches 1 time. Piece measures approx. 19-20-21-22-23-24 cm from cast-on edge. Now put parts together for body as explained below. BODY: Keep stitches from left front piece on circular needle size 3 mm, knit over the 106-116-124-136-152-166 stitches from back piece, and knit over stitches from front piece. Remove the markers from the armholes. Insert 1 marker in each side on body (between front and back piece - there are 106-116-124-136-152-166 stitches between markers on back piece. Number of stitches on front pieces are uncertain as increase for V-neck is not done). Measure piece from where these markers were inserted. Work in stocking stitch back and forth with 1 edge stitch in garter stitch in each side towards mid front. When piece measures 5-5-6-6-7-7 cm from marker, insert 4 marker threads in piece. Move these marker threads upwards when working - marker threads should be used for decrease for waist. Count 30-34-37-42-48-54 stitches out on each side of the 2 markers insert in the sides of body, and insert 1 marker thread on each side of these 60-68-74-84-96-108 stitches (= 4 marker threads). There are 46-48-50-52-56-58 stitches between marker threads on back piece. Work as follows from right side: 1 edge stitch in garter stitch, stocking stitch until 4 stitches remain before first marker thread, work A.4, work in stocking stitch until next marker thread, work A.3, work in stocking stitch until 4 stitches remain before next marker thread, work A.4, work in stocking stitch until last marker thread, work A.3, work in stocking stitch until 1 stitch remains, finish with 1 edge stitch in garter stitch. Continue pattern back and forth like this until A.3 and A.4 have been worked 2½ times vertically (5 decreases have been done vertically and cable has been worked 10 times vertically). After all decreases for waist and increases for V-neck there are 194-214-230-254-286-314 stitches on needle. Work in stocking stitch back and forth with 1 edge stitches in garter stitch in each side until piece measures 21-22-23-24-25-26 cm from markers inserted. Knit 1 row from right side while increasing 59-65-69-77-85-95 stitches evenly = 253-279-299-331-371-409 stitches. Switch to circular needle size 2.5 mm, and work rib as follows: ROW 1 (= wrong side): 1 edge stitch in garter stitch, * purl 1 twisted, knit 1 *, repeat from *-* until 2 stitches remain, purl 1 twisted, 1 edge stitches in garter stitch. ROW 2 (= right side): 1 edge stitch in garter stitch, * knit 1 twisted, purl 1 *, work from *-* until 2 stitches remain, knit 1 twisted, 1 edge stitch in garter stitch. Repeat 1st and 2nd row until rib measures 6 cm. Cast off with PICOT - read explanation above. Jacket measures approx. 46-48-50-52-54-56 cm from shoulder. SLEEVE: Cast on 30-32-34-36-38-40 stitches on short circular needle size 3 mm with DROPS BabyAlpaca Silk. Purl 1 row from wrong side. Work next row as follows from right side: 5 stitches in stocking stitch, work 1 stitch in front and back loop of the next 20-22-24-26-28-30 stitches (= 20-22-24-26-28-30 stitches increased), 5 stitches in stocking stitch = 50-54-58-62-66-70 stitches. Work stocking stitch back and forth and cast on new stitches for sleeve cap at the end of every row in each side as follows: Cast on 3 stitches 1 time, 2 stitches 3-3-3-4-4-4 times, 1 stitch 5-7-9-9-10-14 times, 2 stitches 4-4-4-4-5-4 times and 3 stitches 1 time in each side = 100-108-116-124-134-142 stitches. Put piece together. Insert 1 marker thread where piece was put together (mid under sleeve), move the marker thread upwards when working - use the marker thread for increase mid under sleeve. Work in stocking stitch in the round. When piece measures 3 cm from where marker was inserted, increase 2 stitches mid under sleeve - read INCREASE TIP-2. Increase like this every 4-4-3-3-2½-2½ cm 4 times in total. AT THE SAME TIME when piece measures 8-8-7-7-6-5 cm from where marker thread was inserted, decrease 20-22-24-26-28-30 stitches evenly on round (this is done while continuing increase mid under sleeve). After all increases and decreases, there are 88-94-100-106-114-120 stitches on needle. Work until piece measures 16-16-15-15-14-12 cm from where marker thread was put. On next round decrease 22-24-28-32-36-40 stitches evenly = 66-70-72-74-78-80 stitches. Switch to double pointed needles size 2.5 mm, and work rib (knit 1 twisted/purl 1) for 6 cm. Cast off with PICOT - remember explanation above. Sleeve measures approx. 31-32-32-33-33-33 cm from cast-on edge. Work the other sleeve the same way. ASSEMBLY-1: Sew the shoulder seams. Sew in sleeves inside 1 edge stitch in garter stitch on front piece/back piece - distribute extra fabric nicely at the top of sleeve cap. Insert 1 marker mid back of neck - use marker when working bands. BANDS: Begin from right side at the bottom of right front piece, use circular needle size 2.5 mm and pick up approx. 168-174-182-188-196-202 stitches inside 1 edge stitch in garter stitch along the entire right front piece until marker mid back of neck. Then pick up approx. 167-173-181-187-195-201 stitches along the neck, and down along left front piece - number of stitches should be divisible by 2 + 1. Work rib as follows: ROW 1 (= wrong side): 1 edge stitch in garter stitch, * purl 1 twisted, knit 1 *, repeat from *-* until 2 stitches remain, purl 1 twisted, 1 edge stitches in garter stitch. ROW 2 (= right side): 1 edge stitch in garter stitch, * knit 1 twisted, purl 1 *, work from *-* until 2 stitches remain, knit 1 twisted, 1 edge stitch in garter stitch. After the 2 first rows, insert 1 marker in the notch at the bottom of V-neck on both front pieces - insert a marker in a knitted twisted stitch (seen from right side). Repeat 1st and 2nd row as explained above. Increase in addition 1 stitch on each side of stitches with marker on every row from right side until finished measurements (increase by making 1 yarn over - work the increased stitches twisted to avoid holes and work stitches in rib). When band measures approx. 1½ cm, decrease for 4 buttonholes on right band. 1 BUTTONHOLE = make 1 yarn over from right side, and knit yarn over together with 1 knit stitch from wrong side. Top buttonhole should be right below stitch with marker in notch at the bottom of V-neck, and bottom buttonhole should be 6 cm from bottom edge. Distribute the 2 other buttonholes evenly between these 2 buttonholes. Continue like this until band measures 3 cm. Loosely cast off. ASSEMBLY-2: Sew buttons on to left front piece. |
|||||||||||||||||||||||||
Diagram explanations |
|||||||||||||||||||||||||
|
|||||||||||||||||||||||||
 |
|||||||||||||||||||||||||
 |
|||||||||||||||||||||||||
Have you finished this pattern?Tag your pictures with #dropspattern #chamomileteacardi or submit them to the #dropsfan gallery. Do you need help with this pattern?You'll find 32 tutorial videos, a Comments/Questions area and more by visiting the pattern on garnstudio.com. © 1982-2026 DROPS Design A/S. We reserve all rights. This document, including all its sub-sections, has copyrights. Read more about what you can do with our patterns at the bottom of each pattern on our site. |
|||||||||||||||||||||||||


With over 40 years in knitting and crochet design, DROPS Design offers one of the most extensive collections of free patterns on the internet - translated to 17 languages. As of today we count 324 catalogues and 12290 patterns translated into English (UK/cm).
We work hard to bring you the best knitting and crochet have to offer, inspiration and advice as well as great quality yarns at incredible prices! Would you like to use our patterns for other than personal use? You can read what you are allowed to do in the Copyright text at the bottom of all our patterns. Happy crafting!
Post a comment to pattern DROPS 231-21
We would love to hear what you have to say about this pattern!
If you want to leave a question, please make sure you select the correct category in the form below, to speed up the answering process. Required fields are marked *.