
Popular categories
Looking for a yarn?


Comments / Questions (41)
![]() Maria wrote:
Maria wrote:
Czy włóczka drops Alaska jest gryząca ? Czy do tego wzoru lepszą była by wloczka Drops big merino ?
04.12.2021 - 13:31DROPS Design answered:
Witaj Mario, to jest sprawa bardzo indywidualna. Z całą pewnością Big Merino jest łagodniejsza, ale tutaj trzeba przerabiać bardzo ścisło, aby sweterek się nie wyciągnął po praniu. Zawsze trzeba wykonać próbkę i ją uprać. Powinna być zgodna z próbką podaną we wzorze. Jeśli nie trzeba dopasować druty i wykonać próbkę ponownie. Co do Alaski - spróbuj zrobić np. czapkę na początek, zobaczysz czy poziom podgryzania jest dla Ciebie do zaakceptowania. Pozdrawiamy!
06.12.2021 - 09:07
![]() Anna Nowak wrote:
Anna Nowak wrote:
Dzień dobry :-) mogłabym prosić o podpowiedź ile motkow włóczki drops Alaska potrzebowałabym na zrobienie swetra w rozmiarze L?
02.12.2021 - 09:14DROPS Design answered:
Witaj Aniu, na ten sweter w rozmiarze L potrzebujesz 700 g włóczki DROPS Alaska, tj. 14 motków. Pozdrawiamy!
02.12.2021 - 09:25
![]() Michelle wrote:
Michelle wrote:
For the tension check do you use the 4.5 or the 5.5mm needles?
03.11.2021 - 17:18DROPS Design answered:
Dear Michelle, use the needle size that gives you the given gauge (tension). Happy Stitching!
04.11.2021 - 01:18
![]() Ísak Sigfússon wrote:
Ísak Sigfússon wrote:
Vanntar mynstur A1 í uppskrift
30.09.2021 - 00:56DROPS Design answered:
Blessaður Ísak. Mynsturteikning A.1 er neðarlega í uppskriftinni við teikningu á peysu með máli. Slétt lykkja og brugðin lykkja. Gangi þér vel.
05.10.2021 - 16:12
![]() Suzanne wrote:
Suzanne wrote:
Bonjour, je suis rendue à faire les diminutions sur les côtés sous les aisselles à 5 cm de la séparation. Je ne comprend pas comment je peux garder le motif A1 quand je tricote 2 mailles ensembles, je me retrouve avec 2 à l'endroit ou 2 à l'envers de suite et le motif ne suit plus. Je ne trouve pas de tutoriel qui m'explique comment diminuer avec ce point de sable. Pourrriez-vous m'aider s'il vous plaît ?
06.06.2021 - 21:19DROPS Design answered:
Bonjour Suzanne, il est tout à fait normal que le motif A.1 ne tombe pas juste sur les côtés tant que les diminutions ne sont pas terminées, ce n'est pas grave, continuez à tricoter les mailles comme avant pour ne pas décaler les côtes, même si vous avez 3 m jersey ou 3 m point mousse côte à côte. les diminutions se font comme indiqué sous DIMINUTIONS (côtés pull et manches): . Bon tricot!
07.06.2021 - 07:56
![]() Emanuela wrote:
Emanuela wrote:
Buongiorno, ho iniziato a lavorare il modello 219/10, ma non mi è chiara una cosa: gli aumenti del raglan si fanno ad ogni giro? Grazie x la risposta Emanuela
14.05.2021 - 18:15DROPS Design answered:
Buonasera Emanuela, gli aumenti del raglan si lavorano ogni 2 giri. Buon lavoro!
14.05.2021 - 18:20
![]() Lyn Murphy wrote:
Lyn Murphy wrote:
Hi I am in the process of knitting this jumper and have just started the body after finishing the yoke and dividing for the sleeves- I cannot see how a raglan as shown in the diagram will fit with the yoke I have knitted? Thanks
20.04.2021 - 23:46DROPS Design answered:
Dear Lyn, if you mean the part, ehere the body is wider than the yoke, yu will see, when dividing the stotches for teh body and teh sleeves, there will be 10-10-10-12-12-12 stitches (depending on the size you knit) cast on, giving you the sape of the armhole. Happy Knitting!
21.04.2021 - 00:57
![]() Marine wrote:
Marine wrote:
Bonjour, Je ne comprends pas le diagramme A1 pour le point fantaisie. Serait il possible de me le décrire avec des explications s'il vous plaît ? Comment dois-je tricoter mes rangs ? Je vous remercie d'avance.
04.03.2021 - 18:38DROPS Design answered:
Bonjour Marine, le diagramme A.1 est tres facile: rang 1 est tricote a l'endroit, rang 2: repetez 1 maille envers, 1 maille endroit, rang 3: a l'endroit, etc. Bon tricot!
04.03.2021 - 19:15
![]() Ida wrote:
Ida wrote:
Hej Drops. Jeg har forsøgt at læse mig til, hvordan man læser strikkediagrammet A.1 i opskriften, men jeg bliver stadig i tvivl. Går selve mønsteret ud på at strikke: 1 r, 1 r 1 vr, 1 r, 1 r, 1 r 1 vr, 1 r Det ligner det, hvis man læser nederst i højre hjørne og mod venstre? Bh Cecilie
23.02.2021 - 09:31DROPS Design answered:
Hej Ida, hele første pind er ret fra retsiden, hele næste pind er skiftevis 1 ret 1 vrang, 3.pind/omgang er hele pinden ret fra retsiden osv :)
24.02.2021 - 15:41
![]() Lea wrote:
Lea wrote:
Kan denne trøje strikkes i en størrelse XS? Hvordan kan jeg regne opskriften om?
18.02.2021 - 12:16DROPS Design answered:
Hej Lea, når din strikkefasthed er 16 masker på 10 cm, så får du målene som du finder i måleskitsen. Her kan du se hvordan du gør: Hvordan måles strikkefastheden og regnes en opskrift ud
18.02.2021 - 12:20
|
|||||||
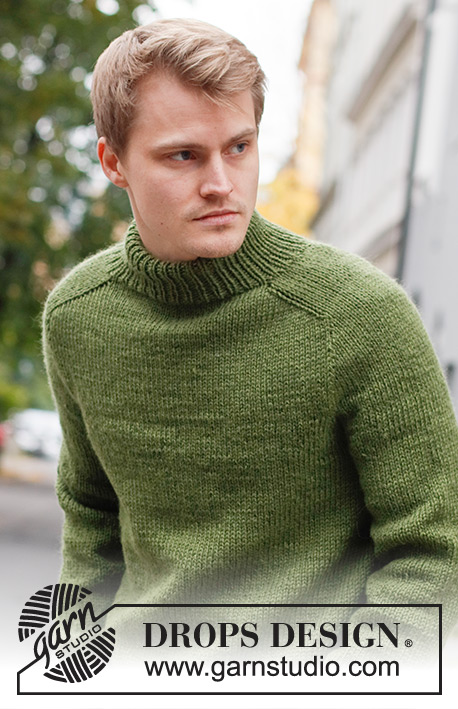
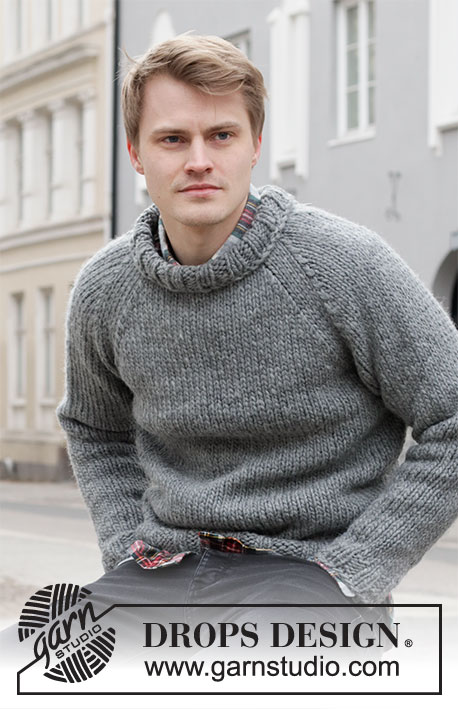
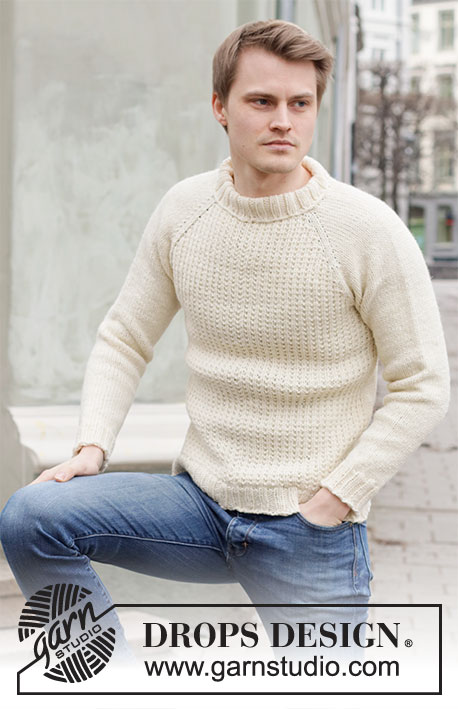
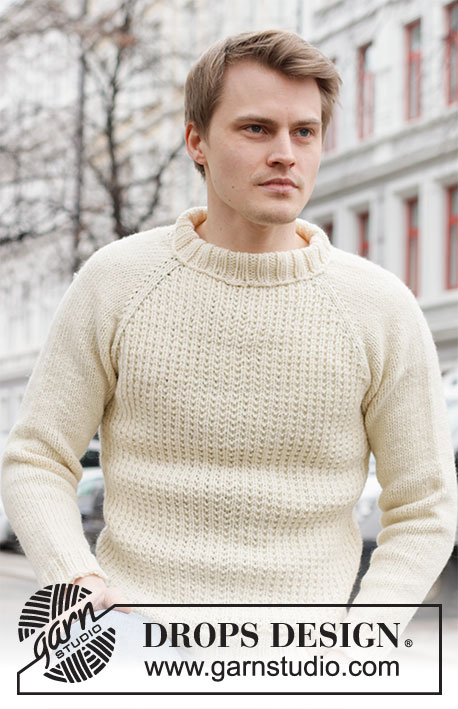
Budding Warmup#buddingwarmupsweater |
|||||||
 |
 |
||||||
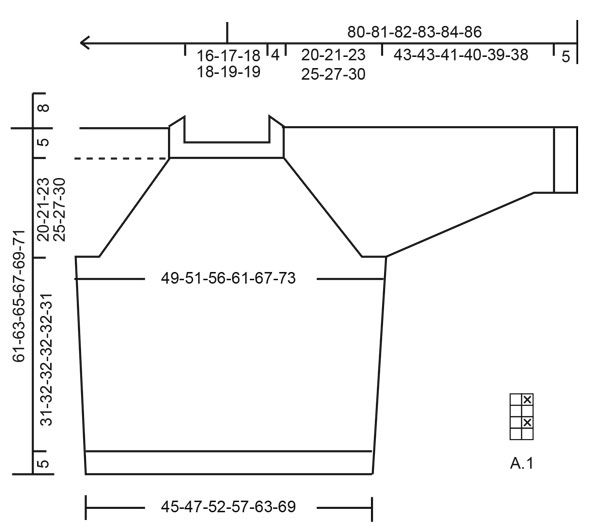
Knitted jumper for men with raglan in DROPS Alaska. Piece is knitted top down with textured pattern and stocking stitch. Size: S - XXXL
DROPS 219-10 |
|||||||
|
---------------------------------------------------------- EXPLANATION FOR THE PATTERN: ---------------------------------------------------------- PATTERN: See diagram A.1. INCREASE TIP-1 (evenly): To calculate how to increase evenly, use the total number of stitches on row (e.g. 96 stitches) , and divide stitches by number of increases to be done (e.g. 10) = 9.6. In this example increase by making 1 yarn over after approx. every 10th stitch. On next round work yarn overs twisted to avoid holes. INCREASE TIP-2 (applies to raglan): Work until 1 stitch remains before marker, 1 yarn over (= 1 stitch increased), work 2 stitches in stocking stitch, 1 yarn over (= 1 stitch increased). Increase like this at all markers (= 8 stitches increased). Knit yarn overs twisted on next round to avoid holes. Work the increased stitch on front piece and back piece in pattern A.1, work the increased stitch on sleeve in stocking stitch. DECREASE TIP (applies to side on body and sleeves): Decrease 1 stitch on each side of marker thread as follows: Work until 4 stitches remain before marker thread and knit 2 together, knit 4 (marker thread is in the middle of these stitches), slip 1 stitch knitwise, knit 1, pass slipped stitch over stitch worked. CAST-OFF TIP: To avoid a tight cast-off edge you may use a larger needle. If this also is too tight, make 1 yarn over after approx. every 4th stitch, cast off these as regular stitches. ---------------------------------------------------------- START THE PIECE HERE: ---------------------------------------------------------- JUMPER - SHORT OVERVIEW OF THE PIECE: Work neck edge and yoke in the round on circular needle from mid back, top down. Work neck edge double and sew in at the end. Now divide yoke for body and sleeves. Body is worked in the round on circular needle, top down. Work sleeves in the round on double pointed needles, top down. NECK EDGE: Cast on 80-84-92-96-96-104 stitches on circular needle size 4.5 mm with Alaska. Work rib = knit 2/purl 2 for 8 cm. Rounds begin mid back. Switch to circular needle size 5.5 mm. Insert 1 marker at the beginning of round, measure yoke from this marker! YOKE: Knit 1 round and increase 2-6-6-2-10-2 stitches evenly = 82-90-98-98-106-106 stitches – read INCREASE TIP-1. Work next round as follows (insert markers between stitches): Work 12-14-16-16-18-18 stitches according to diagram A.1 (= half back piece), 1 stitch in stocking stitch, insert 1st marker, 14 stitches in stocking stitch (= sleeve), insert 2nd marker, work 1 stitch in stocking stitch, work 25-29-33-33-37-37 according to diagram A.1, work 1 stitch in stocking stitch (= front piece), insert 3rd marker, 14 stitches in stocking stitch (= sleeve), insert 4th marker, work 1 stitch in stocking stitch, work 13-15-17-17-19-19 stitches according to diagram A.1 (= last half of back piece). Move the markers upwards when working, increase for raglan on each side of every marker. On next round increase 1 stitch in each side of every marker - read INCREASE TIP -2! Increase like this every other round 19-20-22-24-26-30 times in total = 234-250-274-290-314-346 stitches. REMEMBER THE KNITTING TENSION! Piece measures approx. 19-20-22-24-26-29 cm from marker mid back. Work until piece measures 20-21-23-25-27-30 cm from marker. Now divide the piece for sleeves and body as follows: Work pattern as before over the first 34-35-39-42-47-52 stitches (= half back piece), slip the next 48-54-58-60-62-68 stitches on a stitch holder for sleeve and cast on 10-10-10-12-12-12 stitches under sleeve, work pattern as before over the next 69-71-79-85-95-105 stitches (= front piece), slip the next 48-54-58-60-62-68 stitches on a stitch holder for sleeve and cast on 10-10-10-12-12-12 stitches under sleeve, work pattern as before over the last 35-36-40-43-48-53 stitches (= half back piece). BODY: = 158-162-178-194-214-234 stitches. Insert 1 marker thread in the middle of the 10-10-10-12-12-12 new stitches under sleeve (= in the side of body). Move the marker threads upwards when working; they are used when decreasing in the sides later. Continue with pattern as before (adjust A.1 in the sides so that pattern continue nicely on front and back piece). When piece measures 5 cm from division, decrease 1 stitch on each side of marker threads - read DECREASE TIP (= 4 stitches decreased). Decrease like this every 9 cm 3 times in total = 146-150-166-182-202-222 stitches. When piece measures 31-32-32-32-32-31 cm from division, knit 1 round while AT THE SAME TIME increasing 14-18-14-18-14-18 stitches evenly = 160-168-180-200-216-240 stitches. Switch to circular needle size 4.5 mm and work rib knit 2/purl 2 in the round. Cast off with knit over knit and purl over purl when rib measures 5 cm - read CAST-OFF TIP. Piece measures approx. 36-37-37-37-37-36 cm from division. SLEEVE: Slip the 48-54-58-60-62-68 stitches from stitch holder in one side of piece on double pointed needles size 5.5 mm and knit up 1 stitch in each of the 10-10-10-12-12-12 stitches cast on under sleeve = 58-64-68-72-74-80 stitches. Insert 1 marker thread in the middle of the 10-10-10-12-12-12 new stitches. Move the marker thread upwards when working; it should be used for decrease under sleeve. Work in stocking stitch in the round. When sleeve measures 3-3-4-5-5-5 cm from division, decrease 1 stitch on each side of marker thread - remember DECREASE TIP (= 2 stitches decreased). Decrease like this every 3½-3-2½-2-2-1½ cm 11-12-13-15-15-18 times in total = 36-40-42-42-44-44 stitches. When sleeve measures 43-43-41-40-39-38 cm from division, increase 4-4-2-6-4-4 stitches evenly = 40-44-44-48-48-48 stitches. Switch to double pointed needles size 4.5 mm and work rib knit 2/purl 2 in the round. Cast off with knit over knit and purl over purl when rib measures 5 cm - read CAST-OFF TIP. Work the other sleeve the same way. ASSEMBLY: Fold the neck outwards towards right side. Fasten cast-off edge – Sew with neat little stitches on the wrong side of jumper (make sure to make the seam invisible on the right side and to avoid a tight seam). |
|||||||
Diagram explanations |
|||||||
|
|||||||
 |
|||||||
Have you finished this pattern?Tag your pictures with #dropspattern #buddingwarmupsweater or submit them to the #dropsfan gallery. Do you need help with this pattern?You'll find 27 tutorial videos, a Comments/Questions area and more by visiting the pattern on garnstudio.com. © 1982-2026 DROPS Design A/S. We reserve all rights. This document, including all its sub-sections, has copyrights. Read more about what you can do with our patterns at the bottom of each pattern on our site. |
|||||||


With over 40 years in knitting and crochet design, DROPS Design offers one of the most extensive collections of free patterns on the internet - translated to 17 languages. As of today we count 324 catalogues and 12290 patterns translated into English (UK/cm).
We work hard to bring you the best knitting and crochet have to offer, inspiration and advice as well as great quality yarns at incredible prices! Would you like to use our patterns for other than personal use? You can read what you are allowed to do in the Copyright text at the bottom of all our patterns. Happy crafting!
Post a comment to pattern DROPS 219-10
We would love to hear what you have to say about this pattern!
If you want to leave a question, please make sure you select the correct category in the form below, to speed up the answering process. Required fields are marked *.