
Popular categories
Looking for a yarn?


|
|
Winter City |
|
 |
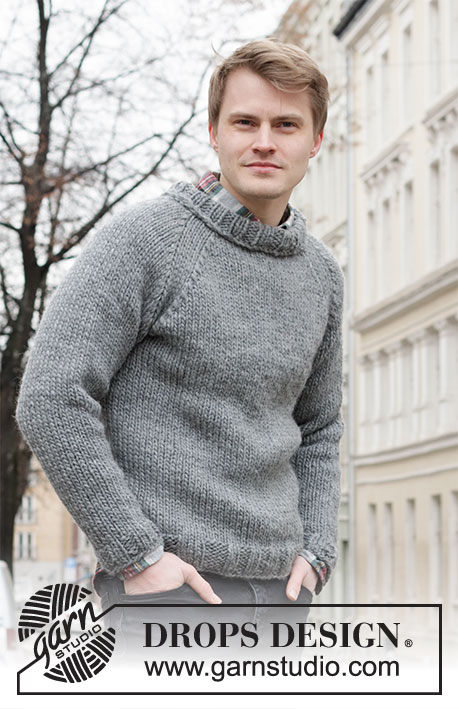 |
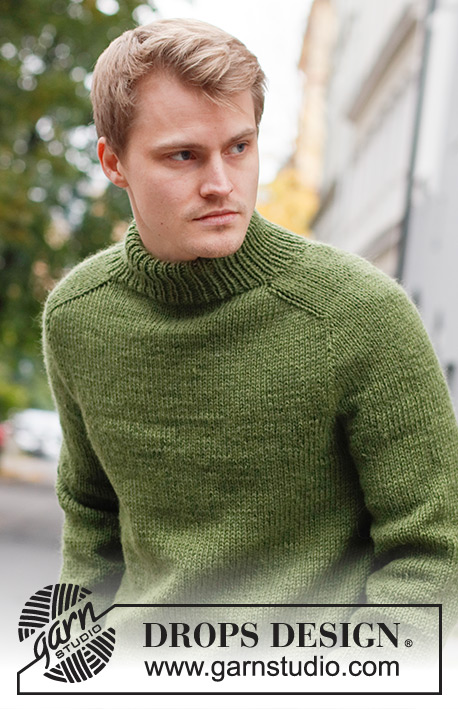
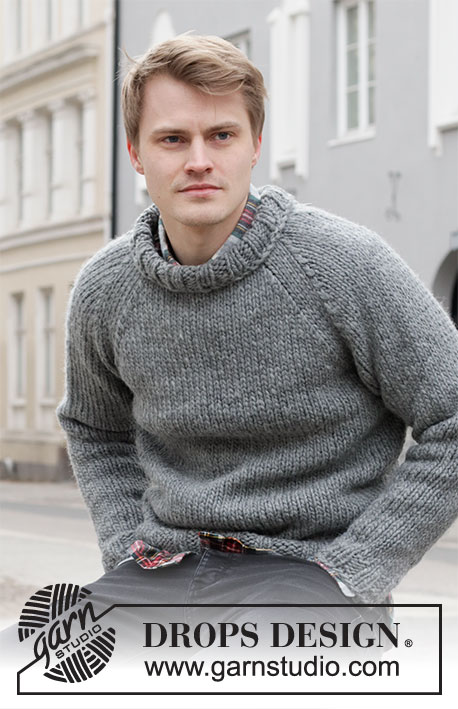
Knitted jumper with raglan for men in DROPS Snow. Size: S - XXXL
DROPS 219-11 |
|
|
---------------------------------------------------------- EXPLANATION FOR THE PATTERN: ---------------------------------------------------------- DECREASE TIP (applies to raglan): Decrease in every transition between sleeve and body piece every other round - begin 4 stitches before marker thread and work as follows: Slip 1 stitch knitwise, knit 1, pass slipped stitch over, knit 4 (marker is in the middle of these 4 stitches), and knit 2 together. When stitches have been slipped on to stitch holder for neck, work back and forth - decrease for raglan on every row from right side. INCREASE TIP (applies to sides on body and mid under sleeve): Work until 1 stitch remains before marker, make 1 yarn over, knit 2 (marker is between these stitches), make 1 yarn over = 2 stitches increased. On next round knit yarn overs twisted to avoid holes. ---------------------------------------------------------- JUMPER - SHORT OVERVIEW OF THE PIECE: Body is worked in the round on circular needle up to armhole. Work sleeves in the round on double pointed needles (switch to a short circular needle when needed). Then slip sleeves on to same circular needle as body, and work yoke in the round. Work neck in the round on double pointed needles or a short circular needle. BODY: Cast on 96-104-112-120-128-148 stitches on circular needle size 7 mm with Snow. Insert 1 marker at the beginning of round, insert another marker after 48-52-56-60-64-74 stitches. Work 1 round in stocking stitch. Work rib in round with knit 2 and purl 2 for 5 cm. Switch to circular needle size 8 mm and work in stocking stitch. When piece measures 12-12-12-12-12-12 cm, increase 1 stitch on each side of each marker – read INCREASE TIP in explanation above. Repeat increase every 6-10-10-10-10-10 cm 3 times in total = 108-116-124-132-140-160 stitches. REMEMBER THE KNITTING TENSION! Work until piece measures 41-41-42-42-42-42 cm, cast off 6 stitches in each side for armholes (i.e. cast off 3 stitches on each side of each marker) = 48-52-56-60-64-74 stitches on needle. Put piece aside and work the sleeves. SLEEVE: Cast on 24-24-24-32-32-36 stitches on double pointed needles size 7 mm with Snow. Work 2 rounds in stocking stitch, then work rib knit 2 and purl 2 until sleeve measures 6-6-6-7-7-7 cm. Switch to double pointed needles size 8 mm, insert a marker at beginning of round and work in stocking stitch. When piece measures 8-10-10-9-9-9 cm, increase 1 stitch on each side of marker – read INCREASE TIP in explanation above. Repeat increase approx. every 5½-4-3½-5-4½-4 cm 8-10-11-8-9-9 times in total = 40-44-46-48-50-54 stitches. Work until piece measures 51-50-49-48-46-46 cm, on next round cast off 6 stitches mid under sleeve (3 stitches on each side of marker) = 34-38-40-42-44-48 stitches. Put piece aside and knit another sleeve the same way. YOKE: Slip sleeves on to same circular needle as body – where stitches for armholes were cast off = 164-180-192-204-216-244 stitches. Insert marker threads in every transition between sleeves and body = 4 markers. Work 2-1-1-0-0-0 rounds stocking stitch before raglan decrease begins. READ ALL OF THE FOLLOWING SECTION BEFORE CONTINUING! Decrease for raglan on each side of 4 stitches at every marker thread - read DECREASE TIP in explanation above - every other round 13-15-16-17-18-21 times. AT THE SAME TIME when piece measures 56-58-60-62-64-66 cm, slip the middle 8-8-10-12-14-16 stitches on 1 stitch holder for neck. Work piece back and forth while decreasing for raglan from right side as before, and cast off for neck at the beginning of every row as follows: Cast off 2 stitches 1 time , and cast off 1 stitch 1 time. After all decreases for raglan and neck, there are 46-46-48-50-52-54 stitches on needle. NECK: Use double pointed needles size 7 mm. Pick up stitches for neck and slip stitches from stitch holder on to needles so that there are approx. 14 to 22 stitches in the neck at the front. There should be approx. 60 to 76 stitches on needles (number of stitches must be divisible by 4). Purl 1 round, then work rib knit 2/purl 2 for 9 cm. Loosely cast off stitches with knit over knit and purl over purl. ASSEMBLY: Sew the openings under the sleeves. Fold the neck outwards towards right side. Fasten cast-off edge with neat little stitches from the wrong side of jumper (make sure to make the seam invisible on the right side and to avoid a tight seam). |
|

|
|
|
Have you made this or any other of our designs? Tag your pictures in social media with #dropsdesign so we can see them! Do you need help with this pattern?You'll find tutorial videos, a Comments/Questions area and more by visiting the pattern on garnstudio.com. © 1982-2024 DROPS Design A/S. We reserve all rights. This document, including all its sub-sections, has copyrights. Read more about what you can do with our patterns at the bottom of each pattern on our site. |
|


With over 40 years in knitting and crochet design, DROPS Design offers one of the most extensive collections of free patterns on the internet - translated to 17 languages. As of today we count 304 catalogues and 11422 patterns - 11422 of which are translated into English (UK/cm).
We work hard to bring you the best knitting and crochet have to offer, inspiration and advice as well as great quality yarns at incredible prices! Would you like to use our patterns for other than personal use? You can read what you are allowed to do in the Copyright text at the bottom of all our patterns. Happy crafting!
Comments / Questions (13)
Een vraag over de mouw. 32 steken opzetten op een naald zonder knop. Dan een markeerdraad bij een hoogte van 8cm aan het begin. Dan verder breien op naald 8 Als de mouwen klaar zijn kun je de overige steken op de rondbreinaald zetten bij het voor en achterland. Naai je de zijnaden dicht van de mouwen?
13.03.2024 - 17:11DROPS Design answered:
Dag Carolien
De mouwen worden in de rondte gebreid, evenals de panden, dus je hoeft geen zijnaden dicht te naaien. Enkel de stukjes onder de oksel, waar de mouwen en de panden samen op de naald worden gezet, naai je op het einde dicht.
14.03.2024 - 21:48Hallo, ik zie het al. Ik was in de war met een ander patroon dat vanuit de bovenkant begon.🙈
04.03.2024 - 04:10Klopt het dat je maar 2 markeerdraden hebt. Daar ben ik mee begonnen. Ik zit nu op de 12 cm, en ik kom er niet verder mee. Moeten er niet 4 markeerdraden zijn?
03.03.2024 - 21:47Hallo, Veel dank voor heldere uitleg. Stekenverhouding is oke, maar idd raglanmindering niet om elke ander naald gedaan. Groeten, Remco
07.02.2024 - 09:43Hallo, Trui is af, maar te klein. Ongeveer 10cm. Ben na raglanmindering meteen begonnen aan hals. Had ik eerst nog door moeten breien in triocotstteek? Heb maat L. Dank en groeten, Remco
02.02.2024 - 14:31DROPS Design answered:
Dag Remco,
Nee, je kunt direct na de raglanminderingen met de hals verder gaan. Klopt je stekenverhouding in de hoogte? En heb je de raglanminderingen om de naald gemaakt, dus de ene naald wel en de andere naald niet?
04.02.2024 - 19:12Hallo, Ik loop een beetje vast bij de pas. Zit nu op een hoogte van 60 cm. Waar zet ik de tien steken op de hulpdraad? Is dat op het lange stuk en naast elkaar? Die brei ik dan niet? En moet ik dan terug breien met de mindering? En ik beegrijp het afkanten niet: Kant 1 keer 2 steken af, en kant 1 keer 1 steek af. In totaal 12 of 6 steken afkanten. Dank alvast! Groeten, Remco
12.01.2024 - 09:11DROPS Design answered:
Dag Remco,
Je zet de middelste steken van het voorpand op een hulpdraad, dus precies de 10 middelste steken. Dan brei je het werk verder heen en weer en het afkanten doe je dan steeds aan het begin op elke naald, dus direct naast de 10 steken aan beide kanten. Op deze manier krijg je een mooie ronding in de hals. Je kant aan beide kanten eerst 2 steken af en dan aan beide kanten nog een keer 1 steken. In totaal dus 6 steken (3 steken aan beide kanten).
14.01.2024 - 13:07I am stuck! Having slipped middle 8 stitches on holder for neck I am u sure how I decrease the neck and keep shaping the raglan. Does 'work price back and forth' mean coming off the round?
13.07.2023 - 17:20DROPS Design answered:
Hi Ann, Yes, you now continue back and forth from one side of the neck, around the back piece to the other side of the neck, always continuing the decreases for raglan on rows from the right side. In addition, you decrease for the neck by casting off 2 stitches by the neck 1 time on each side, then cast off 1 stitch on each side 1 time (on both rows from the right and wrong side). Hope this helps and happy knitting!
14.07.2023 - 07:03What are the measurements for the sizes? ie what width chest is size XL. I cant see a conversion chart anywhere.
30.09.2021 - 22:58DROPS Design answered:
Dear Paula, you can find all the relevant measurements on the schematic drawing at the bottom of the pattern. We suggest that you take a sweater that fits and compare the sizing. Happy Stitching!
30.09.2021 - 23:29Hallo , Ob auf Französisch oder auf Deutsch, ich verstehe nicht wie der Kragen bzw. die Halsblende gestrickt wird. Ich habe das viel zu eng gestrickt. Könnten Sie mir das genauer erklären? Danke
15.05.2021 - 22:07Kant dan losjes de af steken 2-1-1-3-4-4 keer af met recht boven recht en averecht boven averecht. Ik begrijp deze zin niet zo goed. Hoe kant ik 4 keer af? Hartelijk dank.
23.03.2021 - 17:52DROPS Design answered:
Dag Irja,
Dat klopt inderdaad niet. Er moet staan: Kant dan losjes de steken af met recht boven recht en averecht boven averecht. Het is nu gecorrigeerd. Veel breiplezier!
26.03.2021 - 16:03