
Popular categories
Looking for a yarn?


Comments / Questions (79)
![]() Nanou wrote:
Nanou wrote:
Bonjour, pourriez vous me dire si je fais mes côtes ensuite l'empiècement en commençant par endroits, pour moi c'est le devant droit, et non le devant gauche comme noté merci bonne journée
30.09.2021 - 20:56DROPS Design answered:
Bonjour Nanou, ce gilet se tricote de haut en bas, donc après le col, vous tricotez sur l'endroit en commençant par le devant gauche, la manche gauche, le dos puis la manche droite, et vous terminez par le devant droit. Sur l'envers, en sens inverse, vous commencez par le devant droit et terminez par le devant gauche. Bon tricot!
01.10.2021 - 07:38
![]() Glenda Bloch wrote:
Glenda Bloch wrote:
Don't worry about my last question - it worked out - I see one is not supposed to count the "yarn overs" as stitches - in the first row of A3B the number of stitches is 335 after an overall total of 23 raglan increases - one needs to count after a row 2 of A1a, A2a and A4a , and NOT after a row 4 where one has put the yarn over, which is where one is in the pattern at the end of the increases. Maybe this could be explained more clearly in the pattern? Thanks - loving knitting this!
21.09.2021 - 09:31
![]() Glenda wrote:
Glenda wrote:
I am struggling with the pattern from where the raglan increase is supposed to be completed (after row 45, if I do a total of 22 raglan increases around A1 including the 1st increase row, 3rd row of yoke). It says there will be 335 stitches, but I only have 319. If I go up to row 47 (i.e. do 23 raglan increases around A1 in total) then I'll have too many stitches. There is no way I can get to 335 stitches, and so I don't know how to continue. Please help! I have put so much work in already :(
20.09.2021 - 17:18DROPS Design answered:
Dear Glenda, you started with 119 sts, increase 16 sts in total in A.1-A.2,A.4 + 12 sts in each A.3 (= 24 sts in total) + 8 sts a total of 22 times for the raglan (= 8*22=176), so that there are: 119+16+24+176=335 sts (when there are K3 in each A.1, A.2, A.4). Hope this will help, happy knitting!
21.09.2021 - 08:33
![]() Wolf wrote:
Wolf wrote:
Bonjour Je suis au début du travail j'ai terminé A.1a, A.2a, A.4a, maintenant je dois continuer sur A.1b,A.2b et A.4b ou je reviens au A.1a ? etc etc. je dois tricoter que A?1a, A.2a, A. 4a jusqu'à hauteur désirée ? Jusqu'à ce que toutes les augmentions pour le raglan soient terminées ?Merci beaucoup pour votre aide
12.07.2021 - 11:22DROPS Design answered:
Bonjour Mme Wolf, effectivement, lorsque les 3 premiers rangs de A.1, A.2 et A.4 ont été tricotés, vous ne tricotez et répétez que les 4 rangs suivants = la partie A.1a/A.2a/A.4a du diagramme. Vous tricoterez A.1b au début de la partie DOS & DEVANTS et A.2b/A.4b à la fin des manches seulement (quand ce sera indiqué). Bon tricot!
12.07.2021 - 16:20
![]() Wolf wrote:
Wolf wrote:
Je ne comprends pas vos diagrammes A.1- A.2-A.4 lequel est pour XL ? L ? Echantillon j\'ai 30 m contre vos 24 je ne peux pas augmenter la taille des aiguilles sinon trop lâche. Je prends la taille au dessus pour arriver à la mienne et avoir un suivi de diagramme correspondant ? Merci pour vos réponse
29.06.2021 - 13:00DROPS Design answered:
Bonjour Mme Wolf, les diagrammes A.1, A.2 et A.4 sont les mêmes pour toutes les tailles, seuls les diagrammes A.3a, A.3b et A.3c sont différents en fonction de la taille. Lavez éventuellement et faites sécher votre échantillon pour vérifiez les mesures finales, le respect de l'échantillon en largeur aussi bien en hauteur est le garant de l'obtention des mesures indiquées dans le schéma pour chaque taille. Retrouvez plus d'infos sur l'échantillon ici. Bon tricot!
29.06.2021 - 15:59
![]() Orchid wrote:
Orchid wrote:
Hi, There is no mentioning when to use diagram A 2b and A4b in the pattern. Is this a mistake? I have read through it a few times now.
16.06.2021 - 23:01DROPS Design answered:
Dear Orchid, in the very last part of the pattern, at the end of the sleeves it says "Work next round as follows: * Knit 1, purl 2 *, work from *-* over the first 15-18-24-24-27-30 stitches, A.2b over A.2a, continue with knit over knit and purl over purl over stitches in A.3c, A.4b over A.4a, * purl 2, knit 1 *, work from *-* over 15-15-21-24-24-27 stitches and finish with purl 2 = 75-78-90-99-102-108 stitches." In here will you find A.2b and A.4b diagrams. Happy Stitching!
17.06.2021 - 01:30
![]() Signe Karlsson wrote:
Signe Karlsson wrote:
Det står att alla varv i mönstret sett från rätsidan menas det att aviga varvet är inräknat?
03.05.2021 - 09:23DROPS Design answered:
Hei Signe. Ja, mønstret fra vrangen er også i diagrammet (pinne 2, 4, 6 osv). Da leser du diagrammet fra venstre til høyre og husk les diagramtekstforklaringen på hvordan det strikkes. mvh DROPS design
03.05.2021 - 15:28
![]() Michelle wrote:
Michelle wrote:
Où trouver les corrections "mises en ligne le 04/06/2020 et le 26/02/2021 ? Sans elles, impossible de réaliser ce modèle
17.04.2021 - 12:49DROPS Design answered:
Bonjour Michelle, si vous aviez imprimé ce modèle avant ces dates, alors il peut être sage d'imprimer à nouveaux les explications, sinon, le modèle en ligne est juste ainsi. Bon tricot!
19.04.2021 - 07:58
![]() Renata wrote:
Renata wrote:
Dzień dobry, bardzo proszę o podpowiedź w jaki sposób wykonać następujące polecenia: "nabrać 8 oczek pod rękawem" oraz "nabrać 1 oczko w każde z 8 oczek nabranych pod rękawem" - w jaki sposób je nabrać? Czy po nabraniu 1 w każde 8 ma być ich 16? Czy one także mają być zdjęte na drut pomocniczy? Serdecznie pozdrawiam
28.03.2021 - 01:07DROPS Design answered:
Witaj Renato, zobacz film TUTAJ. Na 1-sze pytanie odpowiedź jest od 7-mej minuty. Na drugie od 10-tej: tutaj uwaga, oczka są nabierane oddzielnie (czyli inaczej niż we wzorze, który wykonujesz) i otwór pod rękawem zostanie na końcu zszyty. Możesz tak oczywiście zrobić. Nabrać oczko w każde z 8 oczek nabranych pod rękawem oznacza, że za pomocą drutu pończoszniczego wbijasz się w każde z tych 8 oczek i przeciągasz pętelkę, po nabraniu będziesz miała 8 oczek pod rękawem i będziesz dalej wykonywać rękaw na okrągło (nie będzie otworu pod rękawem). Powodzenia!
28.03.2021 - 17:18
![]() Heidi Funk wrote:
Heidi Funk wrote:
Jeg er i tvivl om raglan udtagningen efter mønster A1. Skal jeg blive ved med at foretage udtagningen lige efter mønster A1 eller skal udtagningerne foretages en maske længere ude end forrige udtagning,- således at det er ærmestykkerne der får flere masker mens forstykke og ryg forbliver samme maskeantal? Håber mit spørgsmål er til at forstå. Venlig hilsen Heidi
25.03.2021 - 22:39DROPS Design answered:
Hej Heidi, du tager altid ud til raglan lige før og lige efter A.1 God fornøjelse!
21.04.2021 - 15:56
|
|||||||||||||||||||||||||||||||
Springs Surrender Jacket#springssurrenderjacket |
|||||||||||||||||||||||||||||||
 |
 |
||||||||||||||||||||||||||||||
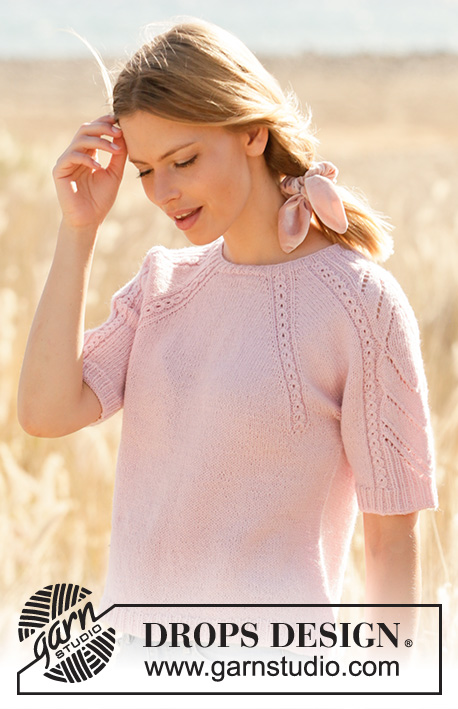
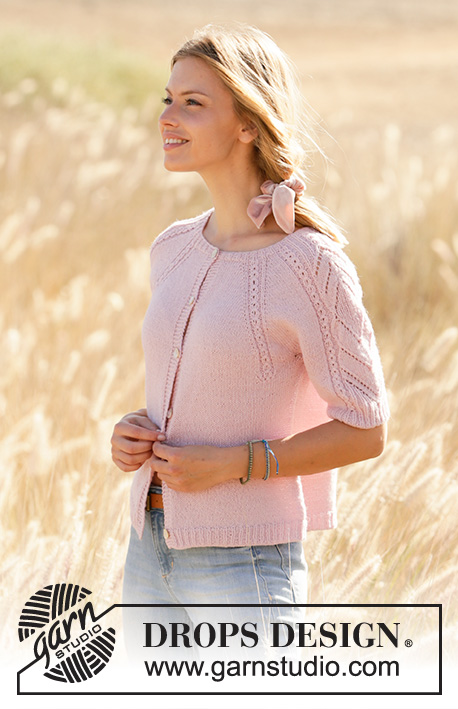
Knitted jacket with raglan in DROPS Alpaca. Piece is knitted top down with lace pattern and short sleeves. Size: S - XXXL
DROPS 212-39 |
|||||||||||||||||||||||||||||||
|
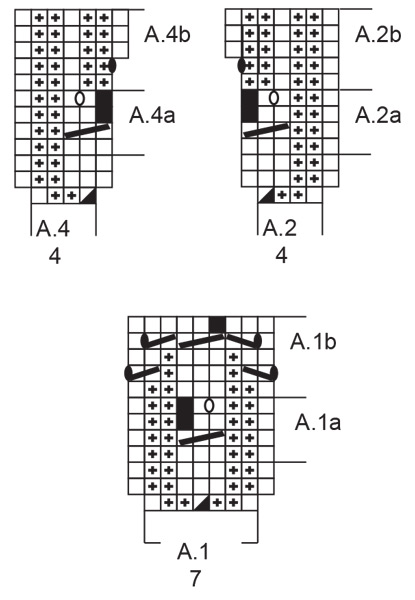
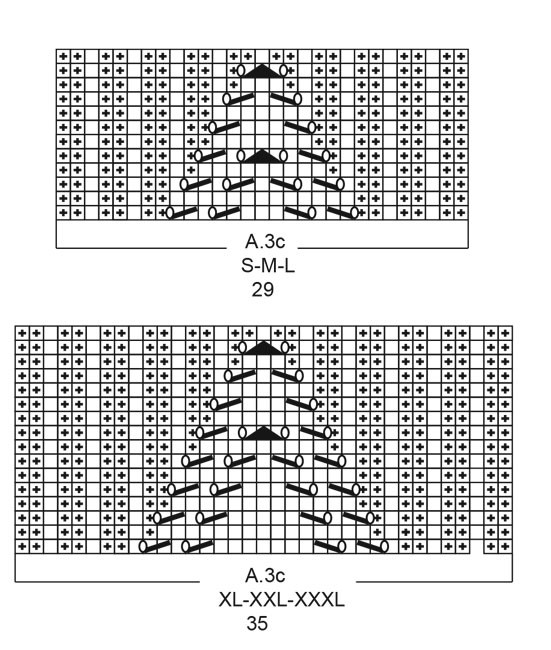
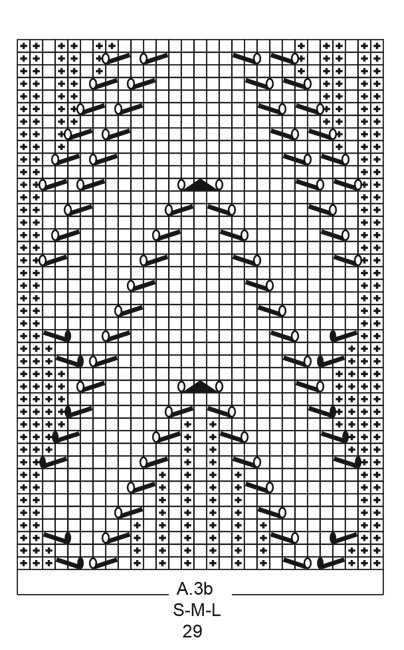
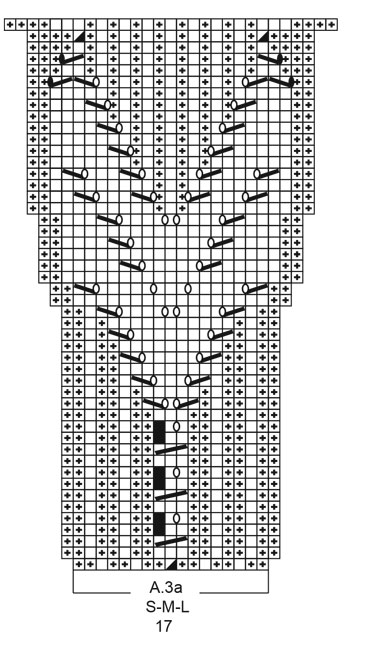
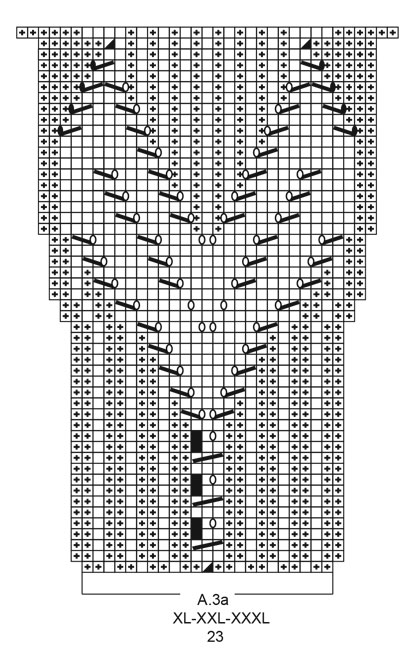
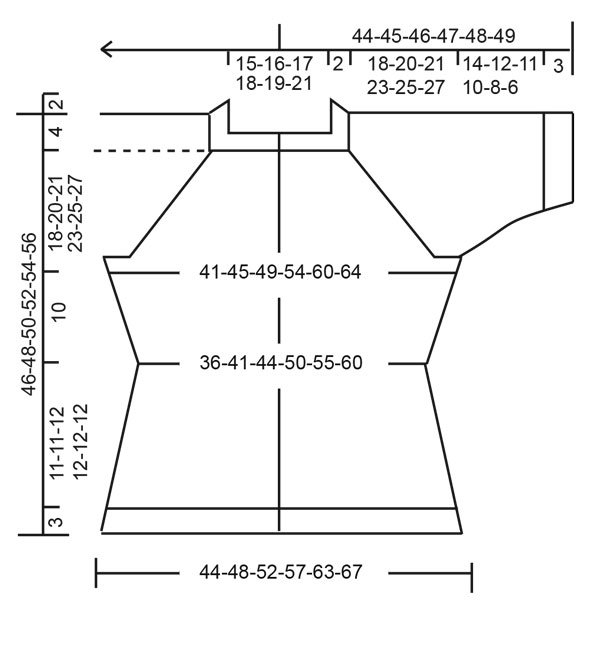
---------------------------------------------------------- EXPLANATION FOR THE PATTERN: ---------------------------------------------------------- GARTER STITCH (back and forth): Knit all rows. 1 ridge vertically = knit 2 rows. PATTERN: See diagrams A.1 to A.4. Choose diagram for your size. Diagrams show all rows in pattern seen from the right side. INCREASE TIP-1 (applies to raglan): All increases are done on a row from right side. Increase 1 stitch by making 1 yarn over between 2 stitches. On next row purl yarn over twisted to avoid hole. Then work the new stitches in stocking stitch. INCREASE TIP-2 (applies to sides of body): All increases are done on a row from right side. Work until 2 stitches remain before marker thread, 1 yarn over, knit 4 (marker thread is in the middle of these stitches), 1 yarn over. On next row purl yarn overs twisted to avoid holes. Then work the new stitches in stocking stitch. DECREASE TIP (applies to side on body and sleeves): All decreases are done on a row from right side. Decrease 1 stitch on each side of marker thread as follows: Work until 3 stitches remain before marker thread and knit 2 together, knit 2 (marker thread is between these stitches), slip 1 stitch knitwise, knit 1, pass slipped stitch over stitch worked. NUMBER OF STITCHES: As both increases and decreases are done in A.1a, A.2a, A.3a and A.4a, number of stitches vary according to which row it is counted on (depending on you are increasing/decreasing in pattern). CAST-OFF TIP: To avoid a tight cast-off edge you may use a larger needle. If this also is too tight, make 1 yarn over after approx. every 4th stitch and cast off these as regular stitches. BUTTONHOLES: Decrease for buttonholes on right band (when garment is worn). Decrease from right side when 3 stitches remain on row as follows: Make 1 yarn over, knit the next 2 stitches together, knit last stitch. On next row knit yarn over to make holes. Decrease first buttonhole when neck edge measures approx. 1½-2 cm. Then decrease the next 5-5-5-5-6-6, approx. 8-8½-8½-9-8-8 cm apart. ---------------------------------------------------------- START THE PIECE HERE: ---------------------------------------------------------- JACKET - SHORT OVERVIEW OF THE PIECE: Work neck edge and yoke back and forth on circular needle from mid front, top down. Now divide yoke for body and sleeves. Work body back and forth on circular needle, top down. Work sleeves in the round on double pointed needles, top down. NECK EDGE: Cast on 119-131-137-143-146-155 stitches (including 5 band stitches in each side towards mid front) on circular needle size 2.5 mm with Alpaca. Purl 1 row (= wrong side). Work next row as follows from right side: Work 5 band stitches in GARTER STITCH - read explanation above, * knit 1, purl 2 *, work from *-* until 6 stitches remain, knit 1 and finish with 5 band stitches in garter stitch. Decrease for BUTTONHOLES - read explanation above. Continue rib like this for 2 cm. Switch to circular needle size 3 mm. Insert 1 marker after band at the beginning of row mid front, measure yoke from this marker! YOKE: Now work as follows from right side: Left front piece: Work 5 band stitches in garter stitch, 6-9-9-9-9-12 stitches in stocking stitch, A.1 (= 7 stitches). Left sleeve: Work 2 stitches in stocking stitch, A.2 (= 4 stitches), A.3a (= 17-17-17-23-23-23 stitches), A.4 (= 4 stitches), 2 stitches in stocking stitch. Back piece: Work A.1 over 7 stitches, 11-17-23-17-20-23 stitches in stocking stitch, A.1 over 7 stitches. Right sleeve: Work 2 stitches in stocking stitch, A.2 over 4 stitches, A.3a over 17-17-17-23-23-23 stitches, A.4 over 4 stitches, 2 stitches in stocking stitch. Right front piece: Work A.1 over 7 stitches, 6-9-9-9-9-12 stitches in stocking stitch and finish with 5 band stitches in garter stitch. On next row from right side increase for raglan on each side of every A.1 – read INCREASE TIP-1 (= 8 stitches increased). REMEMBER THE KNITTING TENSION! Increase like this every other row 22-24-28-33-37-40 times in total. When the first 3 rows in pattern A.1, A.2 and A.4 has been worked, repeat A.1a, A.2a and A.4a in height. When A.3a has been worked 1 time vertically, work A.3b (= 29-29-29-35-35-35 stitches) over A.3a. When increase for raglan is done, there are 335-363-401-447-482-515 stitches on needle – read NUMBER OF STITCHES. Work in the established pattern until piece measures 18-20-21-23-25-27 cm from marker. Adjust so that next row is a row with total number of stitches (i.e. 335-363-401-447-482-515 stitches), this because number of stitches can vary because of decreases/increases in diagrams. On next row divide piece for body and sleeves as follows: Work over the first 50-55-59-66-72-77 stitches as before, slip the next 73-77-87-97-101-107 stitches on a stitch holder for sleeve and cast on 8 stitches under sleeve, work over the next 89-99-109-121-136-147 stitches, slip the next 73-77-87-97-101-107 stitches on a stitch holder for sleeve and cast on 8 stitches under sleeve and work the last 50-55-59-66-72-77 stitches. BODY: = 205-225-243-269-296-317 stitches. Insert 1 marker thread after 54-59-63-70-76-81 stitches in from each side (= in the side of body). There are 97-107-117-129-144-155 stitches between marker threads on back piece. Move the marker threads upwards when working; they should be used for increase and decrease later in the sides. When last repetition of A.1a from the yoke has been worked vertically, work A.1b over every A.1a. When A.1b has been worked 1 time vertically, there are 201-221-239-265-292-313 stitches on needle. Work in stocking stitch with 5 band stitches in garter stitch in each side. When piece measures 2 cm from division, decrease 1 stitch on each side of the marker thread in each side - read DECREASE TIP (= 4 stitches decreased). Decrease like this every 2 cm 4 times in total = 185-205-223-249-276-297 stitches. When piece measures 10 cm from division, increase 1 stitch on each side of marker threads in the sides - read INCREASE TIP-2(= 4 stitches increased). Increase like this every cm 9 times in total = 221-241-259-285-312-333 stitches. When piece measures 21-21-22-22-22-22 cm from division, increase 12-13-13-14-14-14 stitches evenly = 233-254-272-299-326-347 stitches. Switch to circular needle size 2.5 mm and work from right side as follows: Work 5 band stitches in garter stitch, * knit 1, purl 2 *, repeat from *-* until 6 stitches remain, finish with knit 1 and 5 band stitches in garter stitch. When piece measures 24-24-25-25-25-25 cm from division, cast off all stitches by knitting from right side - read CAST-OFF TIP. SLEEVES: Slip the 73-77-87-97-101-107 stitches from stitch holder in one side of piece on double pointed needles size 3 mm and pick up 1 new stitch in each of the 8 stitches cast on under sleeve = 81-85-95-105-109-115 stitches – remember number of stitches. Insert 1 marker thread in the middle of the 8 new stitches. Move the marker thread upwards when working; it should be used for decrease mid under sleeve. READ ALL OF THE FOLLOWING SECTION BEFORE CONTINUING! Work pattern and decrease stitches mid under sleeve as follows: Work A.2a, A.3b and A.4a over the middle stitches, knit the remaining stitches. When A.3b has been worked, work A.3c over A.3b. When sleeve measures 1 cm from division, decrease 1 stitch on each side of marker thread (= 2 stitches decreased). Decrease like this every cm 3-3-3-3-5-5 times in total, then decrease every other cm 2-2-2-2-0-0 times in total = 71-75-85-95-99-105 stitches. On last round in A.3c increase 0-1-2-0-1-1 stitches before pattern, and 2-0-1-2-0-0 stitches after the pattern = 73-76-88-97-100-106 stitches. When A.3c has been worked 1 time vertically, piece measures approx. 14-12-11-10-8-6 cm from division. Switch to double pointed needles size 2.5 mm. Work next round as follows: * Knit 1, purl 2 *, work from *-* over the first 15-18-24-24-27-30 stitches, A.2b over A.2a, continue with knit over knit and purl over purl over stitches in A.3c, A.4b over A.4a, * purl 2, knit 1 *, work from *-* over 15-15-21-24-24-27 stitches and finish with purl 2 = 75-78-90-99-102-108 stitches. Continue with knit over knit and purl over purl until piece measures 17-15-14-13-11-9 cm from division, then cast off by knitting. Work the other sleeve the same way. ASSEMBLY: Sew the buttons on to the left band. |
|||||||||||||||||||||||||||||||
Diagram explanations |
|||||||||||||||||||||||||||||||
|
|||||||||||||||||||||||||||||||
 |
|||||||||||||||||||||||||||||||
 |
|||||||||||||||||||||||||||||||
 |
|||||||||||||||||||||||||||||||
 |
|||||||||||||||||||||||||||||||
 |
|||||||||||||||||||||||||||||||
 |
|||||||||||||||||||||||||||||||
 |
|||||||||||||||||||||||||||||||
Have you finished this pattern?Tag your pictures with #dropspattern #springssurrenderjacket or submit them to the #dropsfan gallery. Do you need help with this pattern?You'll find 28 tutorial videos, a Comments/Questions area and more by visiting the pattern on garnstudio.com. © 1982-2026 DROPS Design A/S. We reserve all rights. This document, including all its sub-sections, has copyrights. Read more about what you can do with our patterns at the bottom of each pattern on our site. |
|||||||||||||||||||||||||||||||


With over 40 years in knitting and crochet design, DROPS Design offers one of the most extensive collections of free patterns on the internet - translated to 17 languages. As of today we count 324 catalogues and 12278 patterns translated into English (UK/cm). 12278
We work hard to bring you the best knitting and crochet have to offer, inspiration and advice as well as great quality yarns at incredible prices! Would you like to use our patterns for other than personal use? You can read what you are allowed to do in the Copyright text at the bottom of all our patterns. Happy crafting!
Post a comment to pattern DROPS 212-39
We would love to hear what you have to say about this pattern!
If you want to leave a question, please make sure you select the correct category in the form below, to speed up the answering process. Required fields are marked *.