
Popular categories
Looking for a yarn?


Comments / Questions (177)
![]() Jane Schmidt wrote:
Jane Schmidt wrote:
Det passer ikke med 150 g til str. L:(
07.10.2020 - 21:49
![]() Jastrid wrote:
Jastrid wrote:
Ift. at lukke masker af til ærmegabet skriver i at man skal lukke masker af i starten af hver pind. Vil det sige at man ikke lukker det samme antal af i slutningen af pinden? For hvis man først lukker masker af i højre side og så strikker hele resten af pinden normalt, og så først lukker det samme antal i venstre side på rækken over, så bliver det da skævt, gør det ikke?
22.09.2020 - 00:39DROPS Design answered:
Hej Jastrid, jo du vil altid få en pind mere i den ene side, men det er der ingen som kan se, når man ellers tager ind lige mange gange i højre og venstre side. God fornøjelse!
24.09.2020 - 15:52
![]() Dorte wrote:
Dorte wrote:
Det er en del spørgsmål til kanten og jeg kan altså ikke forstå jeres svar. I svarer hvergang at det er en almindelig rib med 2 ret, 2 vrang mellem de 5 kantmasker. Det svarer altså ikke til fotoet af kanten. Jeg tror at alle vrangpinde strikkes som I beskriver ( 5 kantmasker ret, 2 r, 2 vr, 5 kantmasker) og alle retpinde strikkes ret over alle masker. Så bliver resultatet som på fotoet
17.09.2020 - 20:30DROPS Design answered:
Hej Dorthe. Du stickar så här från retsiden: *2 m glatstrik och 2 m retstrik* (och 5 m retstrik i var side som kantmasker). Dvs från retsidan blir det ret over alle masker och från vrangen stickar du 2 r och 2 vr (och 5 m ret i var side som kantmasker) precis som du skriver. Mvh DROPS Design
18.09.2020 - 07:28
![]() Barbro Synvis wrote:
Barbro Synvis wrote:
Jeg ønsker å strikke vesten på rundpinne uten splitt men med vrangbord. Skal jeg legge opp samme antall masker?
16.09.2020 - 11:26
![]() Line wrote:
Line wrote:
Er ved at strikke str. m og garnmængden i har oplyst passe ikke. Jeg har tjekket strikkeFastedes og den passer.
14.09.2020 - 09:06
![]() Agneta Östman-Wenger wrote:
Agneta Östman-Wenger wrote:
Förstår ej "Rätstickning" på rätsidan. Slätstickning brukar ju vara pä rätsidan, men 2 maskor slät, 2 maskor rätstickning på rätsidan??
12.09.2020 - 16:34DROPS Design answered:
Hei Agneta. Du strikker 5 masker i hver side av splitten. Vrangborden strikkes med 2 masker glattstrikk (fra retten blir dette 2 glattstrikkende masker hele vrangborden opp), så strikkes det 2 masker som skal strikkes i riller, altså de strikkes rett både fra retten og vrangen. God Fornøyelse!
14.09.2020 - 11:25
![]() Renata wrote:
Renata wrote:
Hvis jeg vil strikke dette vest i str. M hvor meget garn skaljeg bruge? Synes ikke kan læse mig til det :( MVH Renata
12.09.2020 - 16:32
![]() Rita Mollberg wrote:
Rita Mollberg wrote:
Hei! har dere oppskrift til jente på denne? ca 8 til 14 år
07.09.2020 - 12:30DROPS Design answered:
Hei Rita. Nei, det har vi dessverre ikke, enda... mvh DROPS design
07.09.2020 - 13:02
![]() Fatma wrote:
Fatma wrote:
Hej Efter de nederstekanten og indtagningen står der "Strik 1 pind vrang fra vrangen. " Skal man stadigvæk strikke retstrik kanten, eller skal man strikke alle masker vrang inklusiv de 5 kantrmasker?
11.08.2020 - 09:27DROPS Design answered:
Hej Fatma. Du ska stadigvæk strikke retstrik kanten. Mvh DROPS Design
13.08.2020 - 11:55
![]() Cristina wrote:
Cristina wrote:
Para un talle M con Lana mohair fina en aguja 3.5 y 4,5 circular cuanto debo poner de puntos? Quiero empezar desde abajo
01.08.2020 - 06:55DROPS Design answered:
Hola Cristina. No hacemos patrones personalizados. Te recomiendo hacer una muestra con el hilo y la aguja elegidos y comparar con el patrón original. Tienes que hacer tú misma los ajustes y cálculos.
02.08.2020 - 20:12
|
|
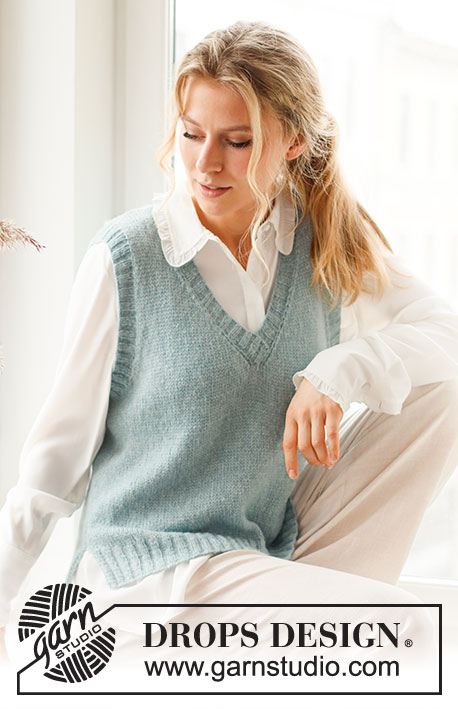
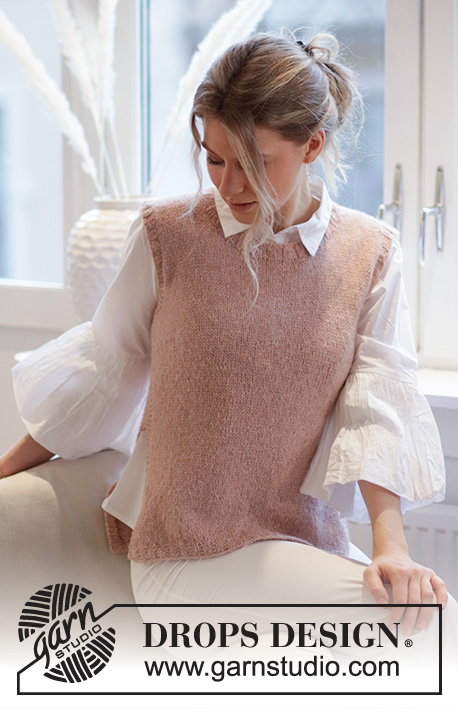
Rose Blush#roseblushvest |
|
 |
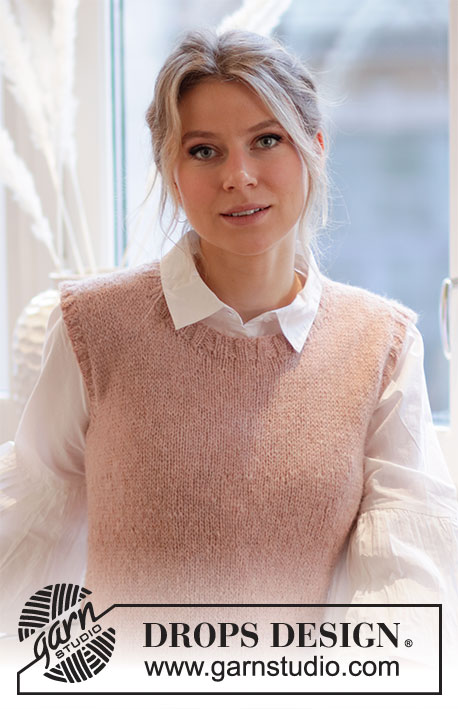 |
Knitted vest / slipover in DROPS Sky or DROPS Soft Tweed. The piece is worked with ribbed edging and a split in the sides. Sizes S - XXXL.
DROPS 212-44 |
|
|
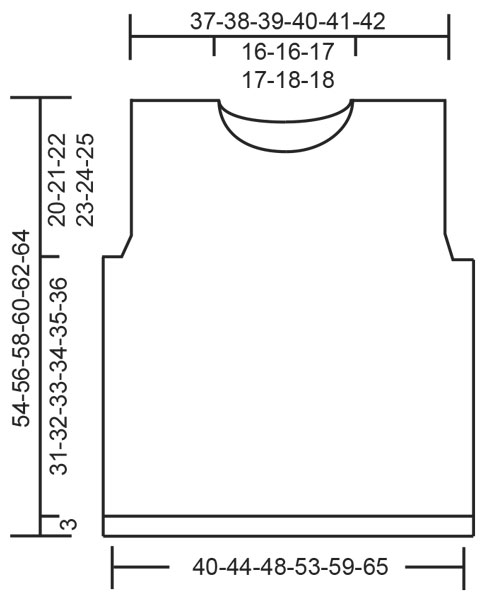
------------------------------------------------------- EXPLANATIONS FOR THE PATTERN: ------------------------------------------------------- RIDGE/GARTER STITCH (worked back and forth): Knit all rows. 1 ridge in height = Knit 2 rows. DECREASE TIP (evenly spaced): To work out how to decrease evenly, count the total number of stitches on needle (e.g. 88 stitches) minus the edge stitches (e.g. 10 stitches) and divide the remaining stitches by number of decreases to be made (e.g. 8) = 9.8. In this example decrease by knitting approx. each 9th and 10th stitch together (do not decrease over the edge stitches). ------------------------------------------------------- START THE PIECE HERE: ------------------------------------------------------- VEST – SHORT OVERVIEW OF THE PIECE: The piece is worked back and forth in sections and sewn together to finish. Stitches are knitted up for the ribbed edges around the armholes and neck. BACK PIECE: Cast on 88-96-104-116-128-144 stitches with circular needle size 3.5 mm and Sky. Purl 1 row (= wrong side). The next row is worked as follows from the right side: 5 edge stitches in GARTER STITCH – read description above, * 2 stitches in stocking stitch , 2 stitches in garter stitch *, work from *-* until there are 7 stitches left, 2 stitches in stocking stitch and finish with 5 edge stitches in garter stitch. Continue like this for 3 cm. Now knit 1 row from the right side, where you decrease 8-8-8-10-10-14 stitches evenly spaced – read DECREASE TIP = 80-88-96-106-118-130 stitches. Purl 1 row from the wrong side. Change to circular needle size 4.5 mm. Work stocking stitch back and forth with 5 edge stitches in garter stitch on each side. REMEMBER THE KNITTING TENSION! When the piece measures 34-35-36-37-38-39 cm, cast off for the armholes at the beginning of each row on each side as follows: Cast off 4-5-6-7-8-9 stitches 1 time, 2 stitches 0-1-2-3-4-6 times and 1 stitch 2-2-2-3-5-5 times = 68-70-72-74-76-78 stitches. Continue back and forth with stocking stitch and 1 edge stitch in garter stitch on each side. When the piece measures 50-52-54-56-58-60 cm, cast off the middle 30-30-32-32-34-34 stitches for the neck and each shoulder is finished separately. Continue by casting off 1 stitch on the next row from the neck = 18-19-19-20-20-21 stitches left on the shoulder. Continue with stocking stitch and 1 edge stitch in garter stitch on each side until the piece measures 20-21-22-23-24-25 cm from where stitches were first cast off for the armhole. Cast off with knit (make sure the cast-off edge is not tight). The piece measures a total of 54-56-58-60-62-64 cm from the shoulder down. Work the other shoulder in the same way. FRONT PIECE: Cast on 88-96-104-116-128-144 stitches with circular needle size 3.5 mm and Sky. Purl 1 row (= wrong side). The next row is worked as follows from the right side: 5 edge stitches in garter stitch – read description above, * 2 stitches in stocking stitch, 2 stitches in garter stitch *, work from *-* until there are 7 stitches left, 2 stitches in stocking stitch and finish with 5 edge stitches in garter stitch. Continue like this for 3 cm. Now knit 1 row from the right side, where you decrease 8-8-8-10-10-14 stitches evenly spaced = 80-88-96-106-118-130 stitches. Purl 1 row from the wrong side. Change to circular needle size 4.5 mm. Work stocking stitch back and forth with 5 edge stitches in garter stitch on each side. REMEMBER THE KNITTING TENSION When the piece measures 34-35-36-37-38-39 cm, cast off for the armholes at the beginning of each row on each side as follows: Cast off 4-5-6-7-8-9 stitches 1 time, 2 stitches 0-1-2-3-4-6 times and 1 stitch 2-2-2-3-5-5 times = 68-70-72-74-76-78 stitches. Continue with stocking stitch and 1 edge stitch in garter stitch on each side until the piece measures 44-46-47-49-50-52 cm, then place the middle 16-16-18-18-18-18 stitches on 1 thread for the neck and each shoulder is finished separately. Continue by casting off on each row from the neck as follows: Cast off 3 stitches 1 time, 2 stitches 2 times and 1 stitch 1-1-1-1-2-2 times = 18-19-19-20-20-21 stitches left on the shoulder. Continue with stocking stitch and 1 edge stitch in garter stitch on each side until the piece measures 20-21-22-23-24-25 cm from where stitches were first cast off for the armhole. Cast off with knit (make sure the cast-off edge is not tight). The piece measures a total of 54-56-58-60-62-64 cm from the shoulder down. Work the other shoulder in the same way. ASSEMBLY: Sew the shoulder seams with grafting stitches inside the cast-off edge. Start under the sleeve and sew the side seam in the outermost loop of the outermost stitch so the seam is flat – leave approx. 18 cm for the split. Repeat on the other side. NECK: Start from the right side at the one shoulder seam and knit up with short circular needle size 3.5 mm approx. 100 to 120 stitches (including the 16-16-18-18-18-18 stitches on the thread) inside the 1 stitch around the whole neck (number of stitches must be divisible by 4). Work rib (= knit 2/ purl 2) in the round for 2½-3 cm. Cast off with knit over knit and purl over purl. EDGE AROUND ARMHOLES: Start from the right side at the side seam under the sleeve and knit up with short circular needle size 3.5 mm approx. 96 to 120 stitches around the armhole (number of stitches must be divisible by 4). Work rib (= knit 2/ purl 2) in the round for 2 cm. Cast off with knit over knit and purl over purl. Work the other edge around armhole in the same way. |
|
 |
|
Have you finished this pattern?Tag your pictures with #dropspattern #roseblushvest or submit them to the #dropsfan gallery. Do you need help with this pattern?You'll find 25 tutorial videos, a Comments/Questions area and more by visiting the pattern on garnstudio.com. © 1982-2026 DROPS Design A/S. We reserve all rights. This document, including all its sub-sections, has copyrights. Read more about what you can do with our patterns at the bottom of each pattern on our site. |
|


With over 40 years in knitting and crochet design, DROPS Design offers one of the most extensive collections of free patterns on the internet - translated to 17 languages. As of today we count 324 catalogues and 12290 patterns translated into English (UK/cm). 12290
We work hard to bring you the best knitting and crochet have to offer, inspiration and advice as well as great quality yarns at incredible prices! Would you like to use our patterns for other than personal use? You can read what you are allowed to do in the Copyright text at the bottom of all our patterns. Happy crafting!
Post a comment to pattern DROPS 212-44
We would love to hear what you have to say about this pattern!
If you want to leave a question, please make sure you select the correct category in the form below, to speed up the answering process. Required fields are marked *.