Comments / Questions (74)
![]() Marzena Allan wrote:
Marzena Allan wrote:
Thank you for the lovely pattern. Is this correct that A.4 for size XL finishes before size L?
29.03.2020 - 18:18DROPS Design answered:
Dear Mrs Allan, yes that's correct, you have increased the correct number of sts in size XL at this row, and you will continue working yoke 1 cm more than size L to get the correct width. Happy knitting!
30.03.2020 - 11:14
![]() Yvonne wrote:
Yvonne wrote:
Hallo Drops Team, bezüglich der Passe habe ich eine Frage. Passe,letzter Absatz, Größe M: 137 Maschen wie zuvor stricken (Rückenteil) , 72 Maschen für den Ärmel stilllegen, 137 Maschen wie zuvor stricken ( Vorderteil) usw. Muss ich nach dem stilllegen der Ärmelmaschen ,keine neuen Maschen unterhalb anschlagen? Danke.
18.02.2020 - 14:13DROPS Design answered:
Liebe Yvonne, ja genau, hier wird man keine Masche unter den Ärmeln anschlagen. Viel Spaß beim stricken!
18.02.2020 - 16:28
![]() Vibeke Wiwe wrote:
Vibeke Wiwe wrote:
Når der står 77cm ved hoftebredden, er det så forstykket eller hele vejen rundt.
19.01.2020 - 16:01DROPS Design answered:
Hei Vibeke. Det gjelder kun forstykket (eller bakstykket). Hele veien rundt er 77 x 2 = 154 cm). God Fornøyelse!
20.01.2020 - 14:58
![]() Chhavi Methi wrote:
Chhavi Methi wrote:
Hi I am sorry I am troubling you . But when I have last increase for the medium sweater size done , my sleeves only have 62 stitches , so I am supposed to inrease once more until I divide the body ? So should I continue increasing the sleeves and following the pattern on the body until all the increases are done ?
11.01.2020 - 06:39DROPS Design answered:
Dear Mrs Mehti, thanks for these further explanations. You increase 29 times for sleeves in size M so that you should have 66 sts on sleeve when all decreases for body are done (20 inc row in A.1 + 8 inc row in A.4). On next increase row on sleeve work A.6 and A.7 on body to keep the lace pattern on raglan lines on body without increasing more stitches. Hope this helps! Happy knitting!
13.01.2020 - 08:40
![]() Chhavi Methu wrote:
Chhavi Methu wrote:
I am working on a medium size . So after 137 , my sleeves needed I be increased one more time for 64 stitches . Do I separate the body and the sleeves after all the increases ? Also should I discontinue working in raglan once u separate the sleeves . And so I include the raglan stitches of 2 in the sleeves ?
09.01.2020 - 13:03DROPS Design answered:
Dear Mrs Methu, I'm sorry, I'm not sure what you mean here, have you make all increases for raglan, this means you have 418 stitches in size M and you are ready to work the dividing round which starts with 137 sts for back piece, then slip the next 72 sts for sleeve, etc..; this round is worked without increasing anymore. Happy knitting!
09.01.2020 - 14:12
![]() Karin Bak Østergaard wrote:
Karin Bak Østergaard wrote:
Iflg. opskriften skal der efter 1. omgang i bærestykket være 122 masker (M), men ved sammentælling i teksten bliver der kun 8+30+3+2+1(omslag)+10+1(omslag)+2+8+30+3+2+1(omslag)+10+1(omslag)+2: i alt 114 masker med et udgangspunkt på 110 masker (M). Hvordan skal jeg forholde mig til det? Trøjen er en fødselsdagsgave til den 8. februar, så giv gerne besked hurtigst muligt. På forhånd tak.
06.01.2020 - 22:45DROPS Design answered:
Hej Det är 2 omslag i A.1 och 2 omslag i A.3, tar du med dessa så får du ytterligare 8 maskor dvs totalt 122 . Lycka till!
30.01.2020 - 14:18
![]() Chhavi Methi wrote:
Chhavi Methi wrote:
Till when do we have to continue increasing the sleeves ? And does it include raglan like of two stitches after the sleeves ? Do we have to continue the raglan line after the sleeves too ?
05.01.2020 - 06:18DROPS Design answered:
Dear Mrs Methi, you increase for the sleeve on every other round a total of 25-29-30-32-34-35 times, then continue working the sleeves with holes (A.6/A.7) but without increasing thanks to the diagram, so that the holes created by the increases will continue, but no more stitches will be increased. Happy knitting!
06.01.2020 - 08:49
![]() Chhavi Methi wrote:
Chhavi Methi wrote:
After the first vertical ridge of a1 has been completed ? Do I have to increase the raglan line too ? Or only sleeves are to be increased ? And my increased both together are also 4 stitches short when I have 16 plus 110 plus 11 plus 2 plus 38 plus (30 or 22??) two times . . I am not sure why
05.01.2020 - 05:35DROPS Design answered:
Dear Mrs Methi, I'm sorry, I don't get the number you are talking about, which size are you working and until where did you work the pattern?
06.01.2020 - 08:46
![]() Chhavi Methi wrote:
Chhavi Methi wrote:
To continue the eyelet row along raglan line after increases on sleeves are done, work A.6 (= 2 stitches) over the first 2 stitches after raglan linen and A.7 over the last 2 stitches before raglan line towards sleeve. Which raglan line are we talking about ?
05.01.2020 - 05:24DROPS Design answered:
Dear Mrs Methi, after all increases are done, you will work the first 2 stitches in each sleeve as shown in A.6 and the last 2 stitches on sleeve as shown in A.7, so that the holes (increases for raglan) will continue along the K2 stitches as before, but no more stitch will be increased. Happy knitting!
06.01.2020 - 08:45
![]() Chhavi Methi wrote:
Chhavi Methi wrote:
My first stitch in the round on this design shows a yarn over between two stitches (A1) chart , for strawberry swing 202-19 . I am confused . So should I start with a yarn over beginning of the row ?
02.01.2020 - 03:42DROPS Design answered:
Dear Mrs Chhavi Methi, this pattern is worked in the round, and when working diagram A.1, you will start every other round with one yarn over. Happy knitting!
02.01.2020 - 16:02
Strawberry Swing#strawberryswingsweater |
|||||||||||||||||||
 |
 |
||||||||||||||||||
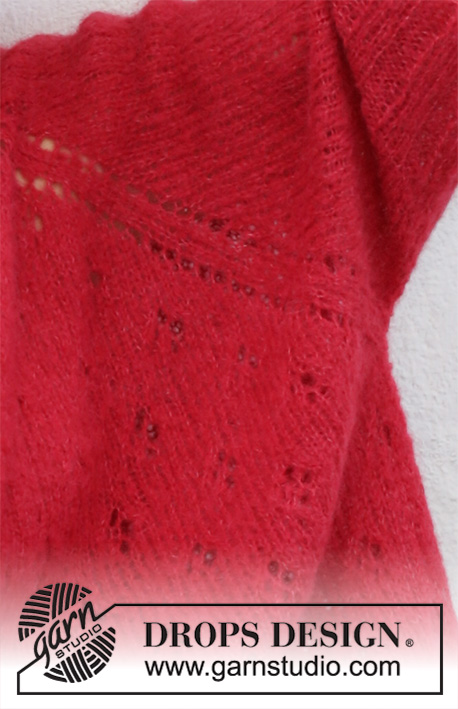
Knitted poncho jumper with raglan in DROPS Brushed Alpaca Silk. Piece is knitted top down with lace pattern. Size: S - XXXL
DROPS 202-19 |
|||||||||||||||||||
|
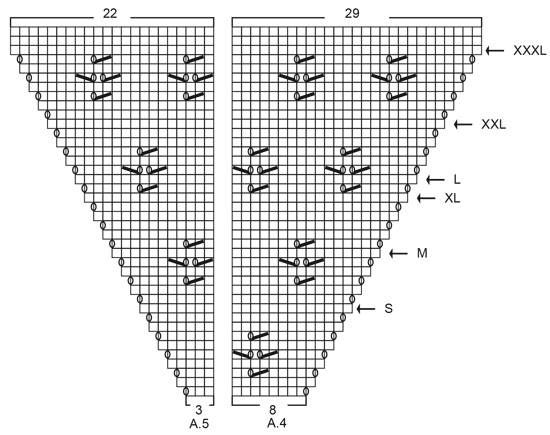
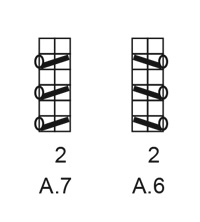
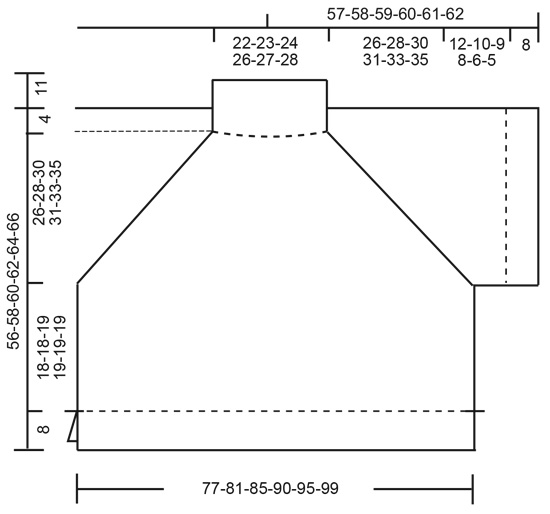
---------------------------------------------------------- EXPLANATION FOR THE PATTERN: ---------------------------------------------------------- INCREASE/DECREASE TIP (evenly): To calculate how to increase/decrease evenly, use the total number of stitches on row (e.g. 102 stitches) and divide stitches by number of increases/decreases to be done (e.g. 8) = 12.8. In this example increase by making 1 yarn over after approx. every 13th stitch. On next round work yarn overs twisted to avoid holes. If decreasing knit approx. every 12th and 13th stitch together. PATTERN: See diagrams A.1 to A.7. Find your size in diagrams (applies to A.4 and A.5). GARTER STITCH (back and forth): Knit all rows. 1 ridge vertically = knit 2 rows. ---------------------------------------------------------- START THE PIECE HERE: ---------------------------------------------------------- PONCHO JUMPER - SHORT OVERVIEW OF THE PIECE: Worked top down. Work neck and yoke in the round. Work body in the round down to vent, then work front piece and back piece back and forth on circular needle. Work sleeves in the round on double pointed needles/a short circular needle. NECK: Cast on 102-108-108-114-120-126 stitches on circular needle size 4 mm with Brushed Alpaca Silk. Knit 1 round. Then work rib (= knit 3/purl 3) for 11 cm. Knit 1 round while increasing 8-2-2-16-10-4 stitches evenly - read INCREASE/DECREASE TIP = 110-110-110-130-130-130 stitches. Switch to circular needle size 5 mm and work yoke as explained below. NOW MEASURE THE PIECE FROM HERE! YOKE: Work first round as follows: Work A.1 (= 8 stitches), work A.2 over the next 30-30-30-40-40-40 stitches (= 3-3-3-4-4-4 repetitions of 10 stitches), work A.3 (= 3 stitches), work 2 stitches in stocking stitch (= raglan line), make 1 yarn over, work 10 stitches in stocking stitch (= sleeve), make 1 yarn over, work 2 stitches in stocking stitch (= raglan line), work A.1 (= 8 stitches), work A.2 over the next 30-30-30-40-40-40 stitches (= 3-3-3-4-4-4 repetitions of 10 stitches), work A.3 (= 3 stitches), work 2 stitches in stocking stitch (= raglan line), make 1 yarn over, work 10 stitches in stocking stitch (= sleeve), make 1 yarn over, work 2 stitches in stocking stitch (= raglan line). There are now 122-122-122-142-142-142 stitches on needle. Continue pattern like this. I.e. on front and back piece increase in each side as shown in A.1 and A.3. On sleeves increase in each side with yarn over on each side of stitches in stocking stitch. Raglan line is always on 2 stitches in stocking stitch. Increase like this every other round 25-29-30-32-34-35 times in total, on next round knit yarn overs on sleeves (= holes) and work the increased stitches in stocking stitch. REMEMBER THE KNITTING TENSION! When A.1 to A.3 have been worked 1 time vertically, there are 350-350-350-370-370-370 stitches on needle. Then work as follows over the 121-121-121-131-131-131 stitches in A.1 to A.3: Work A.4 (= 8 stitches), work A.2 over the next 110-110-110-120-120-120 stitches (= 11-11-11-12-12-12 repetitions of 10 stitches) and work A.5 (= 3 stitches). Continue sleeves as before but when increase is done finish sleeves without increase. To continue the eyelet row along raglan line after increases on sleeves are done, work A.6 (= 2 stitches) over the first 2 stitches after raglan linen and A.7 over the last 2 stitches before raglan line towards sleeve. When you have worked up to round marked with arrow in your size, there are 390-418-438-462-486-506 stitches on needle and piece measures approx. 23-26-29-28-32-35 cm. Continue with pattern and stocking stitch as before but without increases until piece measures 26-28-30-31-33-35 cm. To continue the eyelet row along raglan line after all increases are done work A.6 and A.7 the same way as on sleeve. Work next round as follows: Work 131-137-145-153-161-169 stitches as before (= back piece), slip the next 64-72-74-78-82-84 stitches on 1 stitch holder for sleeve, work 131-137-145-153-161-169 stitches as before (front piece), slip the last 64-72-74-78-82-84 stitches on 1 stitch holder for sleeve. Finish body and sleeves separately. NOW MEASURE THE PIECE FROM HERE. BODY: = 262-274-290-306-322-338 stitches. Insert 1 marker thread at the beginning of round, insert 1 marker thread after 131-137-145-153-161-169 stitches. Marker threads mark the sides. Work 0-3-2-1-0-4 stitches in stocking stitch, repeat A.2 until 1-4-3-2-1-5 stitches remain before marker thread (= 13-13-14-15-16-16 repetitions of 10 stitches) – adjust to continue pattern on correct row, work 1-7-5-3-1-9 stitches in stocking stitch (marker thread is between these stitches), repeat A.2 until 1-4-3-2-1-5 stitches remain at beginning of round (= 13-13-14-15-16-16 repetitions of 10 stitches) and work the remaining 1-4-3-2-1-5 stitches in stocking stitch. Continue pattern like this until piece measures 18-18-18-19-19-19 cm from division – adjust to finish after a round between 2 lace patterns vertically. Now divide the piece at the markers and finish front and back piece separately. BACK PIECE: = 131-137-145-153-161-169 stitches. Knit 1 row from right side while decreasing 2-2-2-0-2-4 stitches evenly - read INCREASE/DECREASE TIP = 129-135-147-153-159-165 stitches. Switch to circular needle size 4 mm. Work next row from wrong side as follows: 3 stitches in GARTER STITCH - read explanation above - * purl 3, knit 3 *, repeat from *-* until 6 stitches remain on needle, finish with purl 3 and 3 stitches in garter stitch. Continue rib like this for 8 cm. Cast off with knit over knit and purl over purl (to avoid a tight cast-off edge use circular needle size 5 mm). FRONT PIECE: Work as on back piece. SLEEVE: Slip the 64-72-74-78-82-84 stitches from stitch holder in one side of piece on a short circular needle/double pointed needles size 5 mm. Continue in stocking stitch until piece measures 12-10-9-8-6-5 cm from division (shorter measurements in the larger sizes because of wider shoulders and longer sleeve cap). Knit 1 round while increasing 2-0-4-0-2-0 stitches evenly = 66-72-78-78-84-84 stitches. Switch to double pointed needles size 4 mm. Work rib = knit 3/purl 3 for 8 cm. Cast off with knit over knit and purl over purl (to avoid a tight cast-off edge use needle size 5 mm). Work the other sleeve the same way. |
|||||||||||||||||||
Diagram explanations |
|||||||||||||||||||
|
|||||||||||||||||||
 |
|||||||||||||||||||
 |
|||||||||||||||||||
 |
|||||||||||||||||||
 |
|||||||||||||||||||
 |
|||||||||||||||||||
Have you finished this pattern?Tag your pictures with #dropspattern #strawberryswingsweater or submit them to the #dropsfan gallery. Do you need help with this pattern?You'll find 26 tutorial videos, a Comments/Questions area and more by visiting the pattern on garnstudio.com. © 1982-2026 DROPS Design A/S. We reserve all rights. This document, including all its sub-sections, has copyrights. Read more about what you can do with our patterns at the bottom of each pattern on our site. |
|||||||||||||||||||


Post a comment to pattern DROPS 202-19
We would love to hear what you have to say about this pattern!
If you want to leave a question, please make sure you select the correct category in the form below, to speed up the answering process. Required fields are marked *.