
Popular categories
Looking for a yarn?


Comments / Questions (49)
![]() Véro wrote:
Véro wrote:
Bonjour, J’aimerais avoir de l’aide concernant un motif entier que j’ai oublié de faire 4 rangs en dessous de là où je suis rendue. Merci 🙏
25.04.2026 - 11:03DROPS Design answered:
Bonjour Véro, vous trouverez ici quelques astuces pour détricoter et reprendre une maille perdue - vous pouvez au choix, détricoter les mailles du motif complet sur le nombre de rangs concernés et les retricoter jusqu'à la hauteur des autres mailles en vous inspirant de ces vidéos. Votre magasin connaît peut-être une autre astuce, n'hésitez pas à lui demander conseil, même par mail ou téléphone. Bon tricot!
27.04.2026 - 08:30
![]() Judith Brink wrote:
Judith Brink wrote:
Thank you I will pull out and start over. Thanks.
22.04.2026 - 19:39
![]() Judith Brink wrote:
Judith Brink wrote:
Hi, please assist me. I am knitting on size Large. Supposed to have 218 stitches on the body, but I have 323, don't know where I have gone wrong. Question 1, After round 1 of the yoke, do i repeat the 1 yarn over, knit 2, making more in the next round or just keep to 3 stitches? Question 2, A1 and A3, when they have been repeated once in height, do you start again with 5 stitches or keep going with 19 stitches or keep increasing 1 stitch every second row? Please help, thank you.
20.04.2026 - 11:50DROPS Design answered:
Dear Mrs Brink, after all increases are done you are supposed to have 344 stitches (this means before dividing piece) do you have this number of stitches? You should then divide stitches as follows: 97 sts (back piece), slip the next 75 sts for sleeve on a thread and cast on instead 12 sts for the side under sleeve, then work the next 97 sts for front piece, and repeat sleeve: slip the next 75 sts for sleeve on a thread and cast on instead 12 sts for the side under sleeve. So that you should have on needle: 97+12+97+12=218 sts on needle, can this help? When A.1 to A.3 are done in height, just repeat from row 1 A.1 to A.3 with 2 more repeats of A.2 inbetween. Happy knitting!
20.04.2026 - 16:05
![]() Sam wrote:
Sam wrote:
Hi! I’m a beginner knitter and this is my first time making a sweater of any kind. I’m also not great at reading patterns so this might be a silly question, but i'm confused about what to do when a1 and a3 have been completed in height. i know it says to continue the pattern in the same way, but could you explain that to me like i’m 5 🙈 thank you!
27.08.2025 - 02:58DROPS Design answered:
Hi Sam, You repeat A.1 and A.3 vertically (directly above the previous repeat and starting again from row 1). And due to the increased stitches you will have room for 2 more repeats of A.2 between A.1 and A.3. Hope this helps. Regards, Drops team.
27.08.2025 - 07:01
![]() Magdalena wrote:
Magdalena wrote:
Dzień dobry, jestem poczatkująca i nie wiem jak rozumieć początek opisu wykonania karczku: czy w rzędzie kiedy zmieniam druty na 4mm mam przerobić 2.prawe, 1 narzut, schemat A1 (czyli dla rozmiaru S 3.prawe) i dalej znowu 3 o.prawe ze schematu A1, czy 2.prawe, narzut i dopiero 3o.prawe ze schematu A1? Będę wdzięczna za odpowiedź, ponieważ bardzo chciałabym się nauczyć prawidłowo czytać schematy i wykonać sweterek:)
23.03.2025 - 13:37DROPS Design answered:
Witaj Magdo, postaraj się nic nie omijać. Ten rząd wykonujesz następująco: *umieścić nitkę marker tutaj, 2 o.p. (oczka prawe), 1 narzut, schemat A.1 ponad 3 nast. oczkami (3 o.p.), schemat A.2a ponad 14 następnymi oczkami (czyli 14 o. p.), schemat A.2b ponad 11 następnymi oczkami (11 o.p.), schemat A.3 ponad 3 nast. oczkami (3 o.p.), 1 narzut, przerobić 2 o.p. i umieścić nitkę marker tutaj (= tył/przód), 1 o.p., 1 narzut, przerobić 15 o.p., 1 narzut, 1 o.p. (= rękaw) *, powtórzyć od *-* jeszcze 1 raz. Zostało dodanych 8 oczek na reglan. Powodzenia!
26.03.2025 - 09:28
![]() Gerti wrote:
Gerti wrote:
Für mich ist diese Anleitung vollkommen unverständlich. Wieviele Maschen sind jeweils zwischen den Umschlägen?
11.03.2025 - 20:38DROPS Design answered:
Liebe Gerti, meinen Sie die Raglanzunahmen? Die werden beidseitig von den 3 rechtesn Maschen am Übergant zwischen Vorder/Rückenteil und Ärmel gestrickt; diese 3 Maschen sind die jenigen mit einem Markeirungsfaden dawischen. Kann das Ihnen helfen? Viel Spaß beim Stricken!
12.03.2025 - 09:46
![]() Karine wrote:
Karine wrote:
Bonjour! Dans la partie empiècement, comment ajouter le motif A2a en largeur tél que décrit dans le texte suivant : « Quand A.1 à A.3 sont terminés, continuer de la même façon; c'est-à-dire tricoter A.1/A.3 après/avant chaque raglan du devant/dos; on a suffisamment de mailles pour tricoter 2 motifs de A.2a en plus en largeur. » Au début du rang et à la fin ou bien on le tricote 3 fois de suite, ce n’est pas clair. Merci!
28.07.2023 - 18:22DROPS Design answered:
Bonjour Karine, quand les diagrammes ont été tricotés 1 fois en hauteur, vous avez augmenté suffisamment de mailles pour tricoter 2 motifs de plus de A.2a, autrement dit, vous allez ensuite tricoter:A.1 puis 3 fois A.2a, tricotez ensuite A.2b et terminez par A.3. Si vous n'avez pas encore terminé les augmentations du raglan après cette 2ème fois, recommencez les diagrammes et cette fois, tricotez 5 fois A.2a. Bon tricot!
31.07.2023 - 09:59
![]() Vladimíra Fidrmucová wrote:
Vladimíra Fidrmucová wrote:
Dobrý den, děkuji za vaše krásné stránky o pletení a háčkování. Některé modely ze starších katalogů nejsou přeloženy do českého jazyka . Mohla bych vás poprosit o přeložení tohoto svetru do českého návodu ? Děkuji Vlaďka
23.05.2023 - 15:47DROPS Design answered:
Dobrý den, Vlaďko, díky za zpráci a za tip - český návod přidáme během 1-2 dnů. Hezký den! Hana
23.05.2023 - 18:06
![]() Sophie D wrote:
Sophie D wrote:
Merci de votre réponse mais je ne suis pas plus avancée dans ma problématique ! Pourriez_vous au moins dire quelle est la taille du mannequin et celle tricotée du modèle qu'elle porte ?
01.03.2023 - 11:35DROPS Design answered:
Bonjour Sophie, nos modèles portent en général soit du S soit du M, mais comme chacune a sa propre morphologie, seules comptent les mesures d'un vêtement analogue que vous avez déjà et dont vous aimez la forme, vous pourrez ainsi choisir la taille et l'aisance qui vous correspondent. Bon tricot!
01.03.2023 - 13:28
![]() Sophie D wrote:
Sophie D wrote:
Bonjour, Je voudrais tricoter ce très joli modèle mais j'ai un gros doute sur la taille à choisir. Le schéma indique un tour de poitrine, (exemple pour la taille S : 43*2 = 84 cm): les mesures ainsi écrites comportent-elles déjà l'aisance du pull ou bien faut-il rajouter une aisance et si oui de combien pour avoir le même rendu que le modèle de présentation ? Merci d'avance et bonne journée Sophie
01.03.2023 - 10:00DROPS Design answered:
Bonjour Sophie D, mesurez un vêtement similaire que vous avez et dont vous aimez la forme et comparez ces mesures à celles du schéma, vous pourrez ainsi choisir la taille qui convient ainsi que l'aisance que vous souhaitez. Retrouvez plus d'infos ici. Bon tricot!
01.03.2023 - 10:08
|
||||||||||||||||
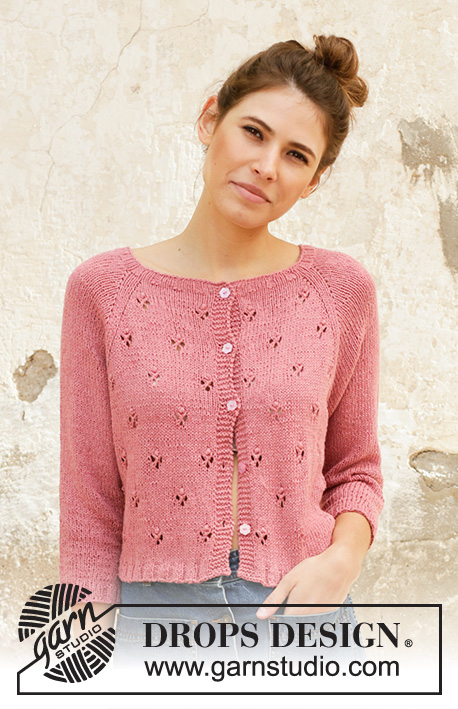
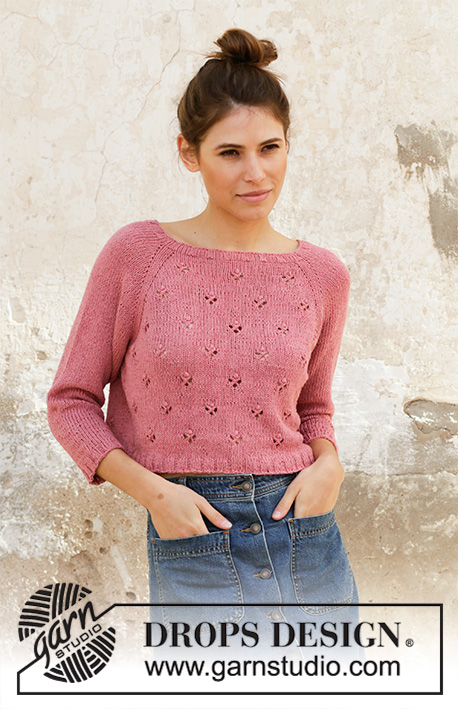
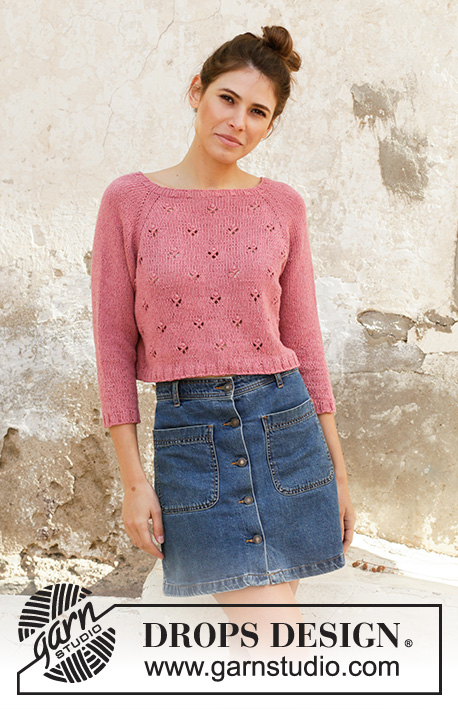
Raspberry Kiss Jumper#raspberrykissjumper |
||||||||||||||||
 |
 |
|||||||||||||||
Knitted jumper with raglan in DROPS Belle. The piece is worked top down with lace pattern. Sizes S - XXXL.
DROPS 202-5 |
||||||||||||||||
|
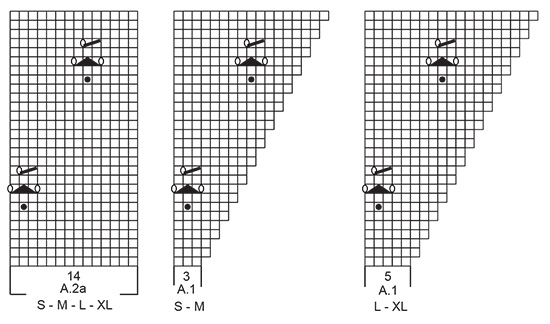
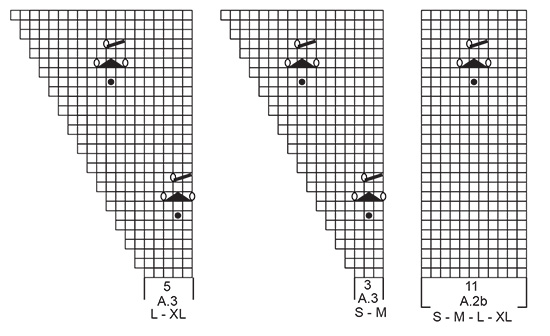
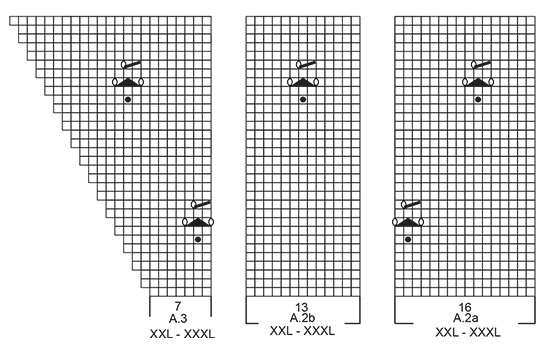
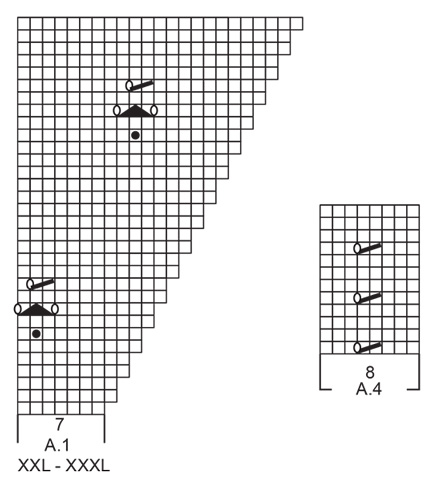
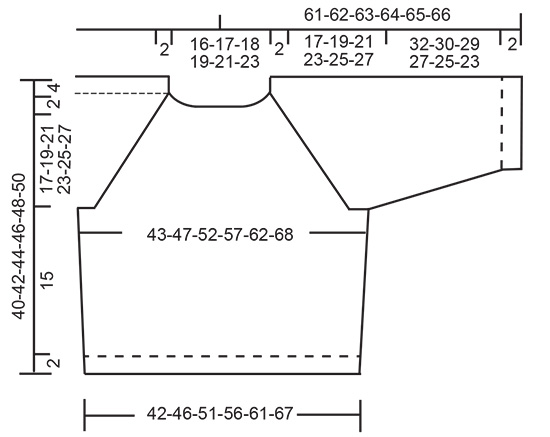
------------------------------------------------------- EXPLANATIONS FOR THE PATTERN: ------------------------------------------------------- PATTERN: See diagrams A.1 to A.4. Choose diagram for your size. DECREASE TIP-1 (evenly spaced): To work out how to decrease evenly, count the total number of stitches on the needle (e.g. 110 stitches) and divide by the number of decreases to be made (e.g. 6) = 18.3. In this example, decrease by knitting together approx. each 17th and 18th stitch. DECREASE TIP-2 (for body and sleeves): Decrease 1 stitch on each side of A.4 as follows: Work until there are 2 stitches left before A.4, knit 2 together, work A.4, slip 1 stitch as if to knit, knit 1 and pass the sipped stitch over the knitted stitch. INCREASE TIP (evenly spaced): To work out how to increase evenly, count the total number of stitches on the needle (e.g. 82 stitches) and divide by the number of increases to be made (e.g. 4) = 20.5. In this example, increase by making 1 yarn over after alternately each 20th stitch and each 21st stitch. On the next round knit the yarn overs twisted to avoid holes. RAGLAN: Increase 1 stitch on each side of the 3 knitted stitches in each transition between body and sleeves (= 8 stitches increased on round). Increase 1 stitch by making 1 yarn over. On the next round knit the yarn overs twisted to avoid holes. Then work the new stitches in stocking stitch on the sleeves and in pattern on front and back pieces. ------------------------------------------------------- START THE PIECE HERE: ------------------------------------------------------- JUMPER - SHORT OVERVIEW OF THE PIECE: The piece is worked in the round with circular needle, top down. The sleeves are worked in the round with short circular needle/double pointed needles, top down. JUMPER: NECK: Cast on 105-110-115-120-130-135 stitches with circular needle size 3 mm and Belle. Knit 1 round. Then work rib (knit 3, purl 2) for 2 cm. Knit 1 round where you decrease 1-6-3-8-2-7 stitches evenly spaced – read DECREASE TIP-1 = 104-104-112-112-128-128 stitches. YOKE: Change to circular needle size 4 mm. Work PATTERN – read description above, as follows: * Insert a marker thread here, knit 2, 1 yarn over, work A.1 over the next 3-3-5-5-7-7 stitches, A.2a over the next 14-14-14-14-16-16 stitches, A.2b over the next 11-11-11-11-13-13 stitches, A.3 over the next 3-3-5-5-7-7 stitches, 1 yarn over, knit 2 and insert a marker thread here (= back/front piece), knit 1, 1 yarn over, knit 15 , 1 yarn over, knit 1 (= sleeve) *, work from *-* 1 more time on the round. You have increased 8 stitches to RAGLAN – read description above. Continue this pattern in the round and increase to raglan every 2nd round a total of 24-26-29-32-35-38 times = 296-312-344-368-408-432 stitches. REMEMBER THE KNITTING TENSION. When A.1 to A.3 have been completed in height, continue the pattern in the same way; i.e. work A.1/A.3 towards each raglan on front/back piece; there is room for 2 more repeats of A.2a in width. When all the increases to raglan are finished, the piece measures approx. 19-21-23-25-27-29 cm from the cast-on edge and down mid front. The next round is worked as follows: NOTE: in sizes S and L the piece is now divided for sleeves and body at the marker threads. In sizes M, XL, XXL and XXXL work a few stitches (= 1-2-1-3 stitches) from the sleeves onto the needle for the body, so that the transition between body and sleeves is no longer by the marker threads: Work the first 83-88-97-105-118-126 stitches, place the next 65-67-75-77-85-87 stitches on a thread (= sleeve), cast on 8-10-12-12-12-14 new stitches on the needle (= in side under sleeve), work the next 83-89-97-107-119-129 stitches, place the next 65-67-75-77-85-87 stitches on a thread (= sleeve), cast on 8-10-12-12-12-14 new stitches on the needle (= in side under sleeve) and work the remaining 0-1-0-2-1-3 stitches on the round. THE PIECE IS NOW MEASURED FROM HERE! BODY: = 182-198-218-238-262-286 stitches. Work pattern A.4 (= 8 stitches) over the middle 8 stitches under the sleeves and continue with as many repeats of lace pattern in A.2a/A.2b as there is room for out towards the sides (the pattern should be directly over the pattern on the yoke!) and the remaining stitches are worked in stocking stitch. When the piece measures 4 cm decrease 1 stitch on each side of A.4 on each side – read DECREASE TIP-2 = 178-194-214-234-258-282 stitches. When the piece measures 15 cm – adjust so that you finish after a complete repeat of lace pattern in height (or a few rounds of stocking stitch if necessary) knit 1 round where you increase 27-31-36-41-47-48 stitches evenly spaced – read INCREASE TIP = 205-225-250-275-305-330 stitches. Change to circular needle size 3 mm. Work rib (knit 3, purl 2) for 2 cm. Cast off with knit over knit and purl over purl. Make sure the cast-off edge is not tight; you can increases a needle size when casting off if this is a problem. The jumper measures approx. 40-42-44-46-48-50 cm from the shoulder down. SLEEVE: Place the 65-67-75-77-85-87 stitches from the thread on one side of the piece on short circular needle/double pointed needles size 4 mm and knit up 1 stitch in each of the 8-10-12-12-12-14 stitches under the sleeve = 73-77-87-89-97-101 stitches. Continue in the round with stocking stitch and work A.4 over the middle 8 stitches under the sleeve. When the piece measures 4-4-3-3-3-2 cm decrease 2 stitches under the sleeve - remember DECREASE TIP-2. Decrease in the different sizes as follows: Size S: Decrease like this alternately every 2 and 3 cm a total of 11 times. Size M: Decrease like this every 2 cm a total of 12 times. Size L: Decrease like this on every 1.5 cm a total of 16 times. Size XL: Decrease like this every 1.5 cm a total of 16 times. Size XXL: Decrease like this every cm a total of 19 times. Size XXXL: Decrease like this every cm a total of 20 times. When all the decreases are finished there are 51-53-55-57-59-61 stitches on the needles. Continue working until the sleeve measures 32-30-29-27-25-23 cm. Now increase 4-7-5-8-6-9 stitches evenly spaced = 55-60-60-65-65-70 stitches. Change to double pointed needles size 3 mm. Work rib (knit 3, purl 2) for 2 cm. Cast off with knit over knit and purl over purl. Make sure the cast-off edge is not tight; you can increases a needle size when casting off if this is a problem. The sleeve measures approx. 34-32-31-29-27-25 cm. Work the other sleeve in the same way. |
||||||||||||||||
Diagram explanations |
||||||||||||||||
|
||||||||||||||||
 |
||||||||||||||||
 |
||||||||||||||||
 |
||||||||||||||||
 |
||||||||||||||||
 |
||||||||||||||||
Have you finished this pattern?Tag your pictures with #dropspattern #raspberrykissjumper or submit them to the #dropsfan gallery. Do you need help with this pattern?You'll find 27 tutorial videos, a Comments/Questions area and more by visiting the pattern on garnstudio.com. © 1982-2026 DROPS Design A/S. We reserve all rights. This document, including all its sub-sections, has copyrights. Read more about what you can do with our patterns at the bottom of each pattern on our site. |
||||||||||||||||


With over 40 years in knitting and crochet design, DROPS Design offers one of the most extensive collections of free patterns on the internet - translated to 17 languages. As of today we count 324 catalogues and 12290 patterns translated into English (UK/cm). 12290
We work hard to bring you the best knitting and crochet have to offer, inspiration and advice as well as great quality yarns at incredible prices! Would you like to use our patterns for other than personal use? You can read what you are allowed to do in the Copyright text at the bottom of all our patterns. Happy crafting!
Post a comment to pattern DROPS 202-5
We would love to hear what you have to say about this pattern!
If you want to leave a question, please make sure you select the correct category in the form below, to speed up the answering process. Required fields are marked *.